Purpose
The purpose of this Business Process Procedure is to explain how to process a Career Progression in the Integrated HR-Payroll System.
Trigger
There is a need to process a Career Progression for one of the reasons listed in the Business Process Procedure Overview section.
Business Process Procedure Overview
Career Progression – Pay factors support a salary adjustment and/or competency level adjustment within the pay range of the employee’s career-banded class, in conjunction with the employee’s attainment and demonstrated use of competencies in same position.
02 - CP-Comp/Skill - Pay factors support a salary adjustment within the pay range of the employee’s career-banded class competency level, in conjunction with the employee’s attainment and demonstrated use of competencies in the same position at the same overall competency level. The employee’s overall competency level will not change. (If salary adjustment is not granted due to funding issues, an action is not processed.)
05 - CP-Labor Market – An employee’s salary is low in relation to market guidelines applicable to the employee’s competencies, and a salary adjustment is in order. Such a situation could be due to: an adjustment in the banded class market rates in conjunction with a labor market study; implementation of a market reference rate with the agency/university; insufficient funding at time of career banding implementation to pay employee at appropriate rate; removal of an internal equity/pay alignment issue that had prevented an employee from being paid at appropriate competency rate.
06 - CP-Comp Level Change – Employee’s overall competency level is changing as a result of the employee’s attainment/assignment and demonstrated use of competencies at a higher or lower overall competency level within the same banded class. The pay factors may support an increase, decrease, or no change in salary. (Note: change in overall competency level that results from disciplinary action shall be coded as a Demotion.)
08 - Broad Band Level Change – a change in the level to which an employee is assigned. (Used for pilot banded employees.)
10 - Broad Band Job Change – Transfer of an employee from one banded occupational group to another banded occupational area--may or may not involve position number and salary change. Object ID must change. If salary change is involved, include in the comment, reason for the adjustment and justification for any increase exceeding 10%. (Used for pilot banded employees.)
11 - Salary Adjustment Fund – A salary increase, provided through approved use of salary adjustment funds, granted to career-banded employees whose salary upon transfer from the graded system to the banded system is less than allowed by the career-banding salary administration policy (Requires OSHR approval).
03 - Temporary Comp/Skill - Salary adjustment within the pay range of the employee’s career-banded class, in conjunction with the employee’s temporary assignment of higher-level competencies in the same position. Overall competency level may or may not change. NOTE: Additional competencies are not the result of “acting pay or acting promotion.”
NOTE: The “N/A Grade Band Transfer” reason is no longer an option for Career Progression action. Please refer to the Transfer action BPP.
Tips and Tricks
Prior to initiating any workflow, ensure the data being used is valid and appropriate.
Access Transaction
Via Transaction Code: ZPAA076; SWBP; PA40
Procedure
There are 42 steps to complete this process.

Step 1. Update the Command Field by entering transaction code: ZPAA076.
Step 2. Click the Enter button.
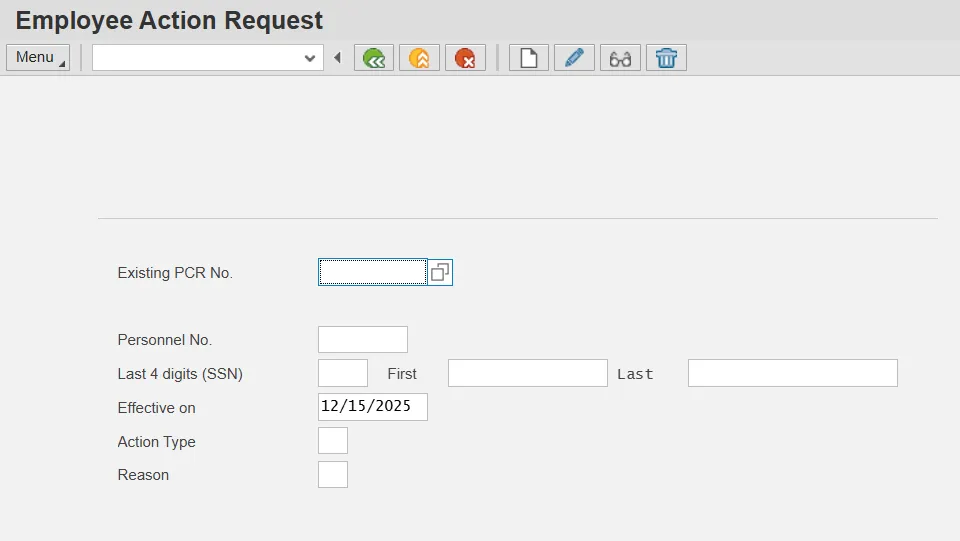
Step 3. Update the following fields:
- Personnel No.: Unique employee identifier
- Effective on: The date on which the action will be effective
- Action Type: An action is a grouping of activities to perform a specific task. The action will prompt you for the Infotypes required to complete the task.
- Example: ZH
- Reason: Reason for the action, such as CP-Comp/Skill
- Example: 02
Step 4. Click the Enter button.
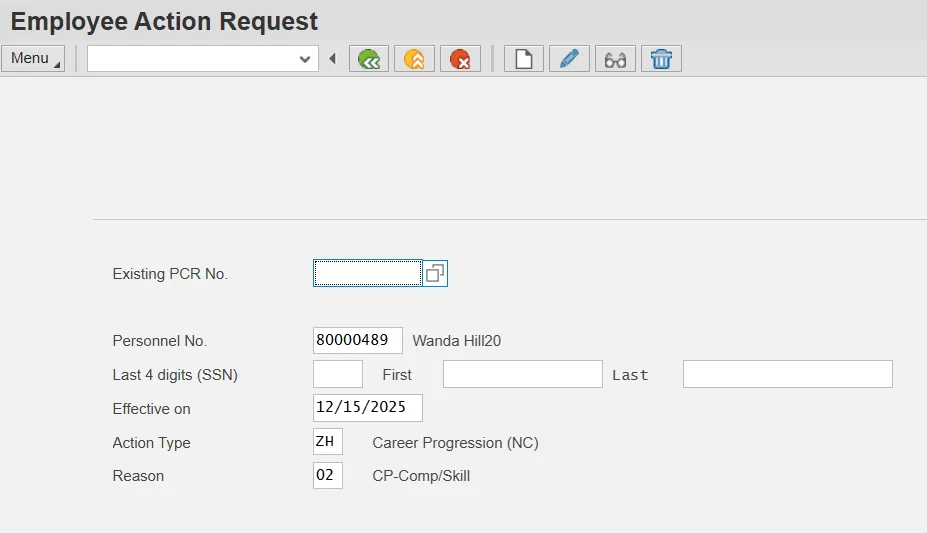
Enter the Personnel Number of the individual to receive the Career Progression. Click Enter to retrieve the name of the individual and verify you have the correct Personnel Number.
If you need to look up the personnel number, click your cursor in the field and click on the matchcode search button to the right of the field for search options.
The system defaults the current date, but you can change the date to a day in the past or in the future.
There are several available Reasons to choose. For specific information on each reason, view the business process overview section at the beginning of these instructions.
Click Enter and verify the information is correct before proceeding.
Step 5. Click the Create (F5) button.
If the information is correct, click Create to begin the process.
Leave the Existing PCR No. field blank if you are creating a new PCR.
Several fields on this screen are mandatory. The system will not let you continue if you have not provided data for the mandatory fields. If you are unsure which fields are mandatory, click Enter, and the system will prompt you for information in the mandatory fields.
Step 6. Update the following fields:
- Annual Salary
Step 7. Click the Enter button.
Enter the new position number and the new annual salary or hourly rate. Click Enter to validate the data. If the employee is hourly, leave the annual salary field blank and only complete the hourly salary field.
Step 8. Click the Save (Ctrl+S) button.
Click Save to save the data and receive a PCR number. The PCR has not been submitted to workflow yet.
Step 9. Click the (Enter) button.
You can save this information as many times as you like. Each time you will receive a confirmation of the save. You will not be able to create a note attachment until you have saved it at least once. If you have already submitted the PCR to workflow, you will not be able to change the details, nor save any new information, only display the existing details.

Step 10. Click the Services for Objects button.
Step 11. Click Create > Create note.
Notes entered during PA Workflow must follow OSHR’s Action Notes Template.
You can enter any information that would be useful to the approvers downstream using the notes area or attachment area. If you just need to type some information in, or copy and paste from an email, create a note. If you want to add a document as an attachment, use the attachment area.
This note and attachment area gets attached to this specific PCR only. It will follow the PCR through the approval/rejection process and live with the PCR into the future. When the PCR has been approved and you are processing the Action (such as a New Hire action), you will need to recreate any notes or attachments if they need to be attached to the Action record as well.

Step 12. Click the (Enter) button to save the note.
Step 13. Click the Enter button on the Employee Action Request screen.
Step 14. Click the Save (Ctrl+S) button.
Step 15. Click the Initiate WF button.
Select the Initiate Workflow button to send the Career Progression Action through the approval process. No changes can be made after the PCR has been submitted for approval, unless the PCR is rejected at any stage and sent back to you (the initiator/requestor).
Step 16. Click the (Enter) button.
Step 17. Click the Back (F3) button.
Step 18. The Initiate Career Progression Action is complete.
After Workflow Approvals have been received, process with the Complete Career Progression Action process.
Instructions for Completing The Action
Access Transaction
Via Transaction Code: SBWP

Step 19. Click the SAP Business Workplace (Ctrl+F12) button.
These instructions assume you have initiated the Career Progression Personnel Change Request (PCR) in workflow already and you have an approved PCR ready to be processed as a Career Progression in the system.
Step 20. Select Inbox >> Workflow.
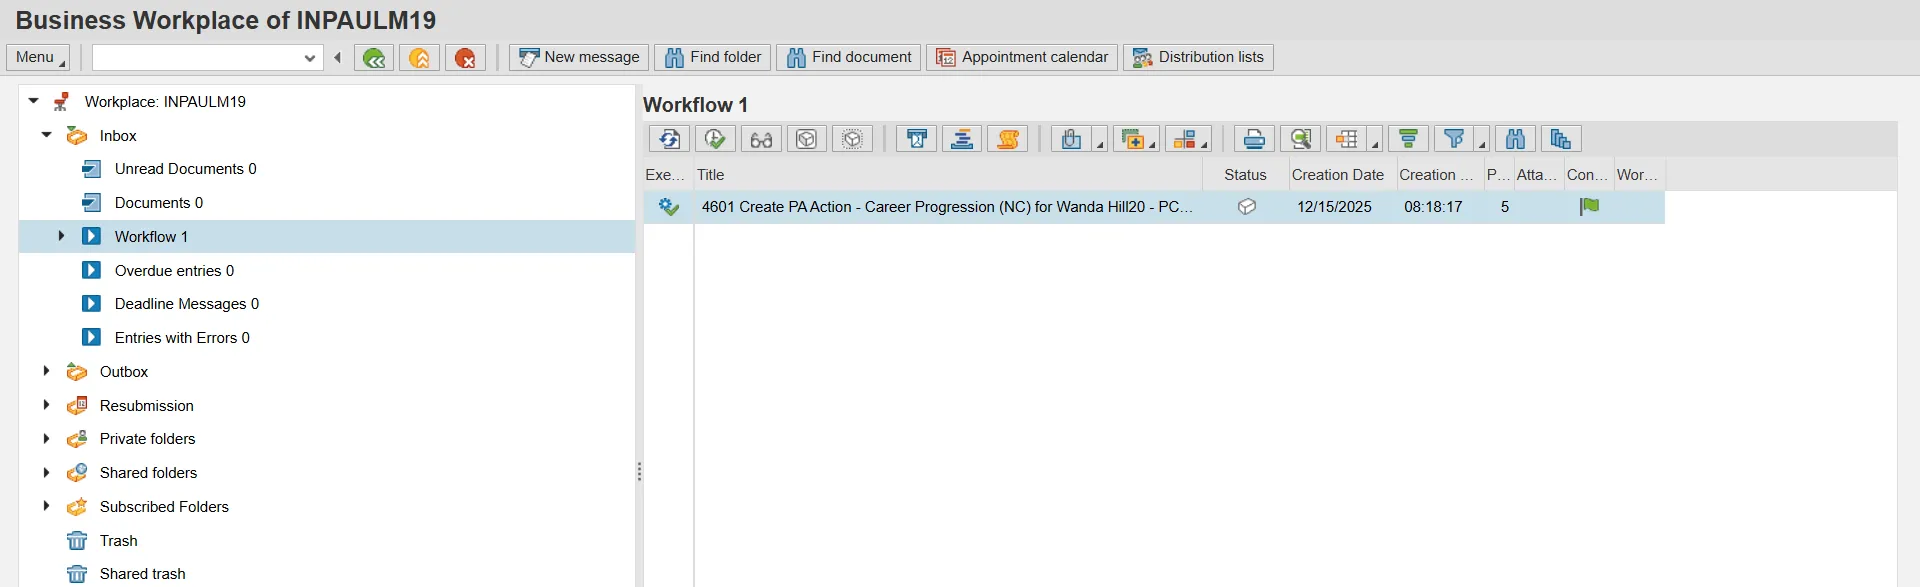
Step 21. The approved PCR will appear in the workspace. Before processing the Action, you must have a copy of the note that you created when you initiated workflow. For directions on how to get a copy of this note, refer to the help doc. PER-57.
Step 22. Double-click on the Approved PCR row or highlight the PCR and click the Execute (F8) button.
Step 23. Update the following field:
- From: Effective date of the personnel action
- Example: 12/15/25
Step 24. Highlight Career Progression (NC) action type.

Step 25. Click the Execute (F8) button.
The effective date is the date the Career Progression will go into effect. This date must match the effective date on the PCR.
Step 26. Click the Enter button.
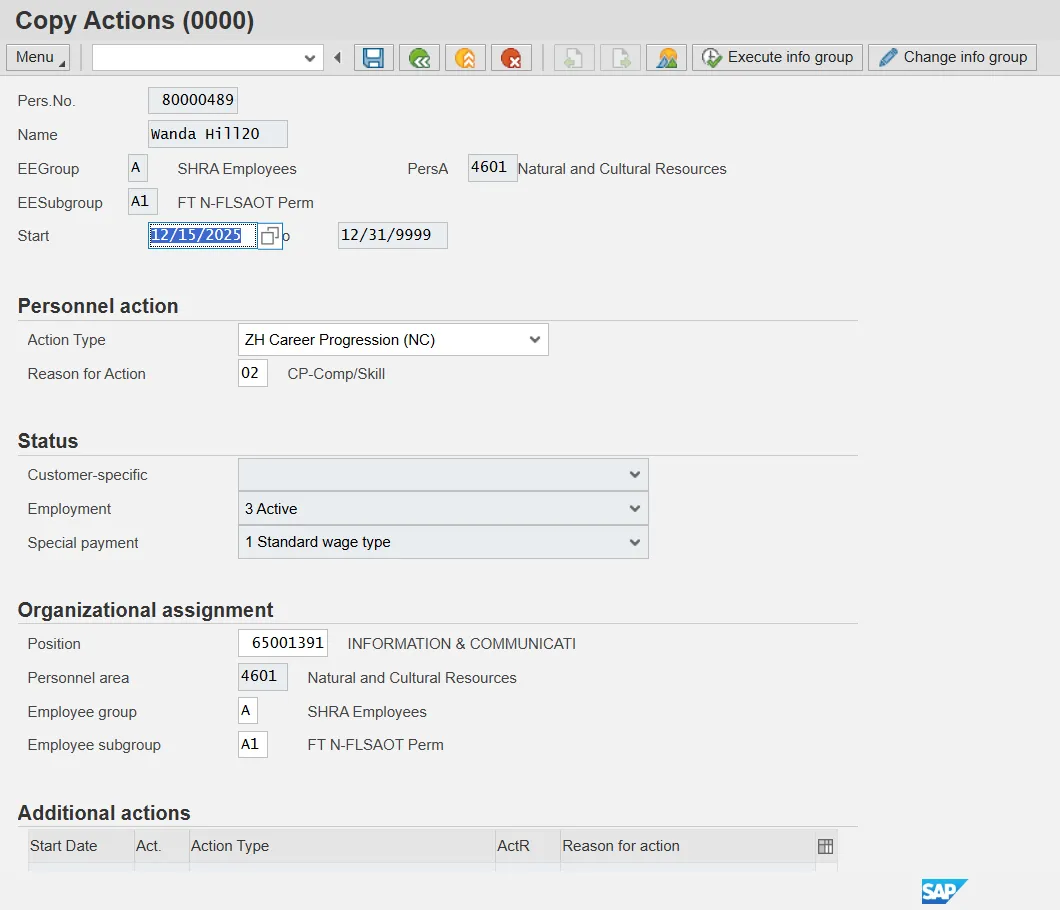
The system will provide a yellow warning message informing you the existing record will be delimited. Click Enter past this warning message.
Notice at the top of this screen the title includes the word “Copy.” This action takes the original action and makes a copy of it, delimiting the previous record and saving the new record. The word “Create” in the title indicates that this infotype is being created on this person's record for the first time.
When the employee subgroup is different from the position employee subgroup you will receive a warning message. Click Enter to continue.
Step 27. Click Edit, >> Maintain text.
To add your comment based on agency or OSHR Policy/Guidelines. Remember you can cut and paste from the PCR.
Step 28. Click the Enter button.
Step 29. Click the Save (Ctrl+S) button.

Step 30. Click the Enter button.
Enter the Contract if required. The Contract key identifies eligibility for Medicare, less than 5 years for STD, and the Rehire of Retiree statuses.
Critical! Subject employees must be positive time. Employment percent should always be 100%.
The system will display a yellow warning message informing you the existing record will be delimited. Click Save to move past this warning message.
Step 31. Click the Save (Ctrl+S) button.

Step 32. Adjust their work schedule as appropriate and save the data.
The Work Schedule Rule and Time Mgmt status defaults from the employee's enterprise structure. It is critical that you review for correctness (including the working week) and change the work schedule as appropriate for the employee if it is different from the one that defaults.
If the individual is part-time, be sure to check the Part-time employee box and verify the working hours are less than 40.
The defaulted work schedule is based on information provided by the various agencies and the Integrated HR-Payroll System team members.
Step 33. Click the Save (Ctrl+S) button.
Notice that when you change the details on the working time infotype, the system reminds you to also manage IT0008, Basic Pay.
Step 34. Click the Enter button.
Step 35. Click the Save (Ctrl+S) button.
Subsequent activities should only be completed if the Career Progression action is assigning the employee to a position in a different retirement system than his or her current position (for example – going from TSERS to LEORS).
Step 36. Click the Cancel (F12) button.
If you do not need to make changes to the benefits of the individual, click Cancel to bypass this infotype.

Step 37. Update the following field:
- Reason: Reason for the action such as Career Progression
- Example: ZH
Step 38. Click the Enter button.
The pay scale values (pay scale type, pay scale area, pay scale group and level) have been designed to default based on the rules assigned to the employee's position. If the pay scale values do not default, please contact BEST Shared Services or your BEST HR Specialist.
Enter the Reason Career Progression (ZH), click Enter to validate the data. Notice the Annual Salary field has retrieved the amount submitted via workflow (or the hourly field is appropriated).
If the employee is hourly, you will manually enter the hourly rate in the amount field; hit enter and the annual salary automatically calculates. Click the Save (Ctrl+S) button.
Step 39. Click the Back (F3) button.

Step 40. Click the Complete Work Item button.
Only once all of the infotype screens within the action have been processed and the system has returned you to the main screen will this Complete button be visible. Now you may complete the PCR in workflow.
Step 41. Click the Back (F3) button.
You can remain in this SAP Business Workplace and process additional PCRs or click the Back to return to the main SAP screen.
Step 42. The Career Progression Action is complete, but we recommend reviewing via PA20 all infotypes that have been processed.