Purpose
The purpose of this Business Process Procedure is to explain how to print a mass time statement print job.
Business Purpose
The preferred method for printing time statements is through Employee Self Service (ESS). However, transaction ZNCTIME allows for central printing of the time statement for users who cannot print and for agencies that will initially print this statement. A designated agency user will be able to print the time statements for a group of employees.
Prerequisites
- Pre-definition of the group of people for whom the time statement is to be printed is very important. This pre-definition can be in the form of Organizational Unit(s) or Personnel Number(s).
- To print time statements for your Organizational Unit(s), or for your group of employees, you must have the required authorization.
- Additional knowledge of the Agency’s Organizational structure/units and its relationship with individual personnel will be very useful.
Directions for Using Transaction ZNCTIME
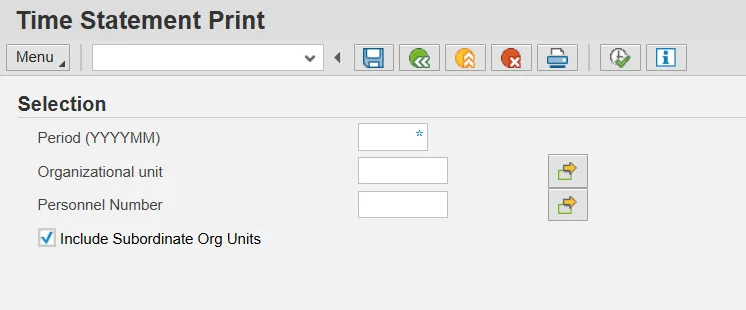
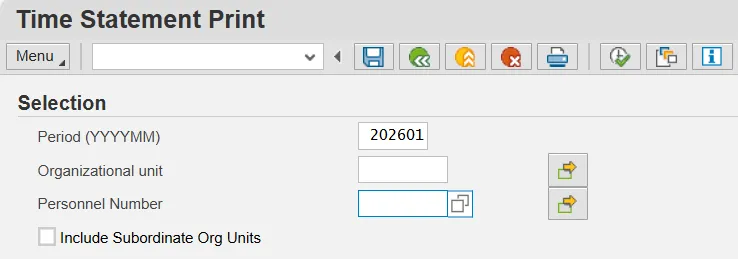
To print time statements using transaction ZNCTIME, shown above, it is important to understand the definitions of the transaction’s selection fields/parameters:
- Period – The Period is the calendar month for which time data is to be included on the time statement. Before a Time Statement is printed, it is important that all time data has been entered and approved for that period and that Time Evaluation has run for the period.
- Organizational Unit – Using Organizational Unit, the local HR representative will be able to print the time statements for all employees under their Organizational Unit (that are in positions that belong to that particular Org Unit). The Agency HR should communicate to each of their HR representatives which Org Unit(s) time statements they will be responsible for printing.
NOTE: Organizational Unit is a master data field and each employee is assigned to a specific Organizational Unit. Each local HR representative will be able to maintain documentation for their assigned organizational units.
NOTE: You cannot enter values in both the Organizational unit and personnel number fields. The system will give an error message if both values are entered. Only use Organizational unit as provided by your HR office.
- Include Subordinate Org Units - The checkbox underneath Personnel Number allows you to include subordinate Org Units (when checkbox selected) or to exclude subordinate Org Units (when checkbox deselected) when the time statements are printed. By default, this checkbox is selected so that entering a value in the Organizational Unit field will include all the subordinate Organizational Units.
Examples of How the Organizational Unit Selection Option Can be Used to Print Time Statements
Print Time Statements for Employees in a Single Org Unit
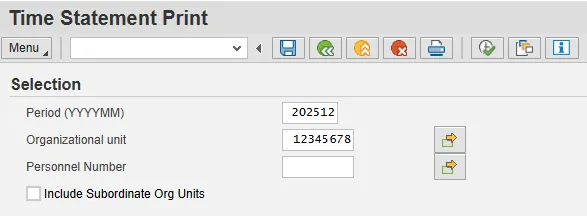
- In the screenshot below, Org Unit A’s org number is 12345678. If you have 10 employees who belong to this Org Unit and you want to print their statements, enter the number of this one Org Unit, deselect the Include Subordinate Org Units checkbox and Execute to print the statements (see end of this document for the printing steps after executing).
- If you do not know the eight-digit number for the Org Unit, select the match code button that appears next to the Organizational Unit field when you click in the field. Drill down in the structure until you find the Org Unit you are looking for, double click on it, and the org unit number will be pulled into the selection field.
Print Time Statements for Employees in More Than One Org Unit Where There is a Hierarchical Relationship with Subordinate Units
- If Org Unit A is the highest Org Unit in the hierarchy (10 employees) and Org Units B (6 employees) and C (5 employees) report to Org Unit A, to print time statements for all 21 employees, enter the number for Org Unit A in the Organizational unit field, make sure the checkbox to Include subordinate Org Units is checked, and Execute to print the statements (see end of this document for the printing steps after executing).
- Note: The Time Statements will print sorted by Personnel Number, regardless of how many Org Units are included.
Print Time Statements for Employees in a Number of Org Units That are not Related via a Hierarchy
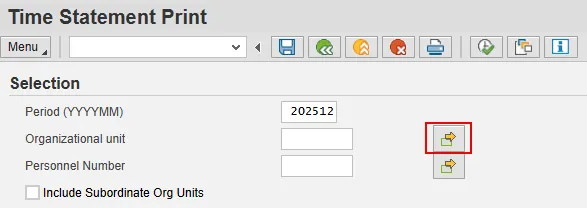
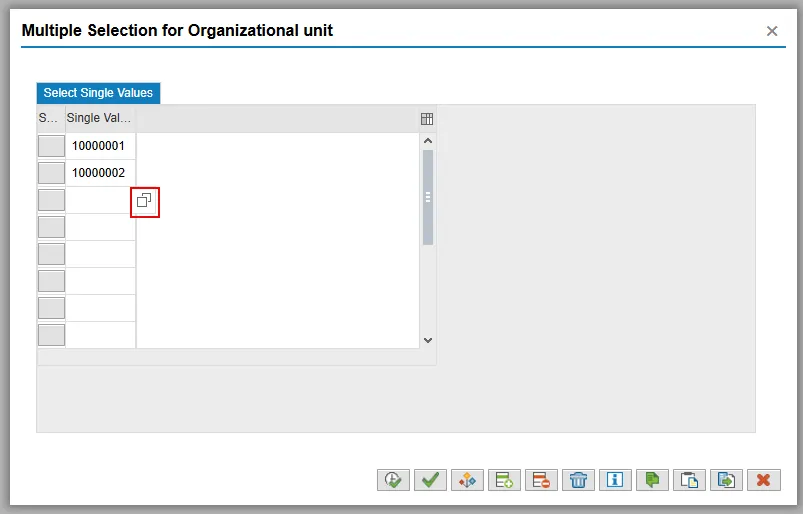
- There may be a situation where you need to print statements for employees who belong to Org Units in separate areas of your organization. For example, Org Unit Z (10000001), Org Unit Y (10000002), and Org Unit X (10000003) do not report to each other. You can still print statements for the employees who belong to these org units by entering the org units separately using the multiple selection button next to the organizational unit field (highlighted below).
- Then, on the Multiple Selection for Organizational Unit pop-up window, manually enter the org units needed, and/or, click on the match code button (highlighted below) and drill down in the Organizational Structure until you find one of the Org Units needed and select the green check. Repeat until all the org units needed have been entered and/or selected and then select the Copy icon.
- Deselect the Include Subordinate Org Units checkbox and Execute to print the time statements (see end of this document for the printing steps after executing).
Examples of How the Personnel Number Selection Option Can be Used to Print Time Statements
Print a Time Statement for a Single Employee
- Enter the employee’s personnel number in the Personnel Number field.
- Make sure that the Include Subordinate Org Units checkbox is not selected and Execute to print the time statement (see end of this document for the printing steps after executing).
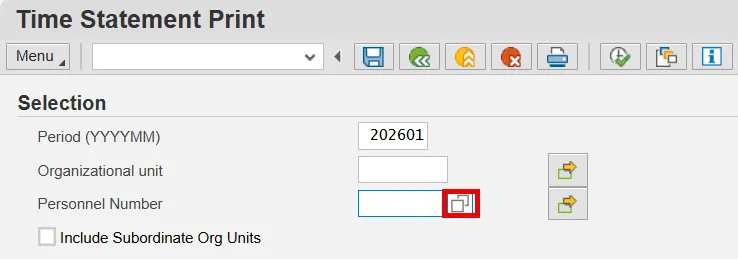
- Tip: If you need to search for the Personnel Number, click in the Personnel Number field and then on the match code icon (highlighted below).
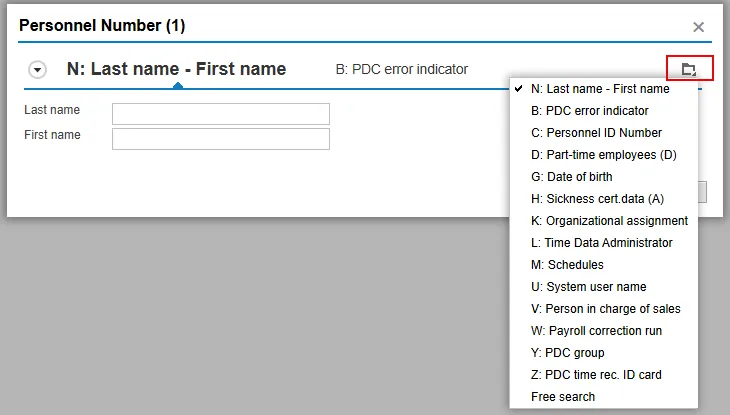
The resulting pop-up window offers several options to search for an employee’s personnel number under the More icon (highlighted below). The most frequently used option is the Last name - First name search. To search this way, select that option and then enter the Last name and/or the First name in the appropriate fields, and then select the Find icon (binoculars).
Double click on the correct result and that personnel number will appear in the personnel number field. Execute to print the time statement (see end of this document for the printing steps after executing).
Tip: If you don’t know part of a name, utilize the asterisk (*) for a wildcard search: for example, enter last name Smith, first name J*, and then select the Find icon. A list of all the employees with the last name of Smith as well as a first name beginning with the letter J will appear.

Double click the correct employee and the employee’s Personnel Number will appear in the Personnel Number field on the main screen. Execute to print the time statement (see end of this document for the printing steps after executing).
Print Time Statements for a Group of Employees Using the Personnel Number Field and a Series of Selection Options
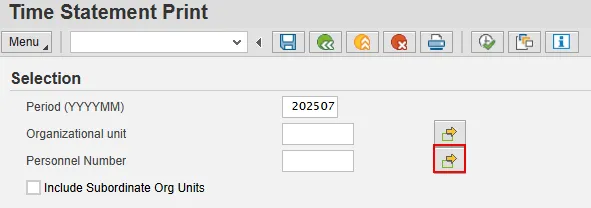
- If you want to select a very specific group of employees in your organization (other than in a particular Org Unit or Units), select the Personnel Number Multiple selection button (highlighted below).
- Note: Only use this option when there is a need to print time statements for a limited number of individual employees.
On the pop-up screen, select that Multiple Selection button.
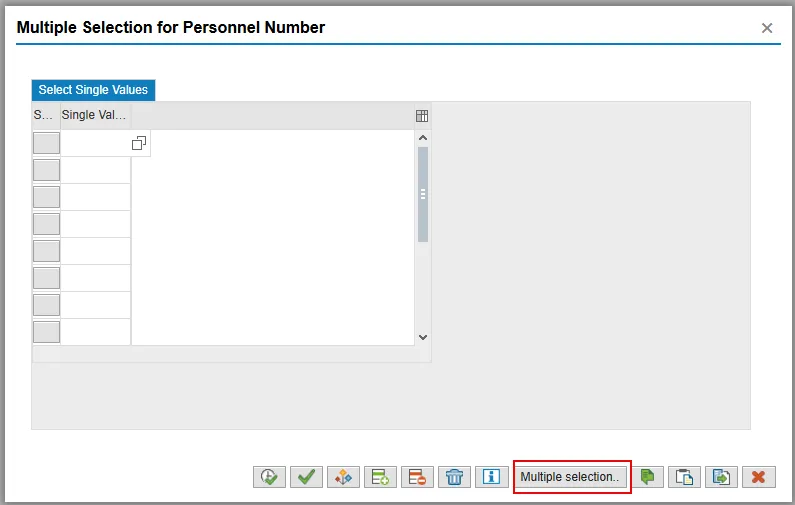
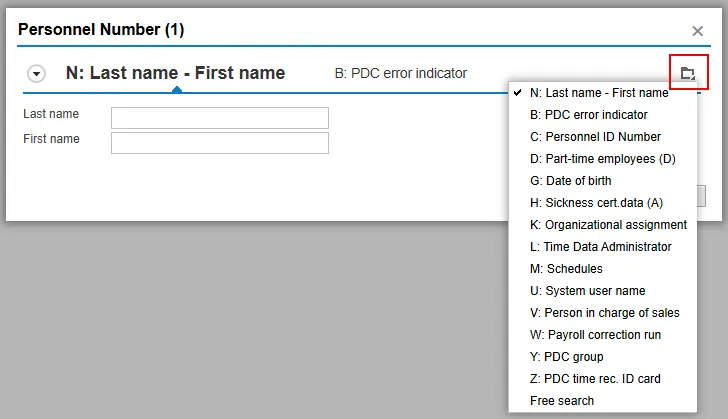
- On the next screen, select the More icon (highlighted below) and then use that menu’s options to begin identifying the group of employees who need statements printed. For example, they might be in a certain employee group or in a certain Payroll Area or a combination.
The following screenshot shows the result of selecting Organizational assignment on the More menu, and then using the fields of Personnel Area, Payroll Area, and Last Name to identify the employees needed.
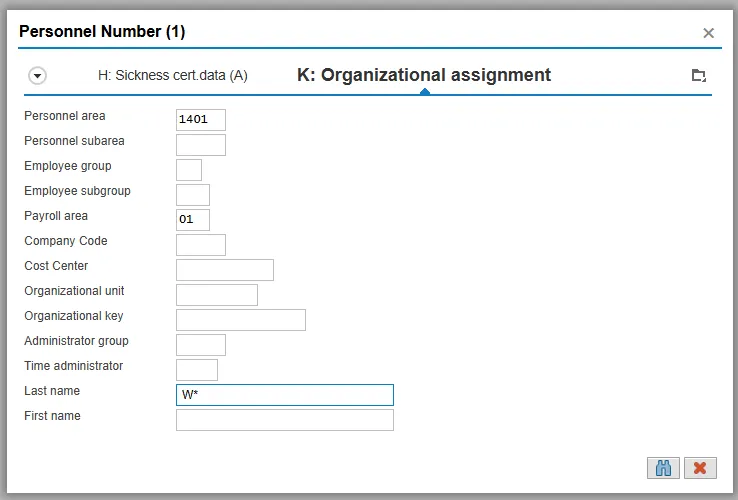
- After all field selections have been made, click on the Find icon. From the resulting list of monthly OSC employees with last names that begin with W (Payroll area 01, Personnel area 1401, Last name W*), highlight some or all of them for printing.
- Select the Copy icon.
- Select the Copy icon.
- Make sure the Include Subordinate Org Units checkbox is not checked.
- Select Execute to print the time statements (see end of this document for the printing steps after executing).
Tip: If there are selection criteria for this transaction that you run frequently, instead of selecting the data each time you run it, you can save the selections in a variant - see help document GN-03.
Printing the Time Statements with WebGUI PDF-Based Printing
In WebGUI, print output is not sent directly to a local printer (such as LOCL) - it is generated as a PDF file within the web browser. Users will open the generated PDF and then choose whether to print it to a physical printer or save it locally.
For Small Print Jobs
- After you have Executed your transaction, the window shown below will appear.
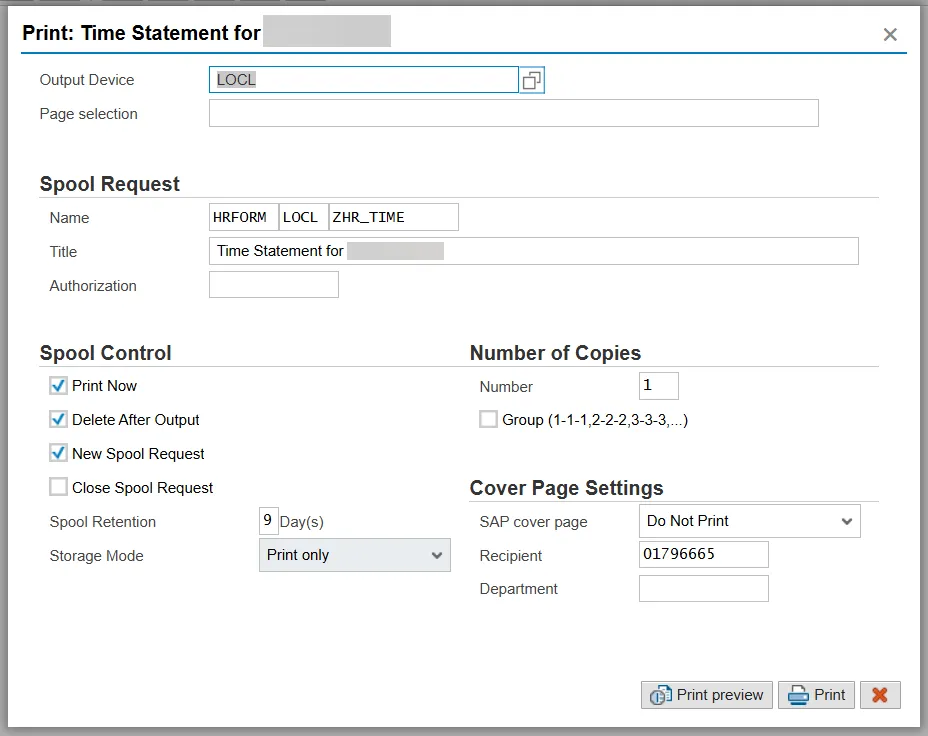
- In the Output Device field, LOCL will prepopulate. Change that to PDF.
- Select Print.
- Access the generated PDF file from the browser window and print the timesheet(s) to a physical printer or save the file locally.
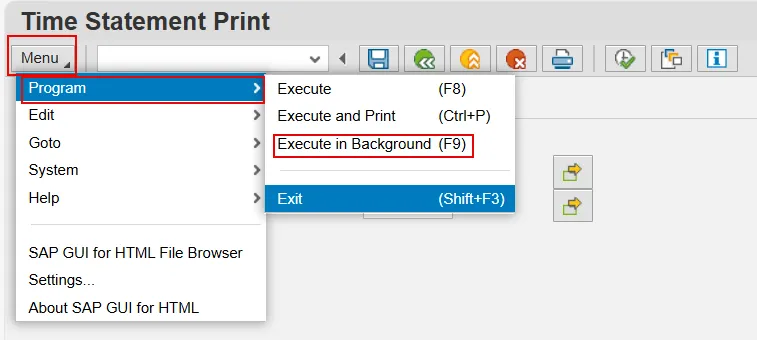
For Mass Print Jobs or Long-Running Jobs
- Instead of selecting Execute to run your transaction, instead, select Menu, Program, Execute in Background.
When a background job is submitted, the system generates a spool request rather than immediately producing output.
- In the Output Device field, LOCL will prepopulate. Change that to PDF.
- Select Continue (green check).

- Select either:
- Immediate, to run the print job Immediately in the background, and then Save.
or
- Date/Time, to run the print job at a later time in the background. Enter a Scheduled Start Date and Time (use military time/24 hour clock), and then Save.
- Immediate, to run the print job Immediately in the background, and then Save.

- Go to transaction SP01- Output Controller: Spool request selection screen.
- Your personnel number and the current date will prepopulate on the selection screen.
- Execute for a list of your spool requests. When the job is done, the status of the spool will show as Compl.
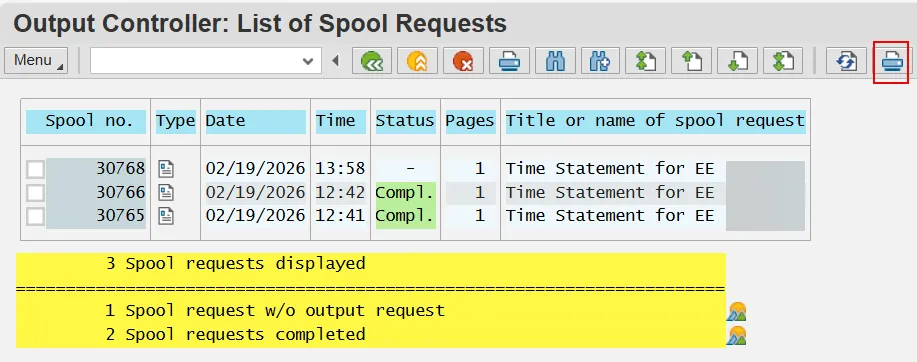
- Select the check box of the job you want to print and select the Print Directly icon (highlighted above).
- Print the resulting Time Statement(s) to a physical printer or save it/them locally.