Purpose
The purpose of this job aid is to provide navigation tips for PPOSE in Org Management.
Introduction to PPOSE
The Organization and Staffing Display transaction (PPOSE) can be used to view the existing organizational structure. It can display the State’s organizational structure and all the elements included in the structure, including org units, positions, jobs, and people. Also, you can use this transaction to find a position number, which is required to complete personnel actions such as new hire.
An organizational plan can be made with many object types, although these four basic object types are the building blocks:
- Persons
- Positions
- Organizational Units
- Jobs
Though your colleagues will most likely use the technical term 'PPOSE', the transaction name - Organization and Staffing Display - has a very important word embedded.
PPOSE is a display transaction only. You cannot affect any employee or position records in PPOSE, so you should feel free to explore everything it can do. You may try right-clicking on different objects to see what options you are given.
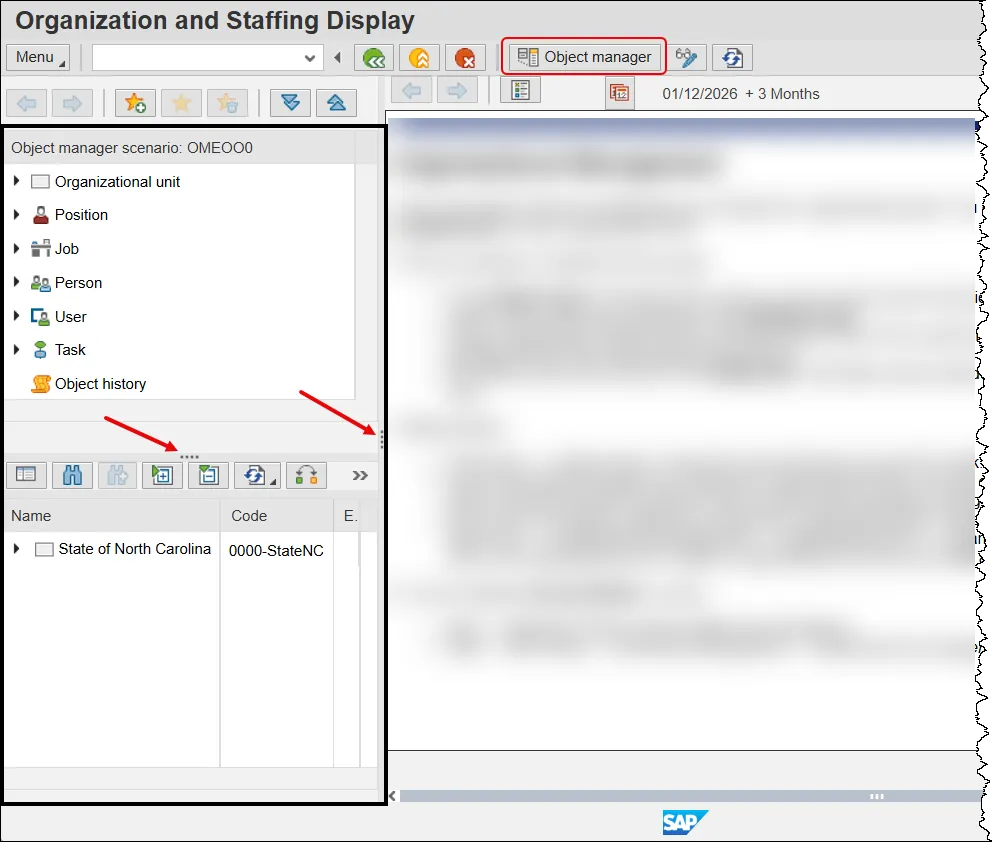
PPOSE Layout
The PPOSE screen is divided into four main sections. On the left side of the screen is the Object Manager, which consists of the Search Area on top and the Selection Area directly below it. The search area is used to locate objects, while the selection area displays the results of the search and allows an object to be selected.
On the right side of the screen, the Overview Area is located on top and displays the relationships associated with the selected object. The Detail Area, located on the bottom right, displays detailed information for an item selected in the overview area.
Each section will be explored in more detail individually.

Search Area
The Search Area is the only section that is populated when the PPOSE transaction is first executed. It allows users to search for organizational information based on:
- Org Unit
- Position
- Job
- Person
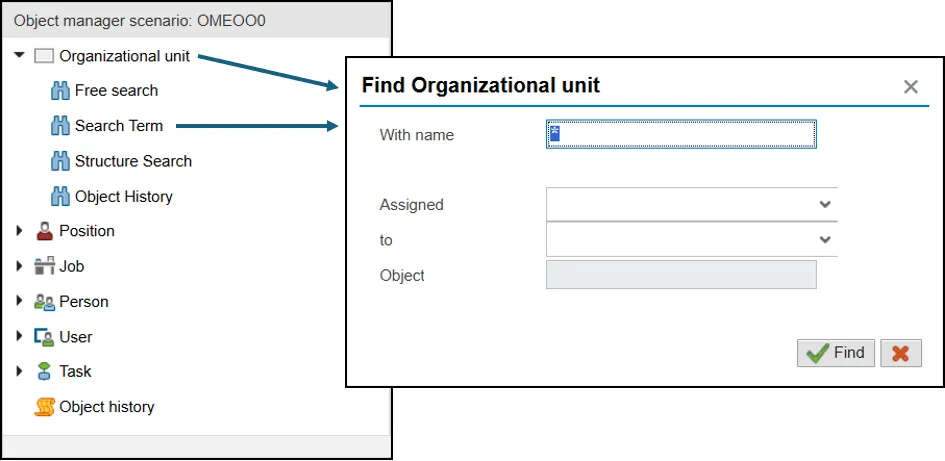
Each of these organizational management objects is listed in the search area and has a node (triangle) next to it. Clicking on the node gives various search options, though this help document will only cover Search Term and Structure Search.
- Clicking on the Search Term option will produce a pop-up window. To find an OM object, input its object number into the With name field and press the Find button. Alternatively, search by OM object name by entering its title into the With name field. When using this option, the wildcard character (*) can be used to search for objects with similar text in their titles. Once the search is performed, the results show up in the Selection Area.
NOTE: Clicking on the object name, such as Org Unit or Position, instead of clicking the node first is the same as using the Search Term option.
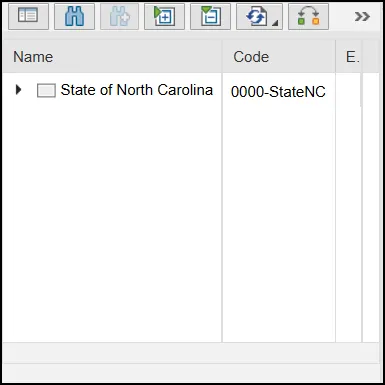
- Clicking on Structure Search will always result in a search for Organizational Units even if it is clicked underneath the Position or Person options. The Selection Area will populate with the top-level org unit the user has access to.
NOTE: Structure Search does not appear within the Job options.
Selection Area
The results of searches performed in the search area are displayed directly below, in the Selection Area. You can modify the search results by sorting or filtering. You can add and delete columns to easily find the object. Once an item is selected from the Selection Area by double clicking it, more information is displayed in the Overview and Details Areas.
If the Search Term option was used, any item that meets the search criteria will be displayed. Using Structure Search displays the top-level org unit based on access. Expand the structure to find the required organizational unit.
Object Manager
The Search Area and Selection Area are collectively known as the Object Manager. This area of your screen can be resized with two splitter bars.
One is a horizontal bar between the Search and Selection areas. It allows the size of one area to increase at the expense of the other.
The other splitter bar is vertical and separates the Object Manager from the Overview and Detail areas. It can be dragged left and right to best suit the user’s needs.
The whole thing can also be toggled on and off with the Object Manager button.
Overview Area
The Overview Area provides a hierarchical view of OM objects and enables navigation within the organizational structure.
Once an item is selected from the Selection Area it is displayed in the Overview Area in a tree structure. Items can be expanded and collapsed using the nodes (triangles) next to each object.
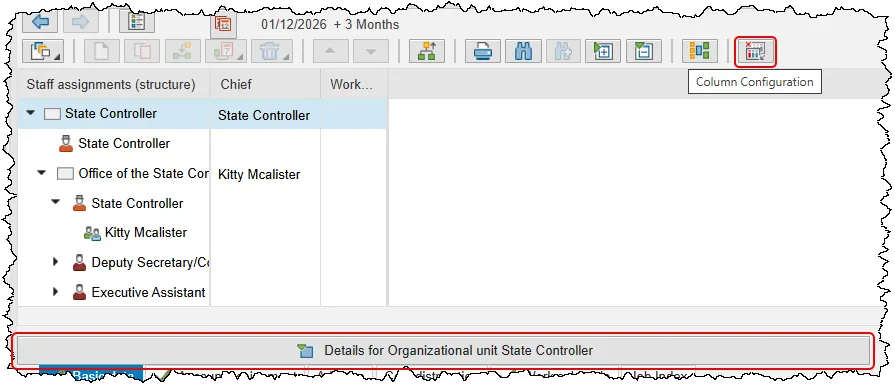
The columns that are displayed or available for display are determined by the type of object selected. Use the Column Configuration button to personalize the display based on user needs.
Double clicking an item in the Overview Area will display its specific data in the Detail Area.
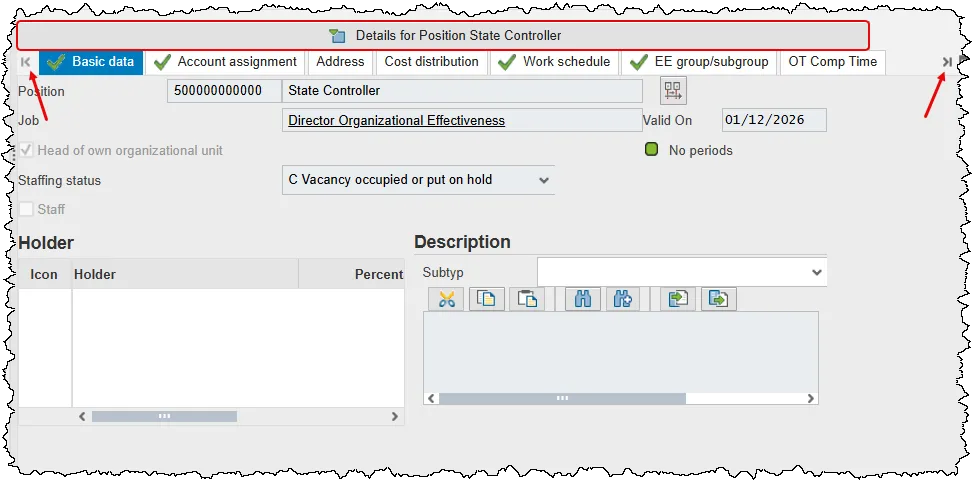
As shown in the screen shot below, there is a gray bar beneath the Overview Area with text reading: Details for <object type><object name>. This bar separates the Overview Area from the Detail Area below it. It also serves as a toggle to minimize/maximize the Detail Area.
The bar will turn blue when you position your cursor over it.
Detail Area
The Detail Area displays more information about the object selected in the Overview Area and will have different tabs depending on the type of OM object that you are viewing. The tabs with check marks will contain data that is specific to the object. Click a tab to see the data assigned to the object you are viewing.
For positions, not all the tabs can be displayed on the screen at once. Use the chevron buttons at either end of the tab row to view tabs that are not currently displayed.
Some of the tabs exist for multiple object types. Ensure that you are looking at the data for the correct object by reading the gray bar above the area. If it is not displaying correctly, find the object that you wish to view in the Overview Area and double click it.