Purpose
The purpose of this Quick Reference Guide (QRG) is to provide tips for using the ADFDI Templates for uploading various transactions and data within the North Carolina Financial System (NCFS). Supplemental instructional detail is provided for the Journal Entries template and the Intercompany Transactions template.
Introduction and Overview
The ADF Desktop Integration (ADFDI) is a framework for integrating ADF-based web applications with Microsoft Excel. Numerous NCFS financial process areas have tasks that interact with the spreadsheet upload features which allows users to upload transactions in bulk.
The ADFDI templates used for uploading into NCFS are the following:
- Create Journals
- Create Intercompany Batches
- Create Invoices
- Create Receipt Batch
- Create Asset Additions
The ADFDI Add-In must be installed for users to integrate transactions in NCFS via Microsoft Excel.
General Tips & Tricks
- All first-time ADFDI users should ensure:
- The ADFDI Add-In is installed.
- Pop Up Blockers option is turned off for the NCFS System.
- Browser cache is empty.
- The suggested best practice is to download a new spreadsheet for each upload.
- Users who will repeatedly use NCFS’ spreadsheet upload functionality should update their ADFDI plugin after each NCFS Oracle patch upgrade to avoid any interruption in their use of the system.
- Complete only one amount column (either Debit or Credit) per row. Entering a value in both amount columns, even if the value is $0, may cause an error during the upload process.
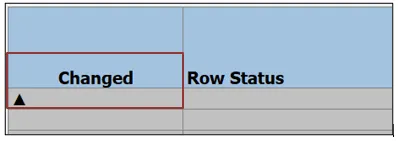
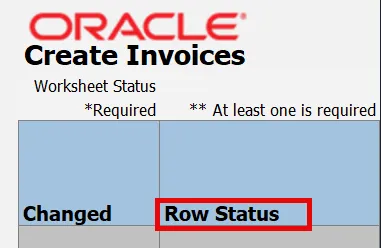
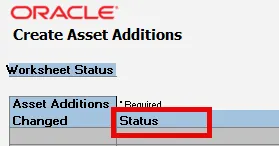
- Whenever a change is made to a row in the template, a black triangle appears in column B. NCFS attempts to process all rows with the black triangle, even if all data on the row has been deleted.
- When pasting, remember to ‘Paste Values’ (not formulas, not formatting). Note that pasting does not necessarily cause the ‘Changed’ column to be populated with a triangle. If this happens, perform any keystroke (even a spacebar) within the row to trigger the triangle.
Re-using a Template
For users who choose to re-use a previously uploaded template:
- Carefully modify any data that needs to be changed, especially dates. Having different effective dates on lines within the same batch can cause an import error.
- Rows without a black triangle in column B are ignored during the upload process.
- NCFS attempts to process all rows with the black triangle, even if all data on the row has been deleted. A blank or incomplete row will error out during the upload process.
- If some rows are not relevant for the current entry, clear the black triangle before uploading the template so these rows will be ignored during the upload process.
Working In Disconnected Mode (Offline)
Working in disconnected mode has both pro’s and con’s.
- Pro:
- Users without the security role which is needed to enter and upload the data can perform the data entry (often a large volume), saving this time for the person who can enter and upload, thus sharing the workload.
- Con:
o No choice lists are available, so manually entered data values may be more likely to be rejected during the upload process.
For whomever is performing the upload:
- Before uploading, ensure there is at least one row whose ‘Changed’ column contains a triangle.
- Before uploading, consider pasting the re-used rows into a freshly downloaded template.
- After uploading, check for errors by reviewing the contents of the “Row Status” or “Status” column as shown below. Row with errors will typically still contain a triangle in the ‘Changed’ column.
- If the person performing the upload is different from the user who maintained the data values, and there are errors upon upload, the sheet is typically:
- Returned to data entry user so errors can be fixed,
- Returned to the user with upload capability (security),
- Uploaded initiated another time.
Tips on Creating GL Journal Entries, Using the Multiple Journals Tab
The following steps provide a detailed explanation for entering journal batches into the template file. There are 7 steps to complete this process.
It is important to note that the images below provide an example of a deposit entry into the template and comments are relevant to a disbursement entry template.
Note: Although a Journal Batch can contain one or more Journals, OSC recommends only one Journal created per Journal Batch, due to the approval/rejection function at the Journal Batch level.
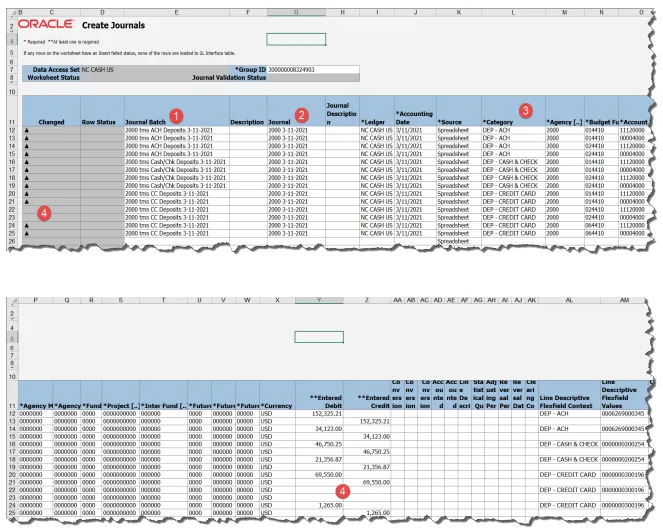
Step 1. Enter unique Journal Batch names to group rows into separate batches.
Note: This field is CASE SENSITIVE! If you enter a Journal Batch name which already exists for the same accounting period, the batch will not be accepted during the Journal Import process.
Step 2. In the example below, there are three Journal Batch names (column E). Each Journal Batch name is associated with one deposit category (column L). When the file is uploaded, NCFS creates three separate batches to approve/post.
Note: Multiple journal batches can be created per deposit category to match actual bank deposit amounts. Each journal batch should correspond to a single bank deposit to facilitate matching between DST Core Banking and NCFS Cash Management.
Step 3. During the upload process, NCFS generates the Journal name within the Journal Batch by combining the value entered on the spreadsheet in column G and appending the value in column L.
Step 4. Whenever a change is made to a row in the template, a black triangle appears in column B. NCFS attempts to process all rows with the black triangle, even if all data on the row has been deleted. A blank or incomplete row will error out during the upload process. Rows without a black triangle in column B are ignored during the upload process. As stated in the section above, when reusing a template, if rows are not relevant for the current entry, clear the black triangle before uploading the template. In the example, there are no credit card deposits for budget fund 024410 so the debit/credit amounts are blank. This will cause an error if the row is read during the upload process. The solution is either to delete the unnecessary rows or clear the black triangle from column B, so the rows are ignored.
Step 5. Debit/Credit amounts of $0 will process and create $0 lines in the uploaded entry. Also, complete only one amount column (either Debit or Credit) per row. Entering a value in both columns, even if the value is $0, causes an error during the upload process.
Step 6. Workflow approval is based on the first value in column L for each unique Journal Batch name.
Note: Be careful not to mix categories with different approval workflows within the same Journal Batch.
Step 7. Having different accounting dates on lines within the same journal batch will cause an import error.
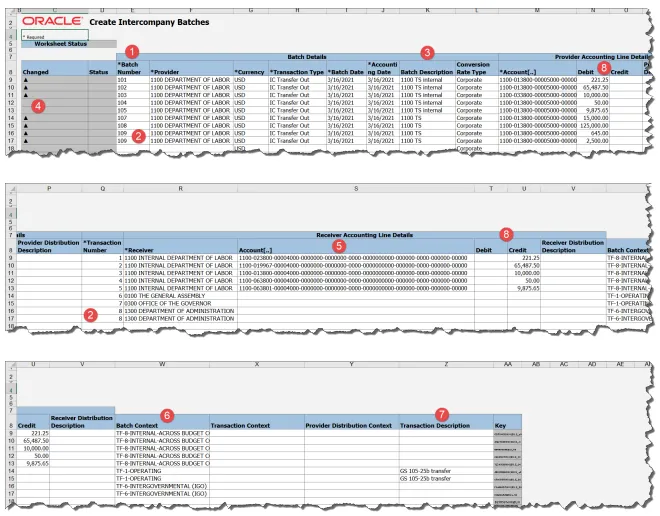
Tips on Creating an Intercompany Transfer Entry Template File, Using the Multiple Batches Tab
There are 11 steps to complete this process.
Step 1. Use a unique Batch Number to group rows into individual transfers. This batch number is not uploaded into NCFS. The Batch Number value entered here will be overridden with a different sequential number generated by NCFS.
Step 2. When a transfer contains multiple provider funding sources (more than one budget fund), identify each line with the same Batch Number to create only one transfer entry to the receiver.
Step 3. While Batch Description is an optional field, it is a good place to enter additional information useful to the Provider agency such as information linking the transfer to a source system or the initials of the user creating the entry. The Batch Description is available on dashboard or searches directed to the Provider agency (e.g., new tab, Manage Intercompany Outbound Transactions).
Step 4. Whenever a change is made to a row in the template, a black triangle appears in column B. NCFS attempts to process all rows with the black triangle, even if all data on the row has been deleted. A blank or incomplete row will error out during the upload process. Rows without a black triangle in column B are ignored during the upload process.
Note: When reusing a template, if rows are not relevant for the current entry, clear the black triangle before uploading the template. In the example, internal transfer rows 104 and 105 are not relevant for this entry. The black triangle from column B has been cleared so these rows will be ignored during the upload process.
Step 5. Complete the Receiver accounting distribution and amount fields for intra-agency transfers. It is acceptable to include both intra-agency and inter-agency transfers on the same spreadsheet if they are identified by separate batch numbers.
Note: For the Account, double click the field below Account to search and select the required account or paste from your supporting data sheet. When pasting, remember to choose the ‘Paste Values’ option.
Step 6. IMPORTANT – DO NOT COPY/PASTE A VALUE INTO THE BATCH CONTEXT FIELD. There is a known error in the Oracle spreadsheet for intercompany transfers. You MUST double-click the batch context field in each row and select the transfer type from the pop-up box for the transfer type to load to NCFS. Otherwise, the transfer type will be blank on the NCFS entries, and your transfer will be rejected.
Note: Oracle is working on a software fix for this issue. OSC will notify users when this issue is resolved.
Step 7. While the Transaction Description field is optional, it is a place to enter limited information useful to the Receiver agency related to the transfer. In the NCFS entry, it appears on the Receiver identification row. It is also available on dashboards or searches directed to the Receiver (e.g., Manage Intercompany Inbound Transactions, Manage Approvals). The Provider agency can also see it on the Requiring Attention tab.
Step 8. Complete only one amount column (either Debit or Credit) per Provider (and Receiver if applicable) row. Entering a value in both amount columns, even if the value is $0, causes an import error during the upload process. Intercompany Transaction spreadsheet import errors cannot be corrected and must be deleted by OSC.
Step 9. Double-click for choice lists of values in the *Provider, *Transaction Type, *Account, *Receiver, and Context Value fields.
Step 10. Intercompany transfers are always initiated from the Provider agency.
Step 11. Make a note of the Process ID. It can be used as QBE filtering criteria within the Intercompany Transactions dashboard.
Wrap-Up
The above content provides guidance around reuse of the ADFDI template, checklist for uploading a ADFDI spreadsheet and general rules for verifying data prior to upload for each given function.
Additional Resources
- Virtual Instructor-Led Training (vILT)
- Web-Based Training (WBT)
- Quick Reference Guides (QRG)