Purpose
The purpose of this Quick Reference Guide (QRG) is to provide a step-by-step guide of how to update a sales order in the North Carolina Financial System (NCFS).
Introduction and Overview
Updating and Revising Sales Orders is the process of modifying existing sales order records to reflect changes in customer requirements, product availability, pricing, delivery schedules, or other key details after the initial order has been created.
Update a Sales Order – Order Management Options
There are four (4) different order management options for updating and revising sales orders. There are 4 steps to complete this process.
Step 1. Revise a Sales Order: allows updates and revisions to existing sales orders.
Step 2. Override a Sales Order Line: used to adjust specific details by overriding a sales order line.
Step 3. Cancel a Sales Order: used to delete or prevent further processing.
Step 4. Copy a Sales Order: used to quickly create new orders with similar details.
Updating a Sales Order – Navigate to Sales Orders
There are 10 steps to complete this process.
Step 1. Click the Company Single Sign-On (SSO) button.
Step 2. Enter your @dac.nc.gov email address.
Step 3. Click Next then enter your password.
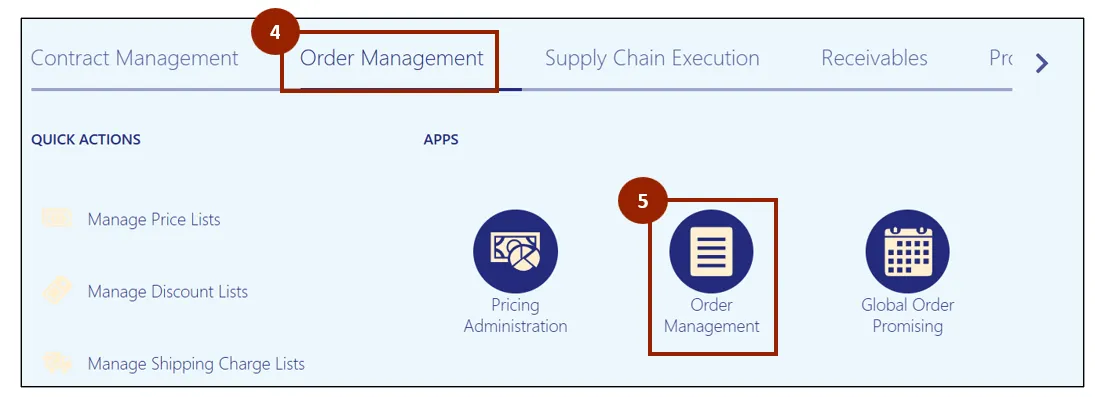
Step 4. On the Home page, select the Order Management tab.
Step 5. Click Order Management App.
Note: The Order Management Overview screen displays information visually, providing data for DAC. As orders are created and progress, the diagrams and values will populate on this screen. If it is a new instance, this screen displays with minimal information.
Step 6. Click Tasks.
Step 7. Select Manage Orders.

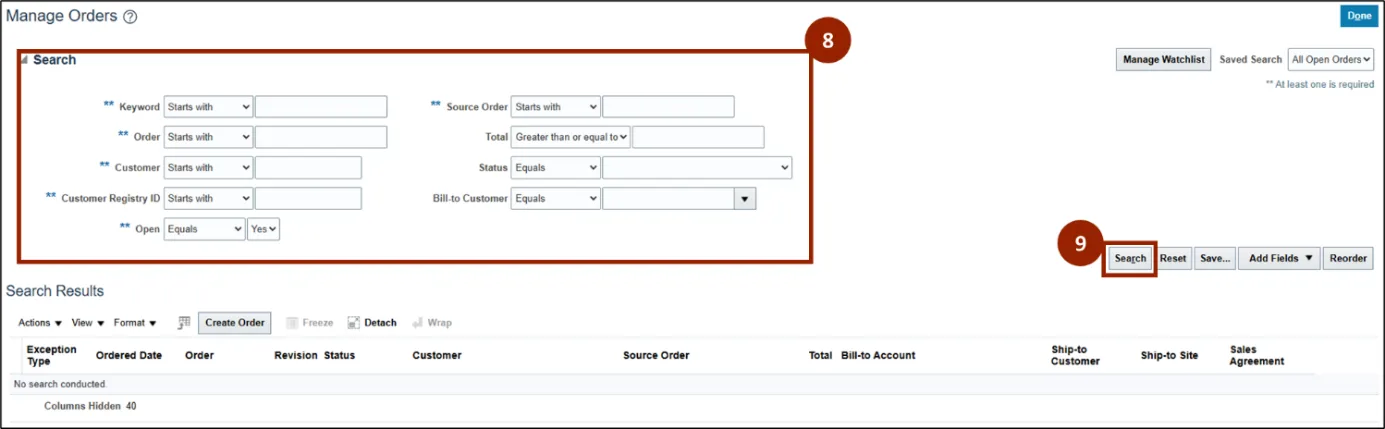
Step 8. Enter search details for the desired sales order to revise.
Step 9. Click Search.
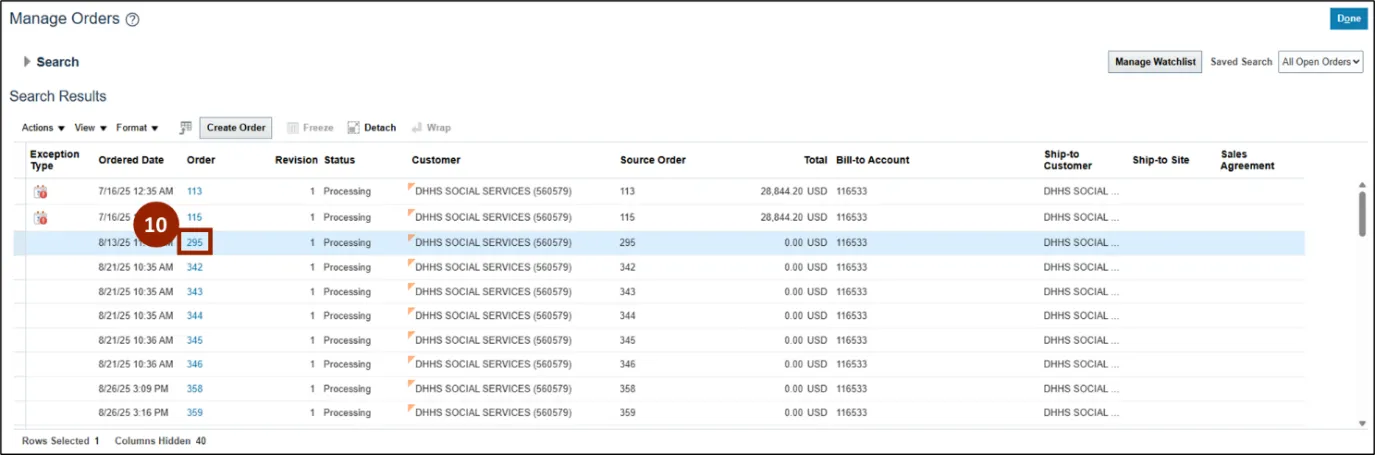
Step 10. Select the Sales Order to update by clicking the order number, shown as a blue link.
Updating a Sales Order – Revise a Sales Order
Note: The applications found within the Order Management tab serve as the primary tools you will use throughout this course. To create a manual order in NCFS, please follow the steps below. There are 7 steps to complete this process.
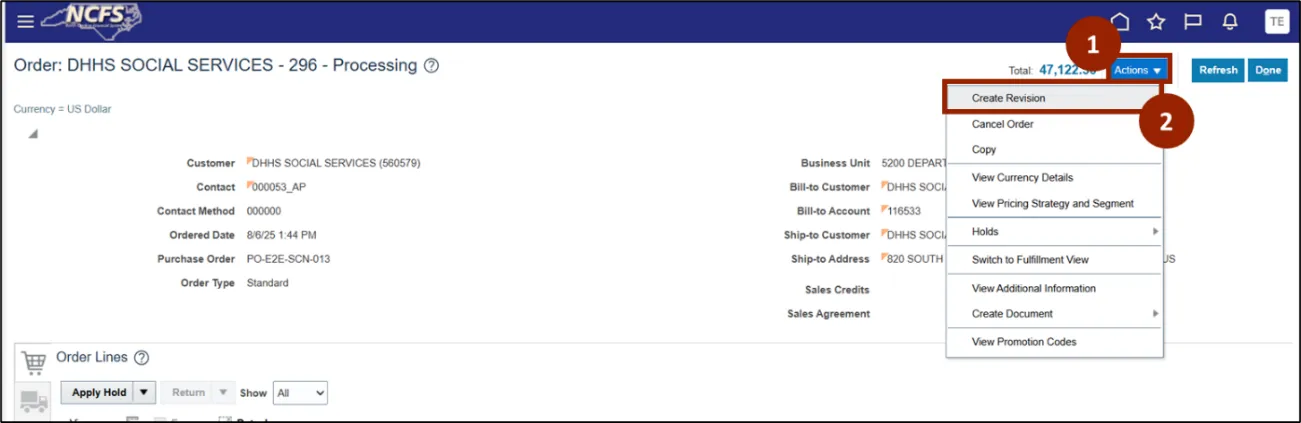
Step 1. Click the Actions button.
Step 2. Click Create Revision.
Step 3. In the Quantity field, enter the updated amount (i.e., 15).
Step 4. Verify Status column displays as Changed.

Step 5. Click Save.
Note: Saving creates a draft revision. Finalize by selecting Submit.
Step 6. Click Submit to finalize revision to sales order line.
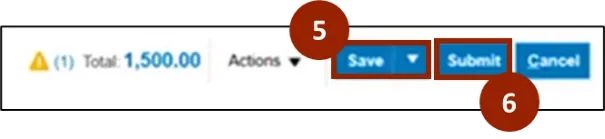
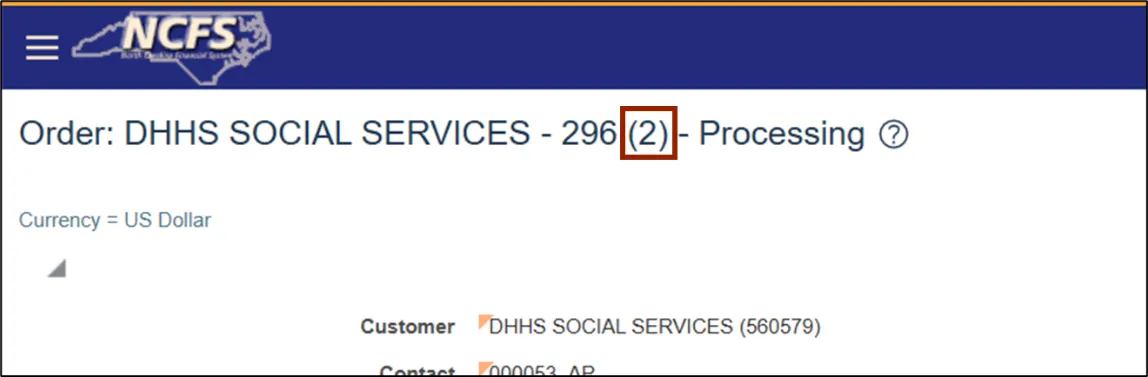
Step 7. Select OK in the Confirmation window to finish.

After confirmation, users will be able to see the number of revisions made to a sales order line, in brackets, next to the order number.
Revise Sales Order from Fulfillment View: After a sales order has been submitted, the system provides an option to revise the sales order line from Fulfillment View. These changes don't create an order revision.
Revise Sales Order from Fulfillment View
There are 7 steps to complete this process.
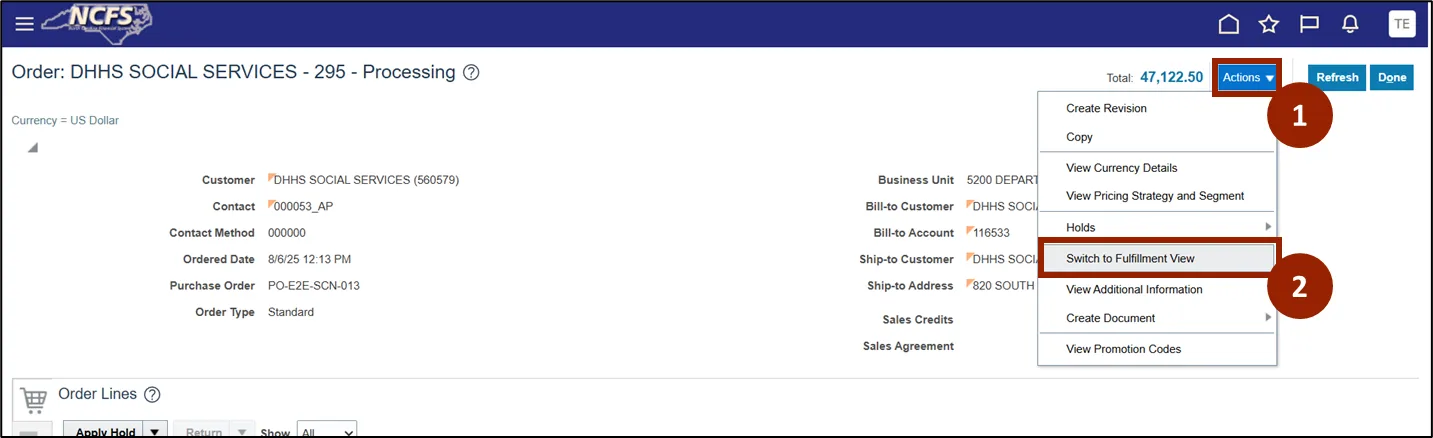
Step 1. Starting from the Order screen, click the Actions button.
Step 2. Click to Switch to Fulfillment View from the list.
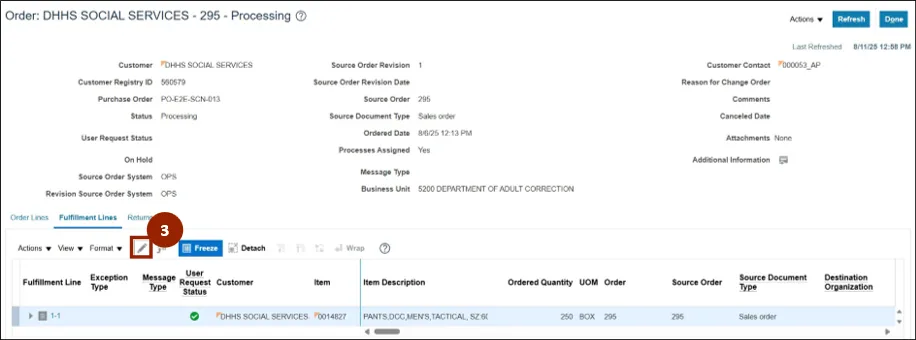
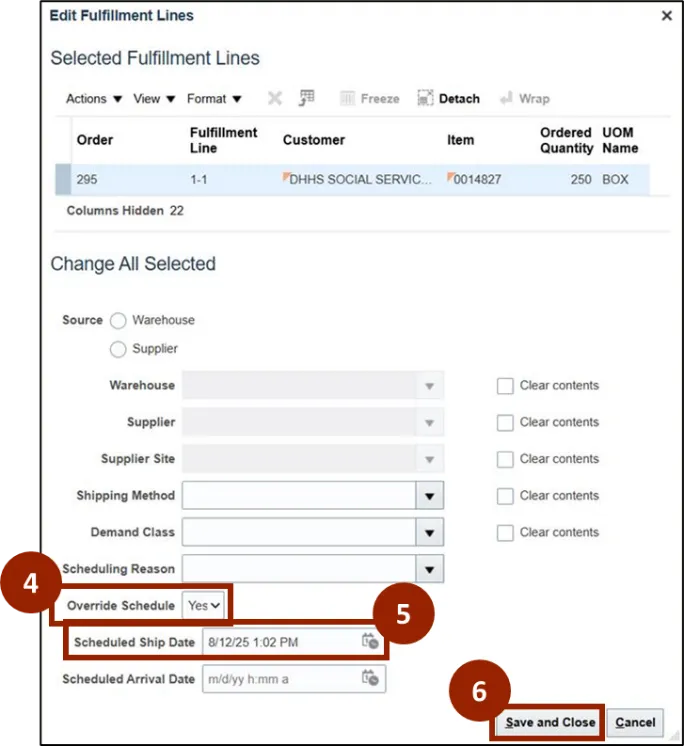
Step 3. Within the Fulfillment Lines tab of the Fulfillment View, click the Pencil icon.
Step 4. In the Override Schedule drop-down field, select the desired option.
Step 5. In the Scheduled Ship Date field, enter or select the desired date.
Step 6. Click Save and Close.
Note: The example highlights the Scheduled Ship Date, but any unlocked field such as the Warehouse or Shipping Method within the Edit Fulfillment Lines window may be updated, as needed.
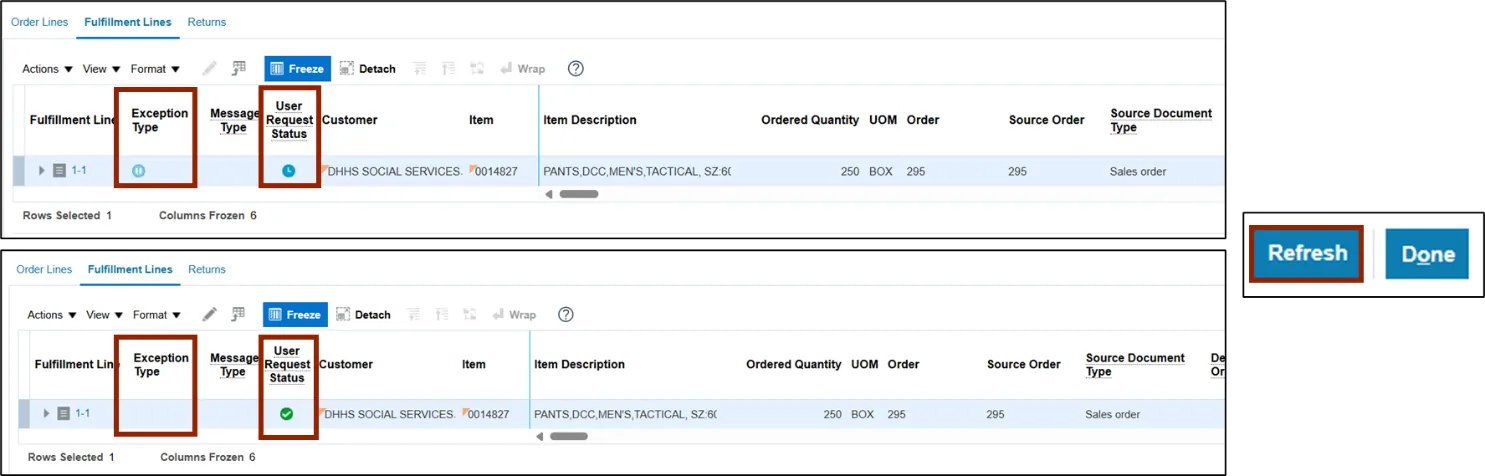
A warning message displays to indicate that the action is currently in progress and the User Request Status column displays as Processing.
Step 7. Click OK.
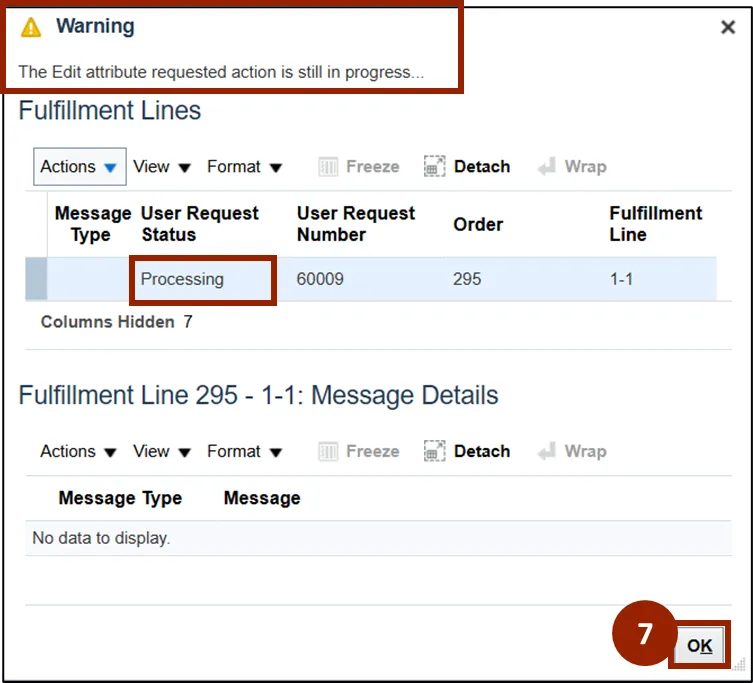
Note: The User Request Status column displays the status and will update throughout the order fulfillment process. To view the most recent updates to the sales order, click the Refresh button at the top left corner.
Update a Sales Order – Override a Sales Order Line
Users can override a sales order line while creating a revision or during sales order entry.
To override a sales order, follow these steps. There are 11 steps to complete this process.
Step 1. Click the Actions button.
Step 2. Select Create Revision.

Step 3. Click the Shipment Details Icon.
Step 4. In the Order Line Details table, click the orange Actions button on the line item.
Step 5. Select Override Order Line.
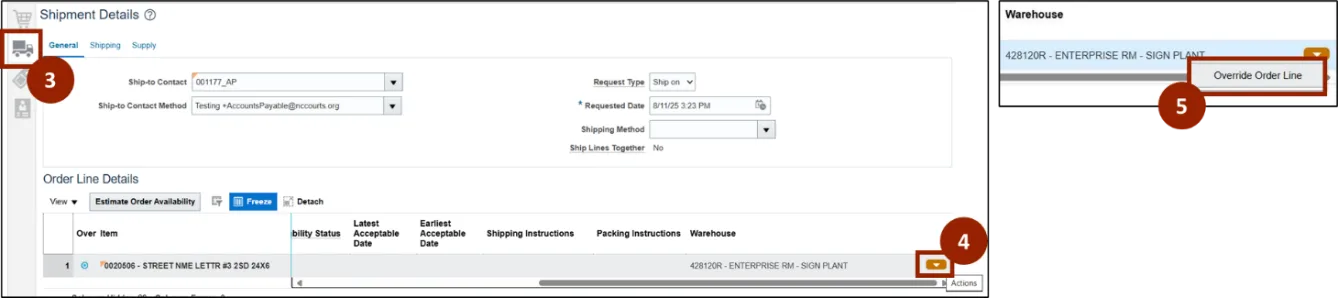
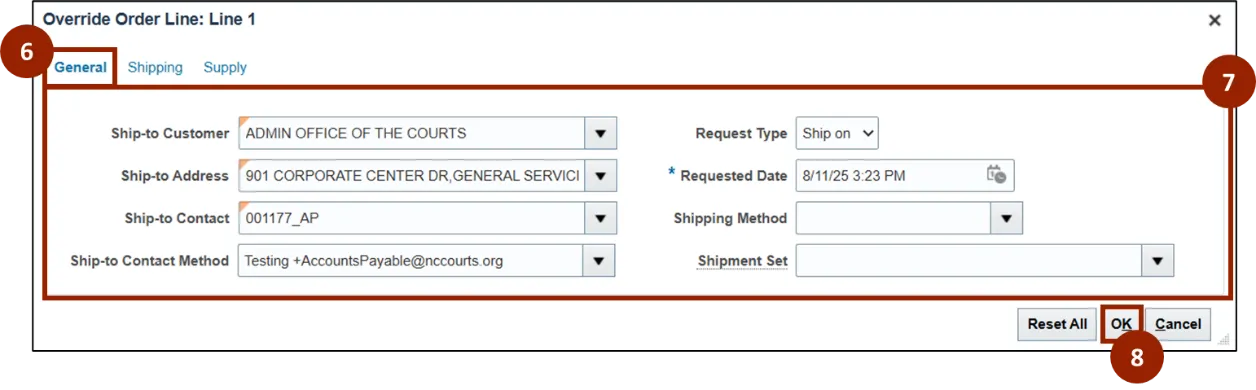
Step 6. The field to update may be selected from General, Shipping, or Supply tab.
Step 7. Select and Input the appropriate parameter for each drop-down based on the updates.
Step 8. Click OK.
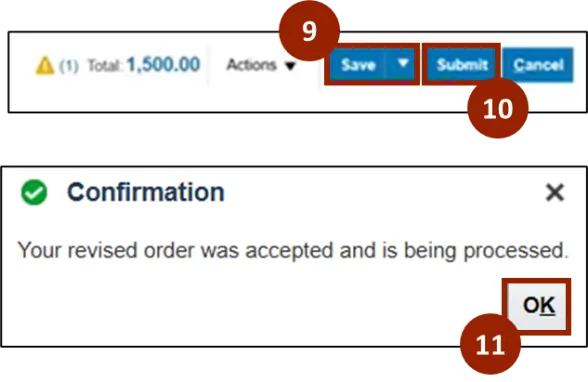
Step 9. Click Save.
Note: Saving creates a draft revision. Finalize by selecting the Submit button.
Step 10. Click Submit to finalize revision to sales order line.
Step 11. In the Confirmation window, click OK to finish.
Update a Sales Order – Cancel a Sales Order
If a customer decides not to proceed, or if there is a business request to cancel, be sure to cancel the quotation or sales order to maintain accurate records and prevent further processing.
Cancel a Sales Order Line: Header: Users can follow these steps to cancel a sales order from the Header Actions.
There are 5 steps to complete this process.
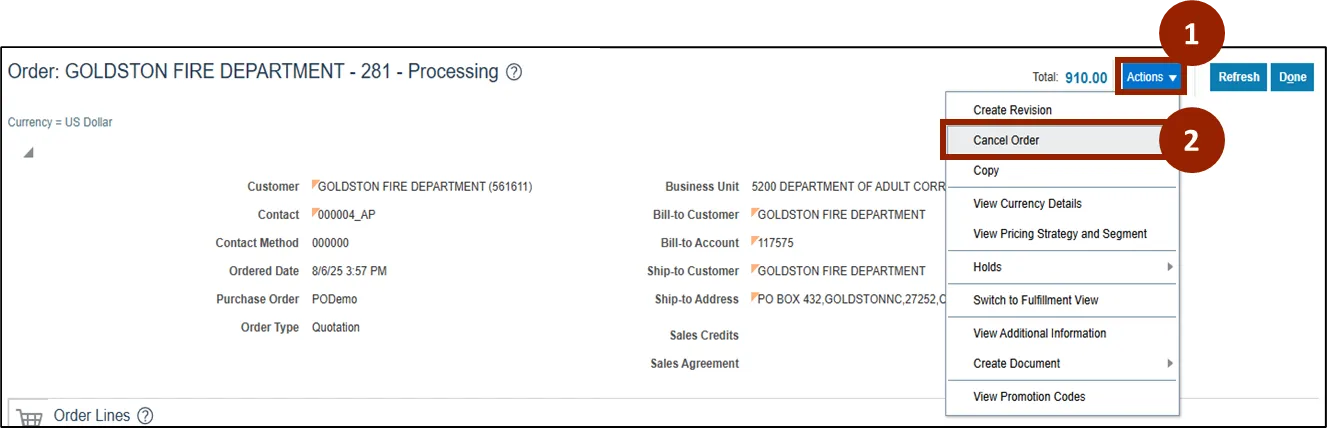
Step 1. From the Order screen, click the Actions drop-down button.
Step 2. Select Cancel Order.
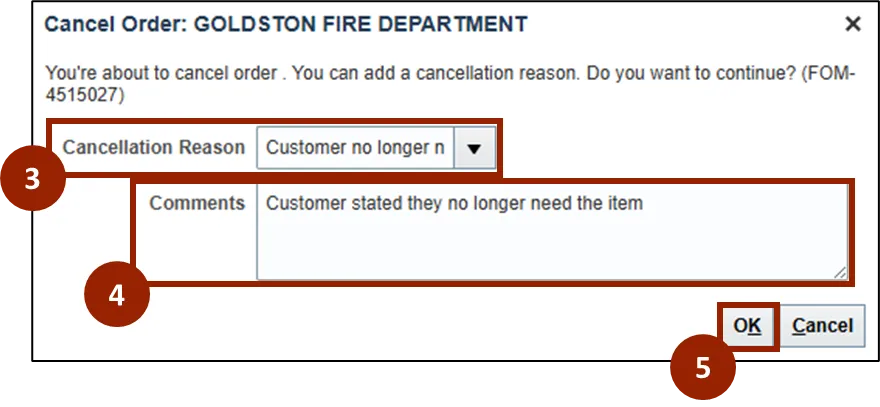
The Cancel Order: Customer pop-up window displays, prompting to choose the appropriate cancellation reason and comments.
Step 3. In the Cancellation Reason drop-down field, select the appropriate reason from the list (i.e., Customer no longer needs the item).
Step 4. (Optional) In the Comments text entry field, enter comments related to the cancellation (i.e., Customer stated they no longer need the item).
Step 5. Click OK.
Cancel a Sales Order Line: Draft
There are 3 steps to complete this process.
Step 1. In the Order Line Details table, click the orange Actions button on the line item.
Step 2. Select Delete.
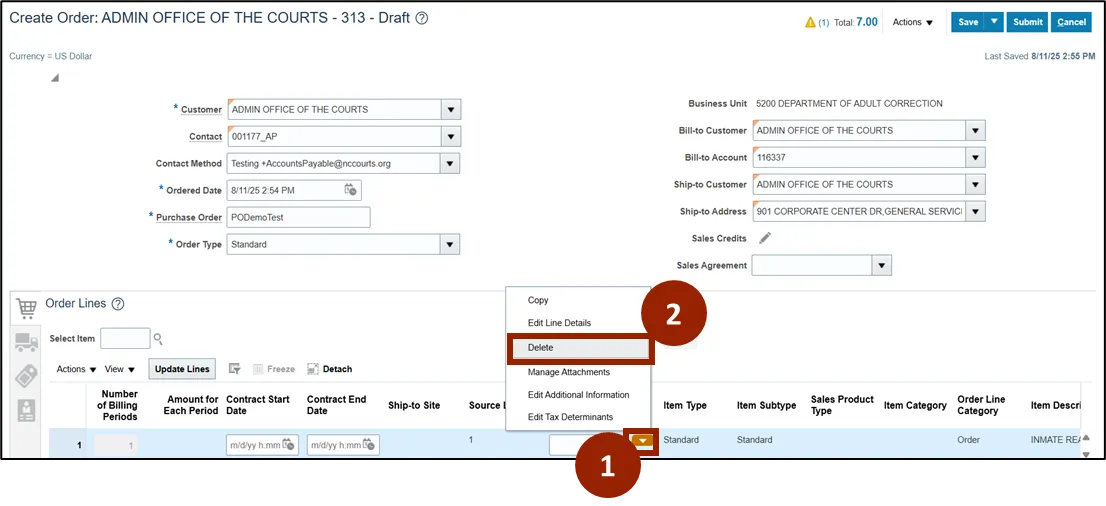
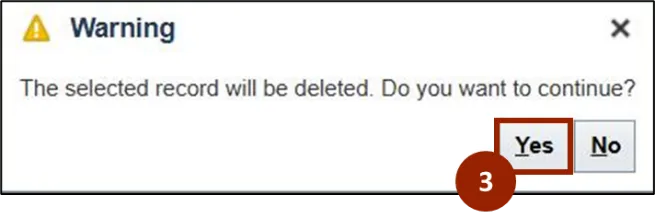
Step 3. A Warning window appears, click Yes.
Cancel a Submitted Sales Order Line
There are 10 steps to complete this process.
Step 1. Click the Actions button.
Step 2. Select Create Revision.

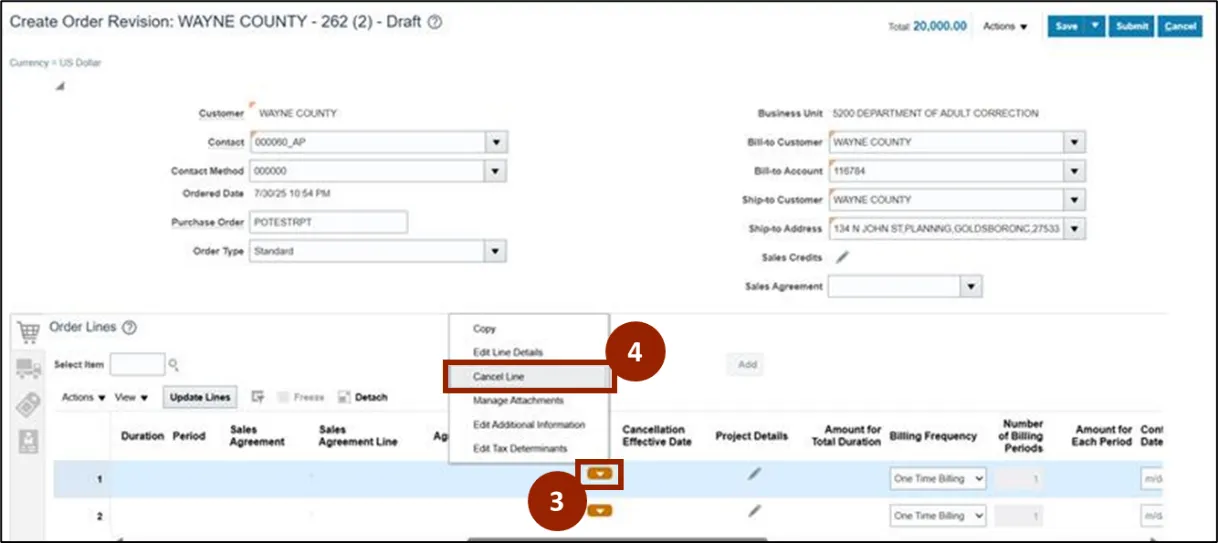
Step 3. In the Order Line Details table of the Create Order Revision screen, click the orange Actions button on the line item.
Step 4. Click Cancel Line.
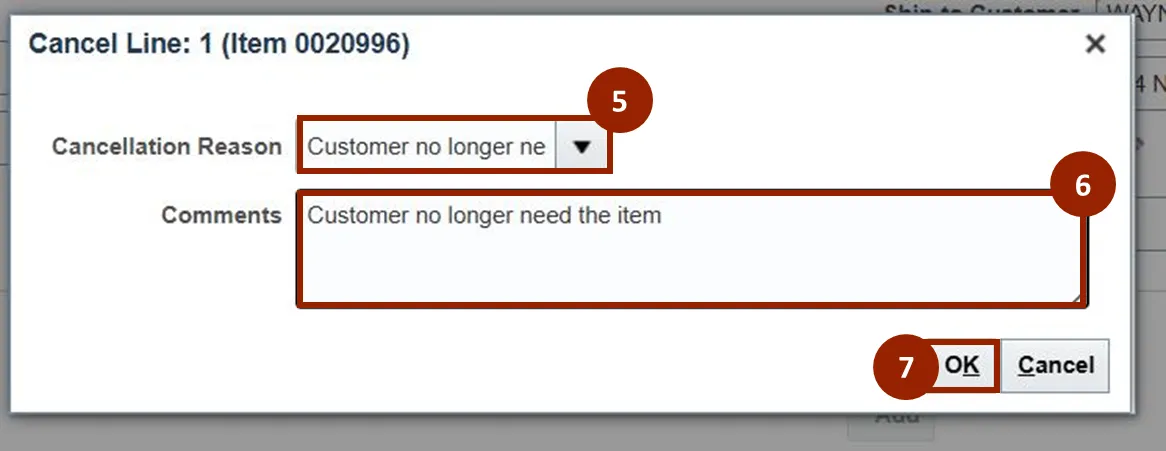
The Cancel Order: Customer pop-up window displays, prompting to choose the appropriate cancellation reason and comments.
Step 5. In the Cancellation Reason drop-down field, select the appropriate reason from the list (i.e., Customer no longer needs the item).
Step 6. (Optional) In the Comments text entry field, enter comments related to the cancellation (i.e., Customer stated they no longer need the item).
Step 7. Click OK.
Step 8. In the Status column, verify Cancellation Requested displays.
Step 9. Click Save.
Step 10. Click Submit.

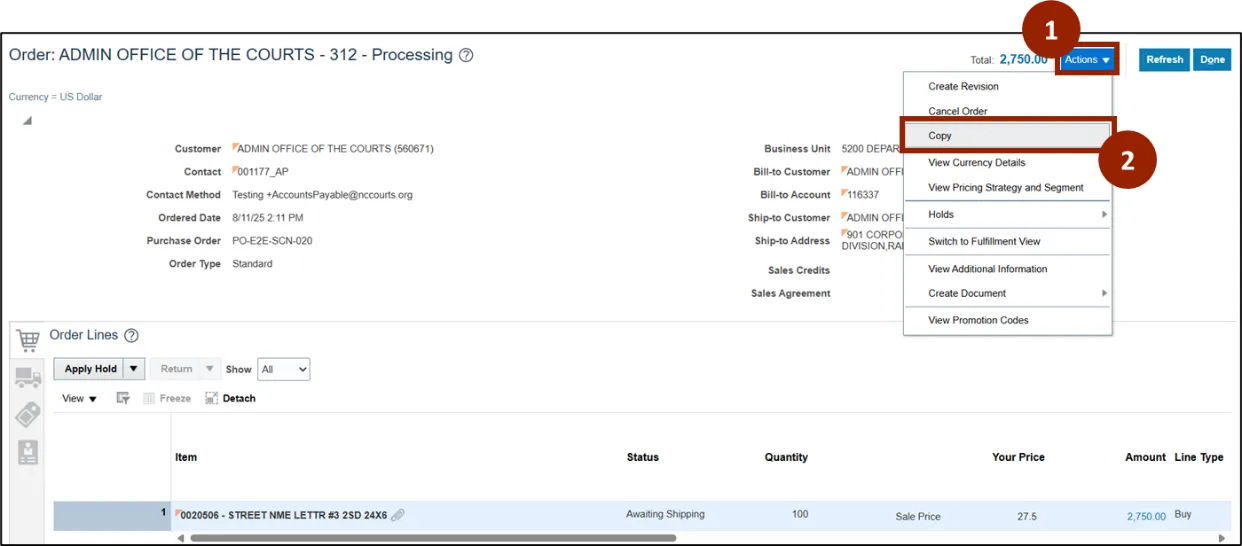
Update a Sales Order – Copy a Sales Order
If a customer requests a repeat order, or if there is a need to create a new order with similar items and details, copying an existing sales order can help save time and support accuracy.
To copy a sales order, from the Order screen follow these steps. There are 6 steps to complete this process.
Step 1. Click the Actions button.
Step 2. Select Copy.
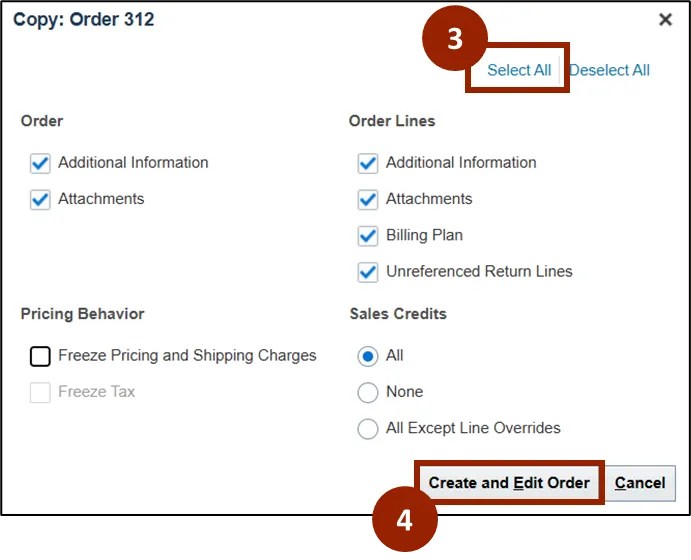
Step 3. Click Select All.
Note: Although Select All parameters was shown here, parameters to be copied can be customized by choosing Deselect All and adjusting any parameters on screen.
Step 4. Click the Create and Edit Order button.
Note: When the Freeze Pricing and Shipping Charges field is selected, the new order will retain the pricing from the original order, including any manual price adjustments. The new order will not reflect any price changes that have occurred since the original order was created, such as price increases or decreases.
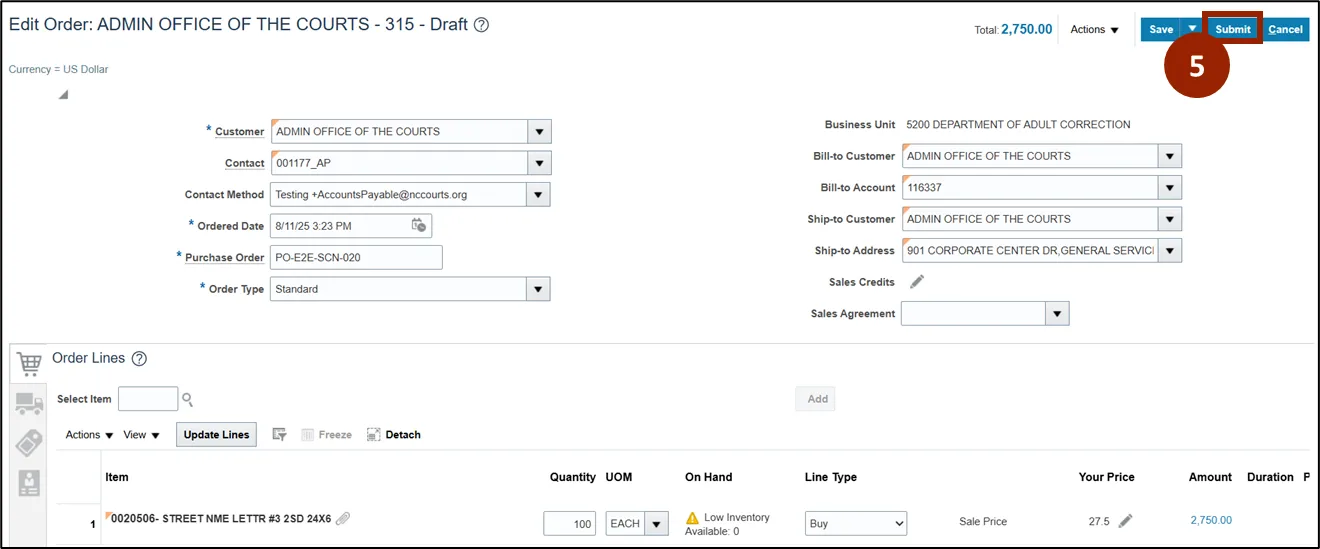
Step 5. Once ready, click Submit.
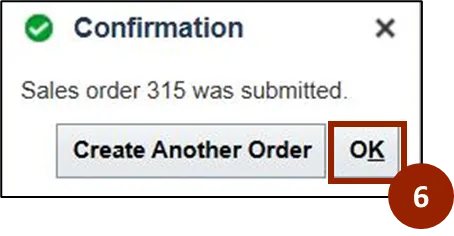
Step 6. The Confirmation window displays confirming the sales order was submitted.
Wrap-Up
NCFS users can follow the steps above to create sales orders within the NCFS system.
Additional Resources
- Instructor Led Training (ILT)
- Web-based Training (WBT)