WebGUI is similar to SAP GUI but has a few notable differences. Some of those differences are listed below.
To proceed to a specific topic, click the corresponding link below:
- Green Check = Enter
- Opening New Sessions
- Services for Object Button
- The Menu Bar is Gone
- Logging Off vs. Closing Tabs
- SAP Business Workplace Looks Different
- Wage Type Reporter & ABAP Runtime Error
In the desktop GUI, you may have used the Green Check button after entering data (like position or personnel numbers).
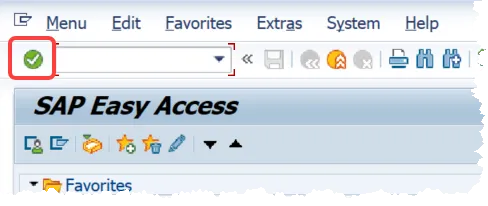
In WebGUI, there is no check button. Instead, simply press the Enter key on your keyboard whenever you would have clicked the Green Check button.
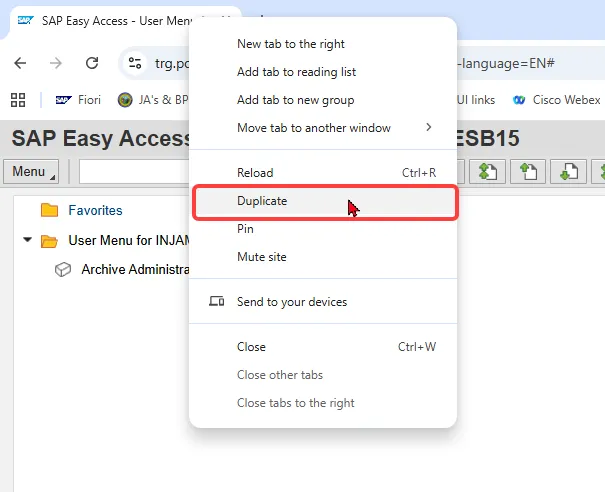
In the desktop SAP GUI, you clicked New GUI Window to open another session (up to six at once).
In WebGUI, that button doesn’t exist. To open a new session, right-click your browser tab and choose Duplicate. There’s no limit on the number of SAP Web GUI tabs, so be careful not to leave too many open at once.
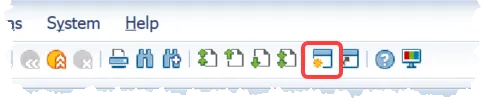
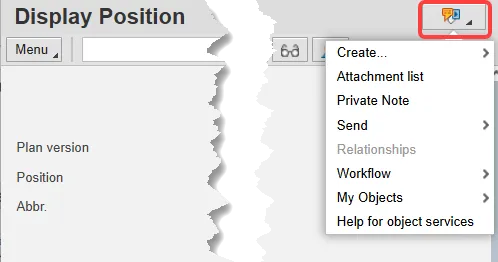
In the desktop SAP GUI, the Services for Object button was in the top left, with options for a toolbar or a dropdown menu.
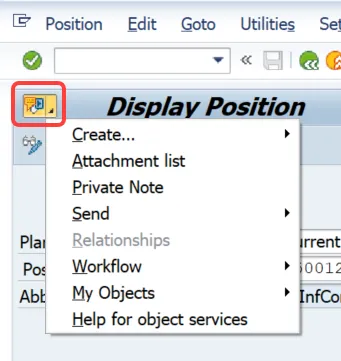
In SAP Web GUI, the button has moved to the top right.
The toolbar option is no longer available, but the dropdown menu works the same as before.
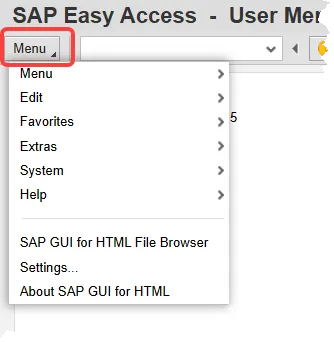
In the desktop SAP GUI, you saw a menu bar across the top with options like Menu, Edit, Favorites, Extras, System, Help.

In SAP Web GUI, these are now grouped under a single Menu button.
Click Menu to access all the same options in one place.
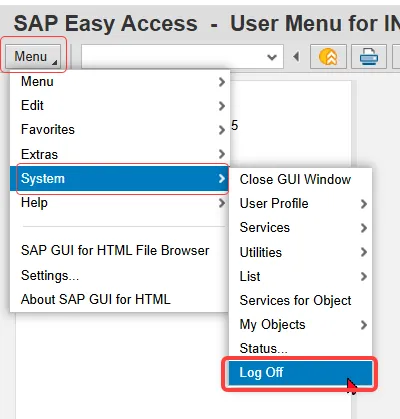
In the desktop SAP GUI, you could log off with the yellow Log Off button or by closing the app window.

In SAP Web GUI, closing a browser tab does not fully log you out — it only closes that tab.
To properly end your session, go to Menu ▸ System ▸ Log Off.
This ensures your session ends and releases any system locks.
SAP Business Workplace Looks Different
In the desktop SAP GUI, your Business Workplace showed extra sections below your PCR list (Description & Objects and Attachments).
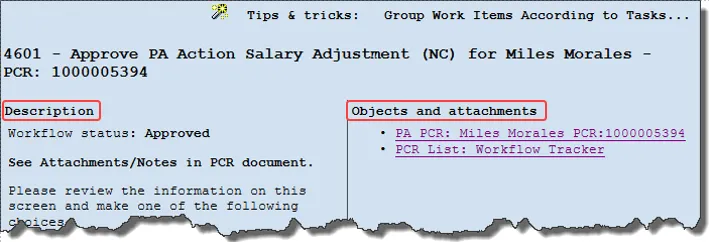
In SAP Web GUI, these sections are no longer visible in the inbox.
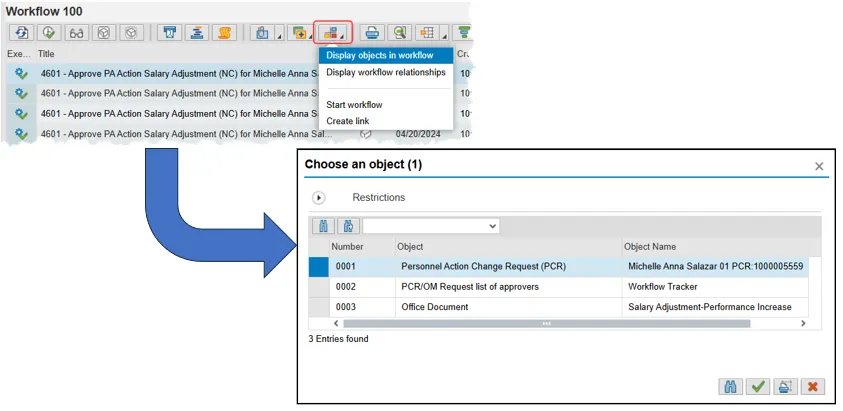
Instead, use the Environment button → Display Objects in Workflow.
A pop-up will give you links to the WF Tracker, WF Header, and any attachments.
Open the WF Tracker to check the current workflow status.
Wage Type Reporter & ABAP Runtime Error
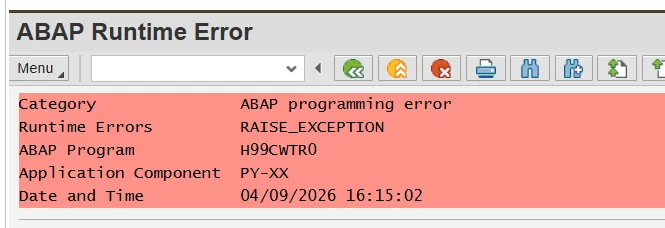
Prior to the switch from desktop SAP GUI to WebGUI, it was possible to run the Wage Type Reporter (SAP transaction PC00_M99_CWTR) with Microsoft Excel selected as the Output.

However, that is not a viable option anymore because Microsoft Office integration with WebGUI is not supported by SAP. So, now you will get an ABAP Runtime Error if you select Microsoft Excel as your Output. With WebGUI, you need to leave the Output selection as the default selection of SAP List Viewer. If you are running a variant, make sure that Microsoft Excel is not saved in it as the Output – if it is, change the selection to SAP List Viewer.
Instructions for Exporting your Data to Excel
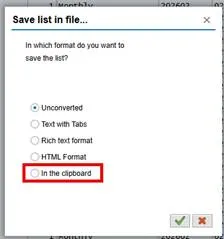
Run the Wage Type Reporter transaction as described above, and then, from your results, select the Local Printer icon (highlighted below).

Now you have two options for exporting your results to Excel.
Option 1:
Select In the Clipboard and the green check.
In a blank Excel spreadsheet, right click in the first cell and select paste.
The data will be unformatted and the first column will be highlighted.
Select Data from the menu and then Text to Columns from the menu.
Select Delimited and Next.
Select Other and in the Other field put the pipe “|” (found on the keyboard key with the back slash) and select finish.
If a pop-up asks if you want to replace data, say Yes.
Option 2:
Instead of selecting In the Clipboard, leave the default selection of Unconverted and select the green check.
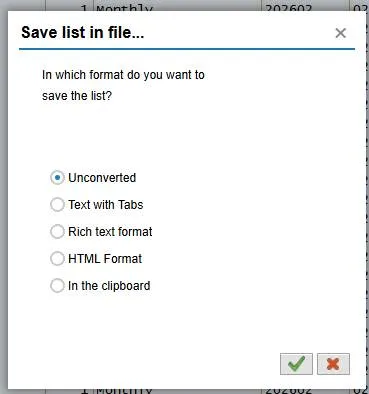
In the next pop-up, add your new file’s name with the file path and change the file format from plain text (.txt) to Excel (.xls ). For example:
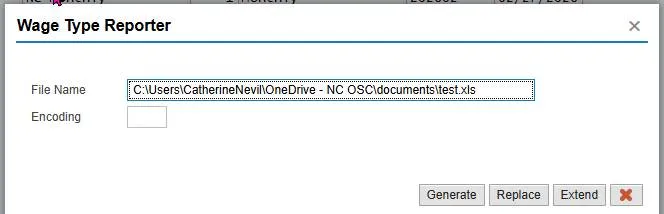
Select Generate.
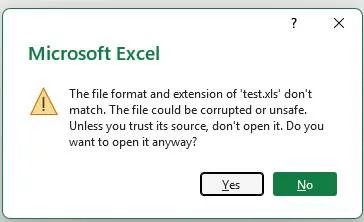
At the next pop-up, select Yes.
The data will be unformatted and the first column will be highlighted.
Select Data from the menu and then Text to Columns from the menu.
Select Delimited and Next.
Select Other and in the Other field put the pipe “|” (found on the keyboard key with the back slash) and select finish.
If a pop-up asks if you want to replace data, say Yes.