Purpose
This help document provides instructions and key considerations for employees transitioning from Desktop GUI printing to WebGUI PDF-based printing. It is intended to help users understand the change from local printer output (such as LOCL) to browser-generated PDF files, recognize differences in printer selection and output behavior, and successfully print documents in the WebGUI environment.
Introduction and Overview
This document outlines the key printing changes users may experience when moving from Desktop GUI to WebGUI, including the transition from local printers to browser-based PDF output. It highlights updates to printer selection and output behavior, and instructions for completing printing tasks in the WebGUI interface.
Printing in WebGUI
Many SAP transactions used by core GUI users include built-in print functionality, ranging from individual employee documents to mass-generated reports and forms. The steps below apply whether you are printing for a single employee or executing a mass print run for multiple employees.
In the WebGUI environment, print output that was previously sent directly to a local printer (such as LOCL) is now generated as a PDF file within the web browser. Users will open the generated PDF and then choose whether to print it to a physical printer or save it locally.
Follow the steps in this section to complete printing tasks in WebGUI regardless of transaction type or print volume. There are 6 steps to complete this process.
Step 1. Initiate Print from the Transaction
- Select the Print option or execute the report within the transaction.
Step 2. Review Print Parameters
- Confirm selection criteria, output format, and other transaction-specific options.
Step 3. Submit the Print Request
- Execute the print or output command.
Step 4. System Generates PDF Output
- The browser opens or downloads a PDF file instead of sending output directly to a local printer.
Step 5. Open the PDF File
- Access the generated file from the browser window or download bar.
Step 6. Print or Save the Document
- Use the PDF viewer to send the document to a physical printer or save it for later use.
Additional Scenario: Printing from Background Jobs and Spool Requests
For mass printing or long-running jobs, users may choose to execute the transaction in the background. When a background job is submitted, the system generates a spool request rather than immediately producing output.
Printing from a spool request in Web GUI follows the same PDF-based process described above. However, users must first access the spool list before selecting a printer.
To print from a background job, please follow the steps below. There are 5 steps to complete this process.
Step 1. Navigate to transaction SPO1 to display spool requests.
Step 2. Locate the applicable spool entry created by the background job.
Step 3. Select the spool request and choose the Print icon.
Step 4. When prompted for printer selection, choose the appropriate PDF output option.
Step 5. The system generates a PDF file in the browser, which can then be printed to a physical printer or saved locally.
This process applies whether the spool was created for a single employee or through a mass print run.
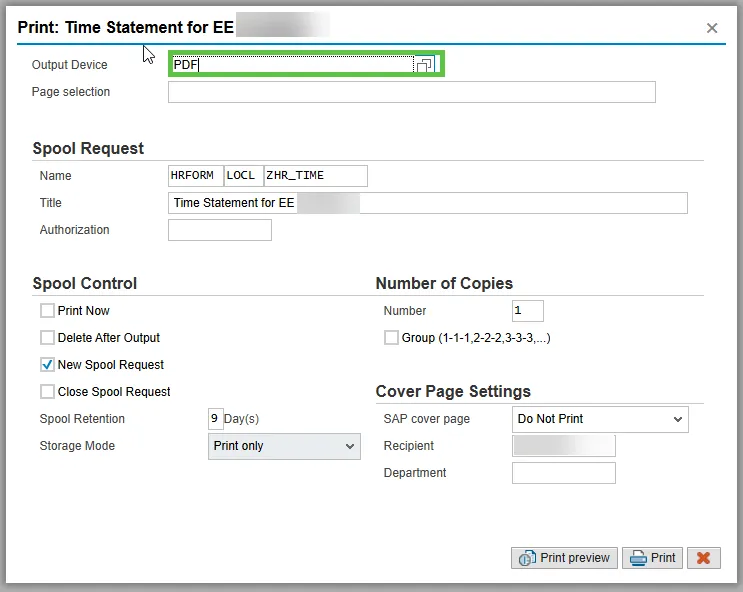
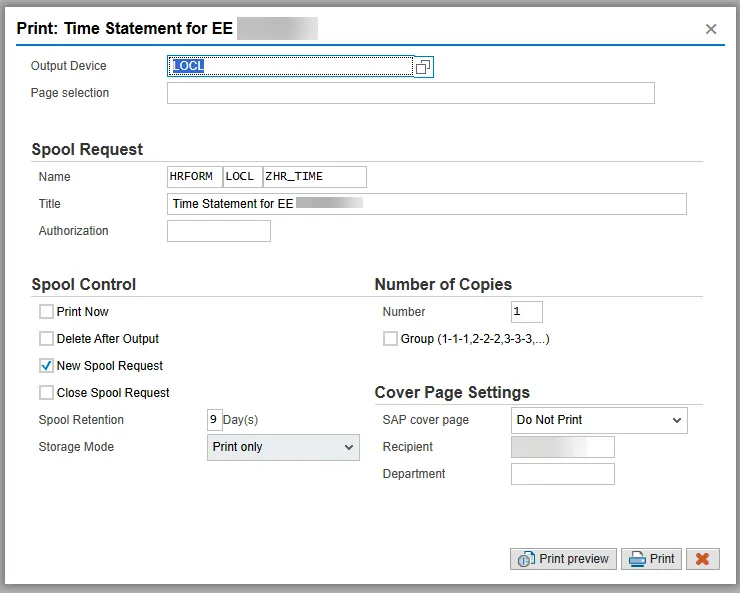
Selecting the Correct Output Device in Web GUI
When printing from Web GUI, the default output device may still display LOCL, which was commonly used in Desktop GUI to send output directly to a local printer. In the Web GUI environment, LOCL is not supported for browser-based printing and must be changed to a PDF output option.
Before submitting the print request, users must update the Output Device field from LOCL to PDF (or the applicable PDF printer configured in the system). This ensures the system generates a browser-based PDF file that can be opened, printed, or saved locally.
Use the screenshots below to identify the Output Device field and confirm the correct selection before continuing.
Print Preview Screen with Default Output Device (LOCL) in Desktop GUI
Output Device Changed to PDF for WebGUI Printing