Purpose
The purpose of this Quick Reference Guide (QRG) is to provide a step-by-step guide of how to conduct the Shipment process in the North Carolina Financial System (NCFS).
Introduction and Overview
This QRG covers the process of Shipment – Plant and Apex. This process provides information on how to manage shipment of items from a plant to a customer, manage the shipment of items from APEX Warehouse to a customer, provide visibility into the status of shipments at each stage of the shipping process and generate and manage necessary shipping documents and reports.
Plant Shipment
Once logged in to NCFS, follow these steps. There are 41 steps to complete this process.
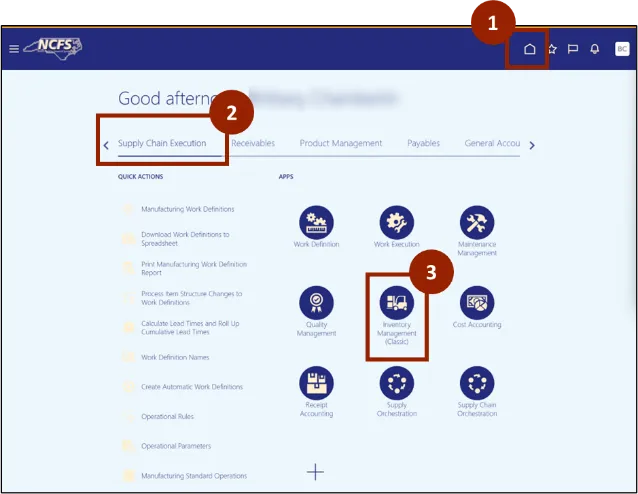
Step 1. Begin from the Home page, or click the Home icon.
Step 2. On the Home page, select Supply Chain Execution.
Step 3. Within the Supply Chain Execution tab, select Inventory Management.
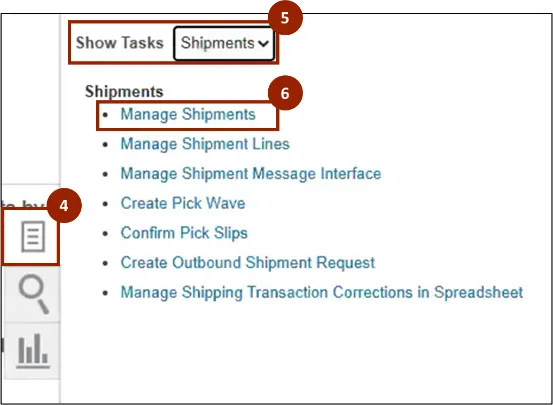
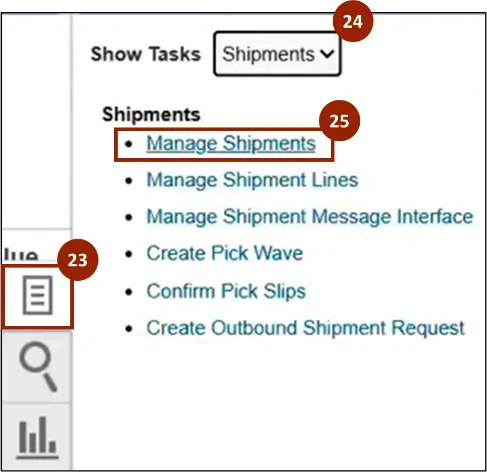
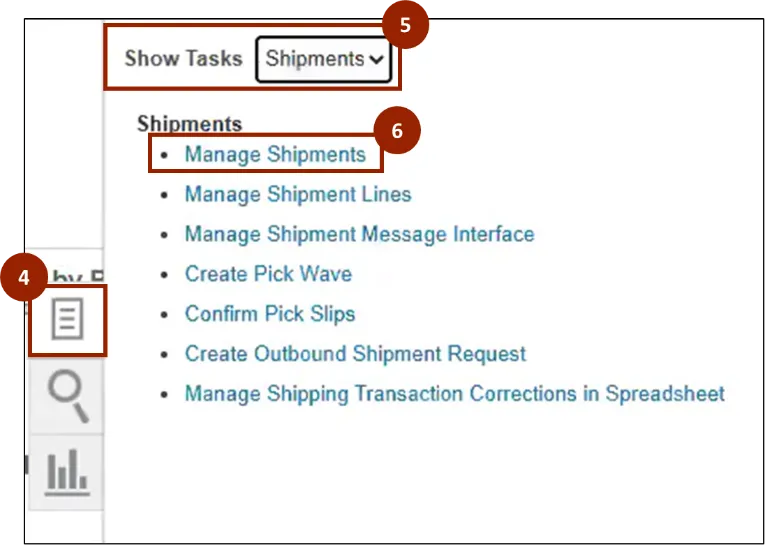
Step 4. Click the Tasks icon.
Step 5. In the Show Tasks field, select Shipments from the drop-down.
Step 6. Select Manage Shipments.
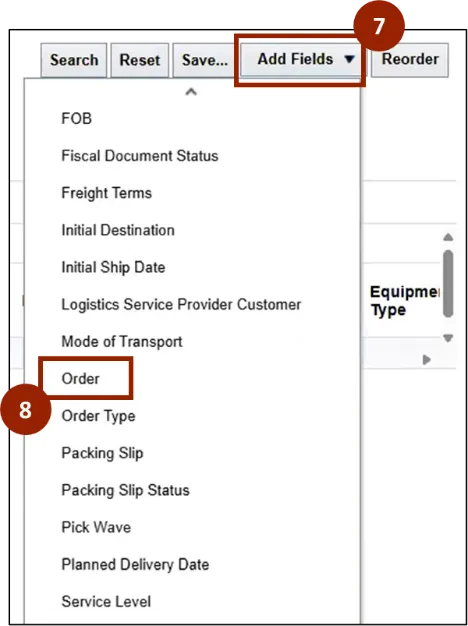
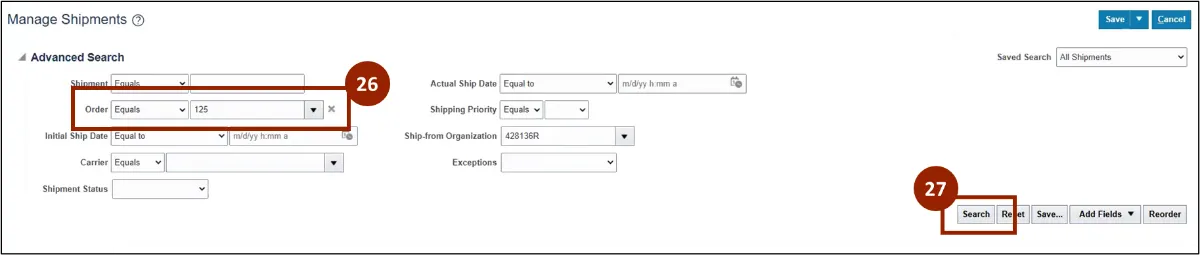
Step 7. Click the Add Fields drop-down.
Step 8. Select Order.
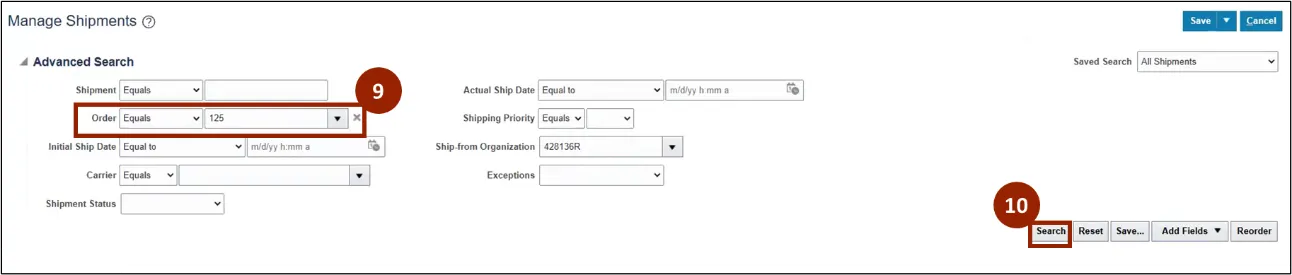
Step 9. Enter the Order Number into the Order drop-down.
Step 10. Click Search.
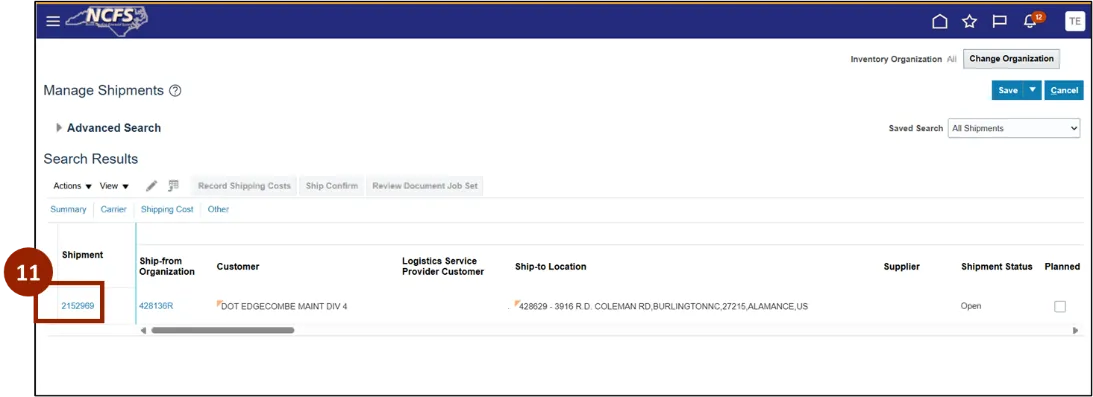
Step 11. Select the shipment number.
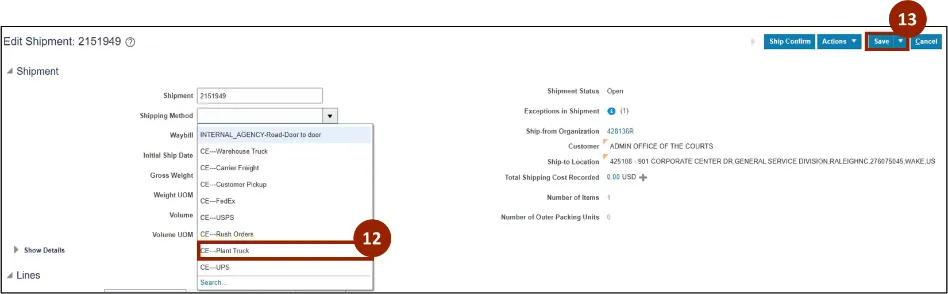
Step 12. Select the appropriate shipping method from the Shipping Method field drop-down.
Step 13. Click Save.
Note: For a plant shipment, you can go through Pick Confirm process once you pick the materials physically from the storage location and move it to the staging area within the plant. Run the Pick Release Rule.
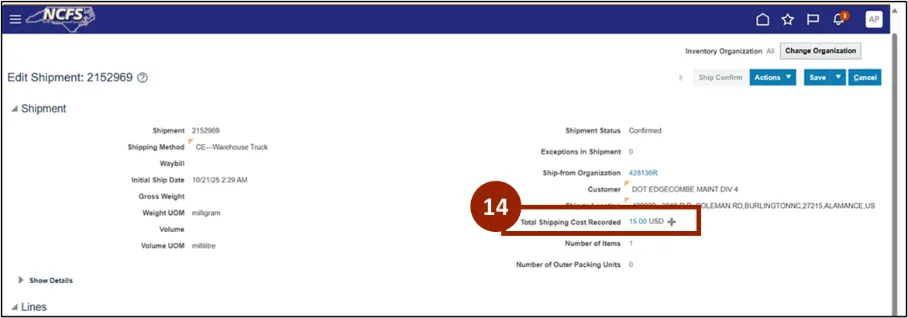
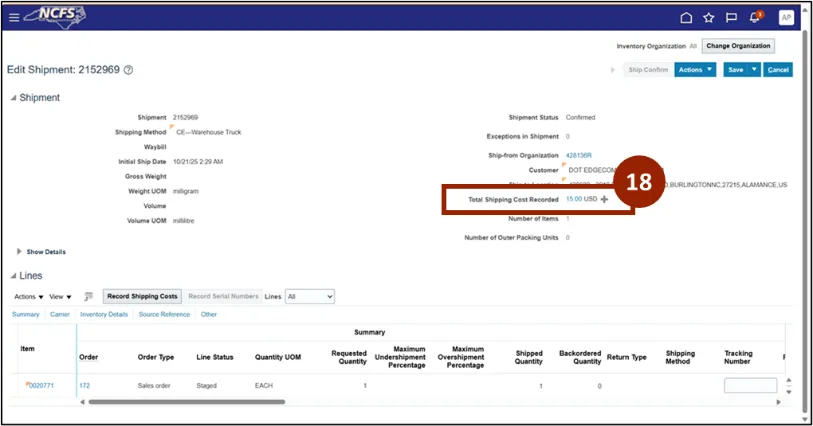
Step 14. On the Edit Shipment screen, click the Plus (+) icon in the Total Shipping Cost Recorded field.
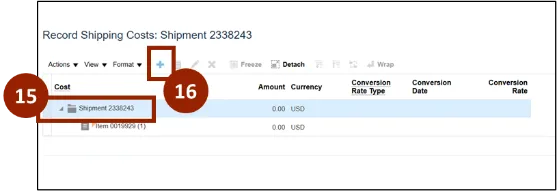
Step 15. The Record Shipping Costs window appears, select the Shipment number.
Step16. Click the Plus (+) icon.
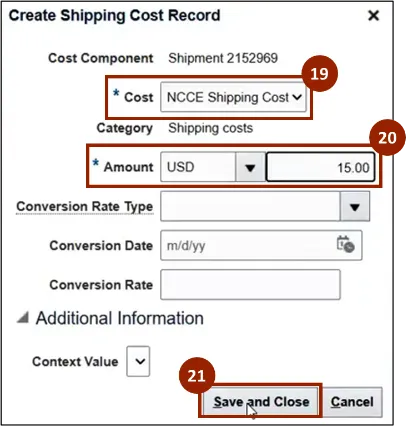
Step 17. The Create Shipping Cost Record pop-up window will appear. In the Cost drop-down, select NCCE Shipping Cost.
Step 18. In the Amount field, enter the shipping amount.
Step19. Click Save and Close.

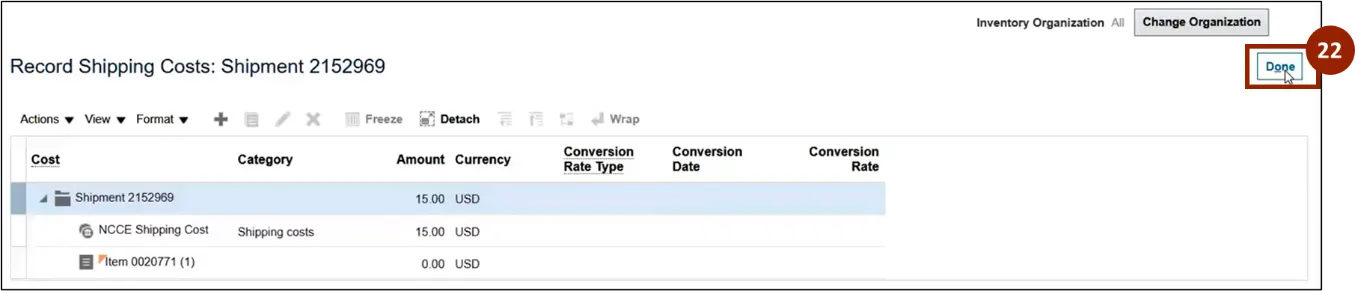
Step 20. On the Record Shipping Cost screen, you will now see the NCCE Shipping Cost amount. Click Done.
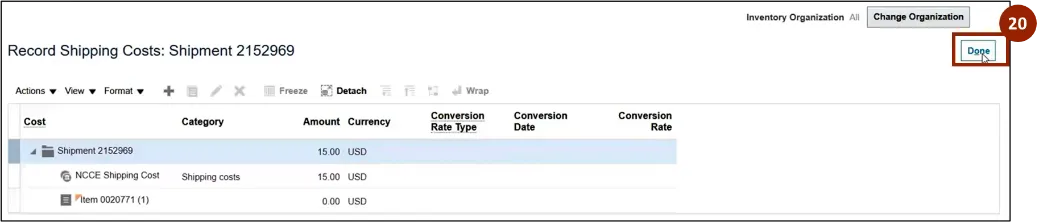
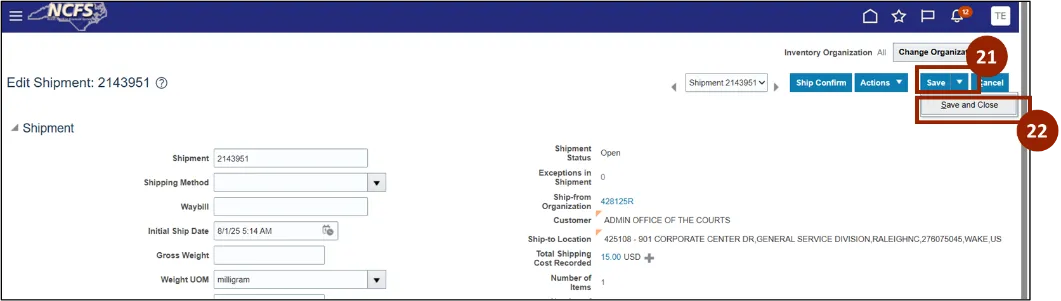
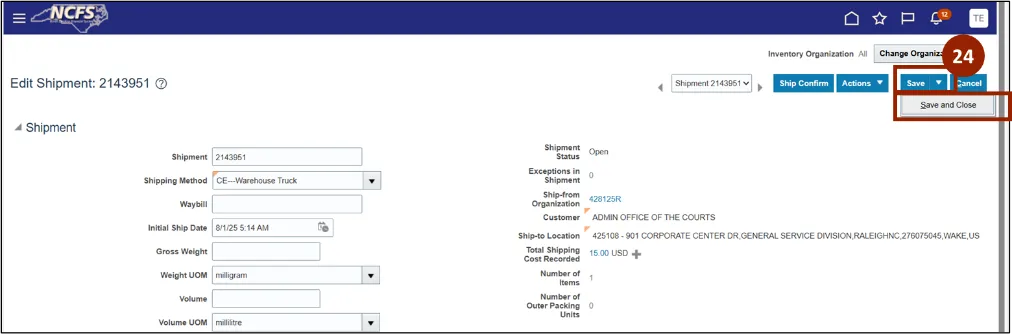
Step 21. Review the information in each line for accuracy. Click the Save drop-down.
Step 22. Click Save and Close.
Step 23. Once you save and close, you return to the Inventory Management Home screen. Click the Tasks icon.
Note: For repair and Return orders, once the Plant/APEX receives the order at the plant, there is no need to perform Ship Confirm for the RMA order shipment lines. Once receiving is completed, the RMA shipment line will be automatically closed.
Step 24. Select Shipments from the Show Tasks drop-down.
Step 25. Select Manage Shipments.
Step 26. In the Order field, enter the order number or shipment order.
Step 27. Select Search.
Step 28. Once plant is ready to deliver to the customer, select the Shipment.
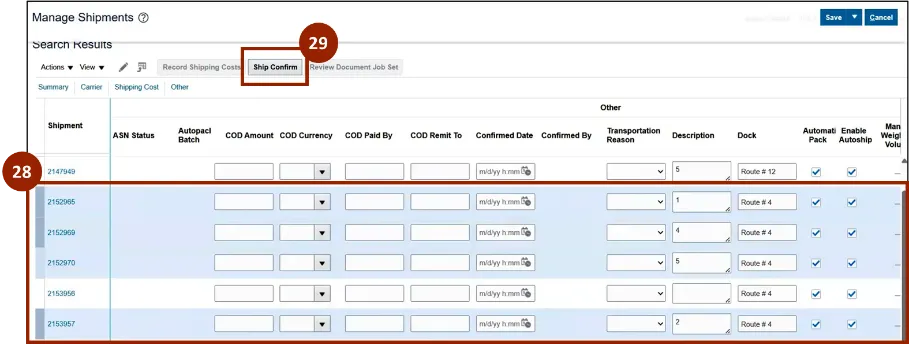
Step 29. Click Ship Confirm.
Step 30. A Confirmation pop-up will appear. Click OK.

Step 31. Select Actions drop-down.
Step 32. Select Reopen.
Note: This is for a specific shipment line versus multiple.

Step 33. Once you reopen you will return to the Inventory Management Home screen. Click the Tasks icon.
Step 34. Select Shipments from the Show Tasks drop-down.
Step 35. Select Manage Shipments.

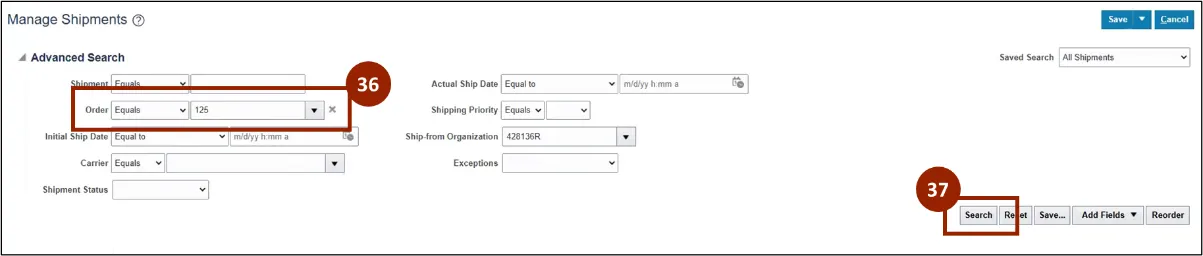
Step 36. In the Order field, enter the order number or shipment order.
Step 37. Select Search.
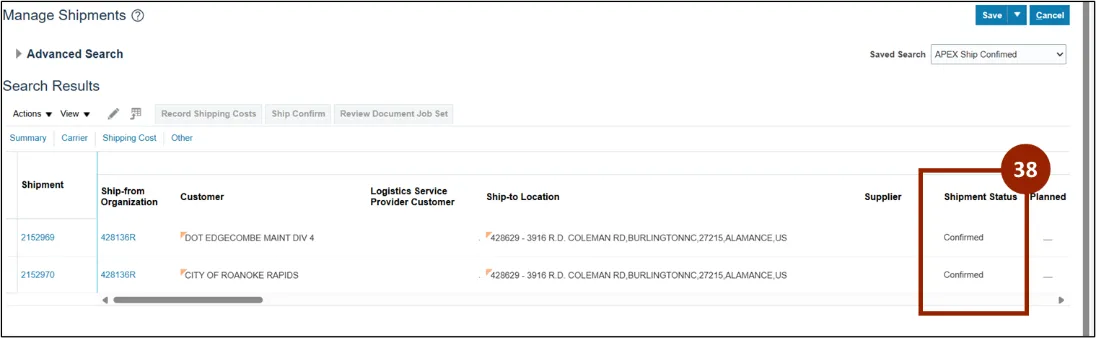
Step 38. The orders appear on the Search Results screen. Shipment status should say Confirmed.
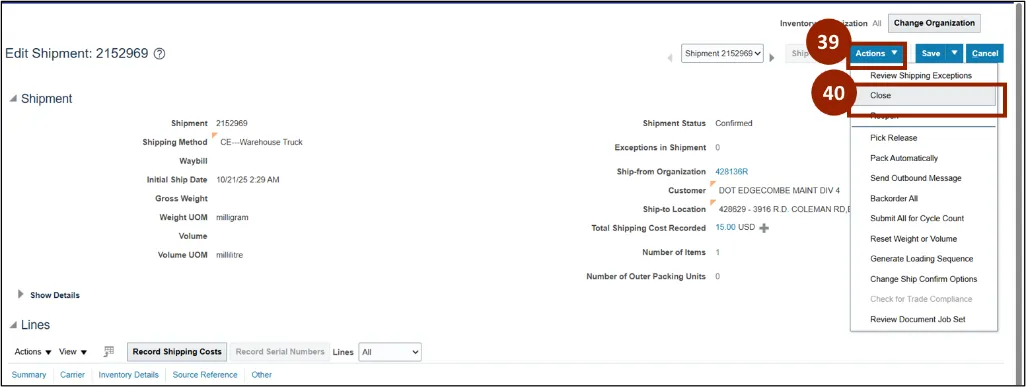
Step 39. Select Actions drop-down.
Step 40. Select Close.
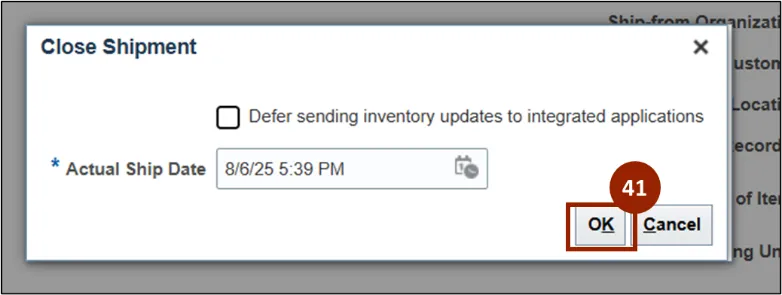
Step 41. The Close Shipment notification appears, select OK.
APEX Shipment – Pre-Shipment Reports
Once logged in to NCFS, follow these steps. There are 16 steps to complete this process.
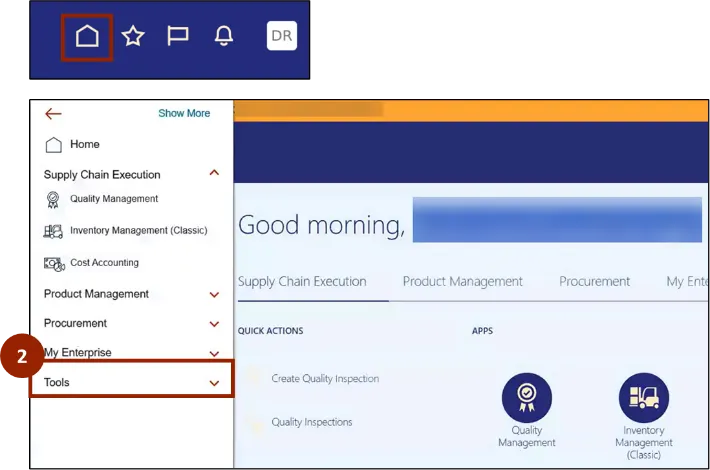
Step 1. Click the Home icon.
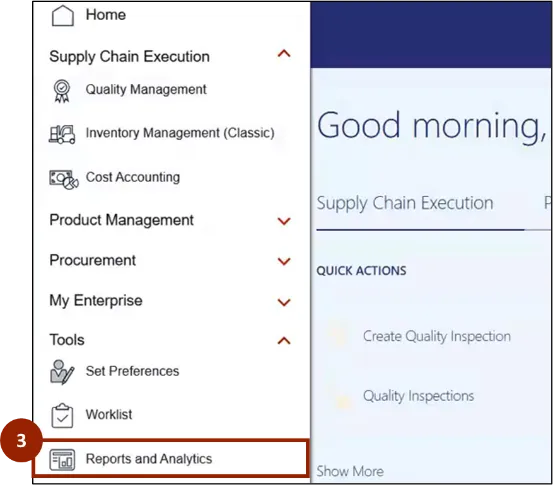
Step 2. Within the Navigator, click Tools.
Step 3. Select Reports and Analytics.
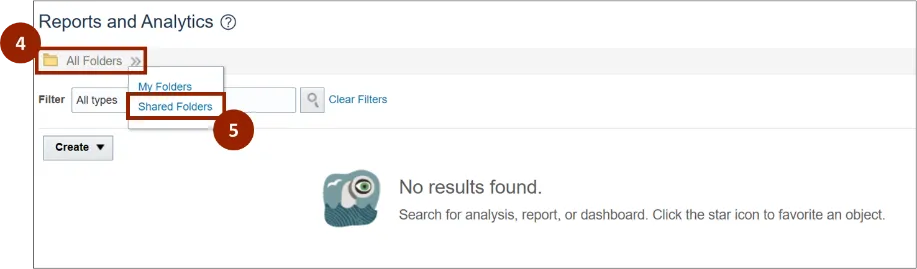
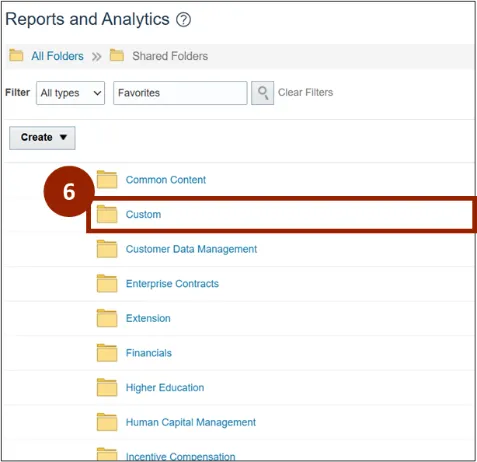
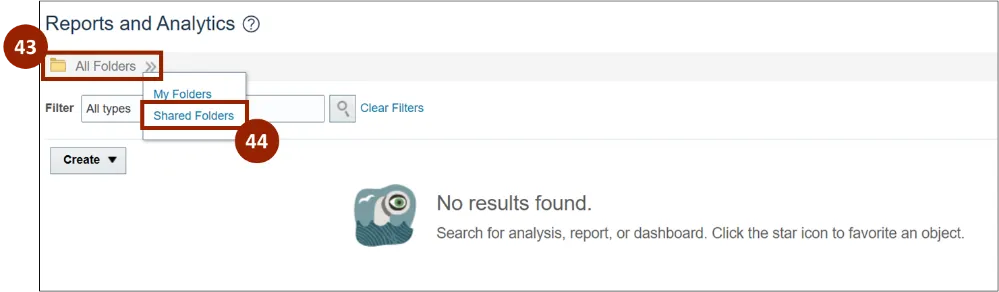
Step 4. Click the All Folders drop-down menu.
Step 5. Select Shared Folders.
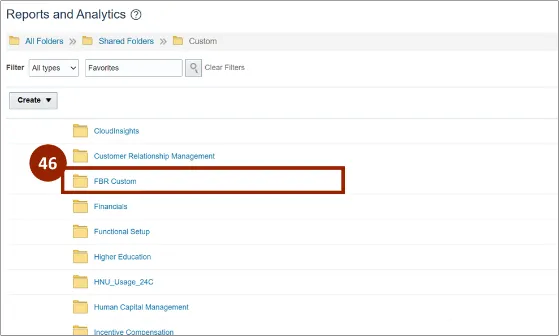
Step 6. Click the Custom folder.
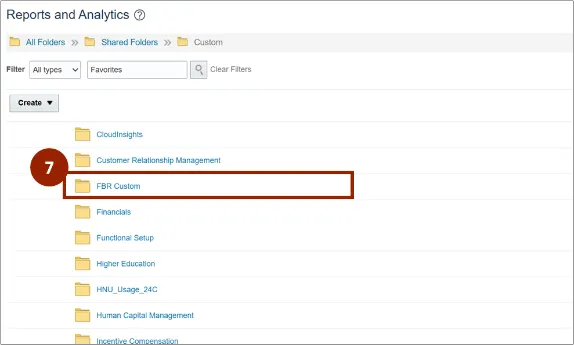
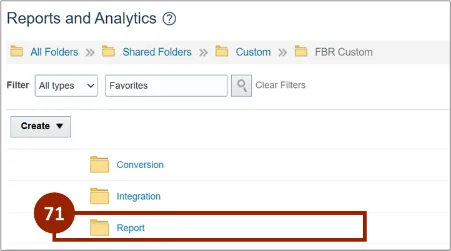
Step 7. Click the FBR Custom folder.
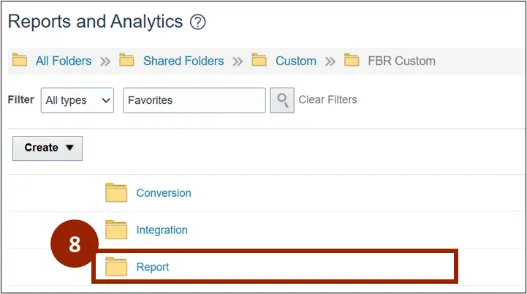
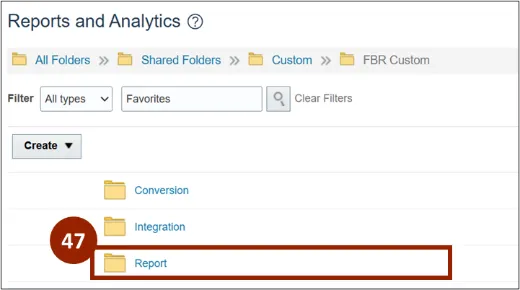
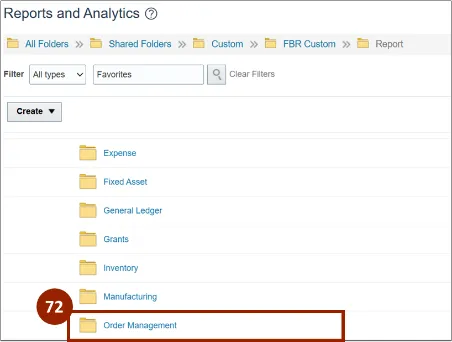
Step 8. Click the Report folder.
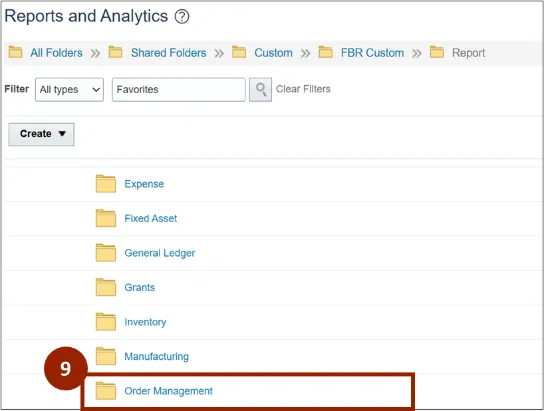
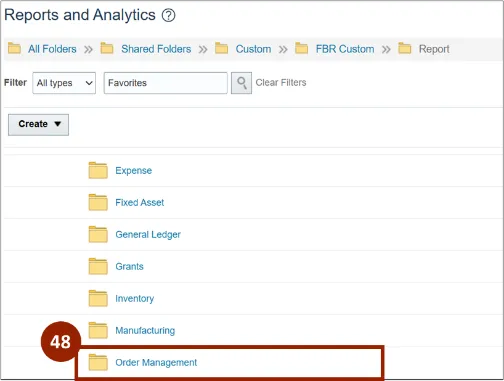
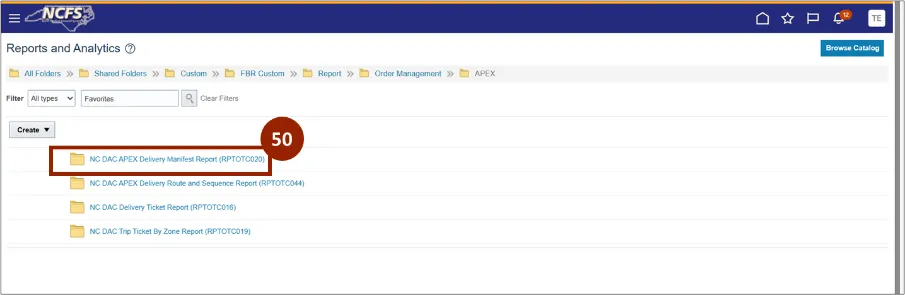
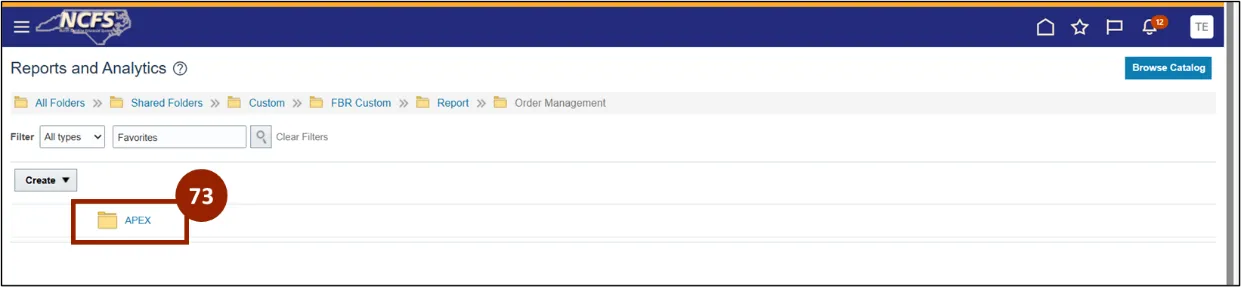
Step 9. Click the Order Management folder.
Step 10. Select APEX.
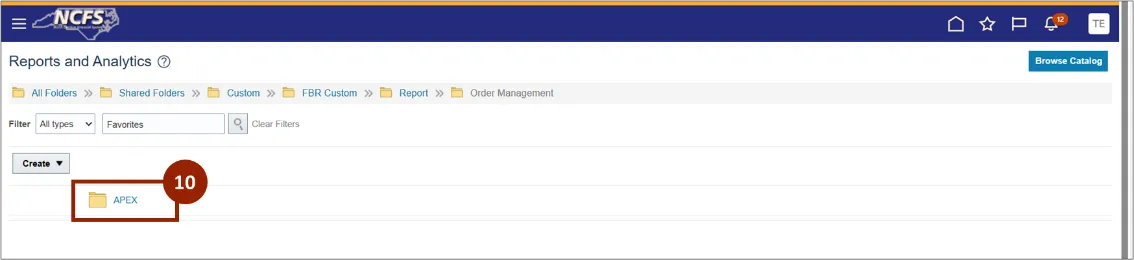
Step 11. Select the NC DAC APEX Delivery Route and Sequence Report (RPTOTC044).
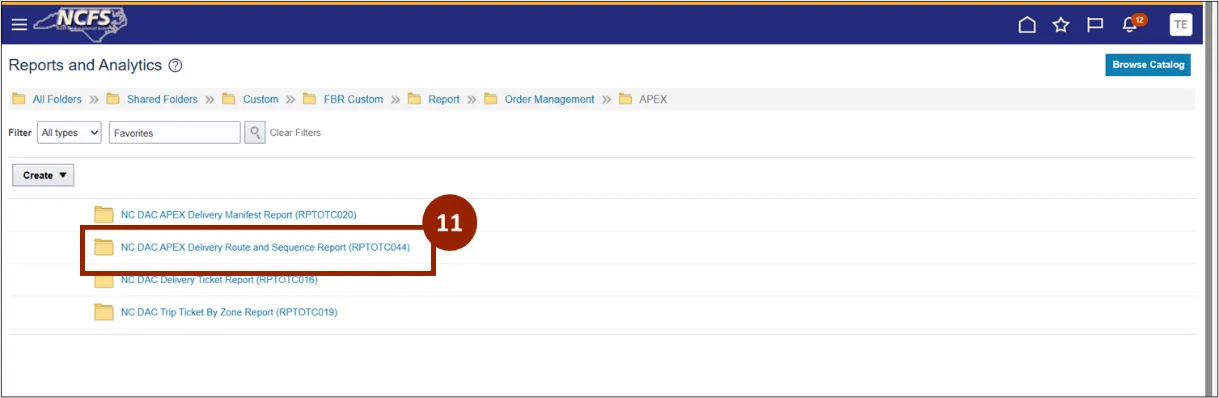
Step 12. Select the NC DAC APEX Delivery Route and Sequence Report (RPTOTC044).
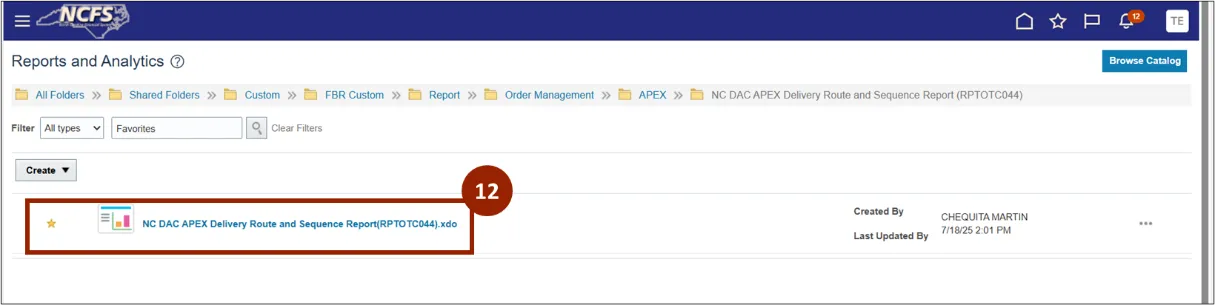
Step 13. The NC DAC APEX Delivery Route and Sequence Report (RPTOT044) displays and gets updated on shipment.
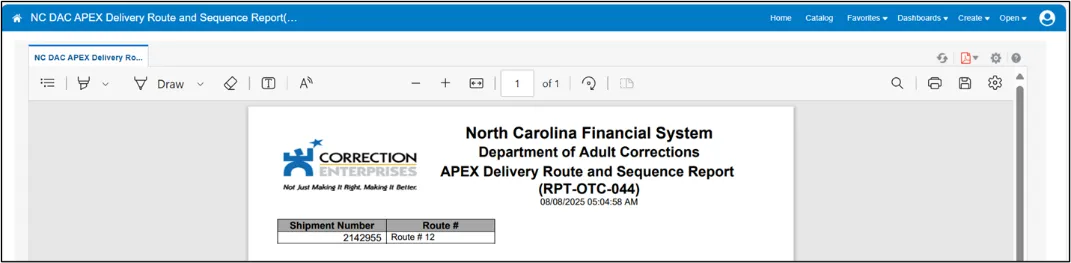
Step 14. The interface will update the shipment route information in the Dock field as per the report NC DAC APEX Delivery Route and Sequence Report (RPTOT044).
Note: Once route is updated Shipment will no longer be visible in the report.

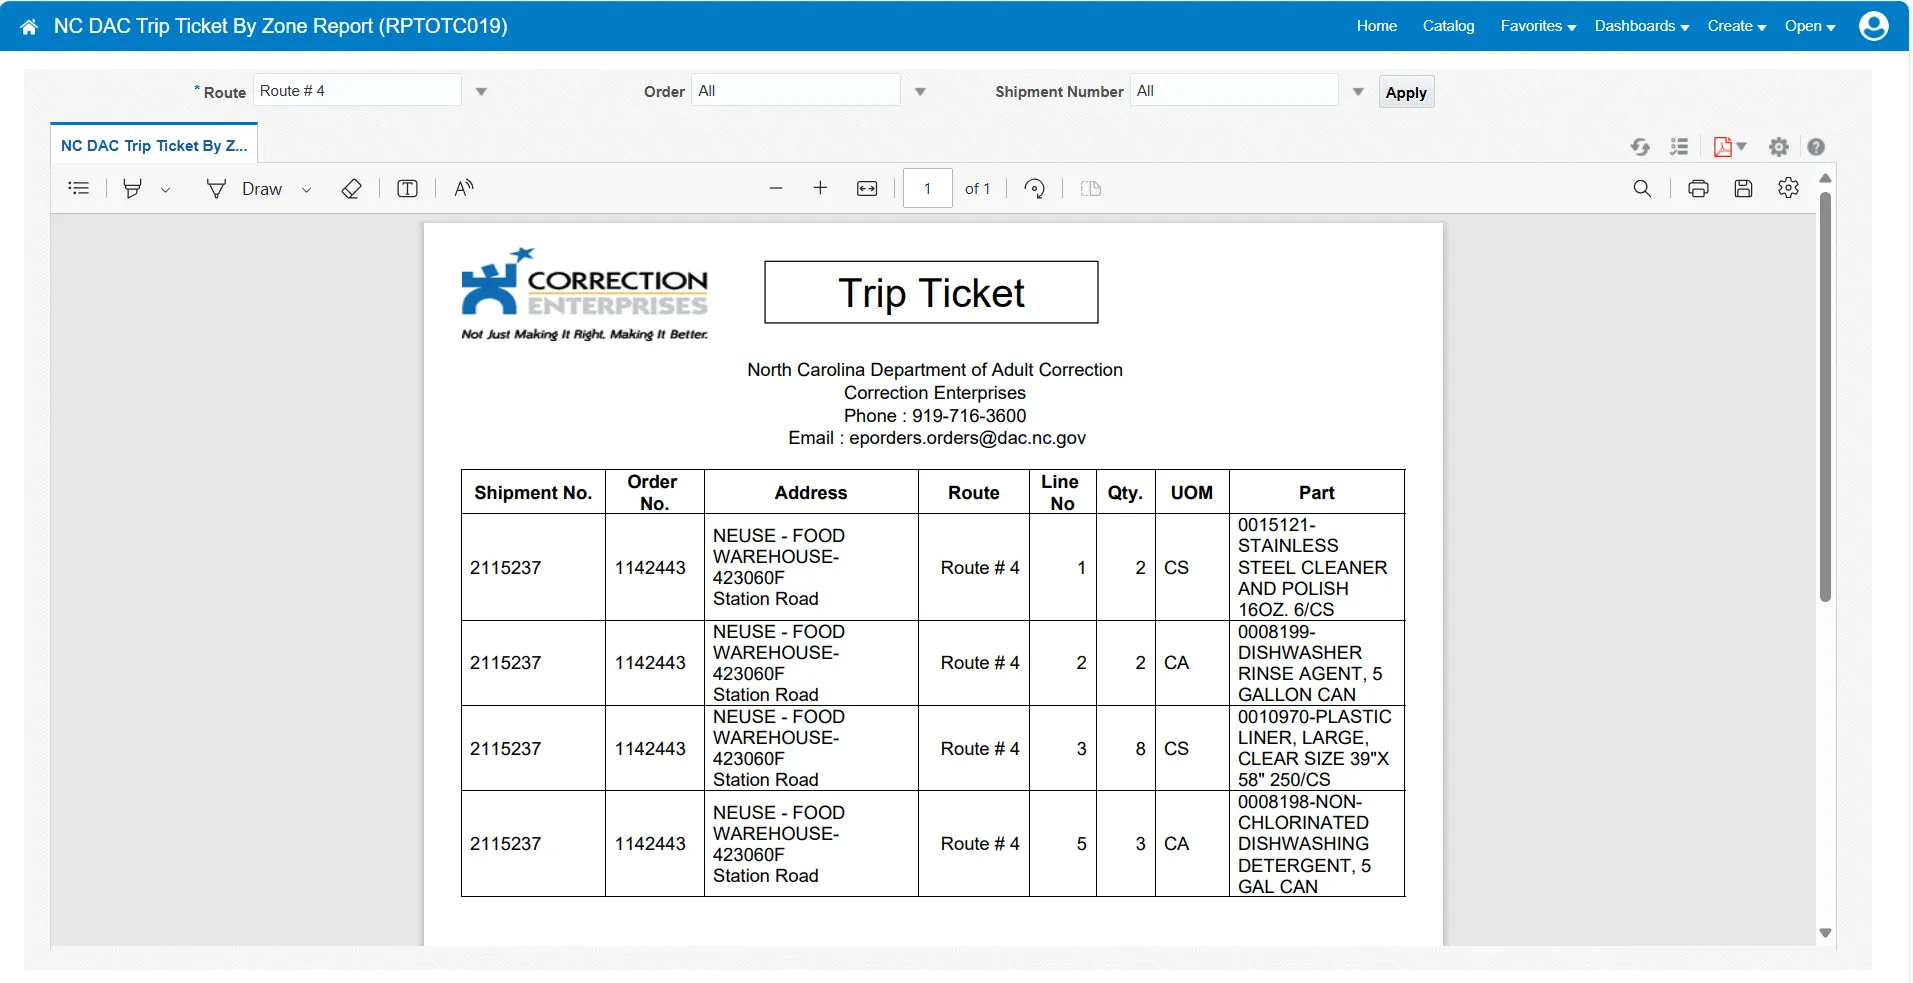
Step 15. Once you are done viewing the report, the Report and Analytics page displays. Select the NC DAC Trip Ticket Zone Report (RPTOTC019).
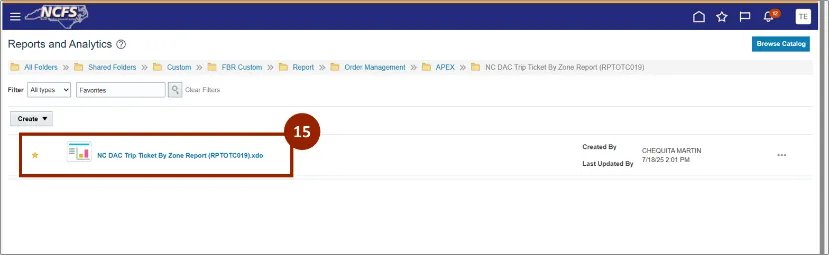
Step 16. The NC DAC Trip Ticket Zone Report (RPTOTC019) displays.
APEX Shipment
Once logged in to NCFS, follow these steps.
The APEX Shipment process is comprised of five sub processes:
- APEX Shipment
- Record Shipping Costs
- Packing and Shipping Instructions
- Reopening a shipment
- Closing a shipment
APEX Shipment
Once logged in to NCFS, follow these steps. There are 16 steps to complete this process.
Step 1. Begin from the Home page, or click the Home icon.
Step 2. On the Home page, select Supply Chain Execution.
Step 3. Within the Supply Chain Execution tab, select Inventory Management.

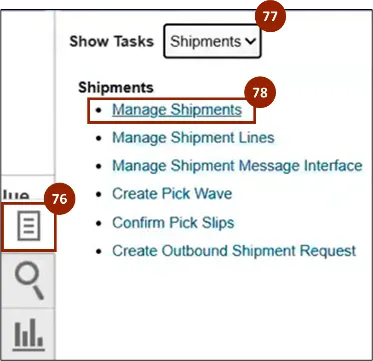
Step 4. Click the Tasks icon.
Step 5. In the Show Tasks field, select Shipments from the drop-down.
Step 6. Select Manage Shipments.
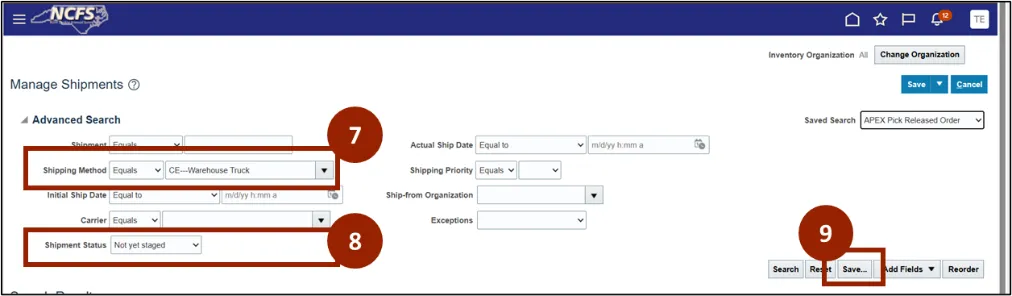
Step 7. In the Shipping Method drop-down, select CE-Warehouse Truck. Pick Released Shipments that are ready for APEX warehouse will be visible by the search results once the field is added to the search form.
Step 8. In the Shipment Status drop-down, select Not yet staged.
Step 9. Click Save.
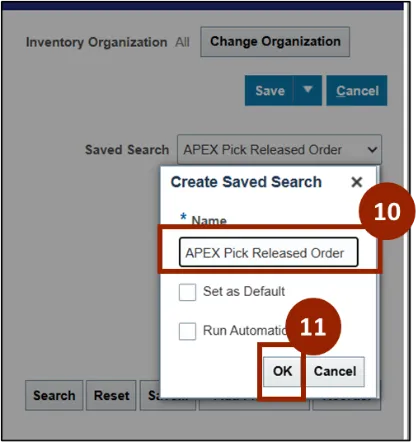
Step 10. Once you select Save, the Create Saved Search notification appears. Save as APEX Pick Released Order.
Step 11. Click OK.
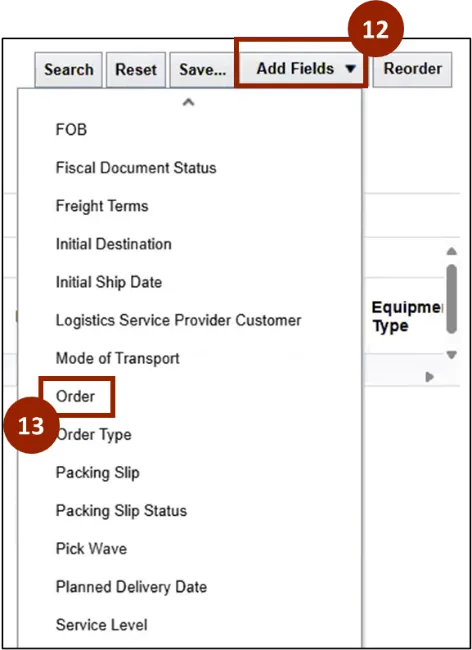
Step 12. Click the Add Fields drop-down.
Step 13. Select Order.
Note: These steps are used to search for an order number. Have the necessary order information available before beginning.
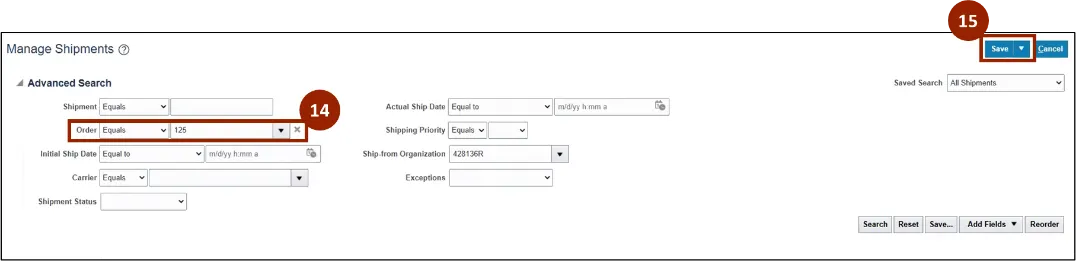
Step 14. Enter the Order Number into the Order drop-down.
Step 15. Click Save.
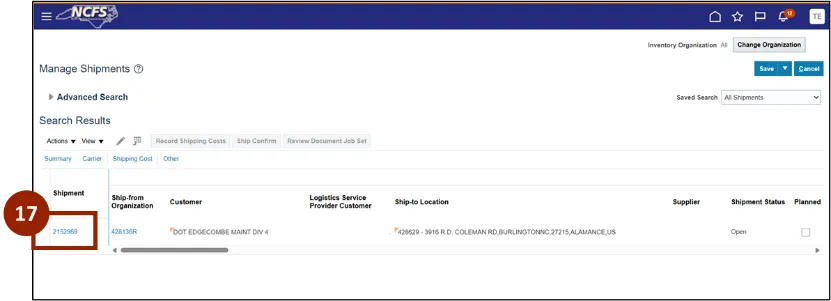
Step 16. The search results displays the shipment for the order.

Record Shipping Costs
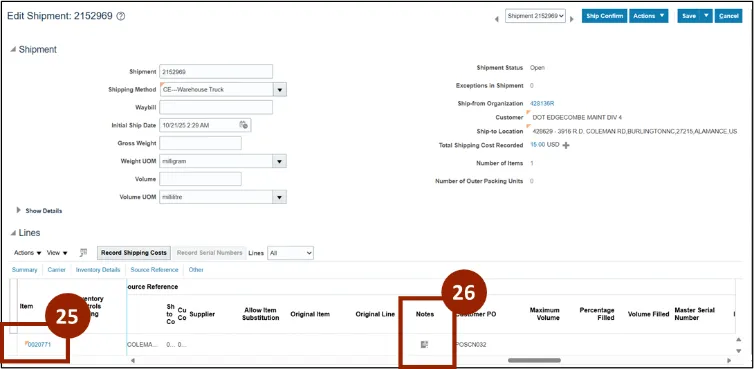
Step 17. Select the shipment number.
Step 18. On the Edit Shipment screen, click the Plus (+) icon in the Total Shipping Cost Recorded field.
Note: The line needs to be selected prior to clicking record shipping cost button.
Step 19. The Create Shipping Cost Record pop-up window will appear. In the Cost drop-down, select NCCE Shipping Cost.
Step 20. In the Amount field, enter the shipping amount.
Step 21. Click Save and Close.
Step 22. On the Record Shipping Cost screen, you will now see the NCCE Shipping Cost amount. Click Done.
Step 23. Review the information in each line for accuracy. Click the Save drop-down.
Step 24. Click Save and Close.
Packing and Shipping Instructions
Step 25. To enter shipping and packing instructions click on the shipment line.
Step 26. Select the Notes icon.
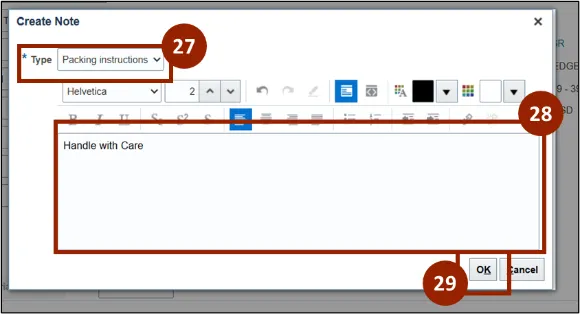
Step 27. The Create Note notification appears, in the Type drop-down select Packing instructions.
Step 28. Enter appropriate packing and shipping instructions in the notes section.
Step 29. Click OK.
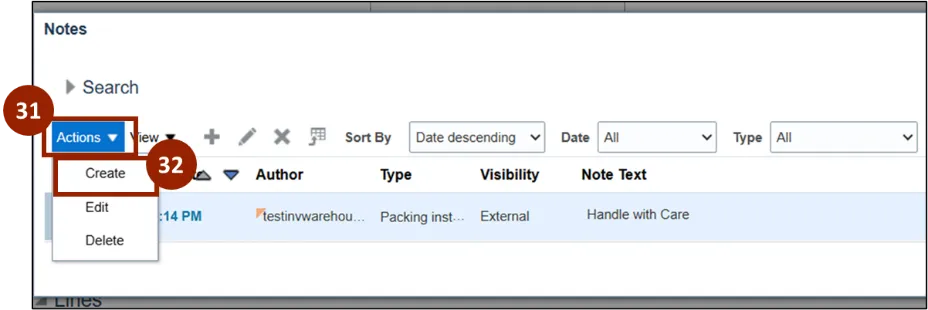
Step 30. To add additional instructions, click on the notepad icon in the Notes column.
Step 31. Click the Actions drop-down.
Step 32. Select Create.
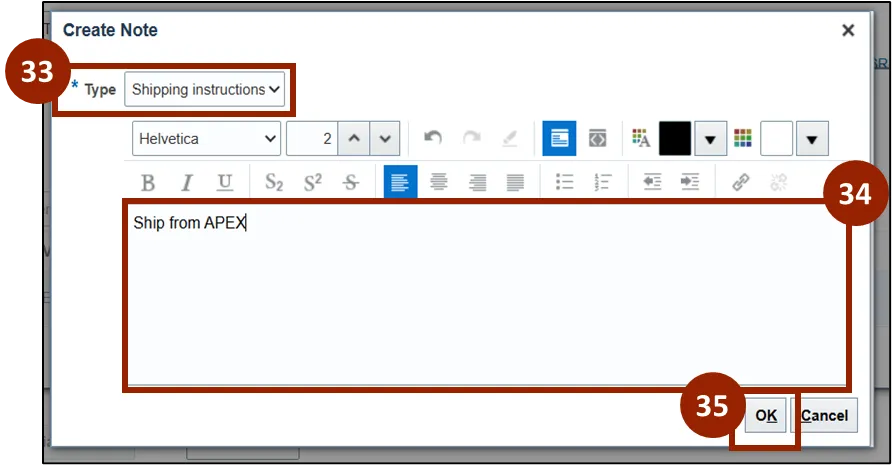
Step 33. The Create Note notification appears, In the Type drop-down select Shipping Instructions.
Step 34. Enter appropriate shipping notes.
Step 35. Click OK.
Step 36. After adding the instructions, they will display in the Search section.
-
These instructions will be printed on the APEX Manifest and Pick List report
Image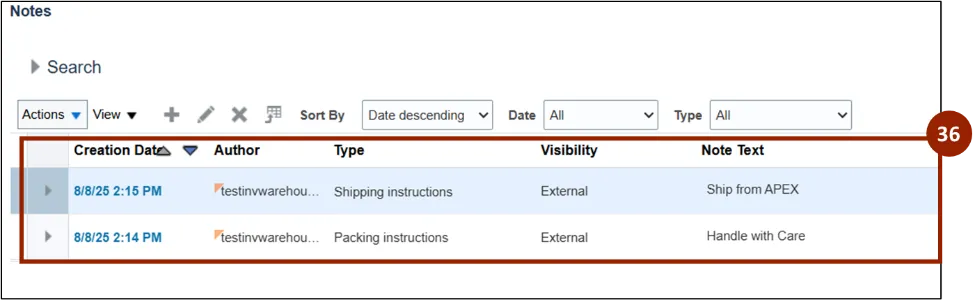
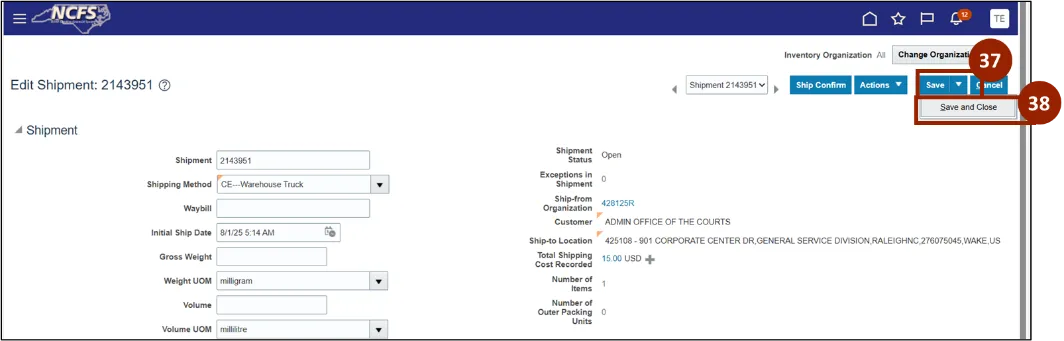
Step 37. Review the information in each line for accuracy. Click the Save drop-down.
Step 38. Click Save and Close.
APEX Shipment
Once logged in to NCFS, follow these steps.
Step 39. Begin from the Home page, or click the Home icon.
Step 40. On the Home page, click the Navigator icon.
Step 41. Within the Menu, click Tools.
Step 42. Select Reports and Analytics.

Step 43. Click the All Folders drop-down menu.
Step 44. Select Shared Folders.
Step 45. Click the Custom folder.

Step 46. Click the FBR Custom folder.
Step 47. Click the Report folder.
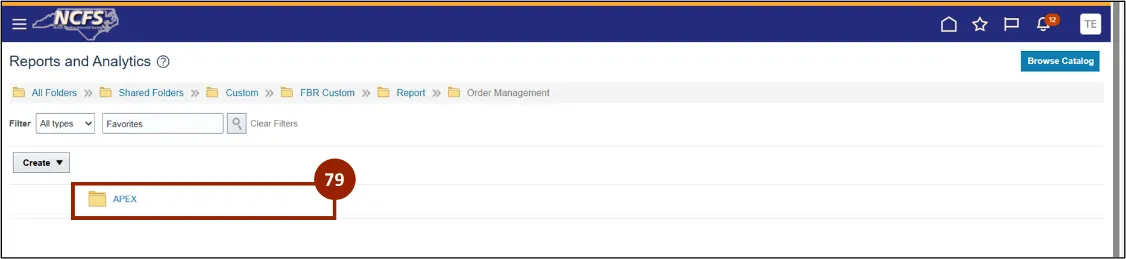
Step 48. Click the Order Management folder.
Step 49. Select APEX.
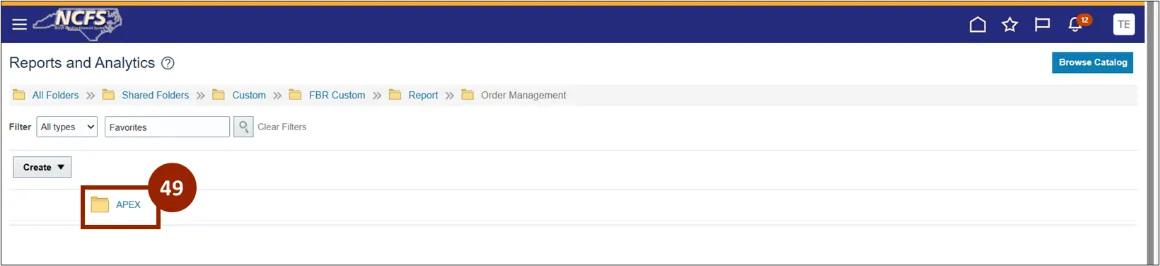
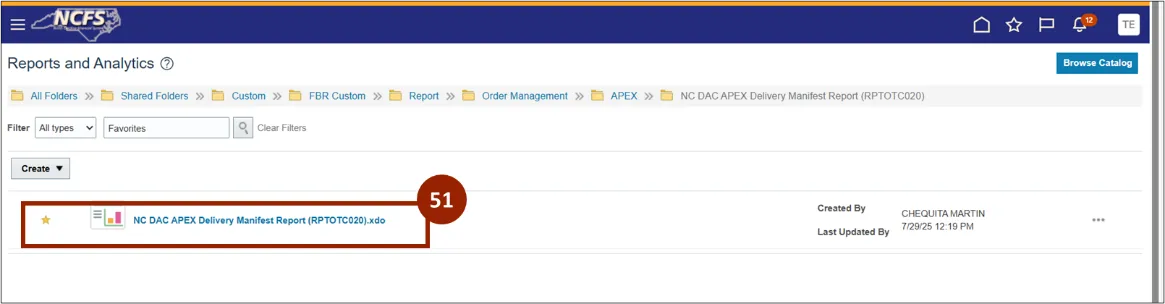
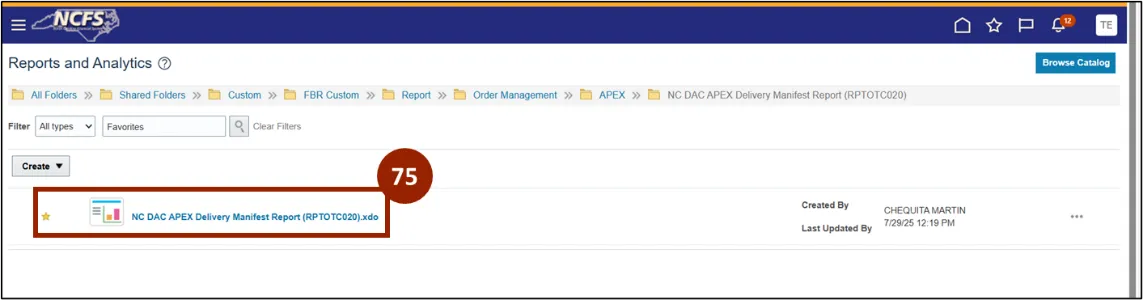
Step 50. Select the NC DAC APEX Delivery Manifest Report (RPTOTC020).
Step 51. Select the NC DAC APEX Delivery Manifest Report (RPTOTC020).
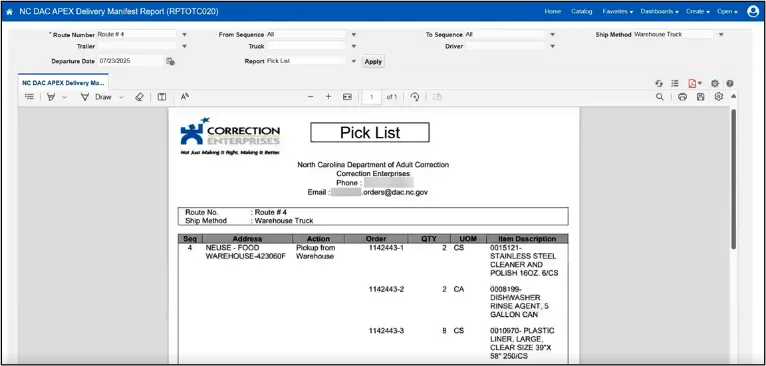
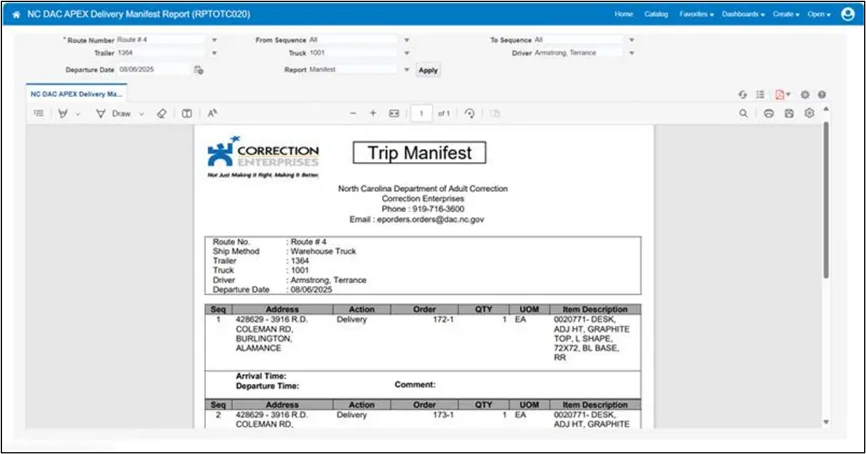
Step 52. In the Route Number field, enter the route number.
Step 53. In the Report field, select Pick List.
Step 54. Click Apply.
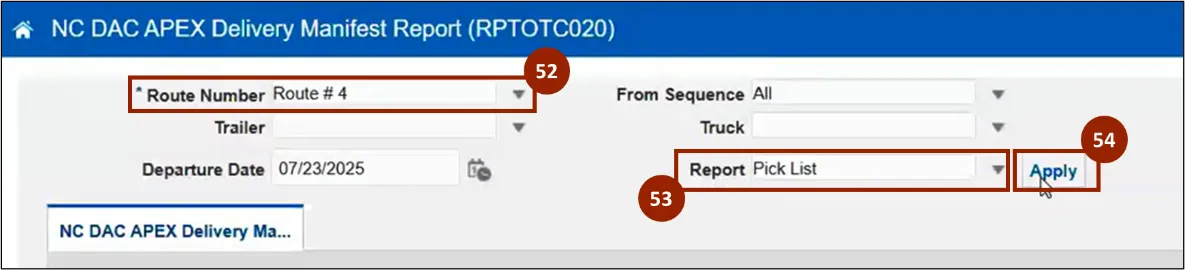
Note: The Pick List Report will show information about transfer orders or sales orders for that particular route (i.e., sequence numbers, addresses, etc.) in a reverse sequence. The APEX team will load the truck based on this report.
Step 55. Once all the orders have been confirmed, return to the Inventory Management Home screen, click the Tasks icon.
Note: For repair and Return orders, once the Plant/APEX receives the order at the plant, there is no need to perform Ship Confirm for the RMA order shipment lines. Once receiving is completed, the RMA shipment line will be automatically closed.
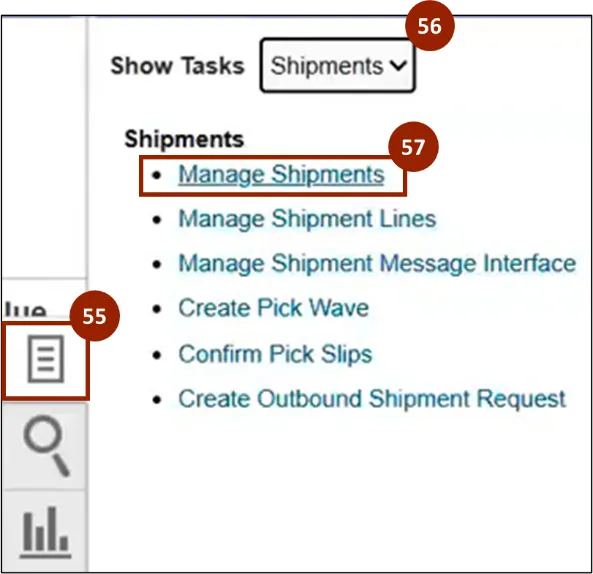
Step 56. Select Shipments from the Show Tasks drop-down.
Step 57. Select Manage Shipments.
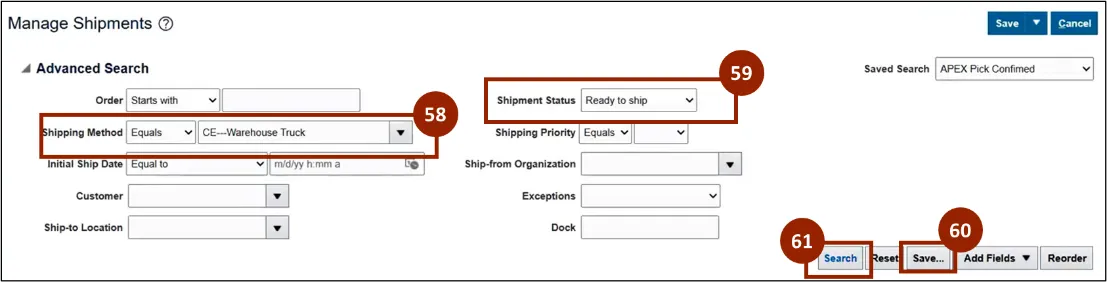
Step 58. Pick confirmed orders will be visible by the search results. In the Shipping Method drop-down, select CE-Warehouse Truck.
Step 59. In the Shipment Status drop-down, select Ready to Ship.
Step 60. Save this search for future references by clicking Save.
Step 61. Click Search.
Note: The Description field will be manually updated with the sequence number by the APEX Warehouse team.
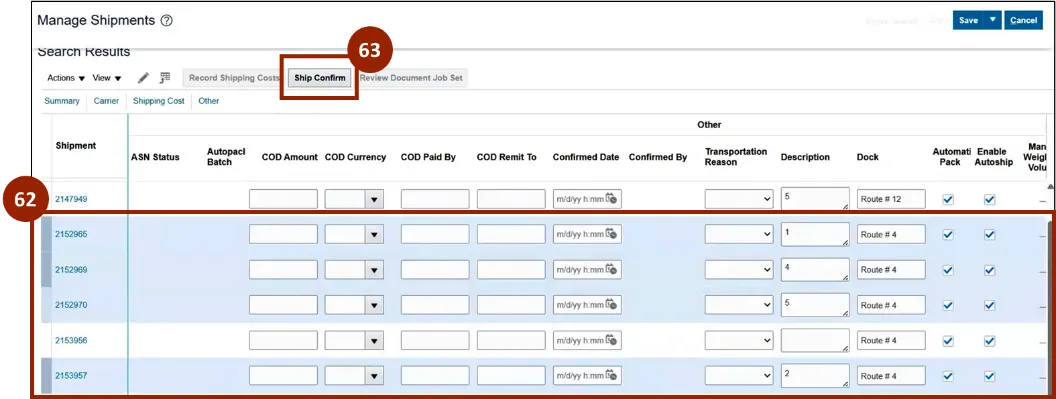
Step 62. The shipments appear on the Search Results screen. Select the shipments that APEX is ready to deliver to the customer.
Step 63. Click Ship Confirm.
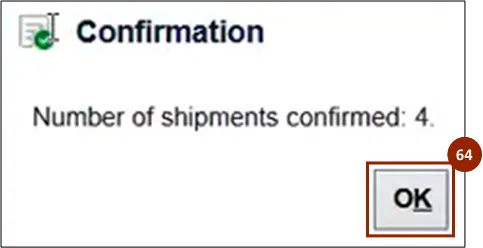
Step 64. A Confirmation pop-up will appear, click OK.
Step 65. Begin from the Home page, or click the Home icon.
Step 66. On the Home page, click the Navigator icon.
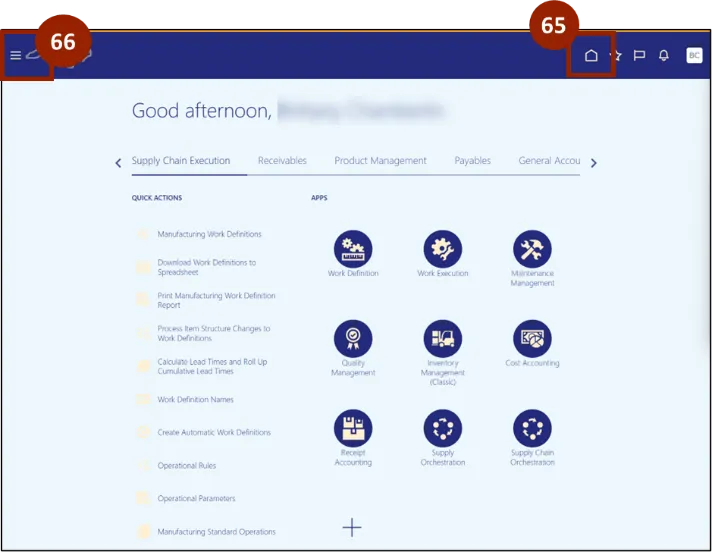
Step 67. Within the Menu, click Tools.
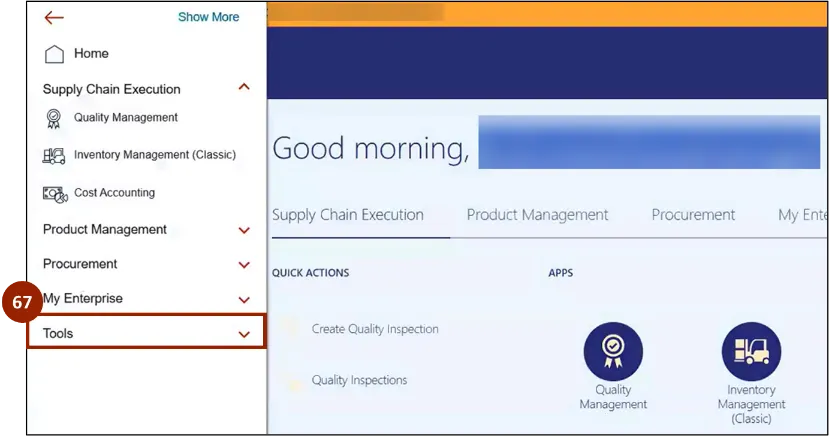
Step 68. Select Reports and Analytics.

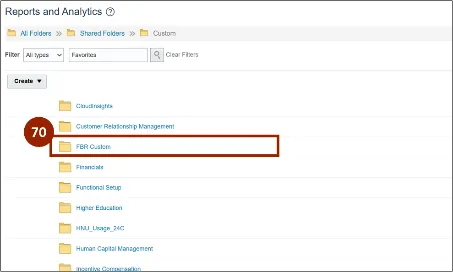
Step 69. Click the Custom folder.

Step 70. Click the FBR Custom folder.
Step 71. Click the Report folder.
Step 72. Click the Order Management folder.
Step 73. Select APEX.
Step 74. Select APEX Delivery Manifest Report (RPTOTC020).
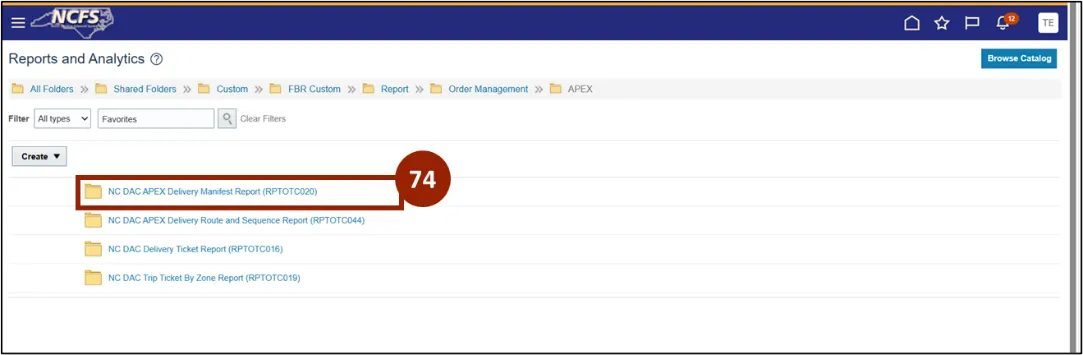
Step 75. Select APEX Delivery Manifest Report (RPTOTC020).
Note: The NC DAC APEX Delivery Manifest Report should be run with the "Manifest" parameter to generate a list of shipments in ascending order. This sequenced list will be provided to the driver to enable efficient and organized customer deliveries.
Step 76. Once all of your orders have been confirmed, return to the Inventory Management Home screen. Click the Tasks icon.
Step 77. Select Shipments from the Show Tasks drop-down.
Step 78. Select Manage Shipments.
Step 79. The Reports and Analytics Page displays, select APEX.
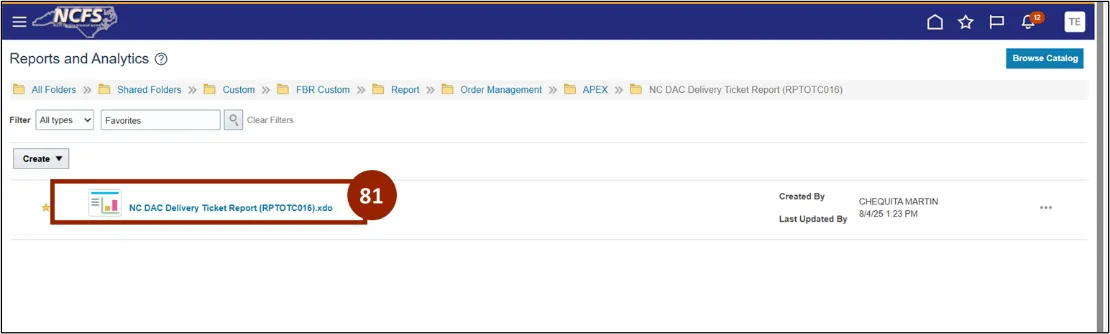
Step 80. Select NC DAC Delivery Ticket Report (RPTOTC016).
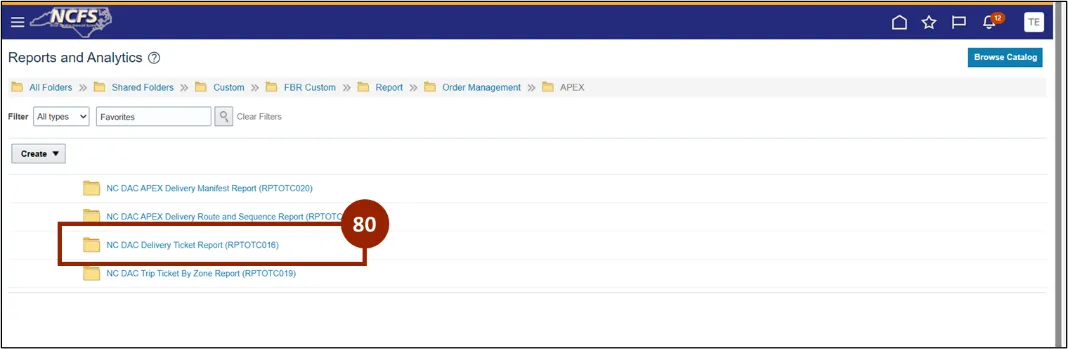
Step 81. On the Reports and Analytics screen, select the NC DAC Delivery Ticket Report.
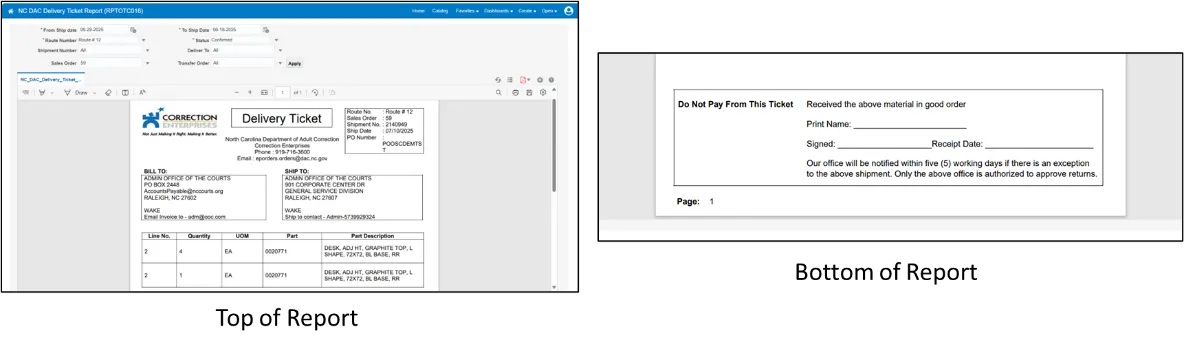
This report is generated for a specific order and provided to the truck driver for customer delivery. The driver will also use the report to obtain the customer’s signature as proof of delivery.
Step 82. In the From Ship Date field, enter the from ship date.
Step 83. In the To Ship Date field, enter the to ship date.
Step 84. In the Route Number field, enter the Route Number.
Step 85. Click Apply.

Note: The NC DAC Delivery Ticket Report will appear.
APEX Shipment
Reopening a shipment
Step 86. Select Actions drop-down.
Step 87. Select Reopen.
Note: This is for a specific shipment line versus multiple

APEX Shipment – Closing a shipment
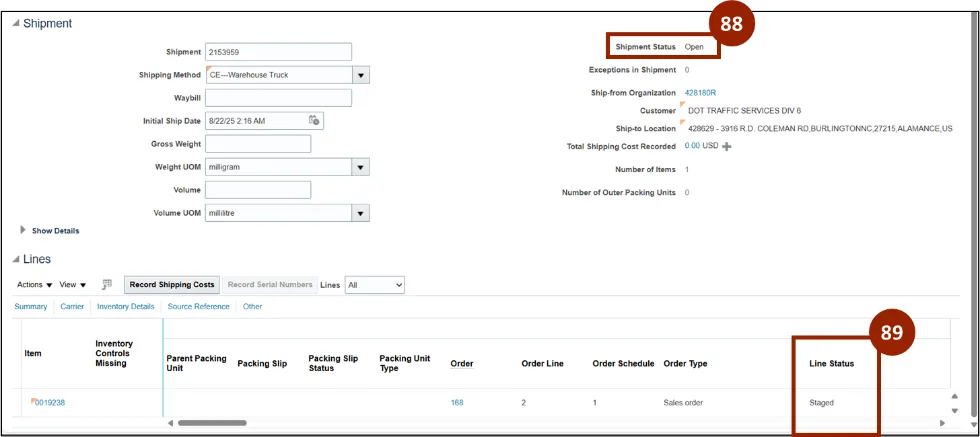
Step 88. You will see the Shipment Status field as Open.
Step 89. You will see the Line Status field as Staged.
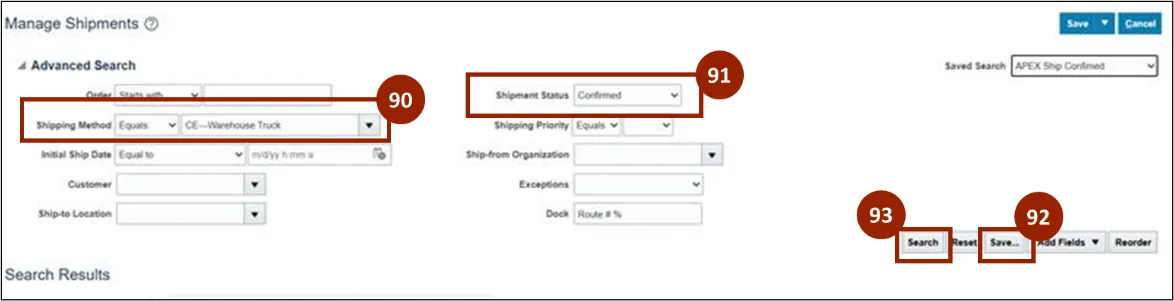
Step 90. Ship confirmed orders will be visible by the search results. In the Shipping Method drop-down, select CE-Warehouse Truck.
Step 91. In the Shipment Status drop-down, select Confirmed.
Step 92. Save this search for future reference by clicking Save.
Step 93. Click Search.
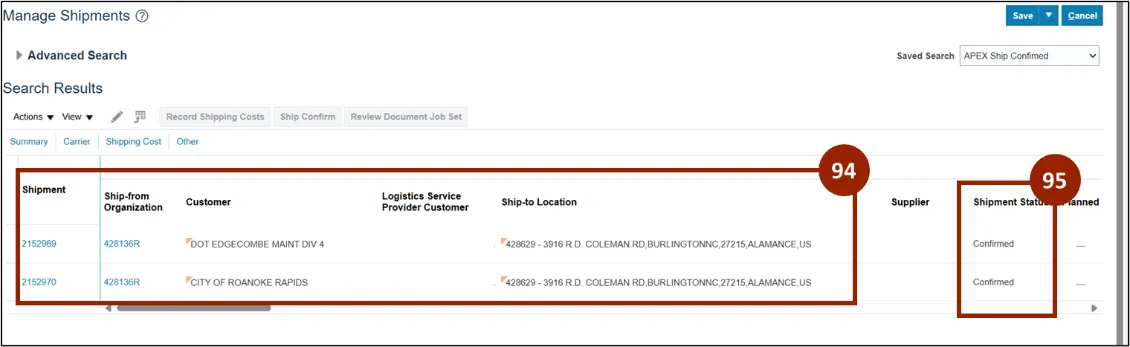
Step 94. The shipments appear on the Search Results section of the Manage Shipments page.
Step 95. Shipment status should say Confirmed.
Step 96. Select the Actions drop-down.
Step 97. Select Close.
Note: This is for a specific shipment line versus multiple.
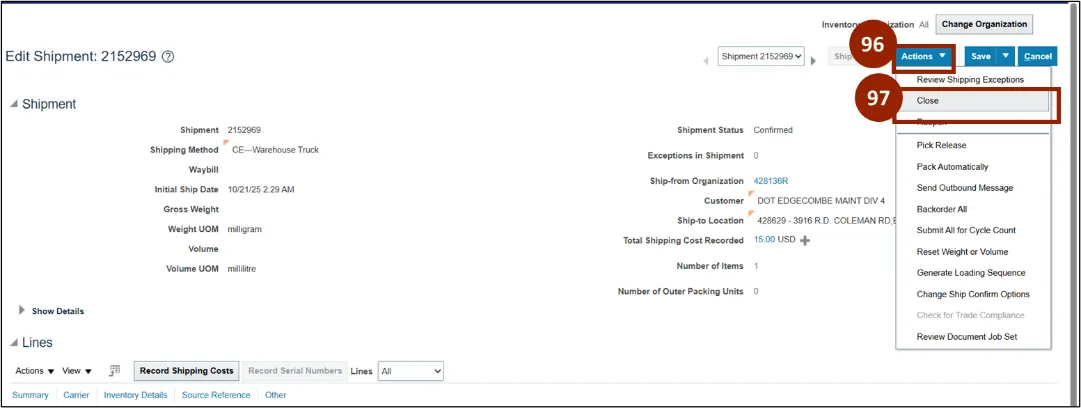
Step 98. The Close Shipment notification appears, select OK.

Wrap-Up
NCFS users can reference the Shipment processes using the steps above.
Additional Resources
- Virtual Instructor Led Training (vILT)