Purpose
The purpose of this Quick Reference Guide (QRG) is to provide a step-by-step guide of how to create and update product master data in the North Carolina Financial System (NCFS).
Introduction and Overview
This QRG covers the process of the creation and modification of Product Master Data primarily through the Product Information Management (PIM) module within the Product Hub. There are two types of products: Inventory Items and Manufactured Items. Inventory Items are used for internal consumption or for manufacturing a finished product, which is stocked, tracked, and valued in inventory. While Manufactured Items are manufactured in the Plant using Inventory Items. Manufactured Items are either internally consumed or sold to external customers.
Initiate Product Creation
There are 11 steps to complete this process.
Step 1. Log in to the NCFS portal using the Company Single Sign-On (SSO) button.
Step 2. Enter your @dac.nc.gov email address.
Step 3. Click Next, then enter your password.
Note: The system will automatically sign on using SSO and log in to NCFS. After the first login using SSO, future access may not require credentials. If SSO is not available, enter credentials manually within the Username and Password fields, then click Sign-In.
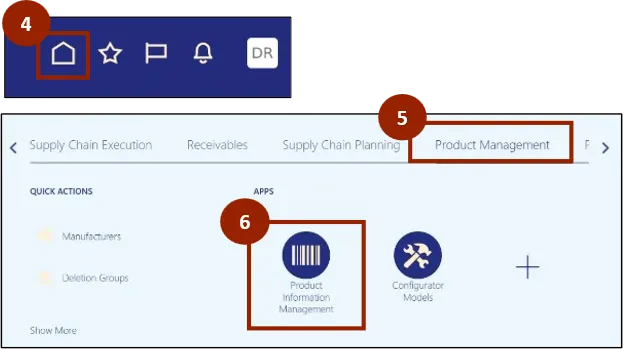
Step 4. Begin from the Home page, or click the Home icon.
Step 5. On the Home page, select Product Management.
Step 6. Within the Product Management tab, select Product Information Management.
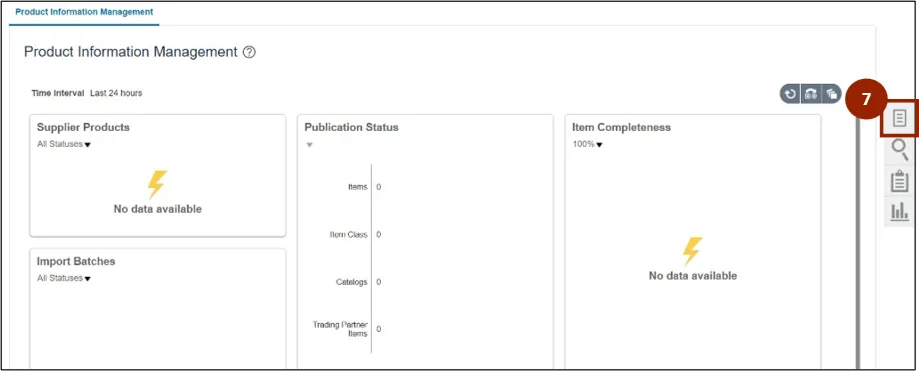
Step 7. Click the Task icon.
Step 8. Under the Item Management heading, click Create Item.
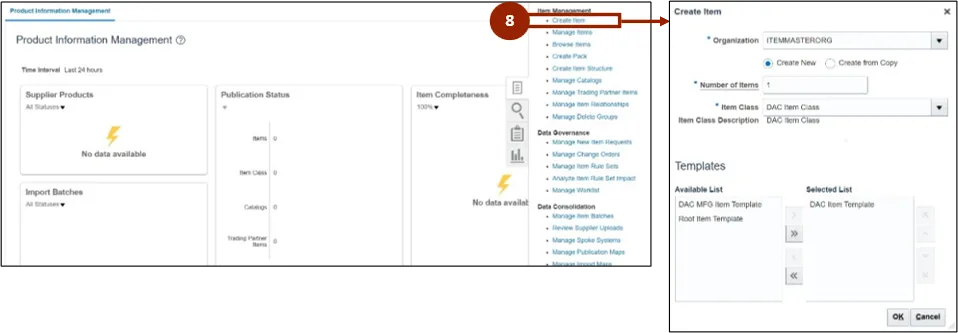
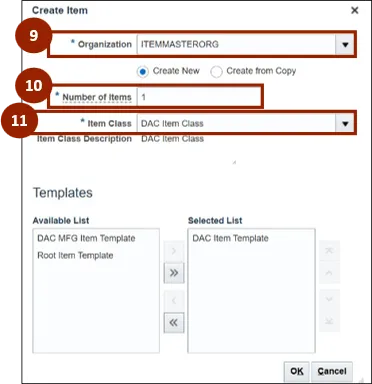
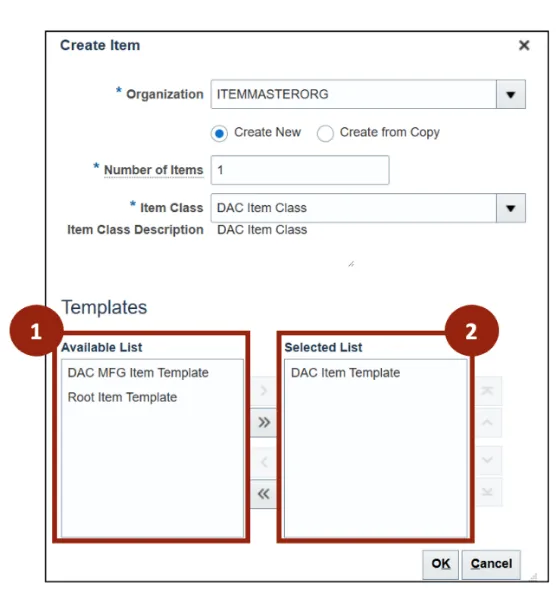
Step 9. In the Organization field, enter ITEMMASTERORG.
Step 10. In the Number of Items field, enter the Quantity required.
Step 11. In the Item Class field, enter DAC Item Class.
Note: Defining the item at the master level ensures that all units use the same item definition.
Applying Item Templates
In DAC, there are two Item Templates: DAC Item Template and DAC MFG Item Template.
- DAC Item Template is typically the default Template selected. It is used when creating items at the ITEMMASTERORG level and creating any buy items from a DAC plant.
- DAC MFG Item Template is used when creating a manufacturing item from a DAC manufacturing plant, also known as finished goods.
To apply an item template, complete the following steps. There are 14 steps to complete this process.
Step 1. Within the Templates section, the Available List displays a list of templates available to apply.
Step 2. The Selected List displays the Template selected for this item, defaulted to display DAC Item Template.
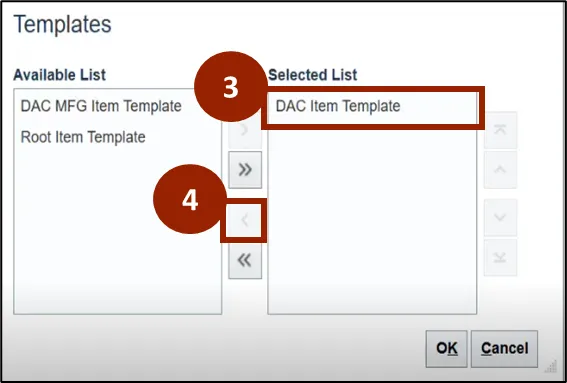
To switch the defaulted Template to the DAC MFG Item Template within the Selected List follow these steps:
Step 3. Within the Selected List, select the Item Template you would like to move (i.e., DAC Item Template).
Step 4. Click the left facing single arrow to move the selected Template to the Available List.
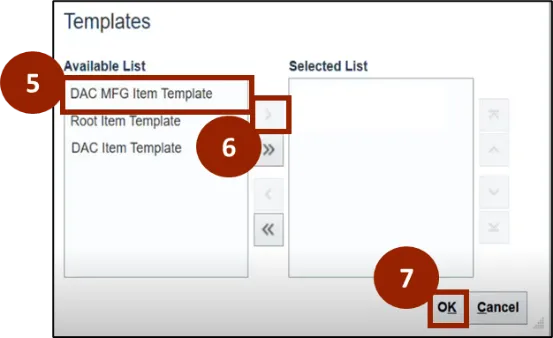
Step 5. Within the Available List, select the Item Template you would like to move (i.e., DAC MFG Item Template).
Step 6. Click the right facing single arrow to move the selected Template to the Selected List.
Step 7. Click the OK button.
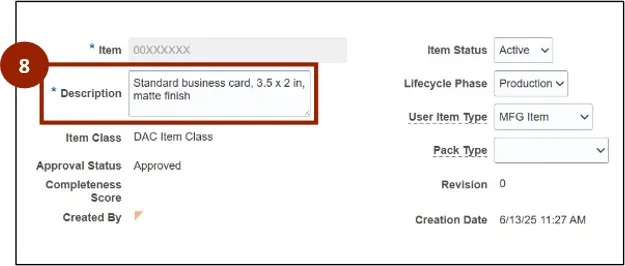
Step 8. On the Create Item screen, enter the item description within the Description field (e.g., standard business card, 3.5 x 2 in, matte finish).
Note: Users can input a maximum of 240 characters including spaces.
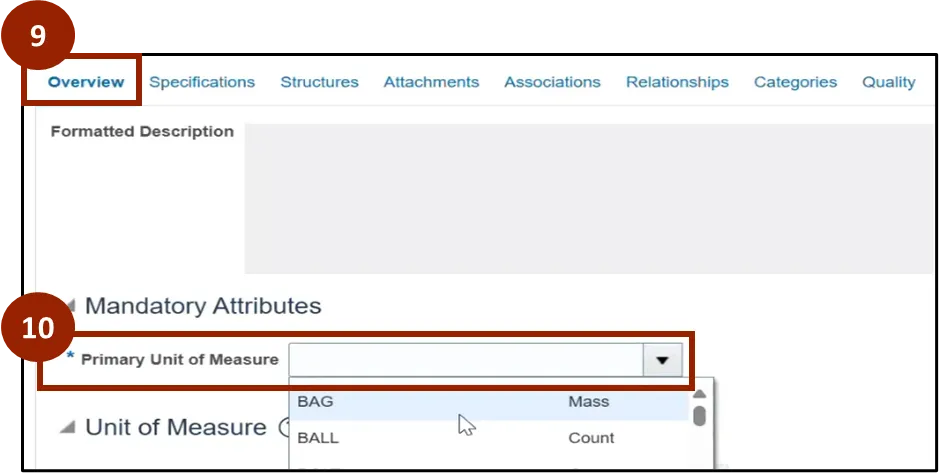
Step 9. Click on the Overview tab.
Step 10. Select the appropriate Unit of Measure (UOM) within the Primary Unit of Measure field based on item type (e.g., for a business card, the UOM would be “Each”).
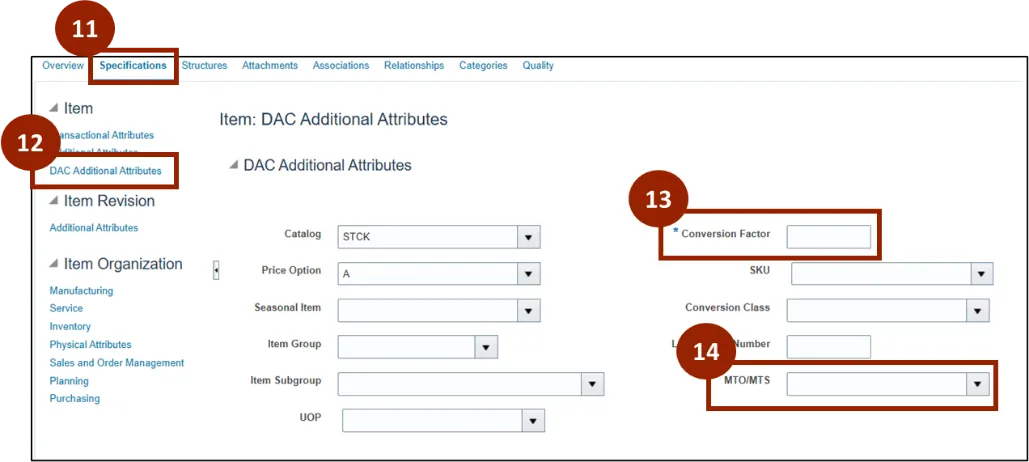
Step 11. Click on the Specifications tab.
Note: Most specifications are auto-filled based on the selected template. Tabs such as Manufacturing, Services, Sales and Order Management, Inventory, and Planning will populate with relevant data.
Step 12. Click DAC Additional Attributes in the Item section.
Step 13. Enter the Conversion Factor.
Step 14. Select MTO/MTS from the drop-down.
Manage Product Master Data Process
The next section of the process flow includes additional activities that complete the Product Master Data management process. These include Add Associations, Define Categories, Save Progress, View and Verify Item Details, Define MFG Template Structure and Finalize and Complete.
Add Associations: Inventory Organization Association Process
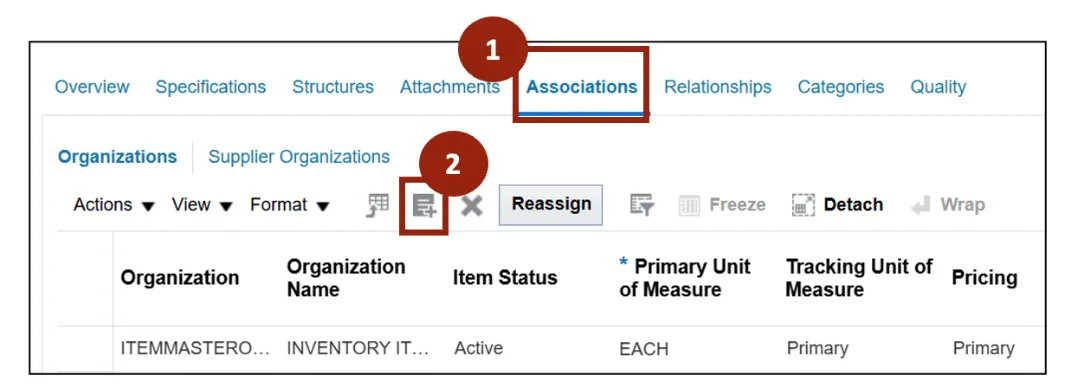
When an item is created in the system it is initially established under the ITEM MASTER ORG level. To enable the item for inventory-related transactions or operations it must be associated with an Inventory Organization.
There are 7 steps to complete this process.
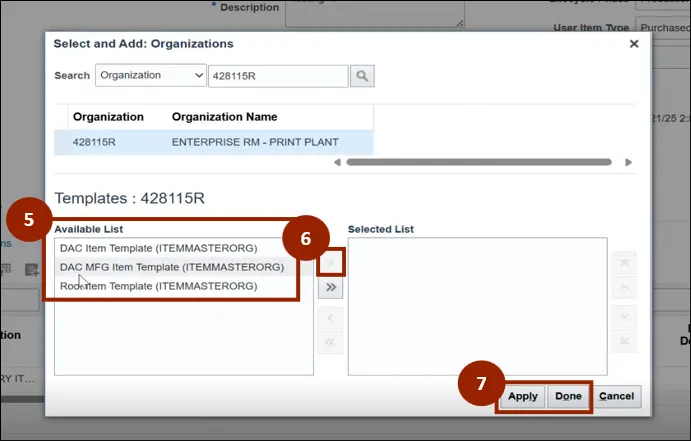
Step 1. Navigate to the Associations tab.
Step 2. Click the Select and Add icon.
Step 3. In the Organization search field, enter a Plant and search.
Step 4. Select the appropriate Plant from the results.
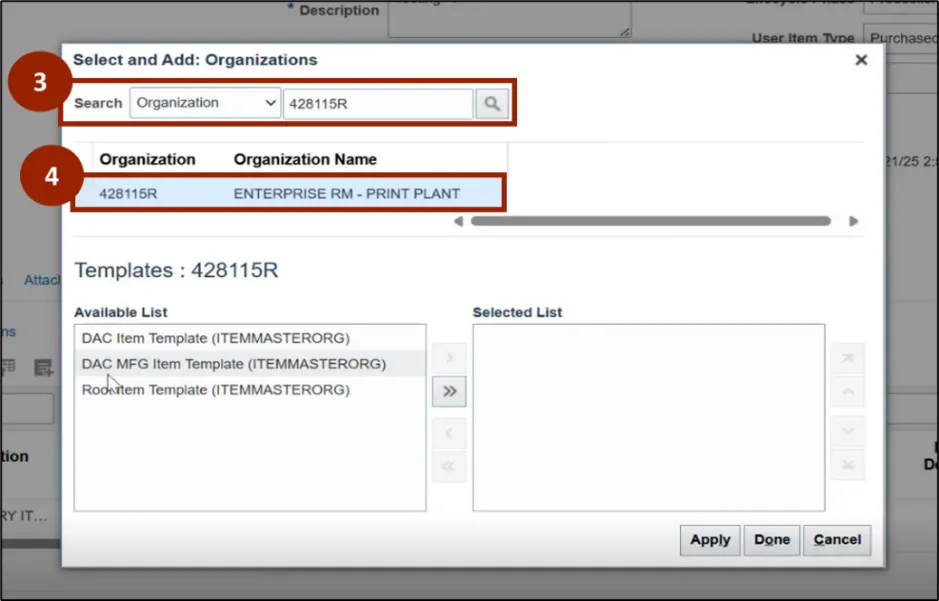
Step 5. Under the Available List, select the appropriate Template.
Step 6. Click the right facing single arrow button to add the desired template to the Selected List.
Step 7. Click Apply, then click Done to close the Select and Add: Organizations window.
Note: When associating an Item with the Organization where it will be manufactured, select the “DAC MFG Item Template” during the association process.
Designate Catalogs and Categories
There are 7 steps to complete this process.
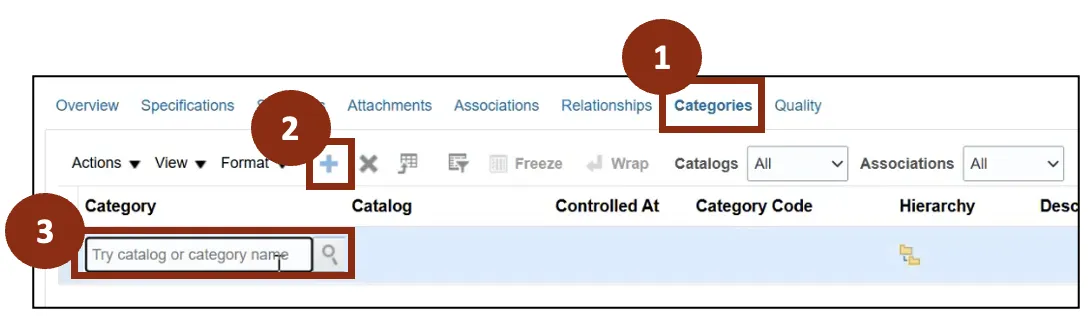
Step 1. To add category or catalog name, navigate to the Categories tab.
Step 2. Click the Plus (+) icon.
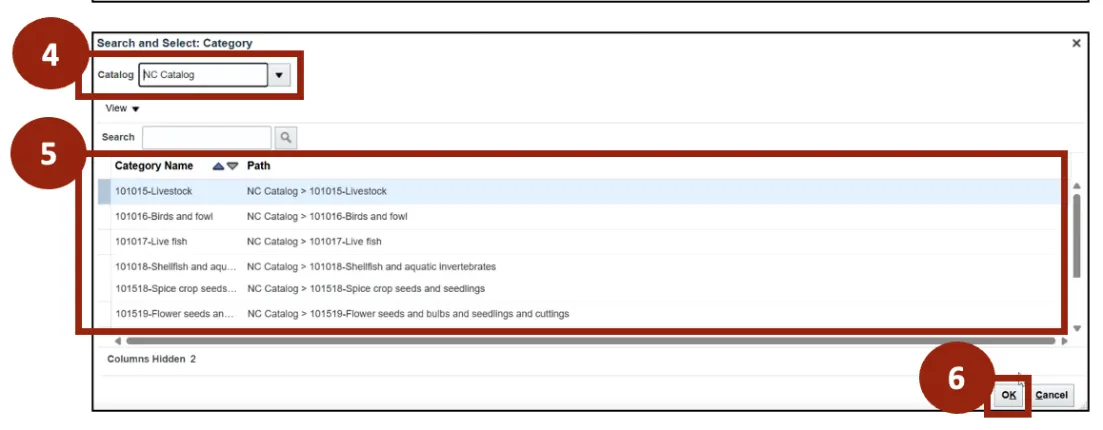
Step 3. Within the Category column, click the Search field icon to open the Search and Select: Category pop-up screen.
Step 4. Within the Catalog field, select NC Catalog.
Step 5. Select the appropriate Category from the results to accurately reflect the item’s nature and classification.
Step 6. Scroll to the bottom of the Search and Select: Category pop-up screen and select OK.
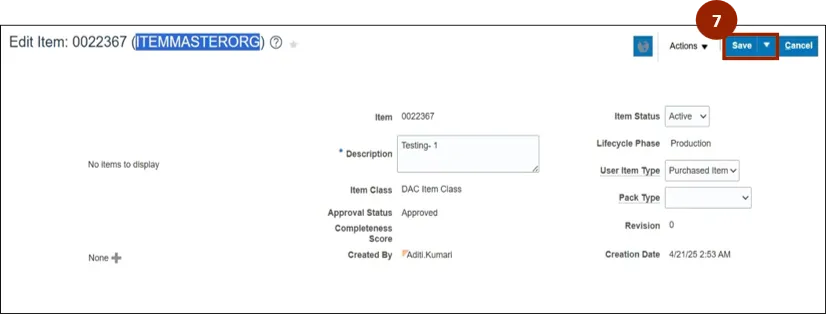
Save Progress.
Step 7. Click Save.
Note: The item currently displays as ITEMMASTERORG, highlighted below. Once saved the system will generate and display the Item Number.
View Item in Plant and Verify Details
There are 16 steps to complete this process.
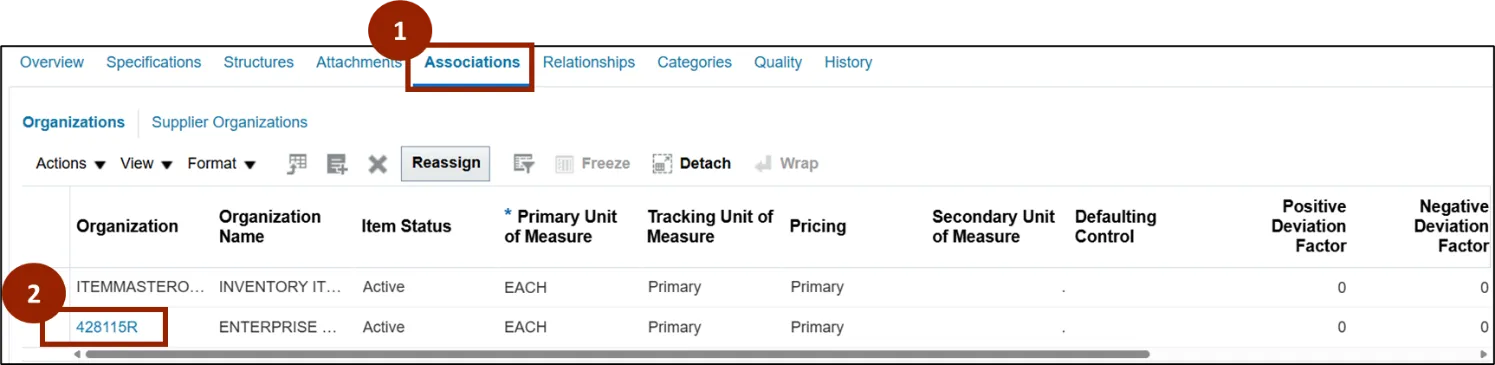
Step 1. Navigate to the Associations tab.
Step 2. Within the Organization column, Click the associated hyperlink to open the plant-specific details page.
Note: Check the item details under the Specifications tab as required.
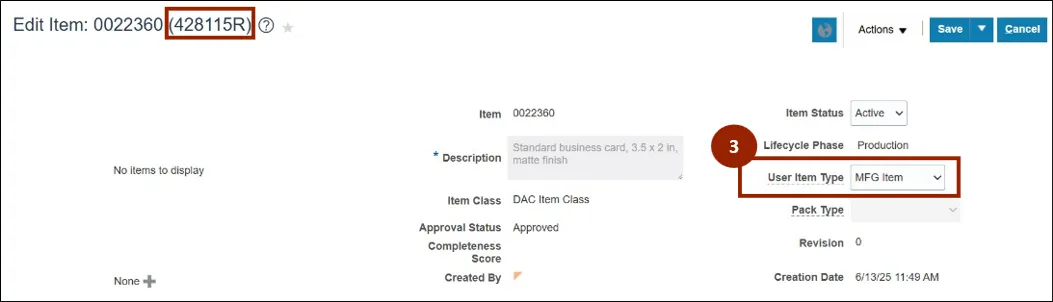
Step 3. Within the Plant details, verify that the User Item Type field is set to MFG item, as this aligns with the selection of the DAC MFG ITEM TEMPLATE for manufacturing items.
Note: The plant identification is displayed in parenthesis next to the Item Number (e.g., 428115R).
Define the MFG Template Structure
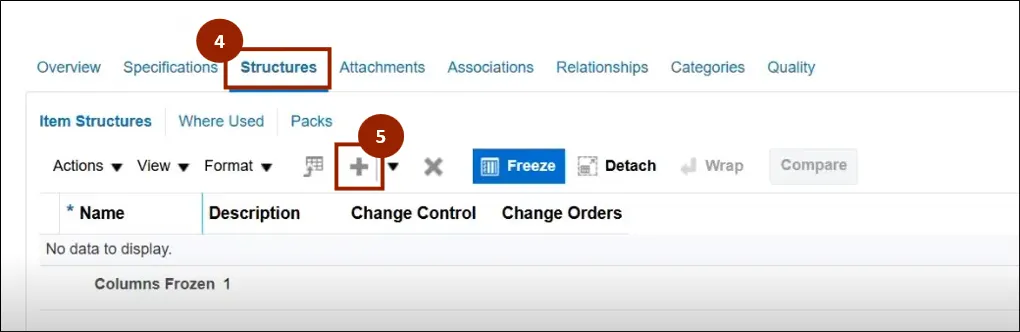
Step 4. Navigate to the Structures tab.
Step 5. Click the Plus (+) icon to add a new structure.
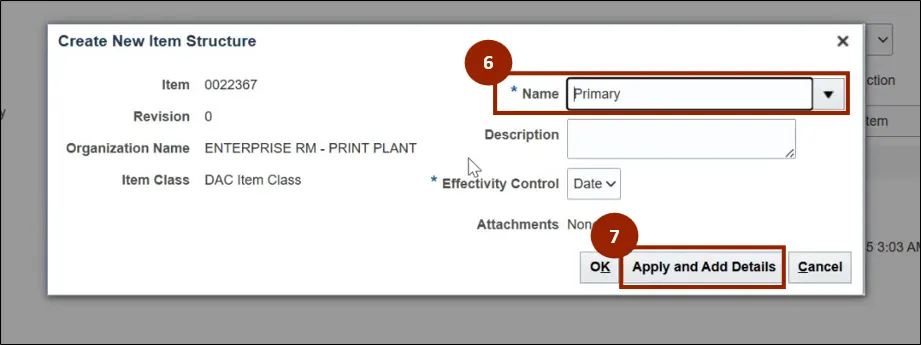
Step 6. Within the Name drop-down field, select Primary.
Note: Primary should be selected when creating the Item Structure.
Step 7. Click on Apply and Add Details.
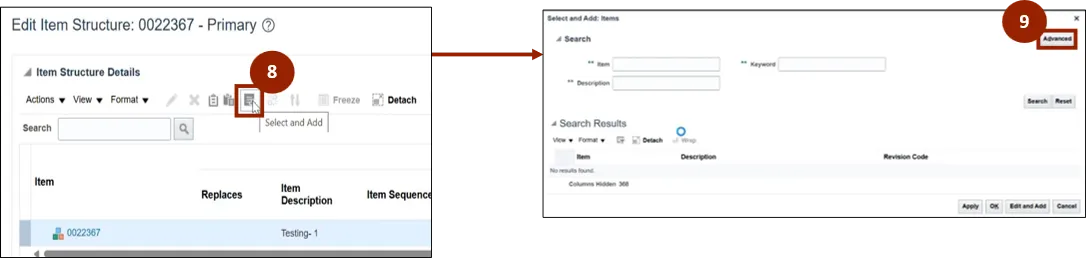
Step 8. Click the Select and Add icon to open the Select and Add: Items pop-up screen.
Step 9. Click Advanced to display Advanced Search fields.
Note: If you do not see the Select and Add icon, click the double arrows to expand table option. The Select and Add: Items screen enables you to define all required raw materials for the Item.
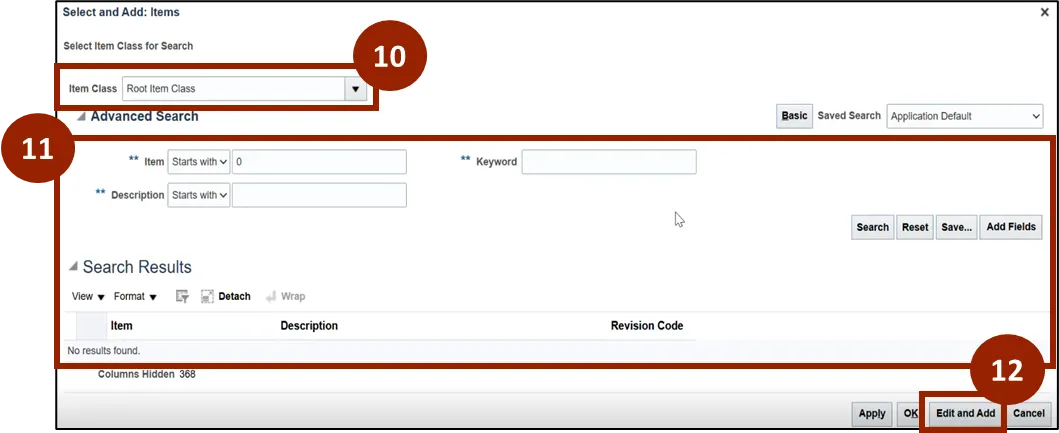
Step 10. In the Item Class field, select Root Item Class.
Step 11. Use the Advanced Search fields to search and select a specific Item from the Search Results (e.g., Item 0002400).
Step 12. Once the Item (raw material) is selected, click Edit and Add.
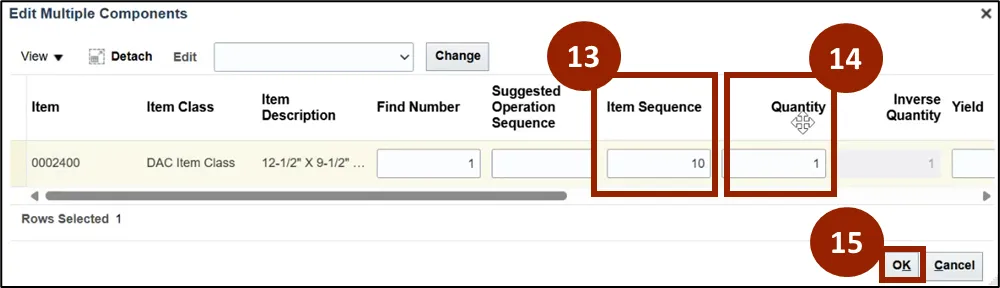
Step 13. Within the Item Sequence entry field, add the Item Sequence (the order in which the material is used in the manufacturing process) as a two-digit number (i.e. 10, 20, 30, and so on).
Step 14. Within the Quantity entry field, add the Quantity of each raw material required to produce the Manufacturing Item.
Step 15. Click OK.
Note: Repeat the above steps before proceeding to add as many Raw Materials as needed for the Manufacturing Item.
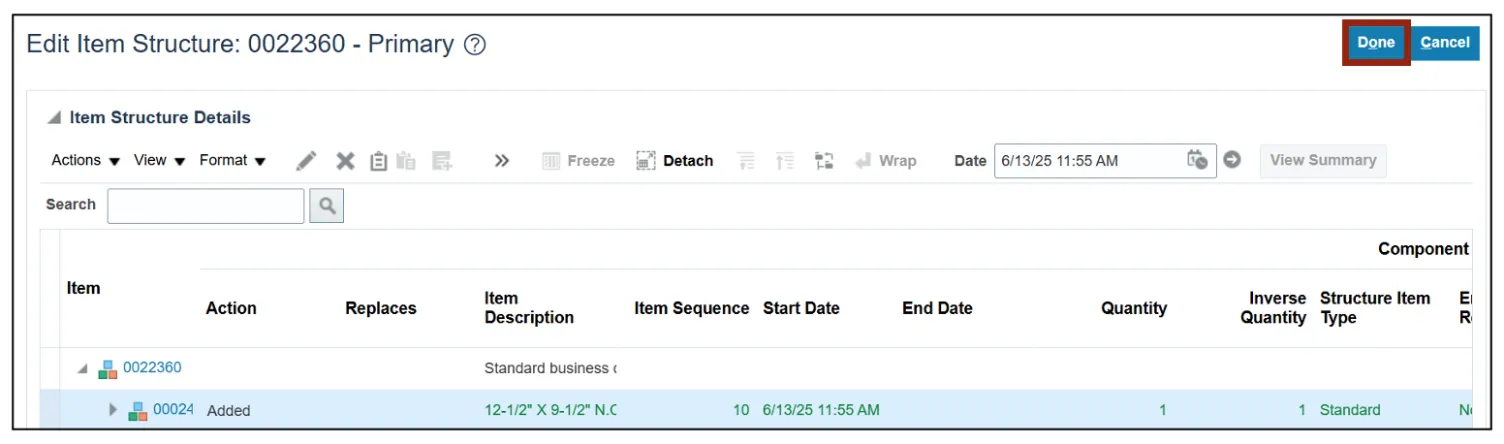
Finalize and Complete
Step 16. Once all raw materials have been added, click Done.
Define Product Relationship (Optional)
At this optional but valuable stage, product relationships can be established to enhance operational and customer-facing procedures. These may include:
- Substitute Items: Suggested alternatives if the primary item is unavailable.
- Related Items: Accessories or add-ons that complement the primary item.
- Cross-sell/Upsell Items: Products used in marketing or sales to increase transaction value.
Creating Product Master Data - Essential Fields
When we are creating a product like a business card, the following fields need to be entered.
| Field | What to Enter |
|---|---|
| Item Number | A unique identifier for the item. |
| Item Description | A concise description of the item (e.g. type, finish, customization). |
| User Item Type | Classification for product (e.g. Manufacturing Items, purchased item). |
| Unit of Measure | The measurement used (e.g., Each, Pack, box). |
| Item Category | Logical grouping of item. |
| Lifecycle Phase | Current stage of item (e.g., Design, Active, Obsolete). |
| Purchasable | Indicate if item can be procured. |
| Sellable | Indicate if item can be sold. |
| Stockable | Whether it should be held in inventory. |
| Inventory Tracked | If inventory quantities can be tracked. |
| Shippable | Whether it can be shipped. |
| Returnable | Whether it can be returned. |
| Organizations Assigned | Select business units where the item is available. |
| Attachments (optional) | Upload technical specs, design templates, or images. |
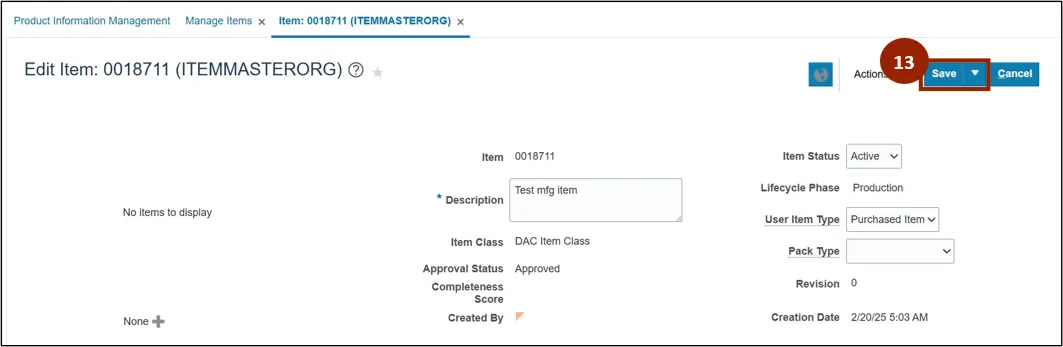
Change Product Master Data
There are 13 steps to complete this process.
To change or update Product Master Data — such as changes to packaging, design, or other attributes —follow these steps.
Step 1. Begin from the Home page, or click the Home icon.
Step 2. On the Home page, select Product Management.
Step 3. Within the Product Management tab, select Product Information Management.

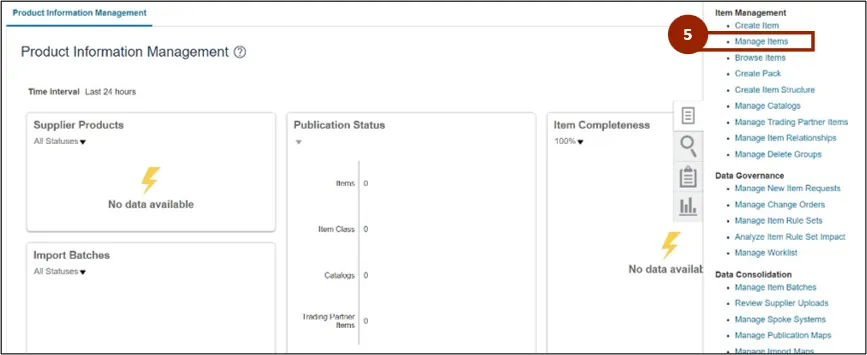
Step 4. Click the Task icon.

Step 5. Under the Item Management heading, click Manage Items.
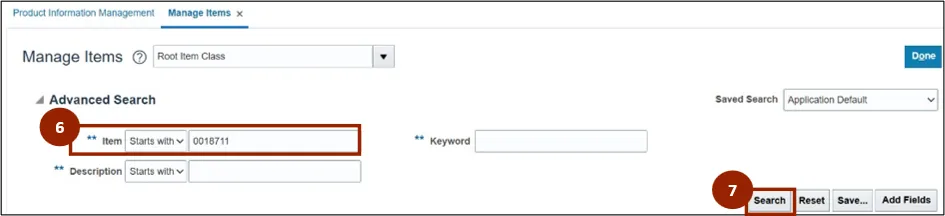
Step 6. Within the Advanced Search section of the Manage Items screen, enter the Item Number within the Item field
Step 7. Click the Search button.
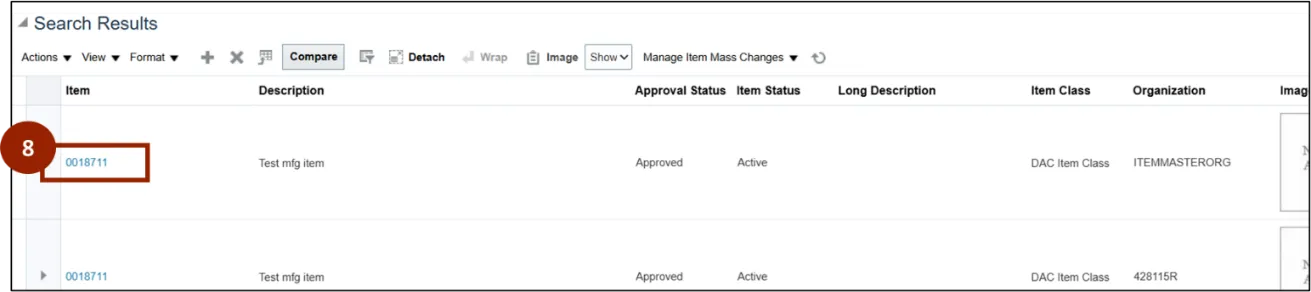
Step 8. Within the Search Results section, click the Item Number link within the Item column to open the Edit Item screen for the selected record.
Note: In the Search Results, multiple records may appear—one for the ITEMMASTER ORG and others based on plant associations. Pay close attention to the Organization and Item Status columns, as these areas will indicate whether an item is active or inactive and display the relevant plant information. Carefully review each of the results before selecting an item to update.
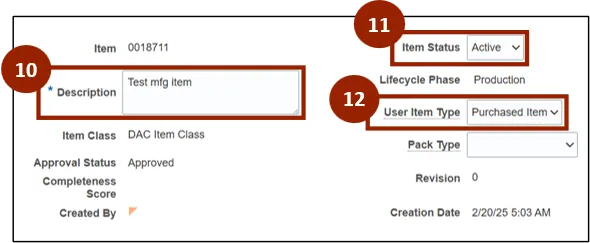
Step 9. Within the Edit Item screen, update any of the unlocked fields to edit the record.
Note: Some fields within the Edit Item screen may be locked or unlocked based on your user role. Make sure you select the correct record to edit item information at either the Master or Plant level. If you cannot edit certain fields, you may not have the required permissions to edit at that level.

Step 10. To update fields, enter the revised text to accurately reflect the new or updated item description.
Step 11. In the Item Status drop-down field, Select the appropriate status option from the list (e.g., change from “Active" to “Inactive").
Step 12. The User Item drop-down field Item can be updated to display another type (i.e., MFG Item or Freight).
Note: If a change to the User Item Type is needed, it is best practice thttps://www.ncosc.gov/training/ncfs-system-training/ncfs-course-catalog/mfg107-manage-product-master-datao mark the existing Item Status as Inactive and create a new item with the desired type to maintain data integrity.
Step 13. Click Save once all changes have been completed.
Wrap-Up
NCFS users can create and update product master data using the steps above.
Additional Resources
- Instructor Led Training (ILT)
- Web-based Training (WBT)