Purpose
The purpose of this Quick Reference Guide (QRG) is to provide a step-by-step guide of how to create, execute, complete and close work orders in the North Carolina Financial System (NCFS).
Introduction and Overview
This QRG covers the process of creating, executing, completing, and closing work orders. Work orders are specific jobs created when customers make a purchase to manufacture all items related to that purchase.
Create Work Order
To create a work order in NCFS, please follow the steps below. There are 29 steps to complete this process.
Step 1. Click the Company Single Sign-On (SSO) button.
Step 2. Enter your @dac.nc.gov email address.
Step 3. Click Next then enter password.
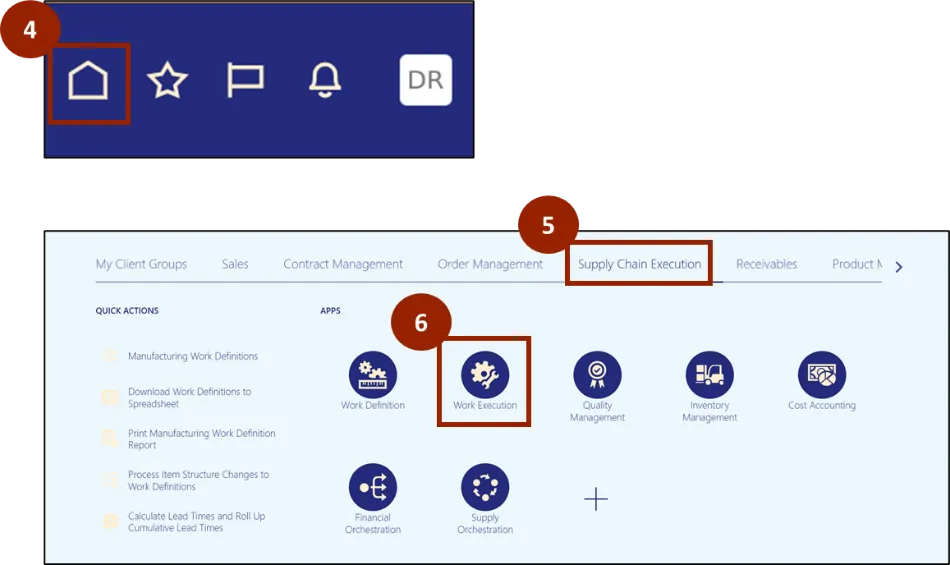
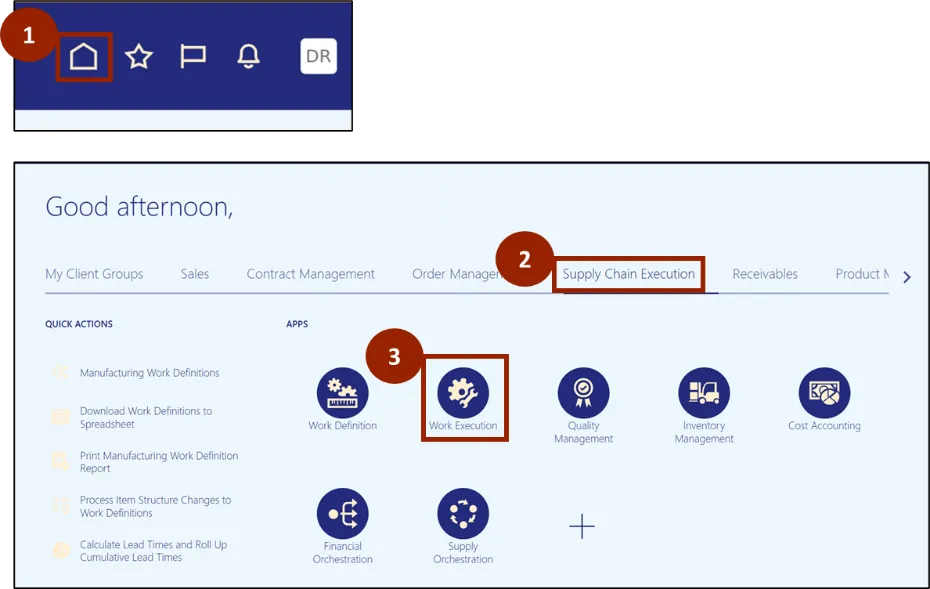
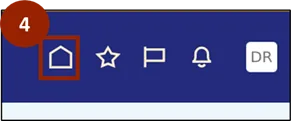
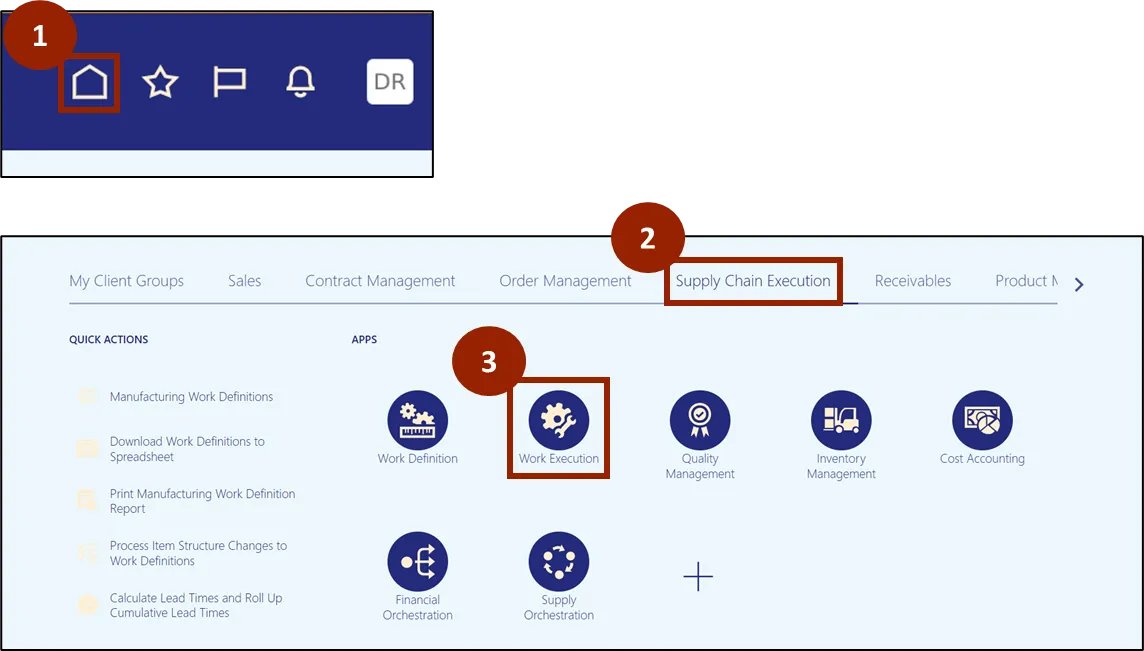
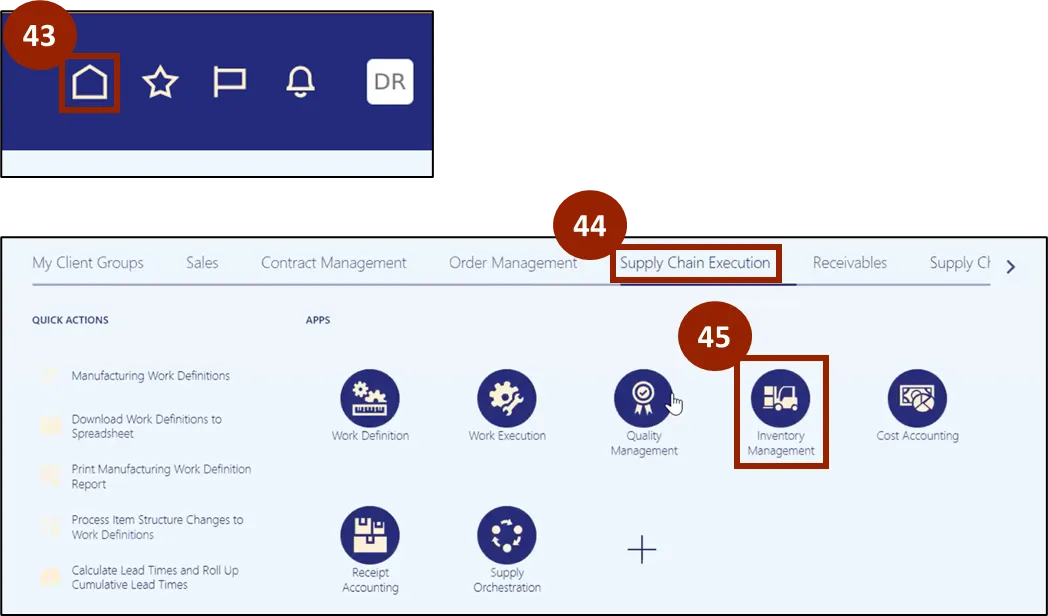
Step 4. Navigate to the Home page.
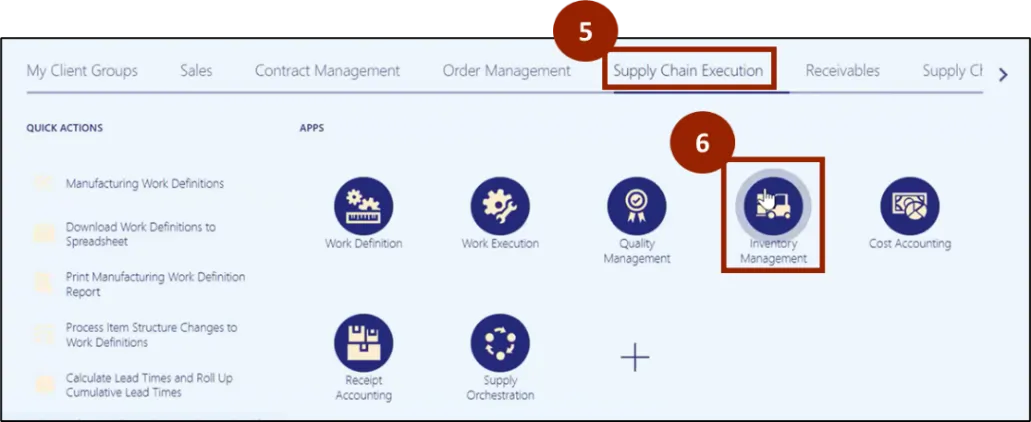
Step 5. While on the Home Screen, in the center section, navigate to the Supply Chain Execution tab.
Step 6. In the Supply Chain Execution tab, click on Work Execution.
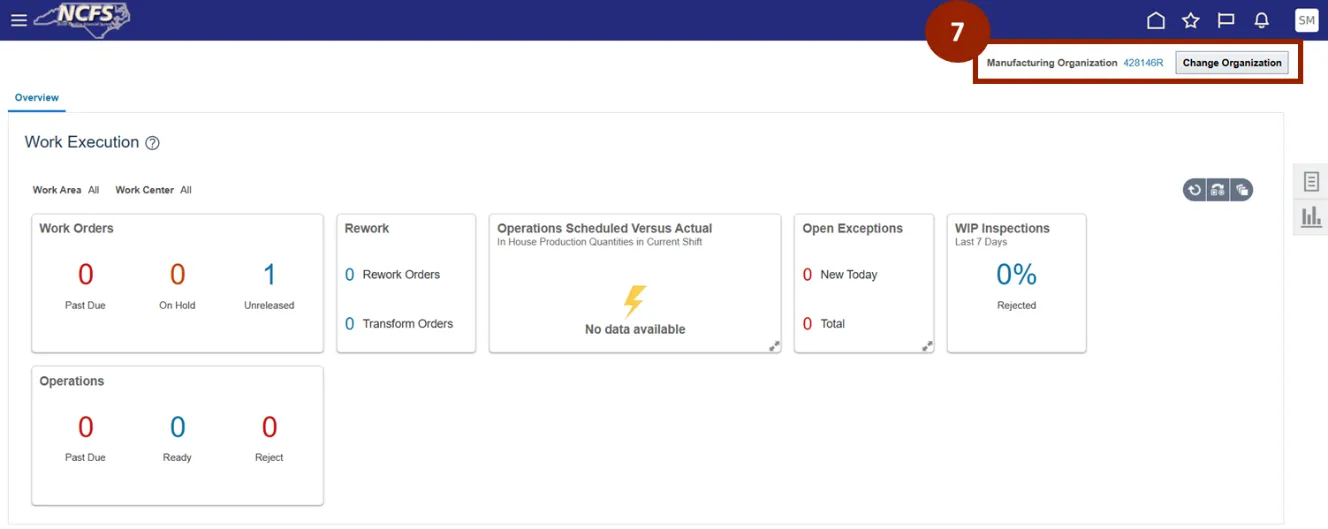
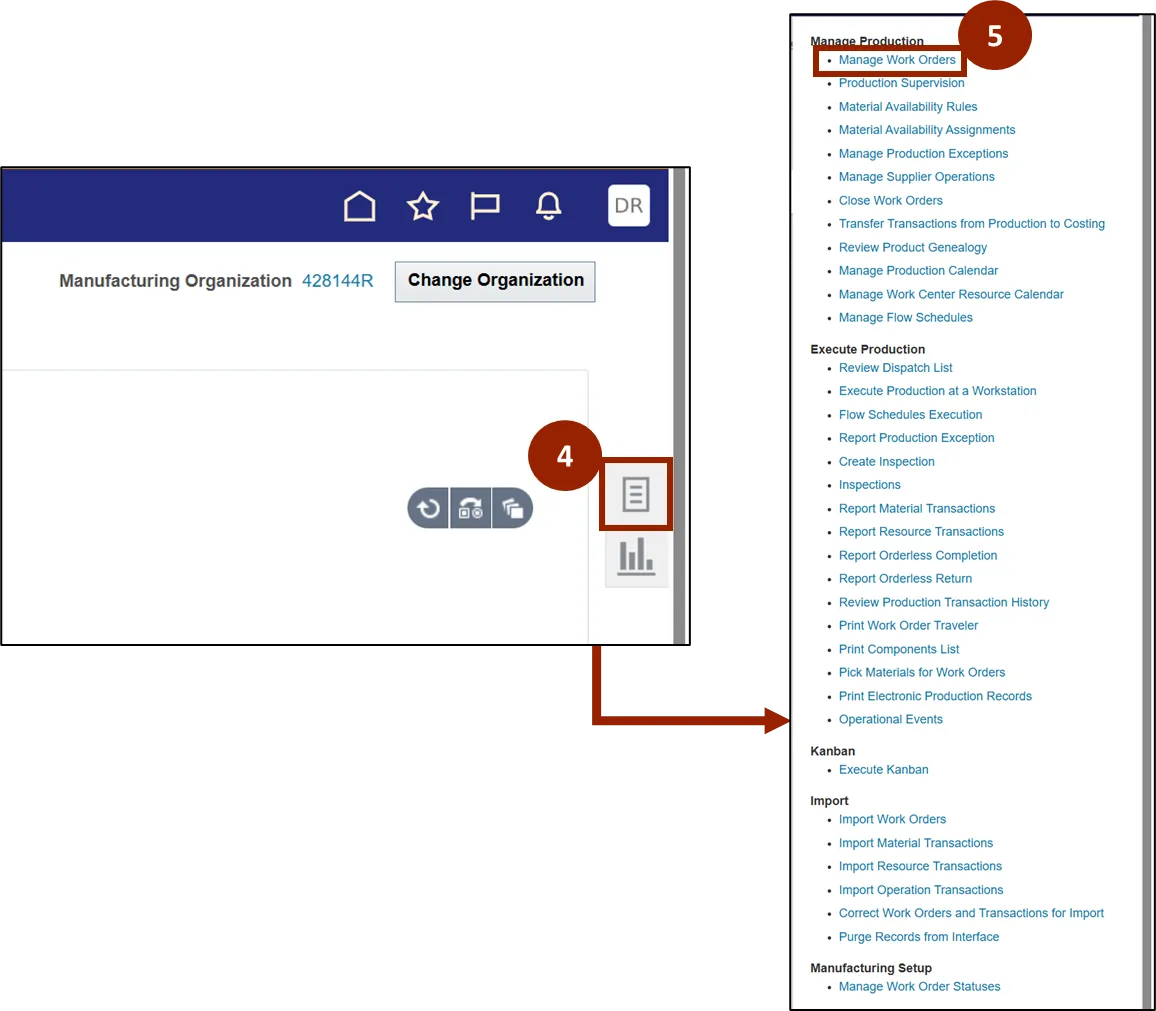
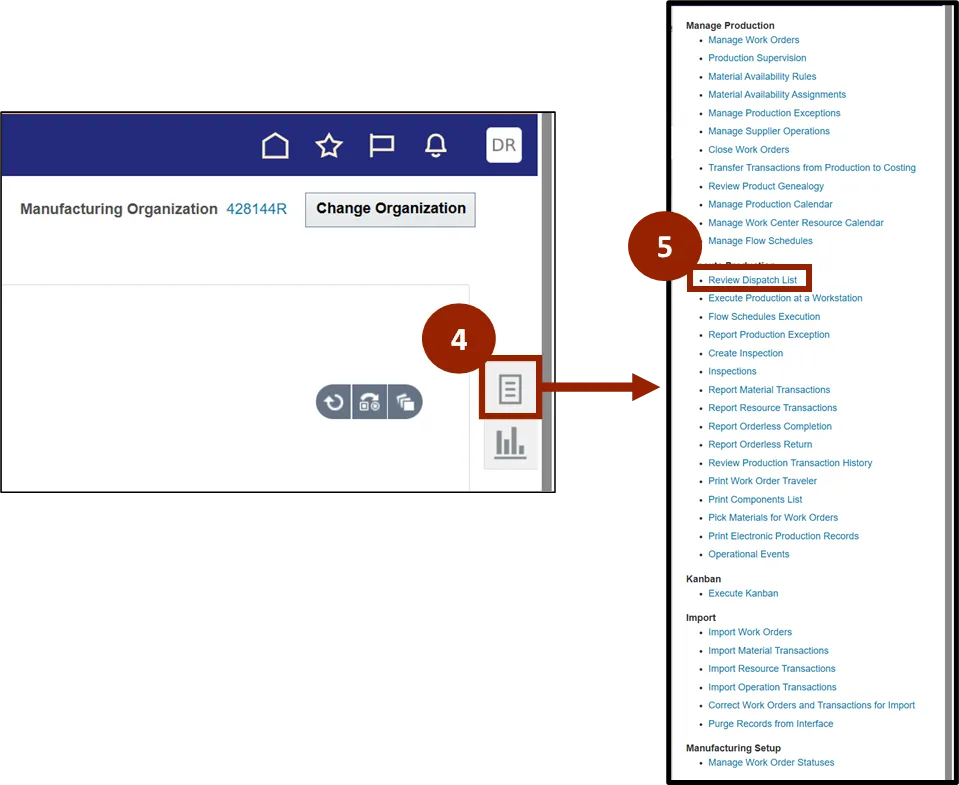
Step 7. Verify the Manufacturing Organization information is correct. If it is incorrect, the user can change the Manufacturing Organization by clicking Change Organization.
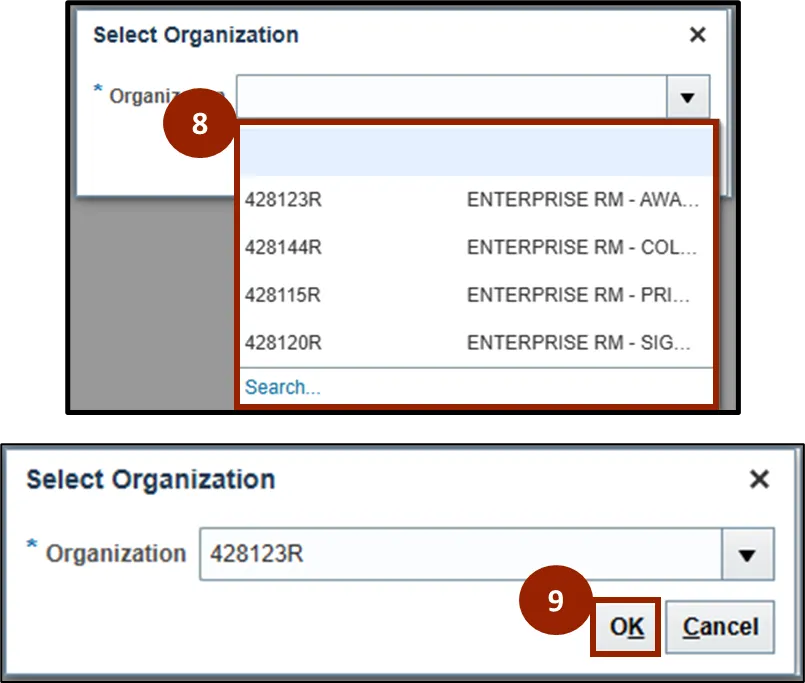
Step 8. In the Organization drop-down, select the appropriate Manufacturing Organization (plant).
Step 9. Click OK.
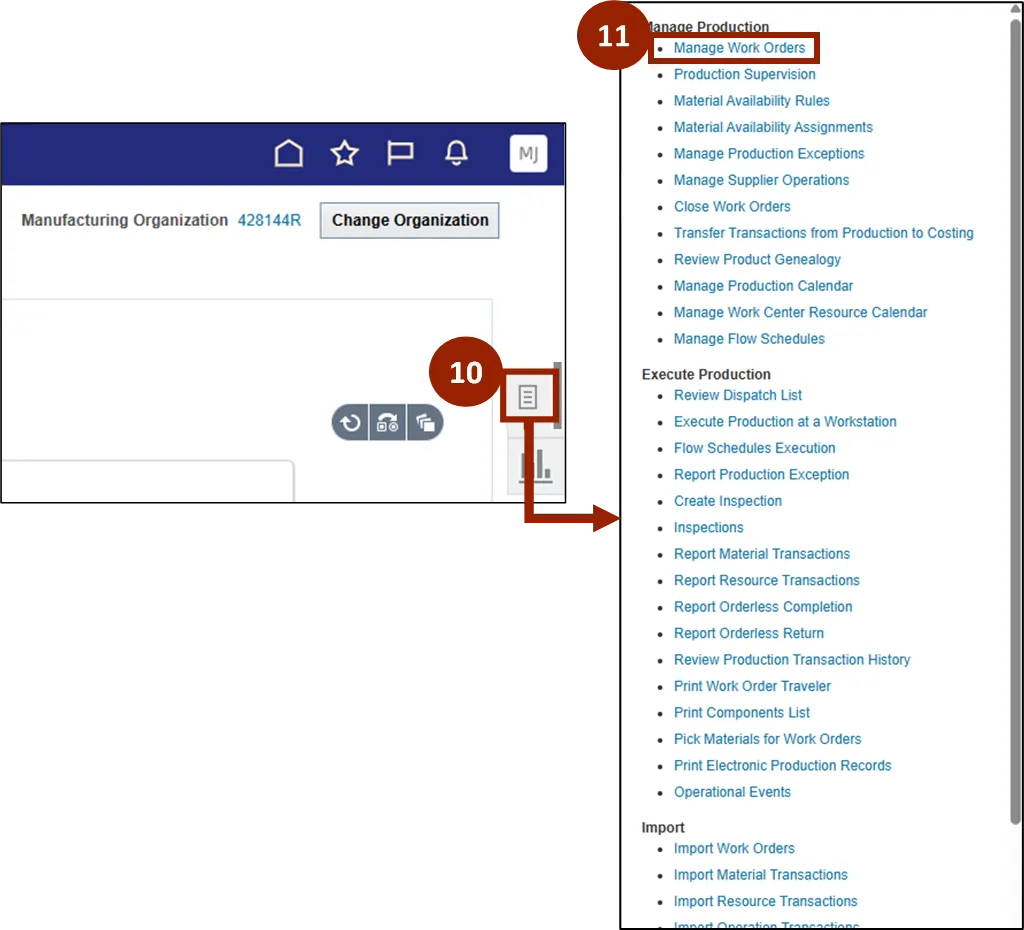
Step 10. On the right-hand side of the screen click on the Task icon.
Note: The Tasks that appear on the menu will be based on user access and may differ than what is shown in the screenshot.
Step 11. In the Task pane that opens, select Manage Work Orders.
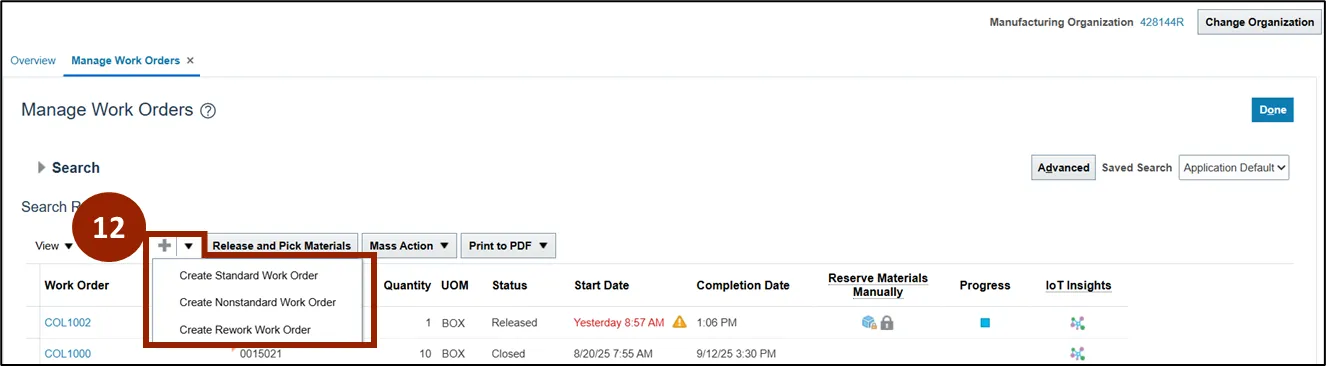
Step 12. On the Manage Work Orders page, click the Plus (+) icon to create a manual Work Order.
- To create a Standard Work Order, click on the Plus (+) icon and select the Standard Work Order from the list.
- A Standard Work Order can be created for a product with a Work Definition.
- If the Work Definition is not present, Non-Standard Work Order or Rework Work Order must be selected.
- For MTS Products, work with your Plant/General Manager to set up the Work Definition.
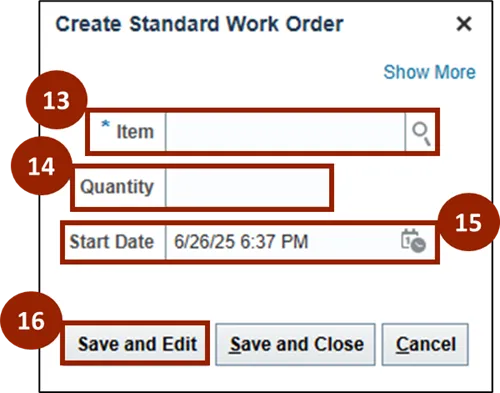
Step 13. Enter the Item number.
Step 14. Enter the Quantity needed.
Step 15. Enter the Start Date for production.
Step 16. When finished, click Save and Edit.
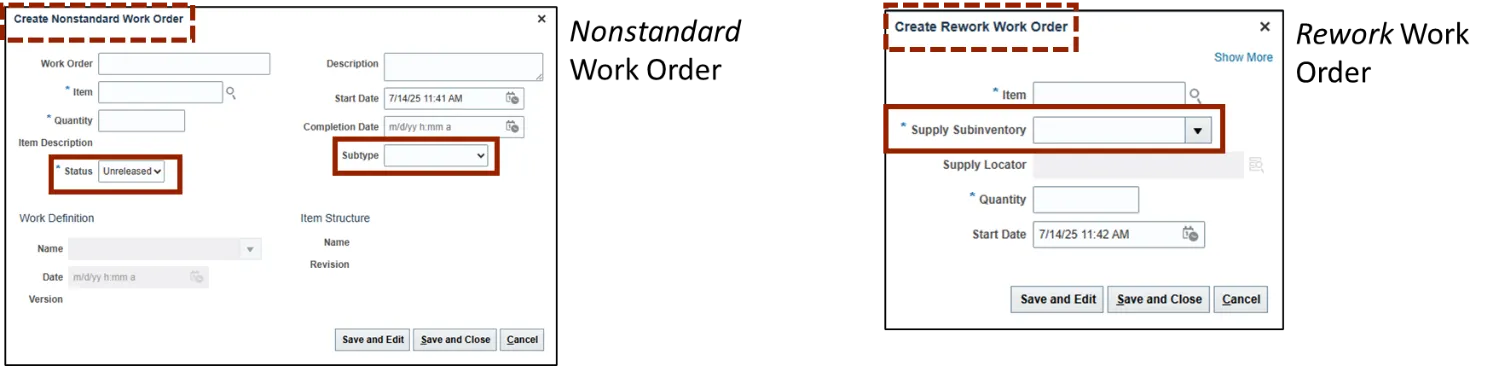
There are three additional fields required for Nonstandard and Rework Work Orders.
- For Nonstandard Work Orders user must also include the Status and Subtype.
- For Rework Work Orders user must also include Supply Subinventory.
Step 17. User will see the Work Order information.
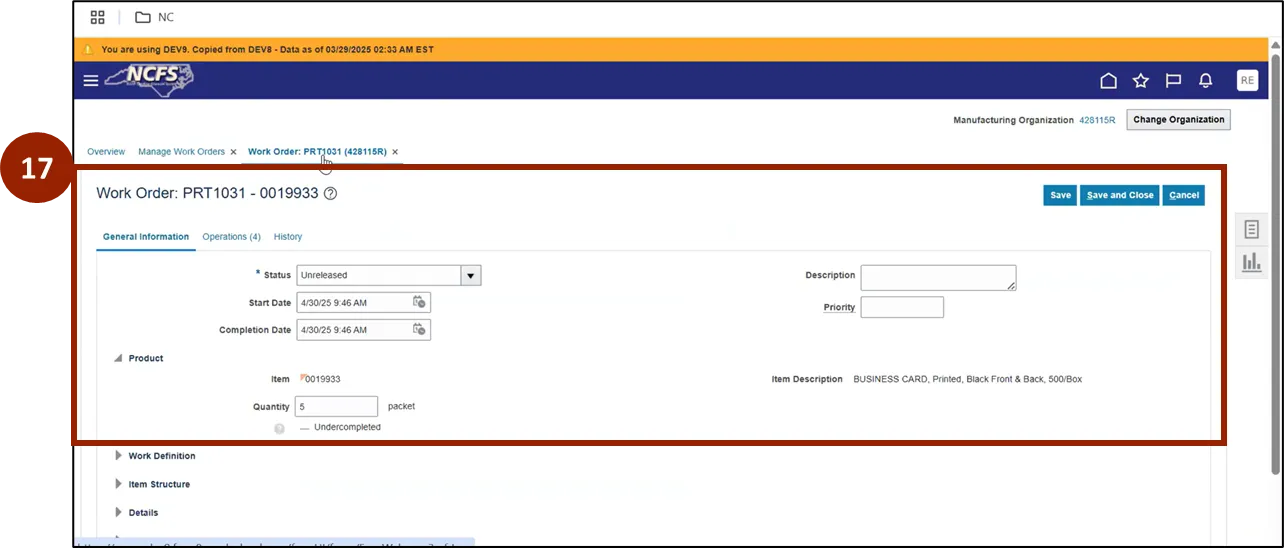
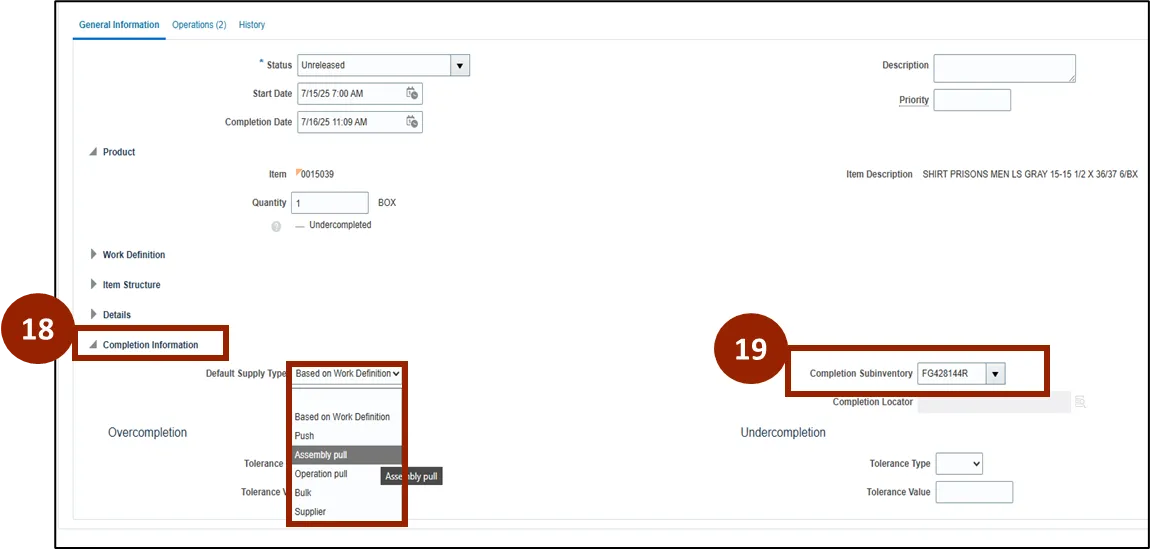
Step 18. Under Completion Information, click the arrow on the left to expand the information shown.
Step 19. Review the Completion Subinventory in the drop-down. This field will be defaulted to select the appropriate location based on the plant selected.
Note: Supply Type needs to be Assembly Pull for all order types.
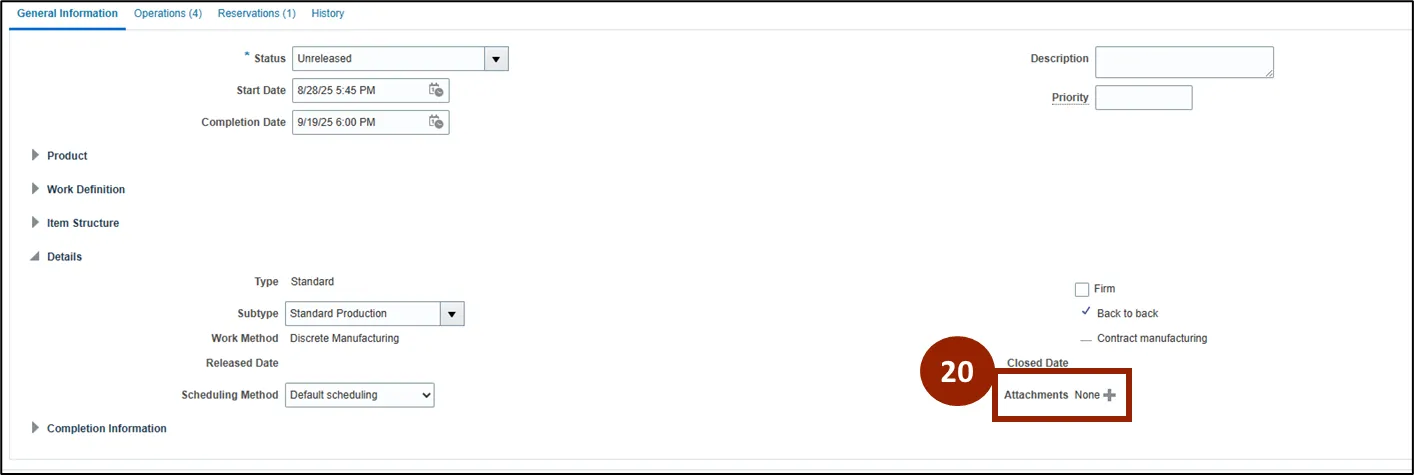
Step 20. To add an attachment, on the General Information tab, under the Details section, select the Plus (+) icon next to Attachments.
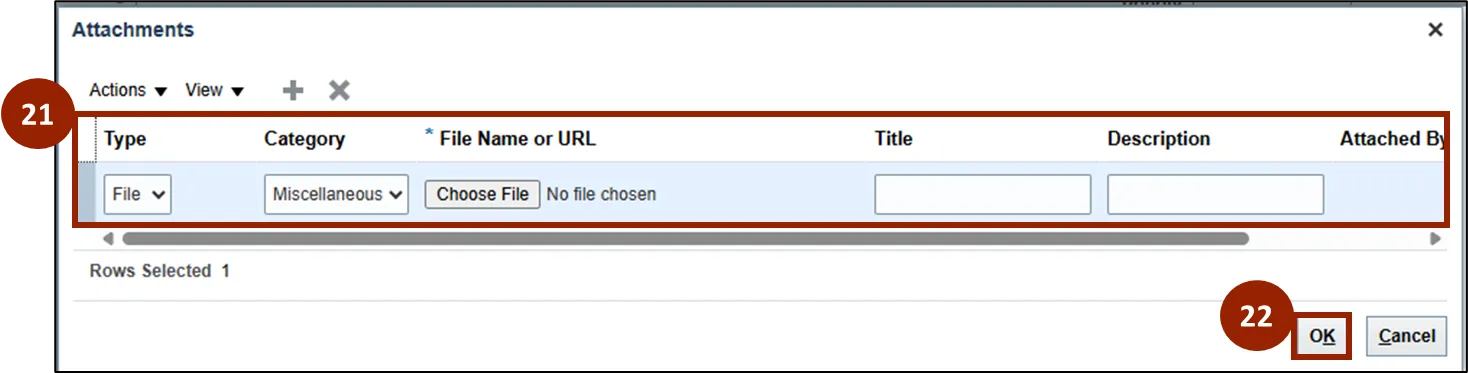
Step 21. Enter the Attachment details such as Type, Category, File Name or URL, Title, and Description.
Step 22. Click OK when done.
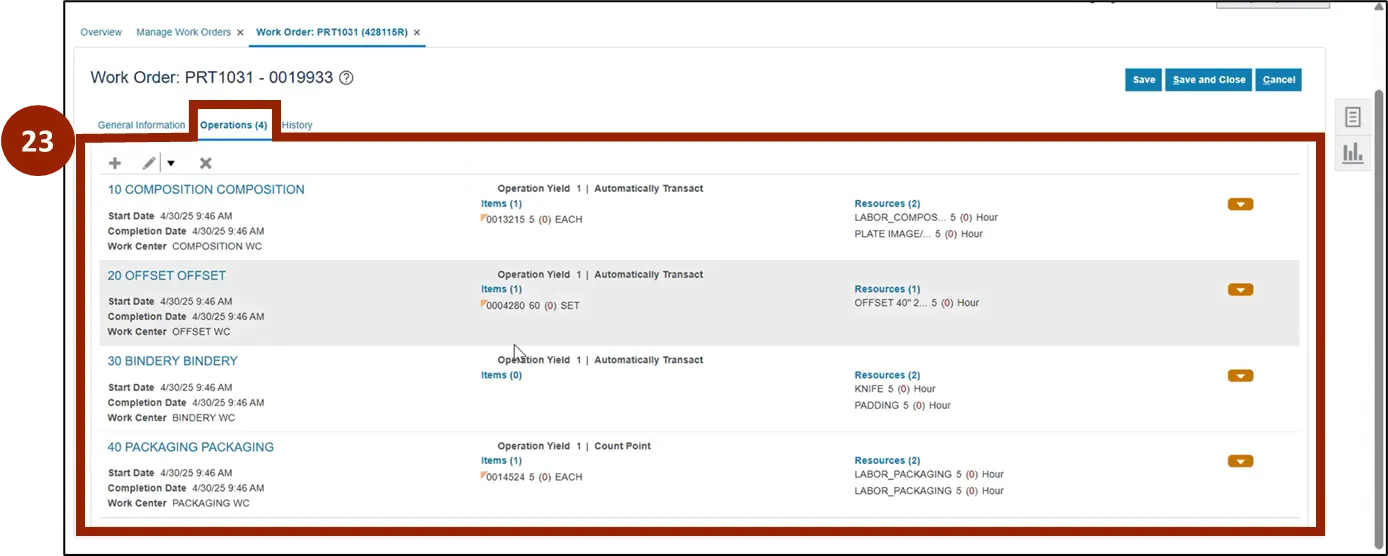
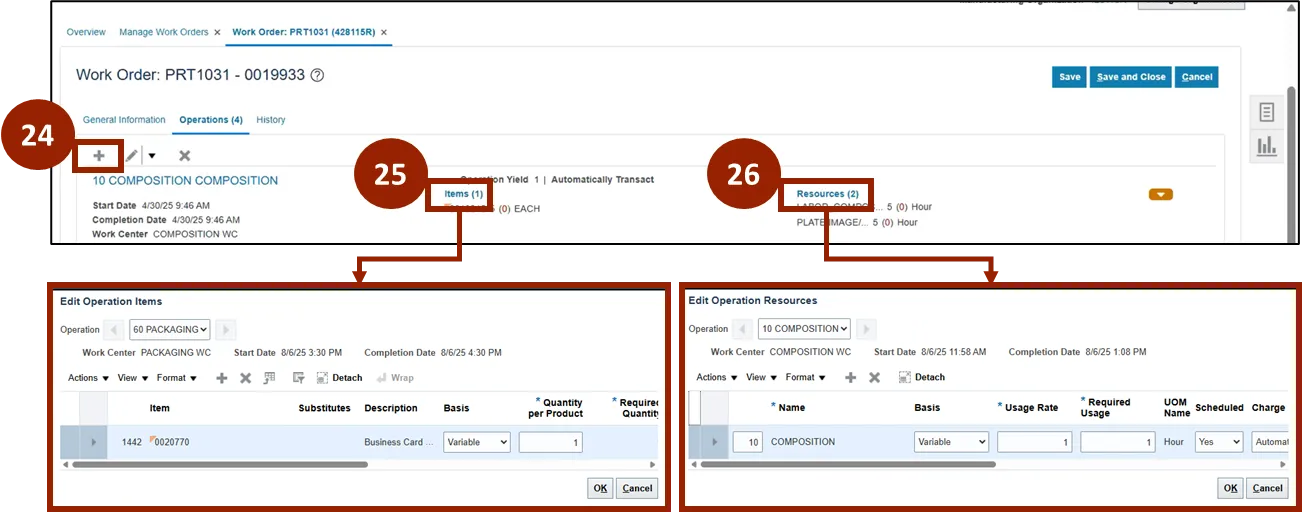
Step 23. The Operations tab will show the Work Definitions selected for the Item (product) and Work Order.
Note: Review Raw Materials and Resources as needed.
Step 24. To add an Operation, select the Plus (+) icon.
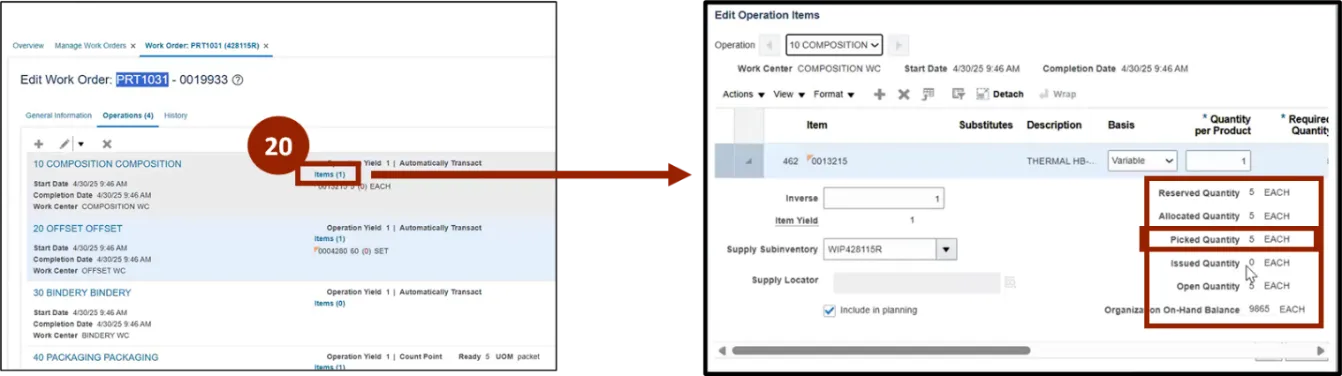
Step 25. To add an Operation Item, select the blue Items link for the Work Order.
Step 26. To add Resources, select the blue Resources link for the Work Order.
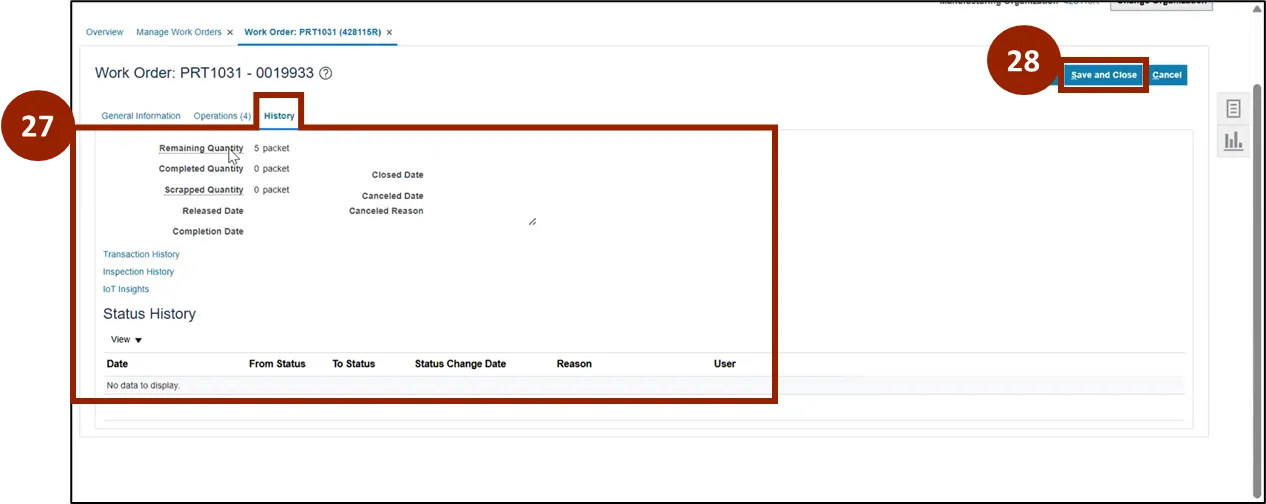
Step 27. The History tab will show you the Remaining Quantity, Completed Quantity, and Scrapped Quantity.
Note: As you complete the Work Order, other details will populate, such as Completed or Scrapped Quantity.
Step 28. Click Save and Close when finished.
Step 29. After a Work Order is created, users can view all created Work Orders on the Manage Work Orders page.

Execute Work Order
There are 18 steps to complete this process.
Step 1. Navigate to the Home page.
Step 2. From the Home page click on the Supply Chain Execution tab.
Step 3. Click on Work Execution.
Step 4. On the Overview page, click the Task icon on the right-hand side of the screen.
Step 5. In the pop-up, click Manage Work Orders.
Step 6. Enter the Work Order information to narrow down the search for the Work Order to execute.
Step 7. Highlight the Work Order to execute.
Step 8. Click Search.
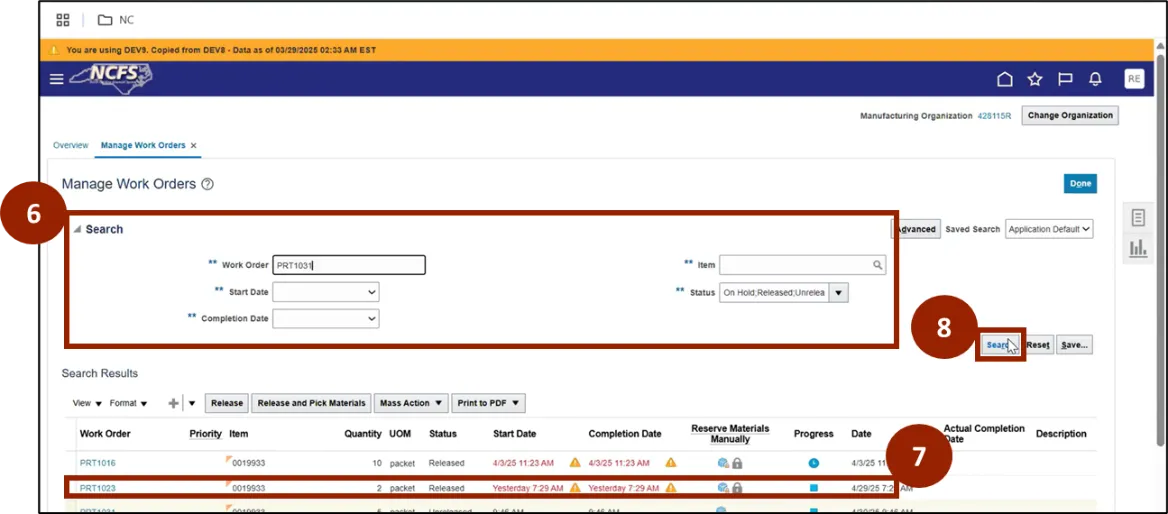
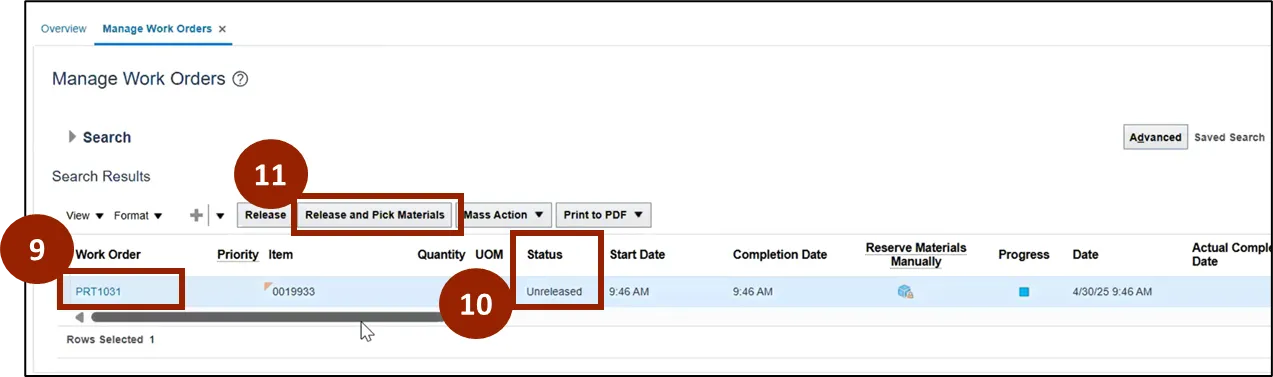
Step 9. Click on the Work Order to execute.
Step 10. Under Status, user can view the status of the Work Order.
Step 11. Click Release and Pick Materials.
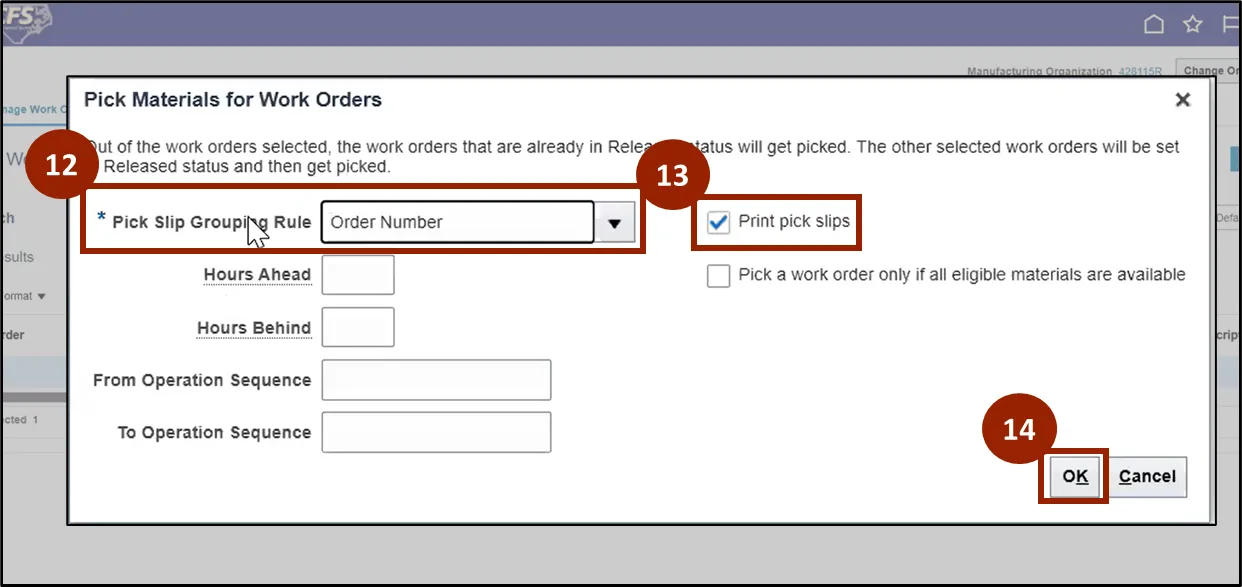
Step 12. In the Pick Materials for Work Orders pop-up, select Order Number in the Pick Slip Grouping Rule drop-down menu.
Step 13. Ensure the checkbox for Print pick slips is checked for the pick slip to be automatically generated.
Step 14. Click OK when finished.
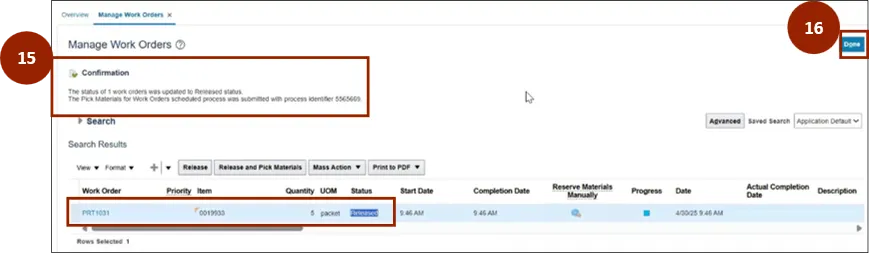
Step 15. A Confirmation message will appear confirming that the Work Order has been released for production.
Note: Write down the process ID number.
Step 16. Click the Done button to return to the Work Execution Dashboard screen.
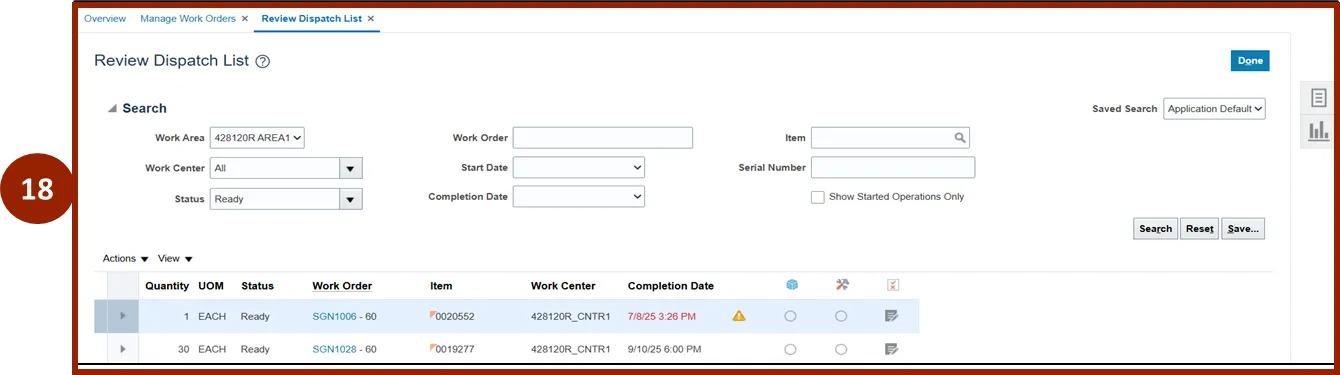
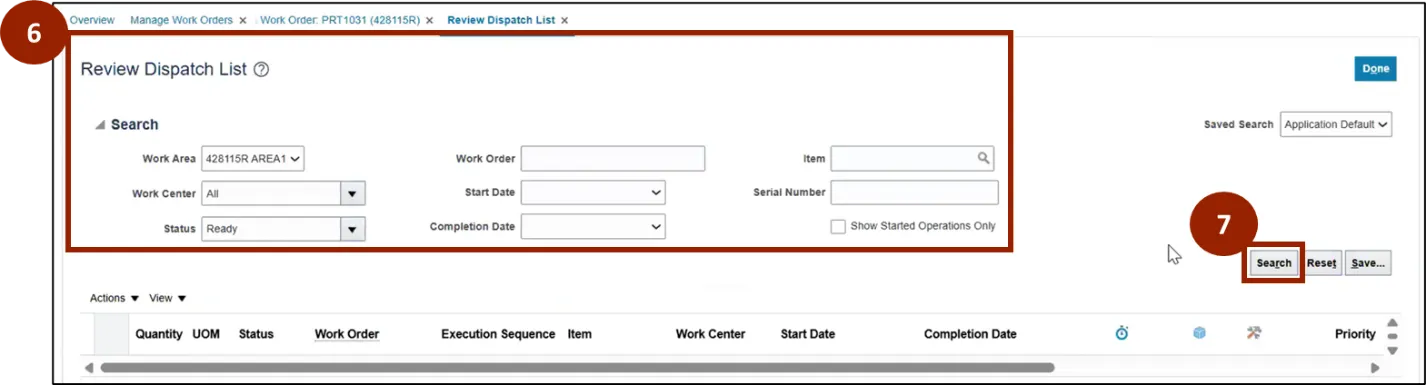
Step 17. To view Work Orders in the Dispatch List, navigate to the Task icon and under Execute Production select Review Dispatch List.
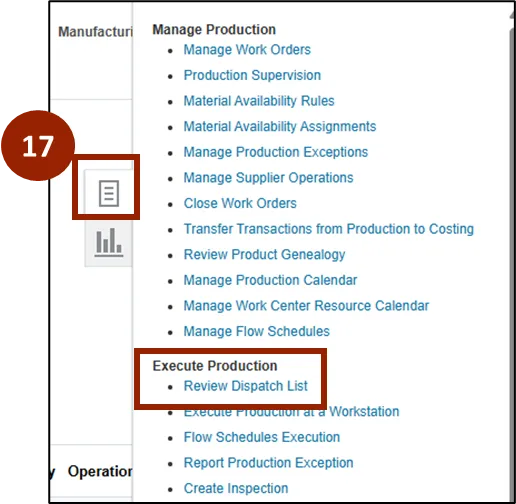
Step 18. Any Work Order that has been released for production will be shown on the Review Dispatch List.
Note: As previous operations are automatically transacted, the system marks those operations as complete. The system then awaits manual completion of the last operation for each released Work Order before closing the Work Order.
Manufacturing Picking Process
Once the Work Order is released for production and the physical movement of raw materials has taken place, the plant manager can track the status of both the Work Order and material movement in this system.
This provides real-time visibility into production progress and inventory updates.
There are 20 steps to complete this process.
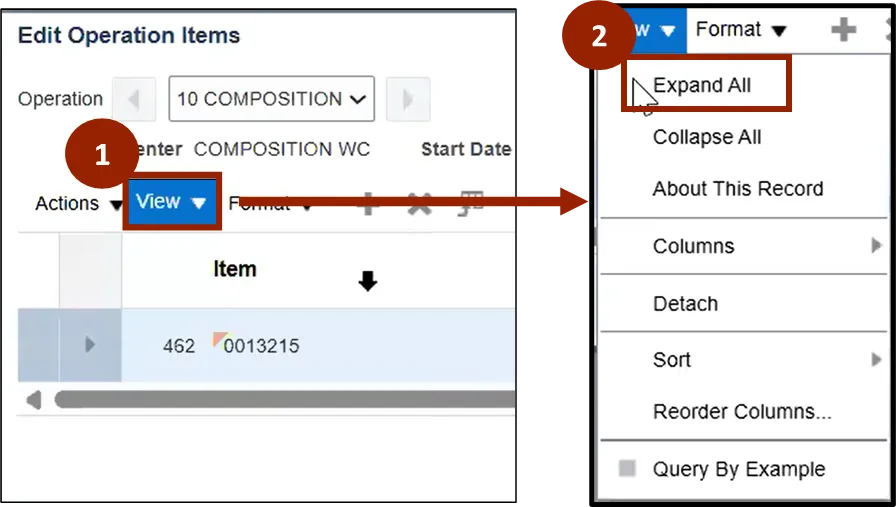
Step 1. To view all the information regarding the item, click on the View button. A drop-down menu will appear.
Step 2. Click on Expand All in the drop-down menu to expand the information of the item.
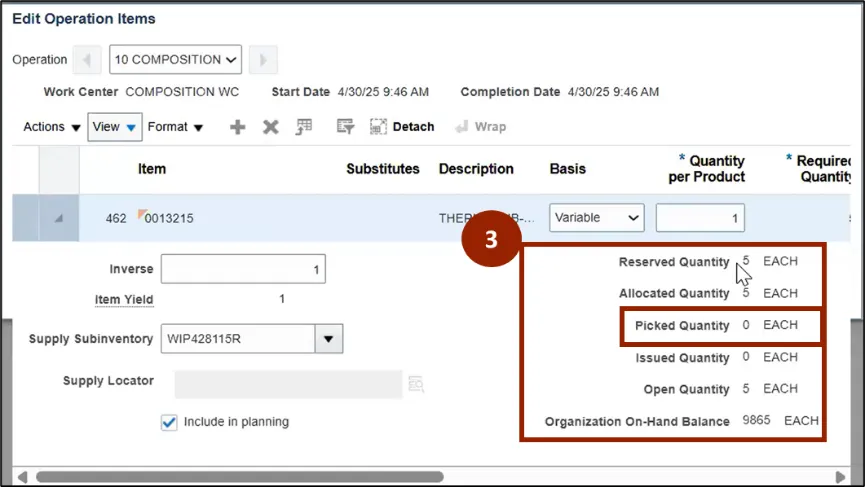
Step 3. On the right-hand side of the pop-up, users can see the different quantities for the Item.
Note: The required quantity refers to the amount needed of a specific item to fulfill the quantity for the product.
Step 4. Navigate back to the Home page.
Step 5. Click on the Supply Chain Execution tab.
Step 6. Click on Inventory Management.
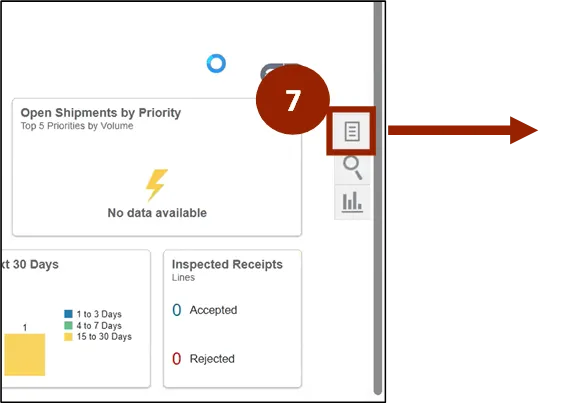
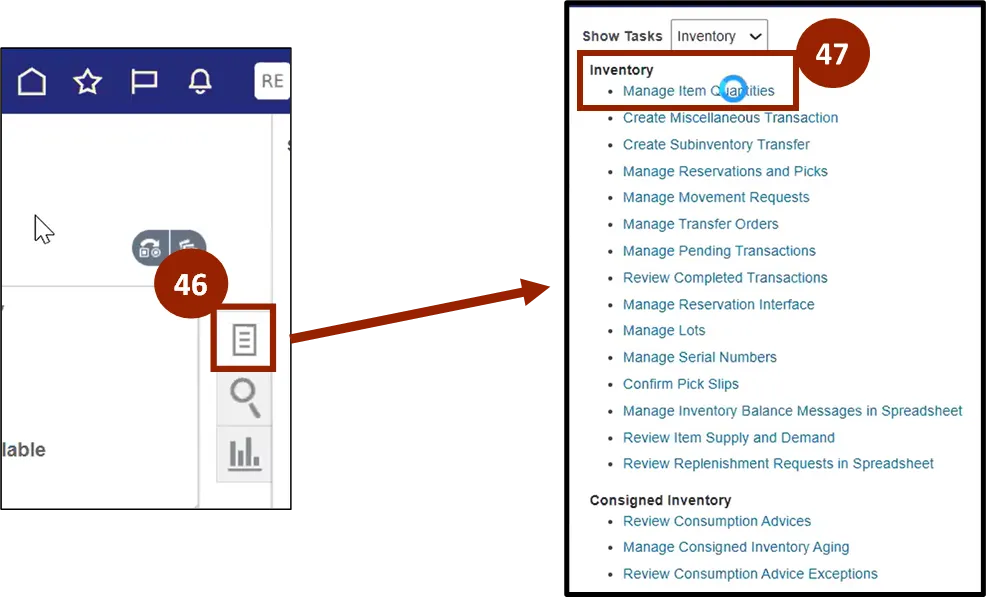
Step 7. Once on the Inventory Management screen, click on the Task icon on the right-hand side of the screen.
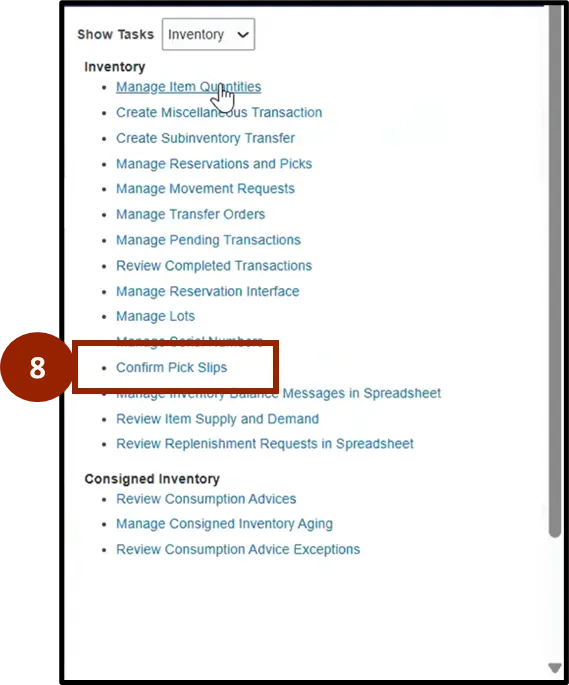
Step 8. Under the Inventory options, click on Confirm Pick Slips.
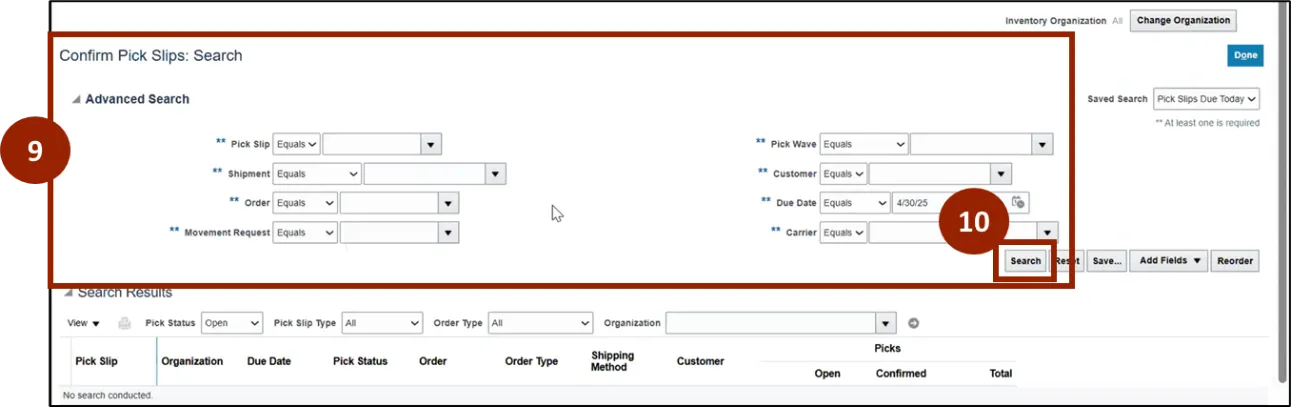
Step 9. In the Confirm Pick Slips: Search page, enter the Pick Slip information.
Step 10. Click the Search button.
Step 11. Click the Pick Slip Number of the Pick Slip to address.

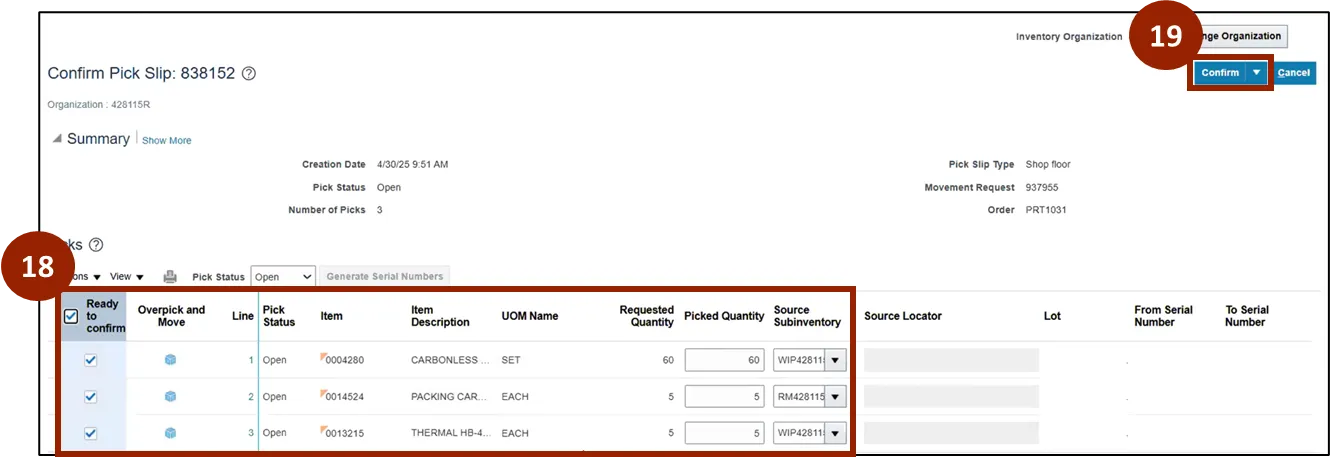
Step 12. Once ready to confirm the information is accurate, check the box next to each line item in the Ready to Confirm column.
Note: If any raw material is unavailable or only partially available, it will not be fully included in the movement request. In such cases, the plant manager can initiate procurement of the required raw material using the Ariba Procurement system.

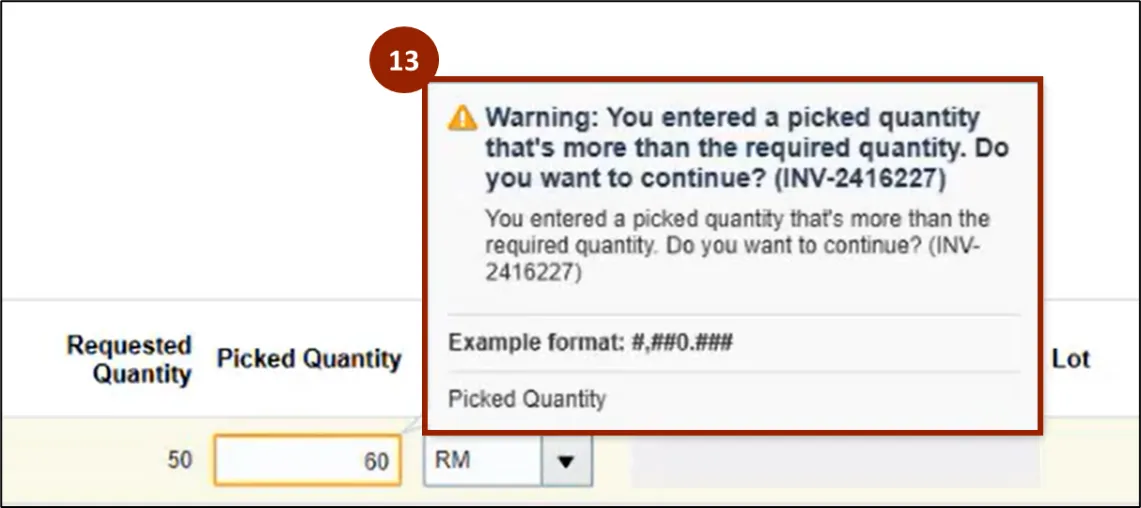
Step 13. Please note that if a quantity in the Picked Quantity field that is higher than that of the Requested Quantity description is entered, a warning message indicating that you have picked more than the required quantity will be prompted.
Step 14. Record the quantity being moved from the warehouse (Rmxxxx subinventory) to the shop floor (WIPxxxx subinventory).
- If the material is being moved in its entirety from RM subinventory and the quantity exceeds the requested amount, update the picked quantity to reflect the total quantity moved. In this case, perform an over-pick and move transaction.
- If the material is being allocated from the shop floor (WIP), whether in full or as a fractional quantity, use the actual quantity needed for the allocation.
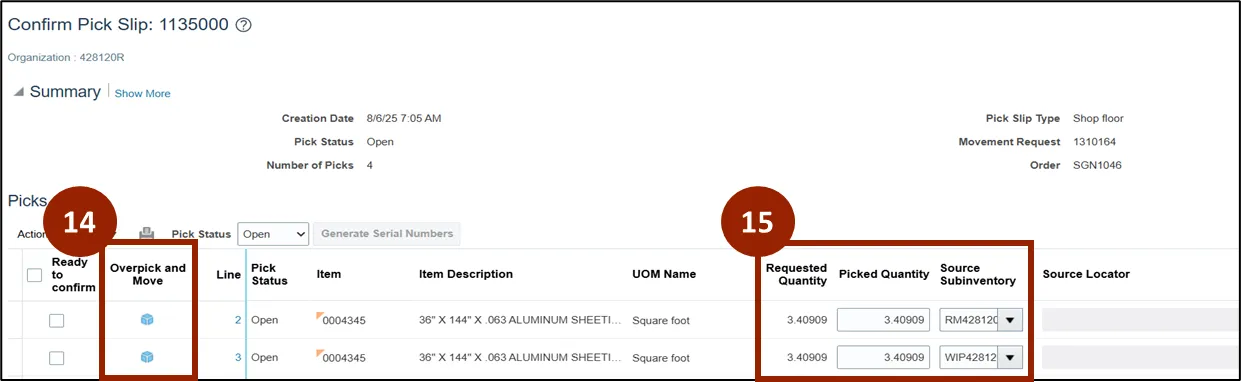
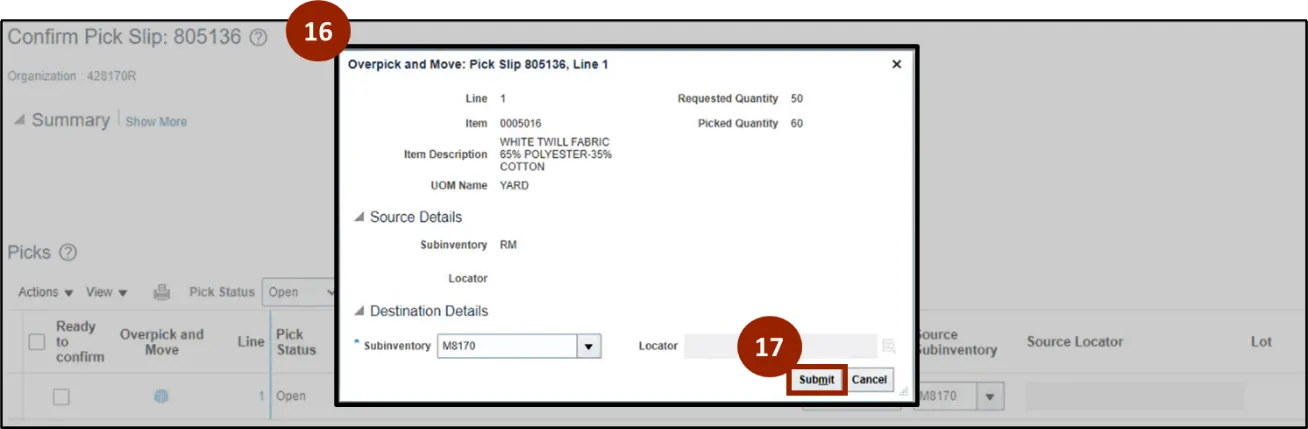
Step 15. If you picked more items than the requested quantity, you can enter the information in Overpick and Move by clicking the blue cube icon. Once done, RM subinventory automatically flips to WIP subinventory.
Step 16. After the pop-up appears, confirm all the information is accurate.
Step 17. Once finished, click the Submit button.
Step 18. If your Pick Slip contains multiple items, ensure the Picked Quantity is accurate for each item and perform Overpick and Move if necessary.
Step 19. Once all information is accurate and user has checked the Ready to Confirm boxes, click on Confirm.
Step 20. Once materials are confirmed, quantities will automatically update when user navigates back to the Operations section of the Work Order and click on the Items' blue hyperlink. Plant Manager should be able to verify on Work Order.
Complete and Close Work Order
Once production is complete and inspected in NCFS, follow the steps listed to complete and close a Work Order. There are 49 steps to complete this process.
Step 1. Navigate to the Home page.
Step 2. Click the Supply Chain Execution tab.
Step 3. Click on Work Execution.
Step 4. From the Work Execution page, click on the Task icon on the right-hand side of the screen.
Step 5. Select Review Dispatch List, located under the Execute Production section of the menu.
Step 6. From the Review Dispatch List, enter the information to locate the Work Order you wish to complete or close.
Step 7. Click the Search button.
Step 8. Locate the Work Order you would like to complete and close, and select it by clicking on that row, which will highlight it in blue.
Step 9. On the left side of that row, click the arrow, this will expand the row to show more information.
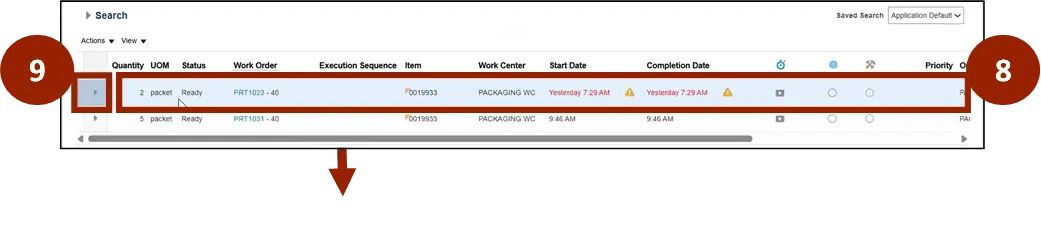
Step 10. Please enter the number of units were completed, rejected, or scrapped. You will be able to report one at a time.
Step 11. Once all information has been entered accurately, click Complete with Details.

The Complete with Details process will begin. The first step in the process is Product:
Step 12. Review the information on this screen and update where necessary.
Step 13. On the Operations page of a Work Order, the last item is related to Quality/Packing.
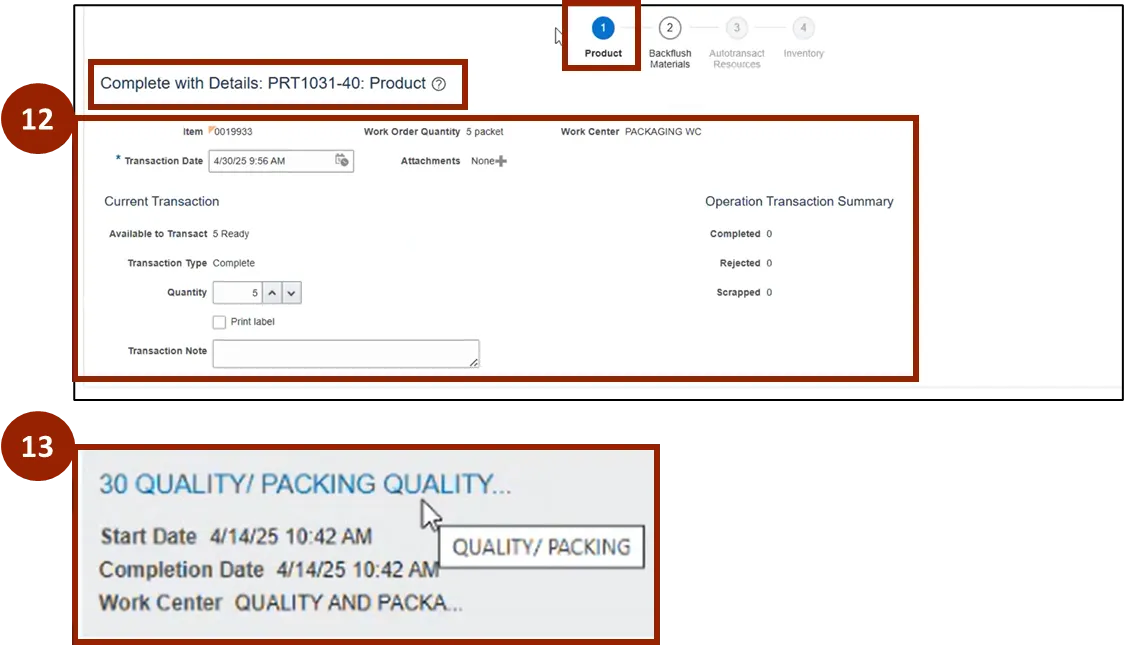
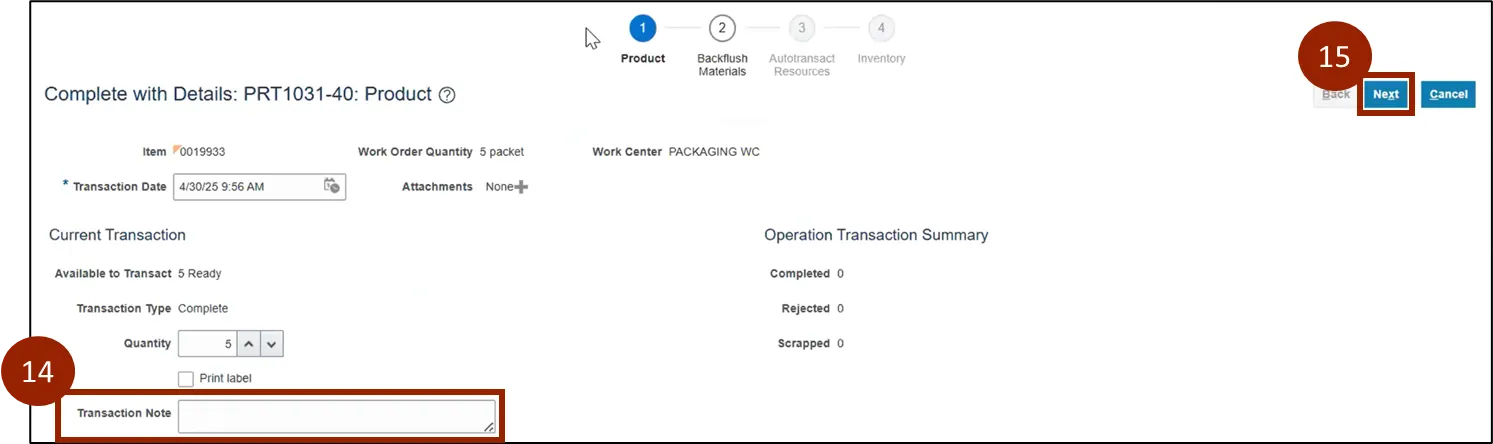
Step 14. In the Transaction Note, enter information related to quality or inspections.
Step 15. When finished, click Next.
Note: There will be no other place in the system to record inspections.
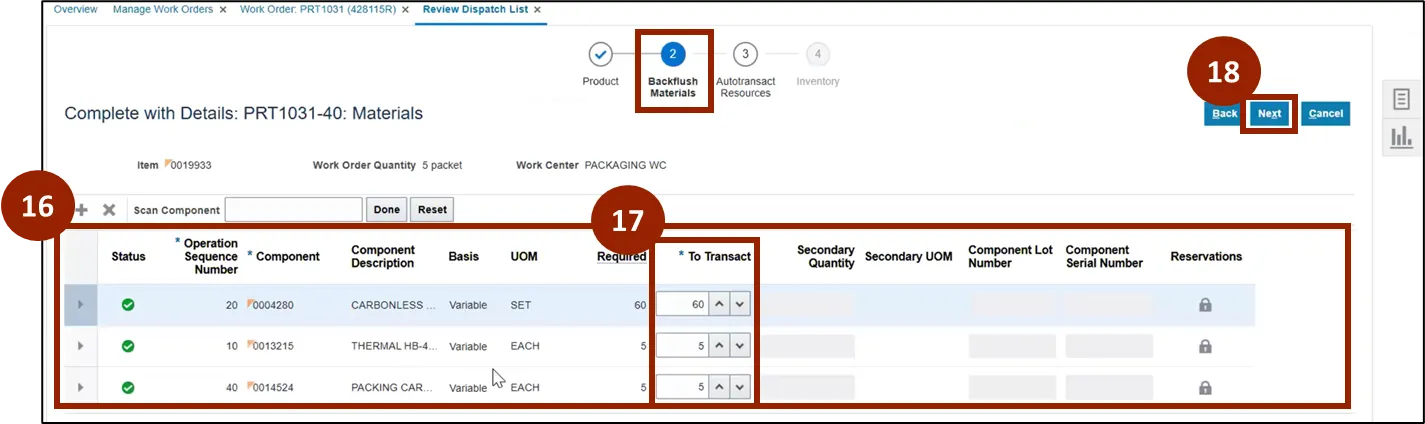
The second step in the process is Backflush Materials.
Step 16. Here, each of the components that were required in the manufacturing process is shown.
Step 17. Update the Raw Material number quantity, if necessary, in the To Transact column (Plant Manager needs to report actual consumed quantity during the production of finished goods. Expand the line by clicking on arrow and verify the source subinventory.).
Step 18. When finished, click Next.
The third step in the process is Autotransact Resources.
Step 19. On this page, a listing of every resource used in the process of manufacturing the Work Order is shown.
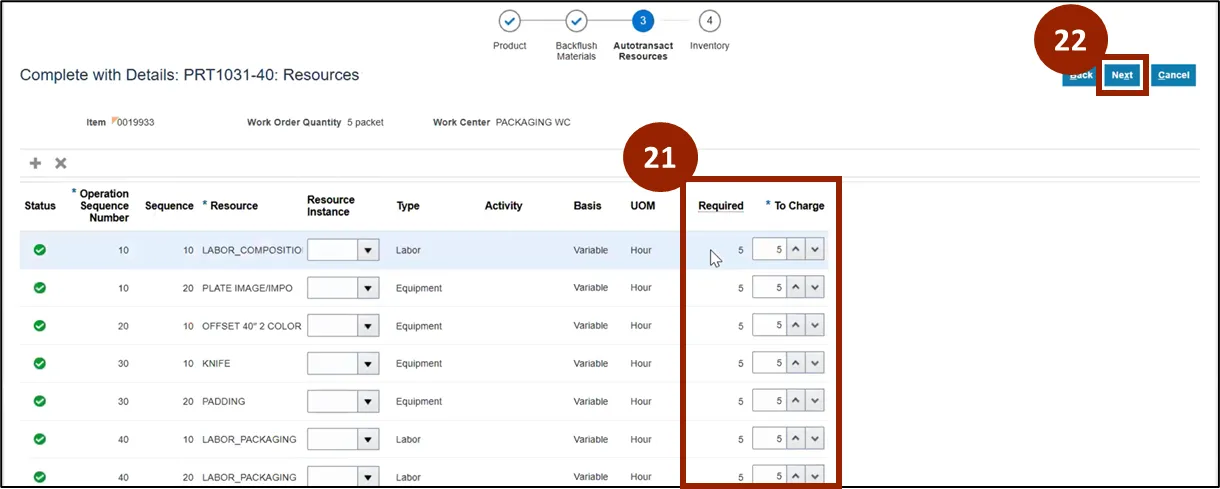
Step 20. If a resource needs to be added or deleted, click the + icon to add or the X icon to delete a resource that is highlighted.
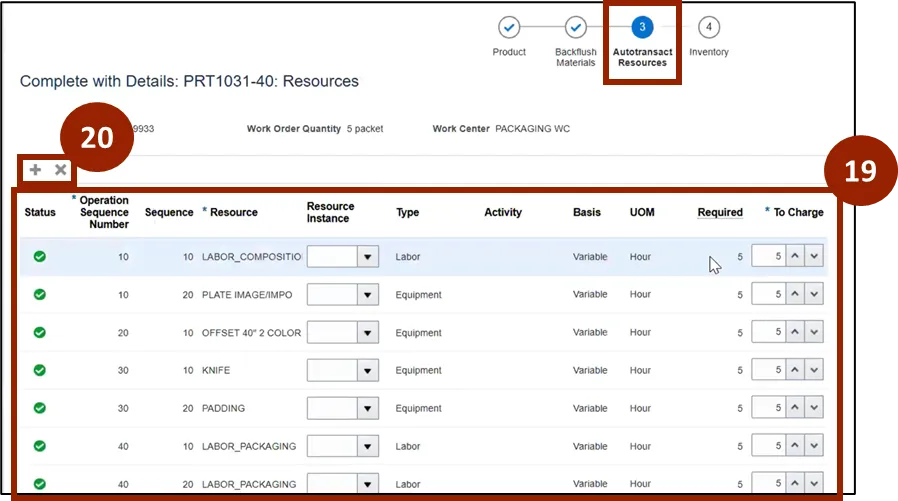
Step 21. Verify the information in the To Charge field is accurate for each resource.
Step 22. When finished, click Next.
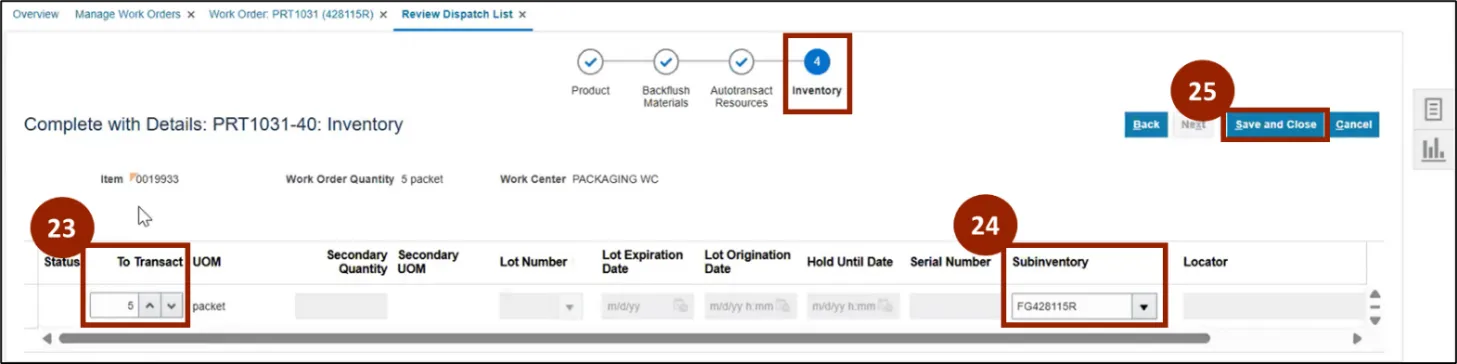
The final section of the Complete with Details process is the Inventory.
Step 23. Ensure that the To Transact (quantity of finished goods produced out of Work Order) field is accurate.
Step 24. Ensure that the Subinventory (where finished good is kept) field is accurate.
Step 25. Once finished, click Save and Close.
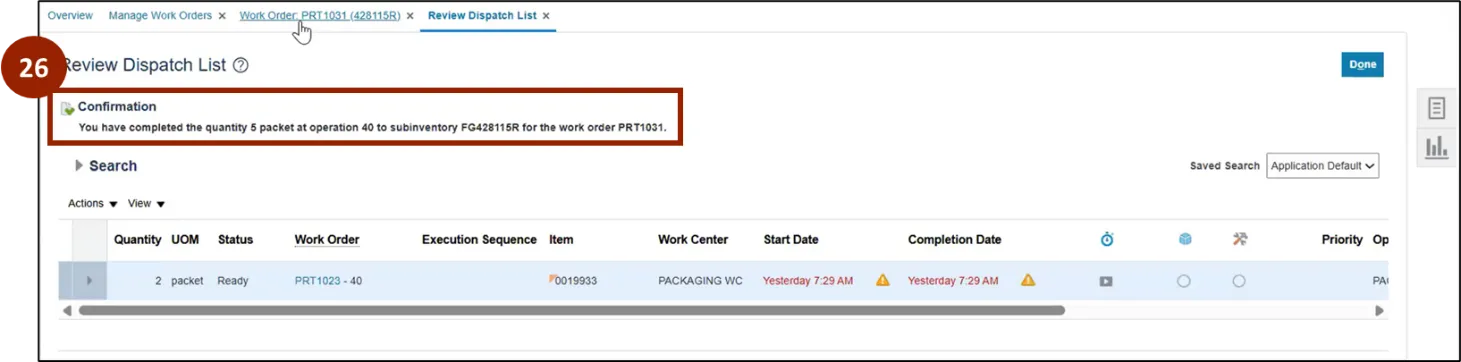
Step 26. A Confirmation message, confirming that the Work Order has been completed will be shown.
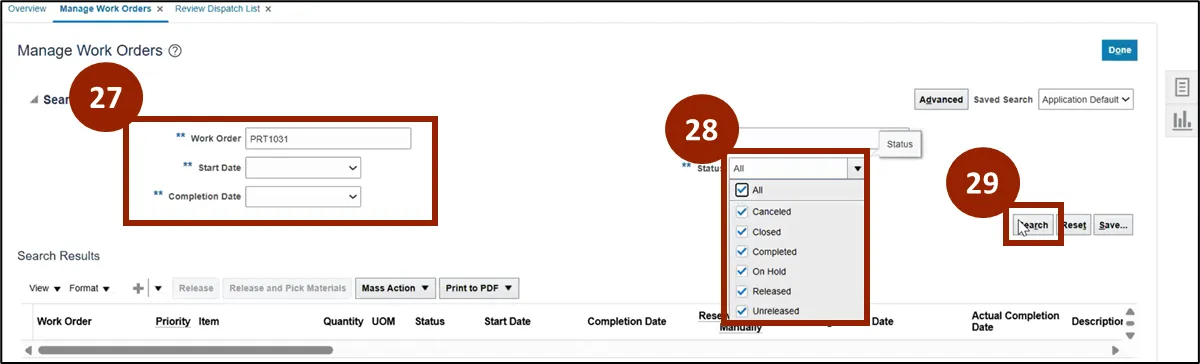
The status of the Work Order has changed now that it has been completed. To view the status of the Work Order, navigate to the Manage Work Orders page.
Step 27. In the search area, enter the Work Order information.
Step 28. Ensure that the Status drop-down menu is listed as All.
Step 29. Click Search.
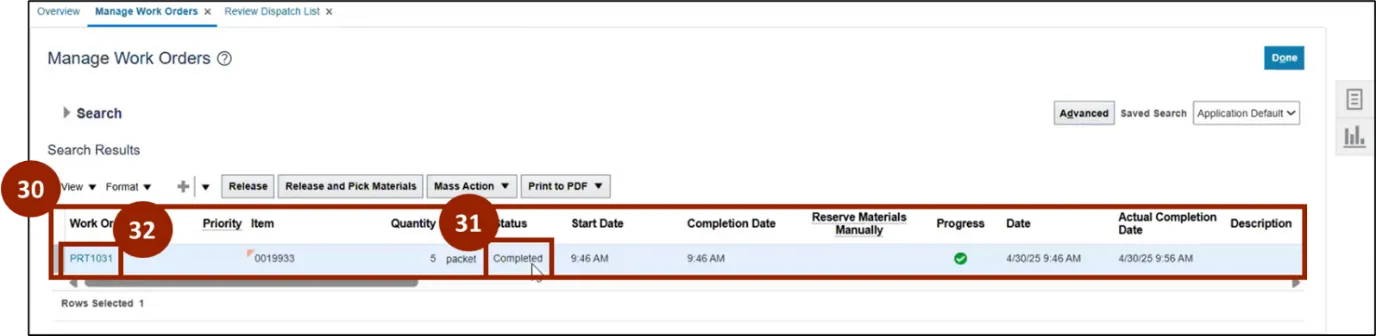
Step 30. The Work Order will display in search result.
Step 31. The Status of the Work Order is now listed as Completed.
Step 32. To review the Work Order further, click on the Work Order blue hyperlink to open it.
Note: A daily process will be scheduled to Close the Completed Work Order to restrict any further update, which will automatically change the Work Order status to Closed.
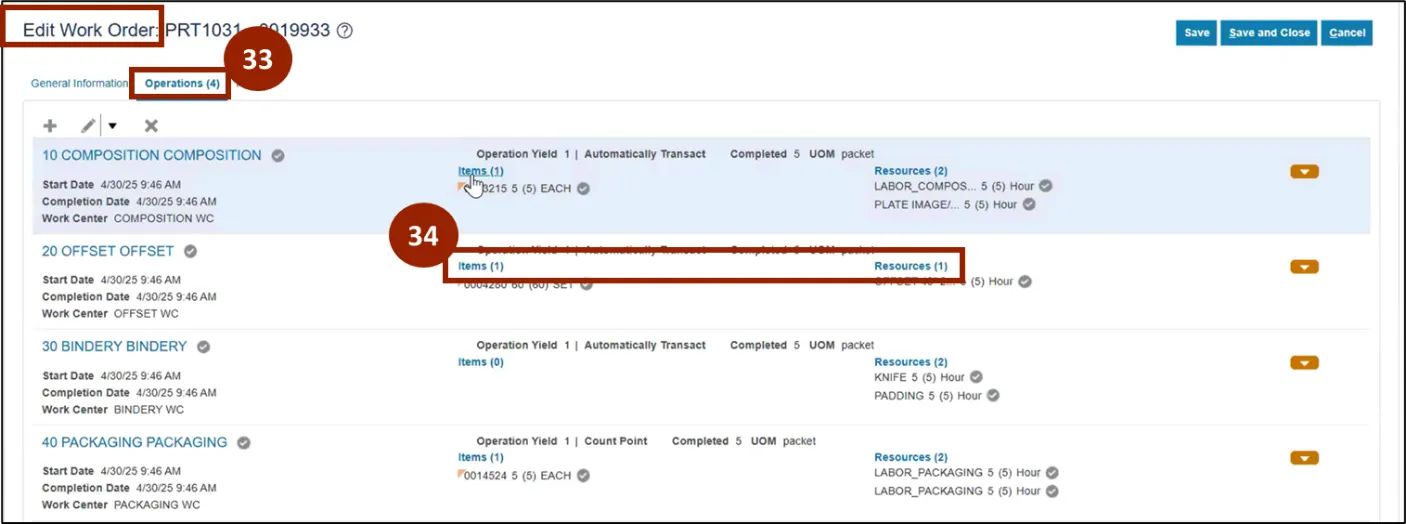
Step 33. Once in the Edit Work Order page, click on the Operations tab.
Step 34. Click on the Items or Resources blue hyperlinks to review.
If Items is selected, the Edit Operation Items pop-up window will appear.
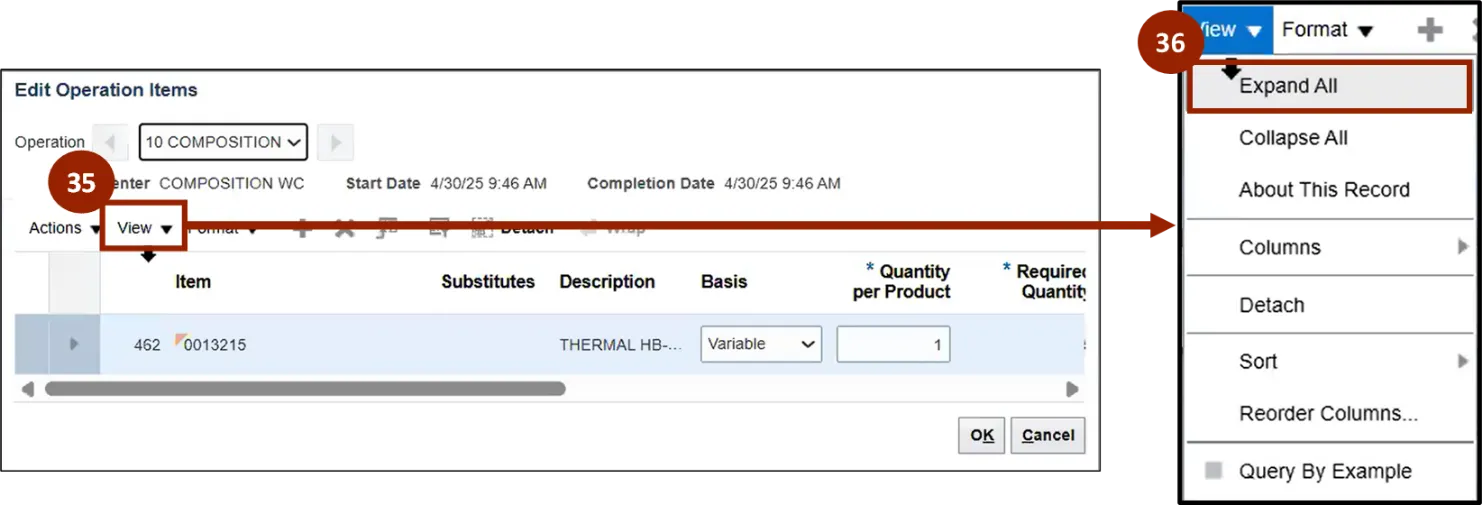
Step 35. To view all the information, click on the View button.
Step 36. On the drop-down menu, click Expand All.
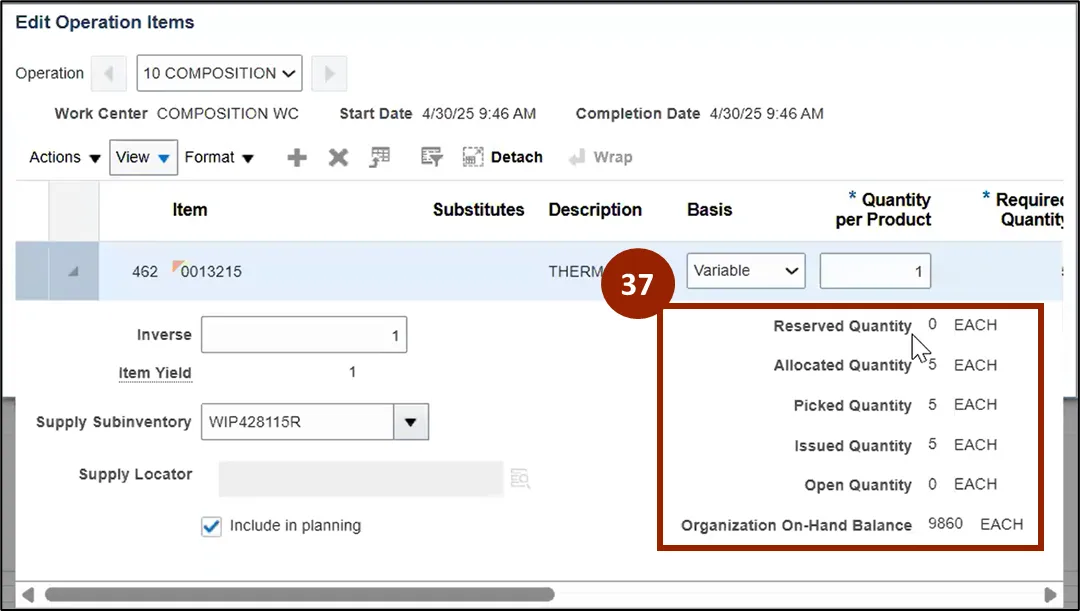
Step 37. The quantities have now been updated for the Work Order.
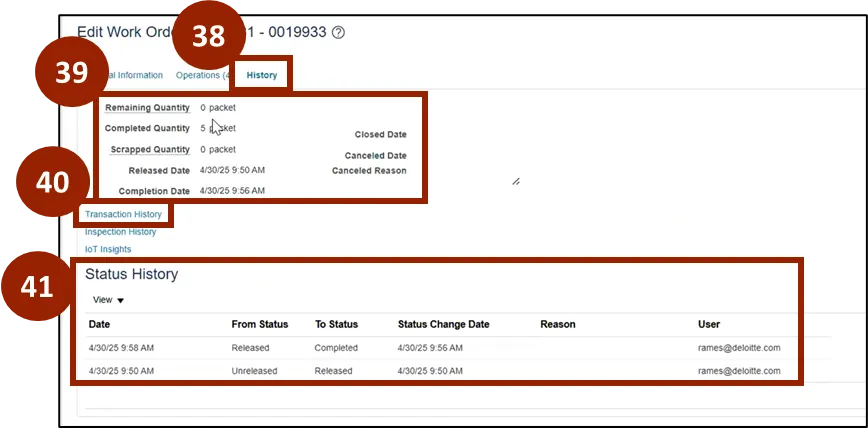
Step 38. If you click on the History tab, the history of the Work Order from creation to completion will be shown.
Step 39. In this section users can see the history of the quantity used in production.
Step 40. If users click on the Transaction History, a view of the entire Production Transaction history for the Work Order can be seen.
Step 41. In this section users can see the status history for the Work Order.
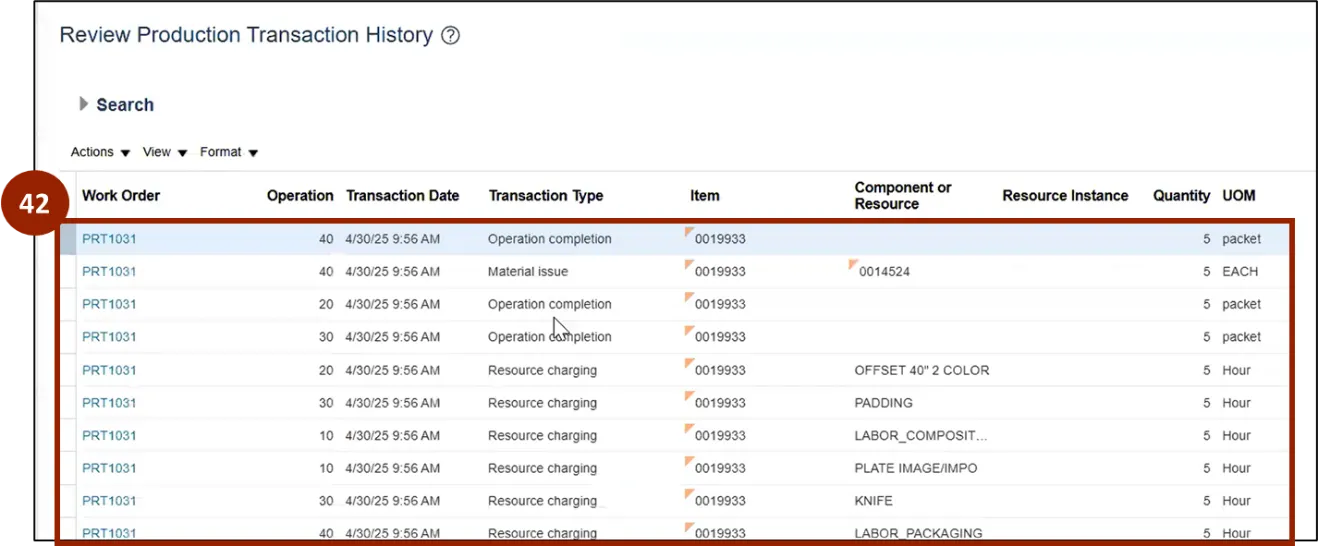
Step 42. On the Review Production Transaction History page, users can see all production transactions for the Work Order.
Verifying Inventory
Following the completion of the Work Order you can manage item quantities.
Step 43. Navigate to the Home screen.
Step 44. Click on the Supply Chain Execution tab.
Step 45. Click on Inventory Management.
Step 46. On the Inventory Management page, on the far right-hand side of the screen click the Task icon.
Step 47. Click Manage Item Quantities under Inventory.
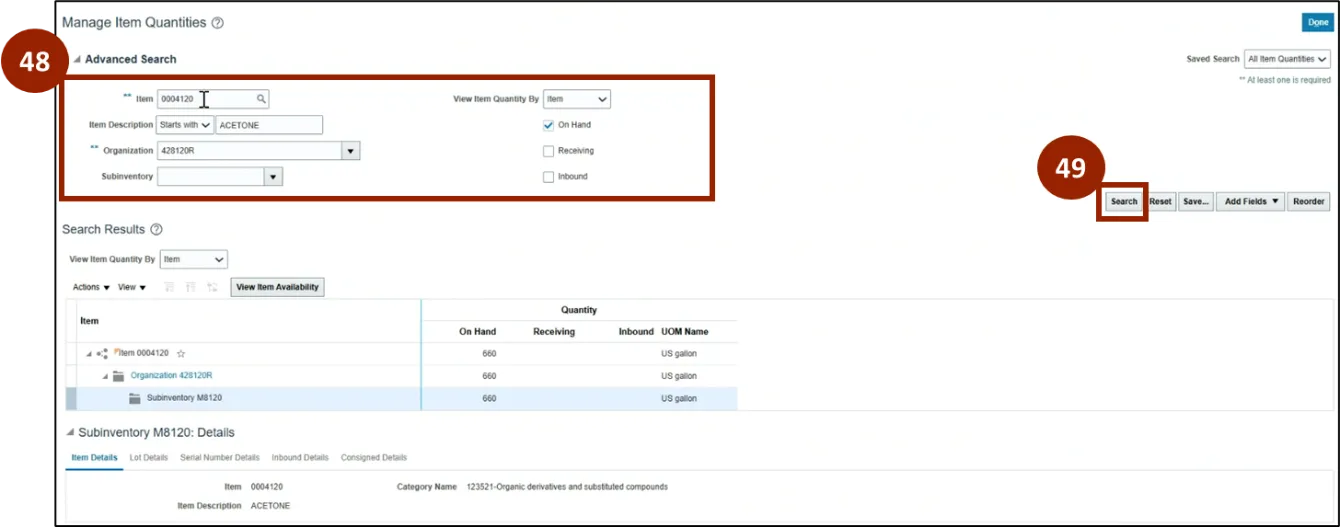
From the Manage Item Quantities screen, users can search for a specific item to verify.
Step 48. Enter information relevant to the item user wants to verify quantities for the completed work order.
Step 49. Click the Search button.
Wrap-Up
NCFS users can learn how to create, execute, complete, and close work orders using the steps above.
Additional Resources
- Instructor Led Training (ILT)
- Web-based Training (WBT)