Purpose
The purpose of this Quick Reference Guide (QRG) is to provide a step-by-step guide of how to create work definition in the North Carolina Financial System (NCFS).
Introduction and Overview
This QRG covers the process to create and edit work definitions for both Make to Stock (MTS) and Make to Order (MTO) scenarios within NCFS.
Create Work Definition
There are 9 steps to complete this process.
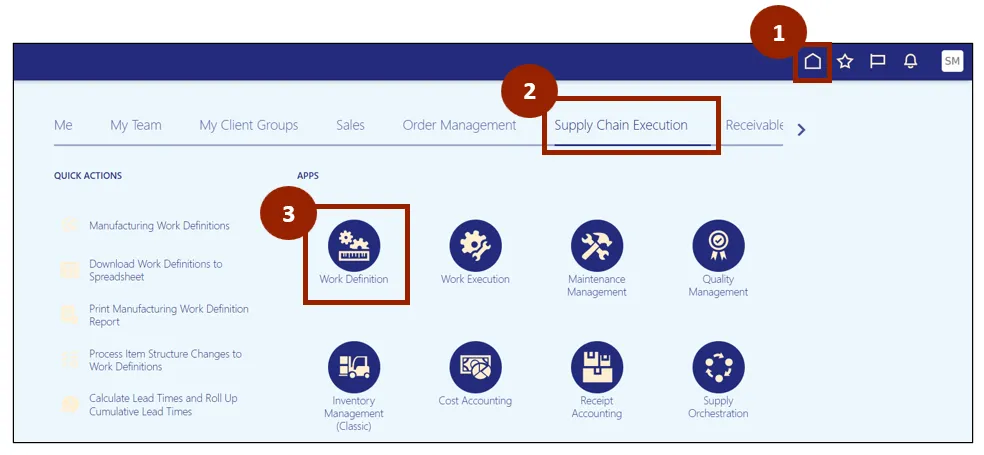
Step 1. Log in to the NCFS portal with your credentials to access the system.
Step 2. On the Home page, select the Supply Chain Execution tab.
Step 3. Select Work Definition.
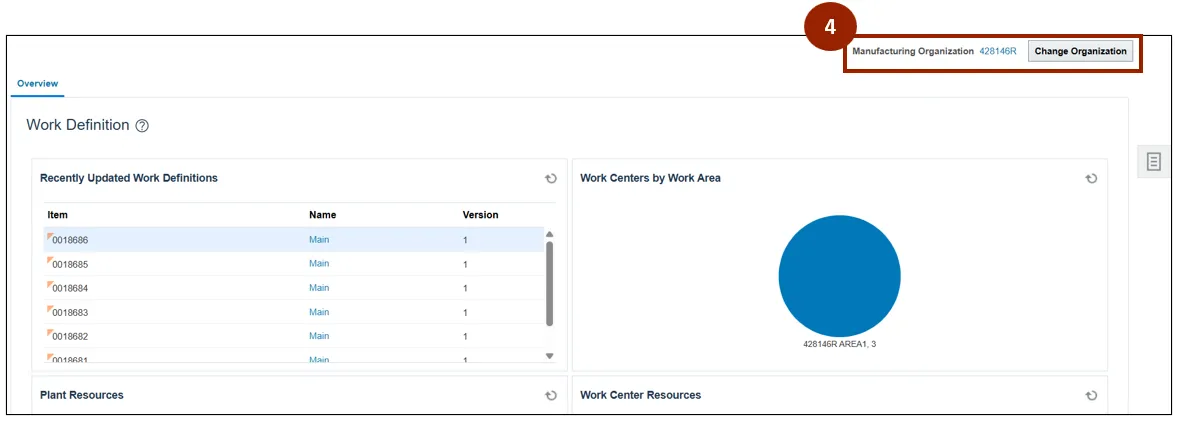
Step 4. On the Work Definition page, review the displayed Manufacturing Organization and select Change Organization if needed.
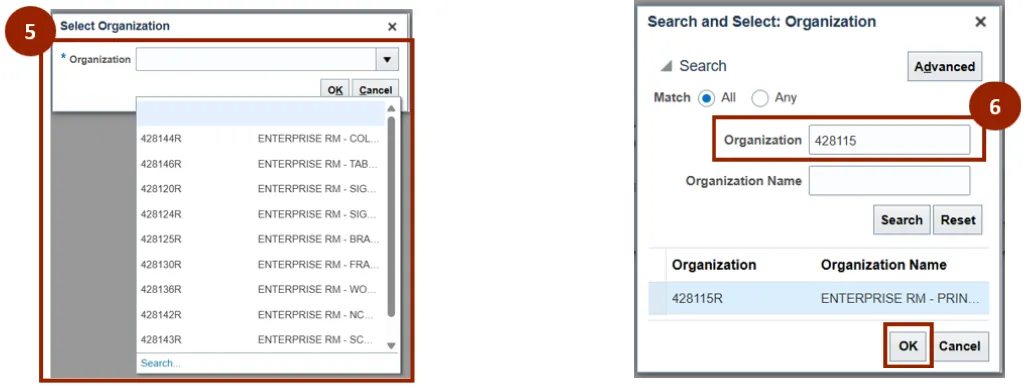
Step 5. Select your appropriate Organization from the list or select Search… to search for a specific Organization number.
Step 6. If you are using the search functionality, enter the Organization number in the Organization field, select the correct Organization, and select OK.
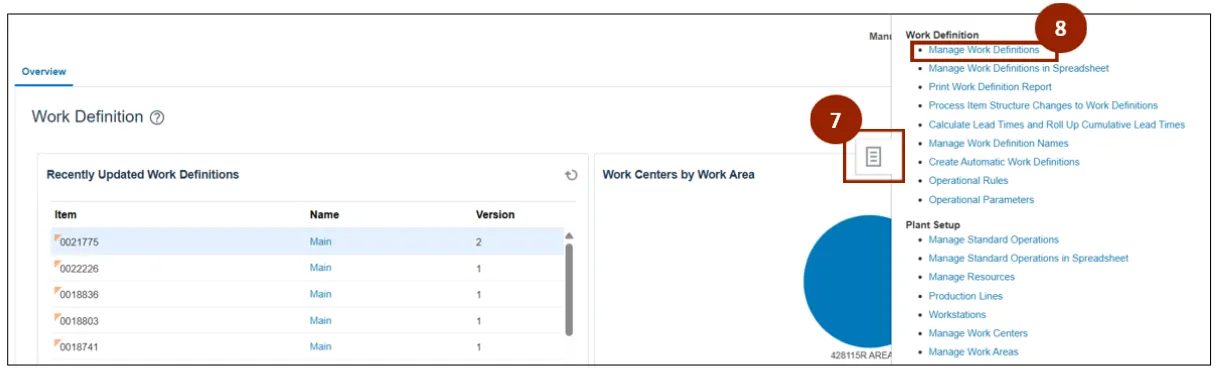
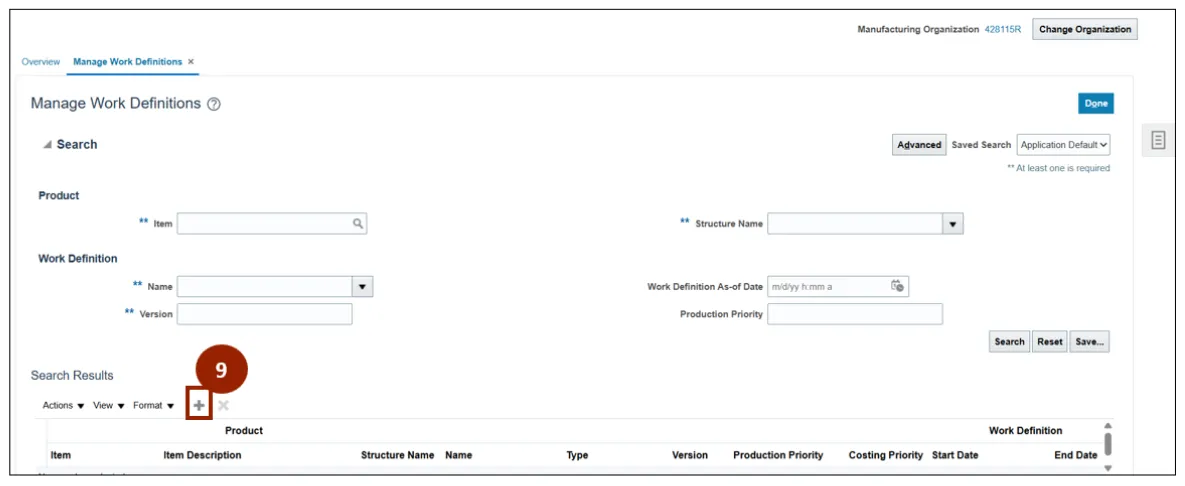
Step 7. From the Work Definition page, click the Task icon.
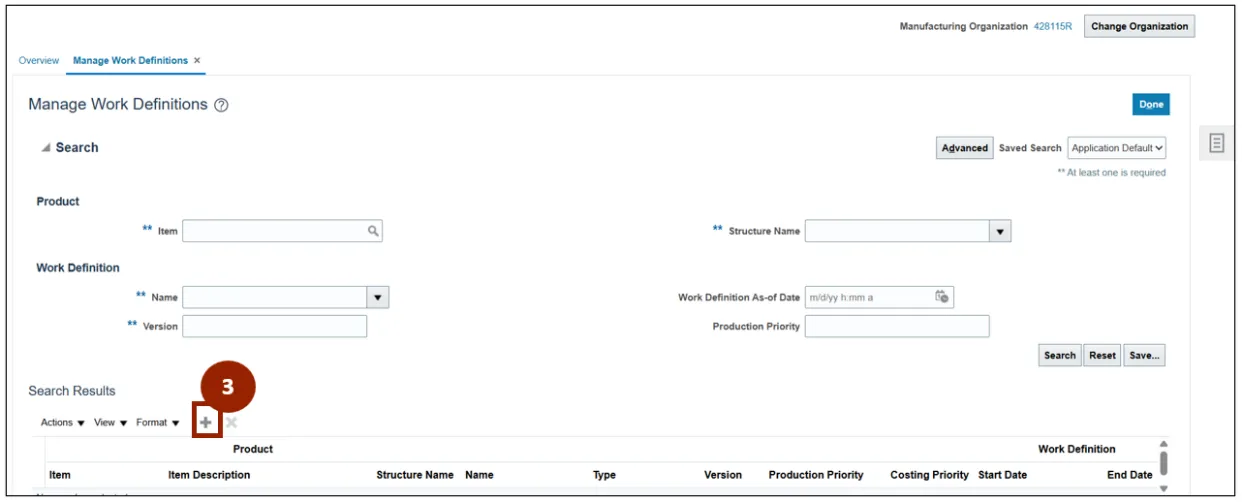
Step 8. Select Manage Work Definitions.
Step 9. Click the Add icon to add a new Work Definition.
Create a Make to Stock Work Definition
Once the Create Work Definition window is displayed, follow these steps. There are 35 steps to complete this process.
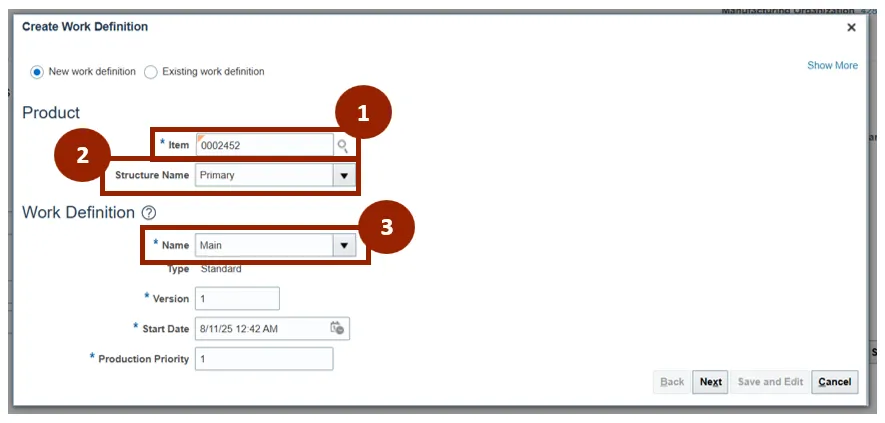
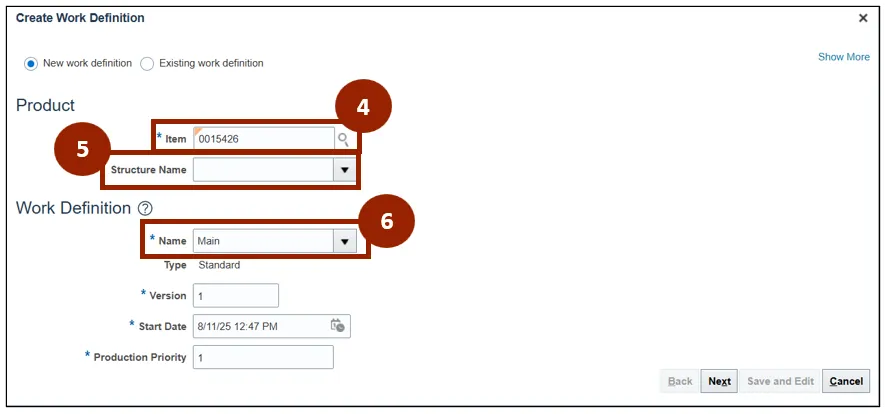
Step 1. In the Item field, input the item number.
Step 2. The Structure Name field will fill in automatically based on the item selected.
Step 3. In the Name field select Main from the drop-down list.
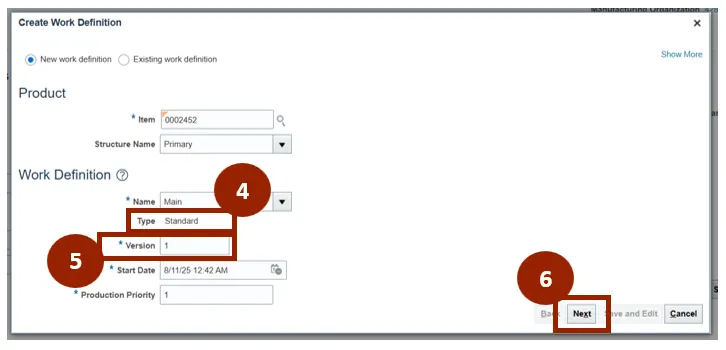
Step 4. The Type field fills in automatically based on the selected Work Definition.
Step 5. The Version field fills in automatically.
Step 6. Click Next.
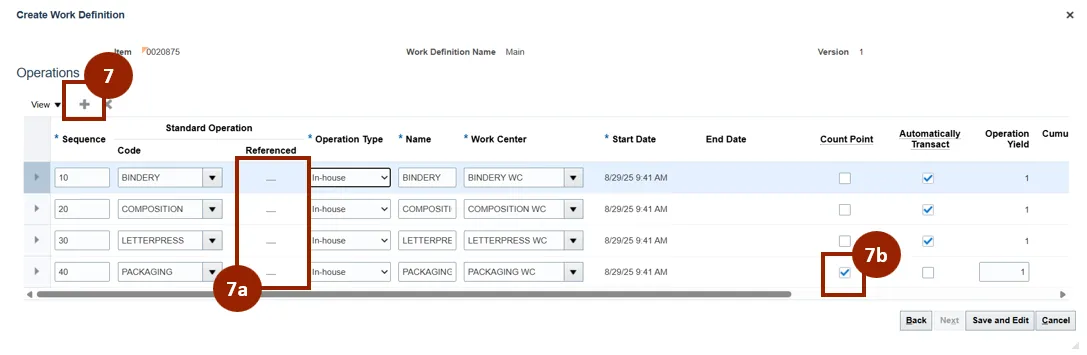
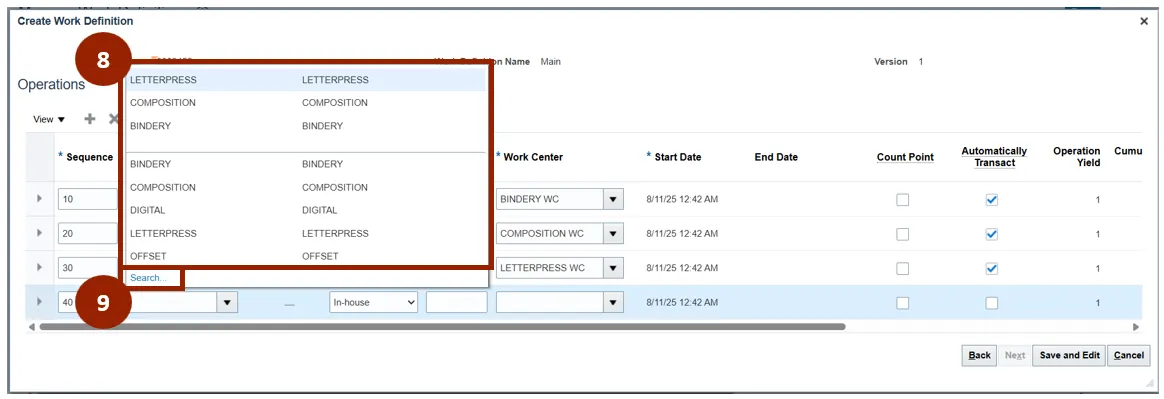
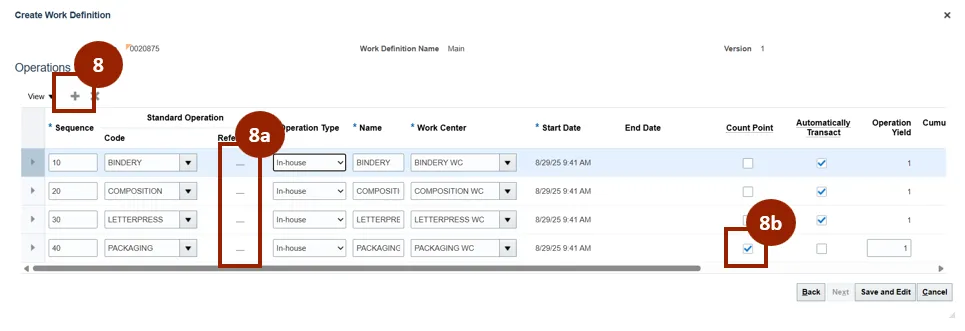
Step 7. Select the Add icon to add additional Operations.
- 7a. Confirm Referenced field displays a dash for all operations.
- 7b. The last operation should be marked as a Count Point operation.
Step 8. Select the appropriate final operation to add from the drop-down list.
Step 9. If you are unable to see the appropriate operation, select Search.
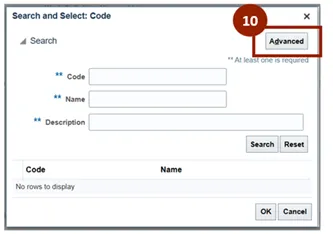
Step 10. After selecting Search…, select Advanced in the Search and Select window.
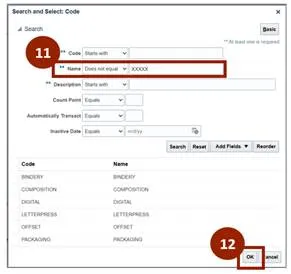
Step 11. In the Name field drop-down select Does not equal and type “XXXXX” in the field to display all possible options.
Step 12. Select OK.
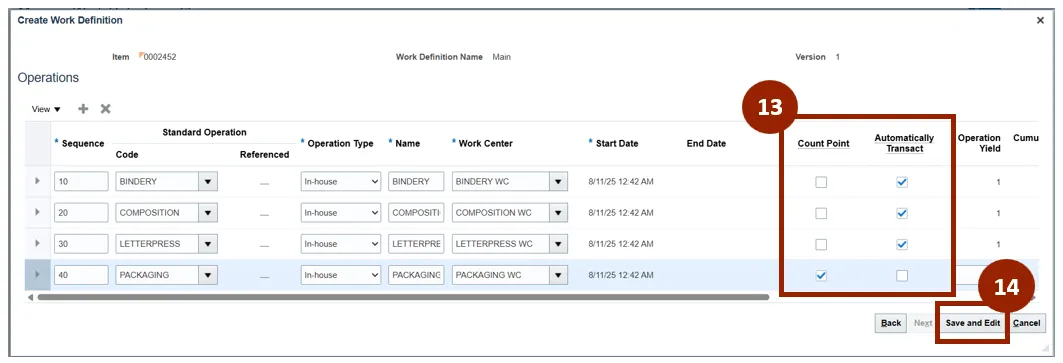
Once all operations are added it is a mandatory requirement that the initial operation must be Automatically Transact, and the last operation must be a Count Point operation.
Step 13. Once complete, select Save and Edit.
Note: If the production process requires repeating an operation, such as returning to the bindery after letterpress, additional operations can be added.
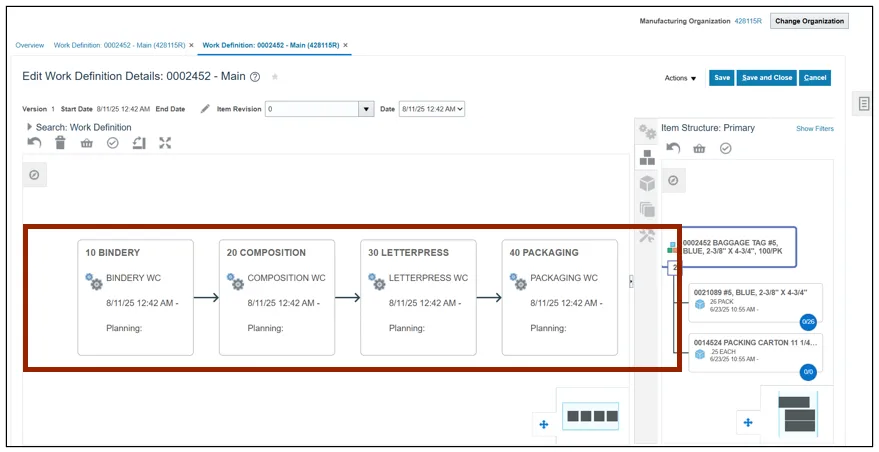
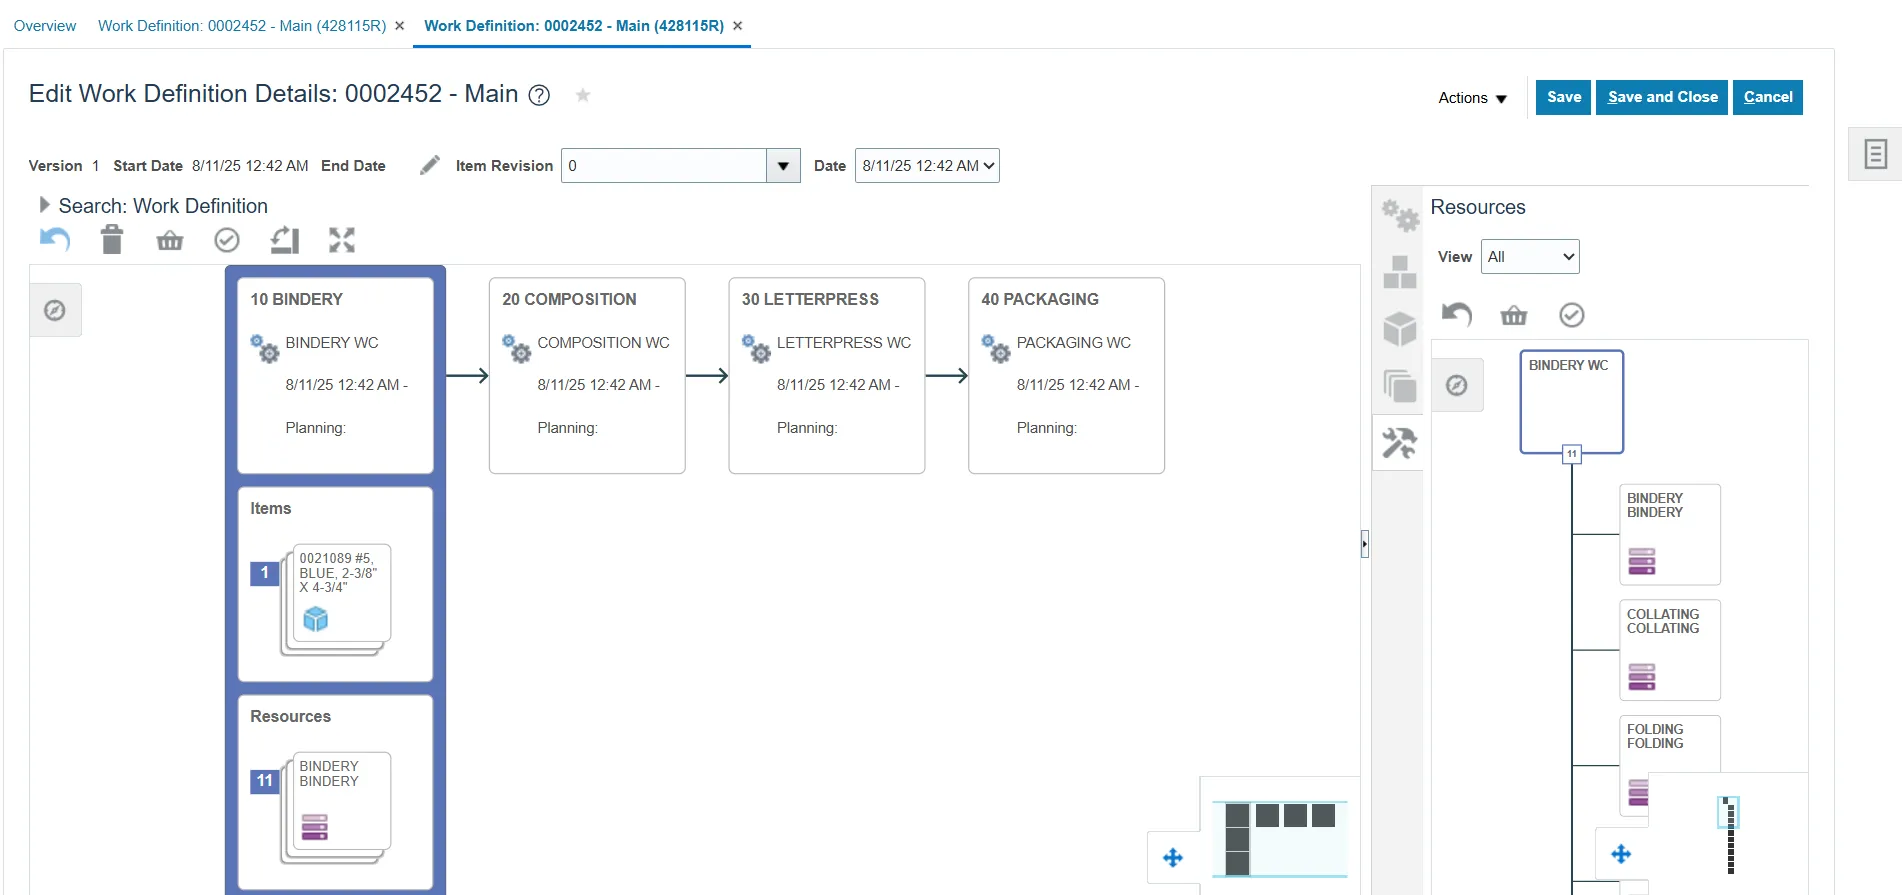
Note: Once the Edit Work Definition Details Page is displayed, please note the following:
- Once the operations are created, the system automatically creates the workflow in the correct order.
- The first operation is bindery, followed by composition, and then letterpress with packaging. This sequence ensures that all steps are performed as needed.
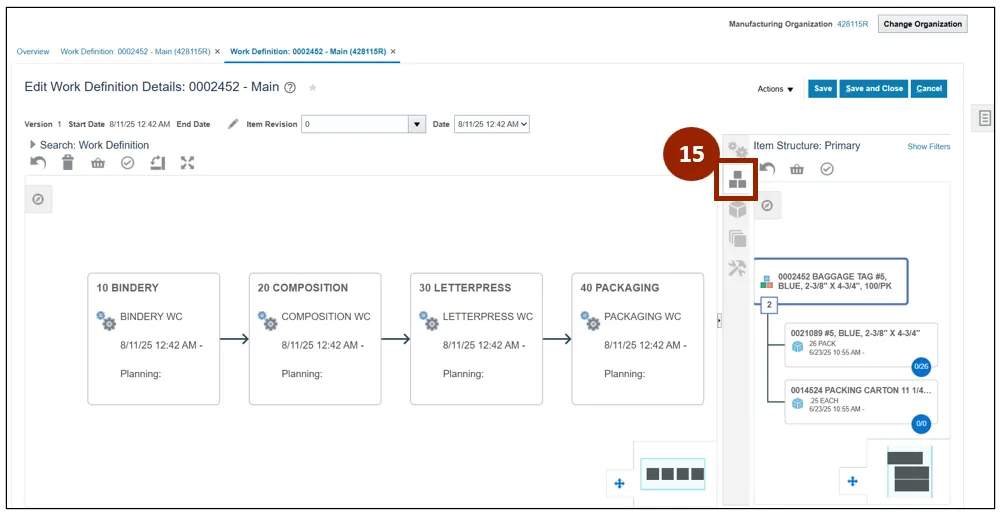
Step 15. To add the Item (raw material) from an Item Structure, select the stacked squares icon on the right-hand pane.
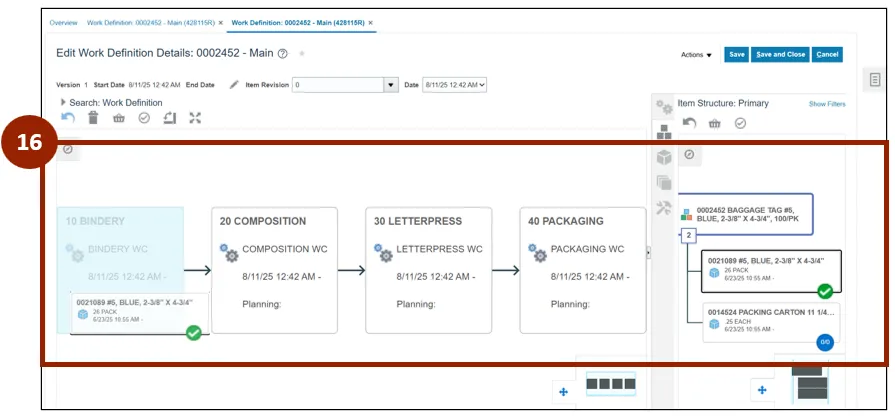
Step 16. Drag and drop the Item to the appropriate operation.
Note: When you assign a Raw Material to an Operation and the quantity used matches the quantity in the item structure, the status indicator displays a green circle. If there is any deviation from the quantity, the circle remains blue, signaling that the quantity used in the Work Definition does not match the item structure.
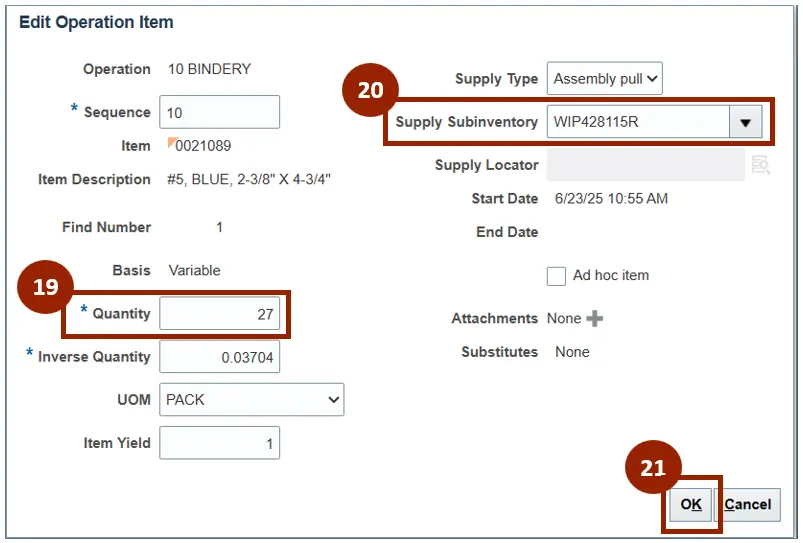
Step 17. To adjust the quantity, select the Item linked to the relevant Operation.
Step 18. From the Actions drop-down, select Edit.
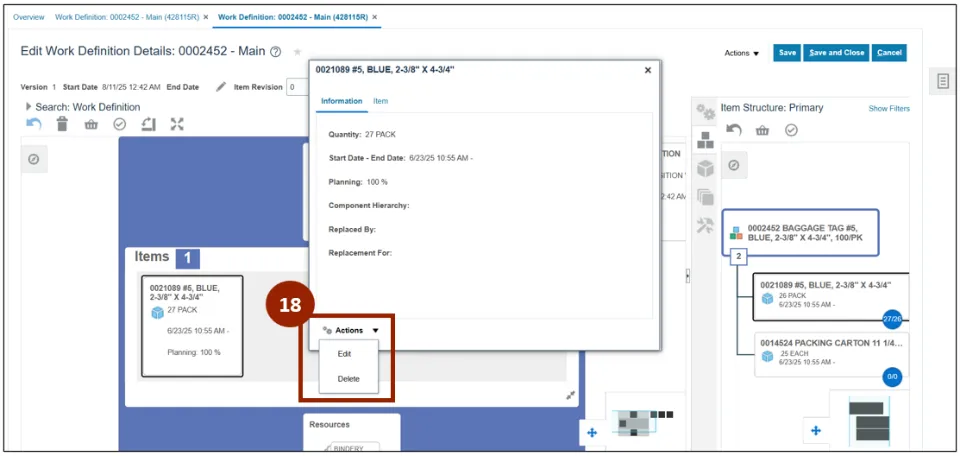
Step 19. In the Quantity field input the accurate Quantity.
Note: The item quantity is automatically populated based on the Item Structure. It can be adjusted down but you will need to work with the Inventory team to correct a needed increase.
Step 20. Adjust the Supply Subinventory field if needed.
Step 21. Click OK.
On the Edit Work Definition Details page, notice the following:
- When a Standard Operation is added, all associated Resources are automatically included. This enables every operation in production to have the correct resources assigned.
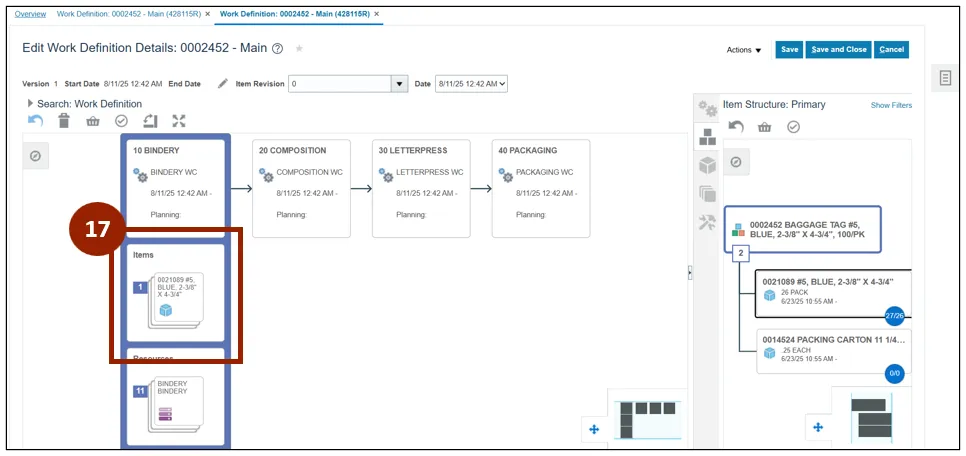
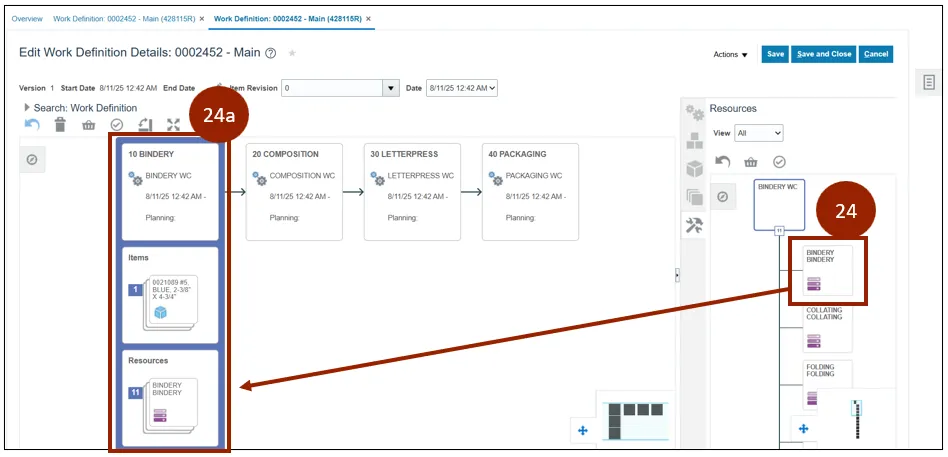
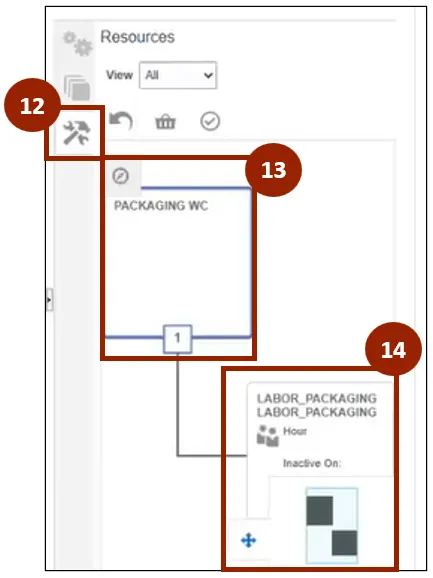
Step 22. Select the Resource icon.
Step 23. Select the appropriate resource.
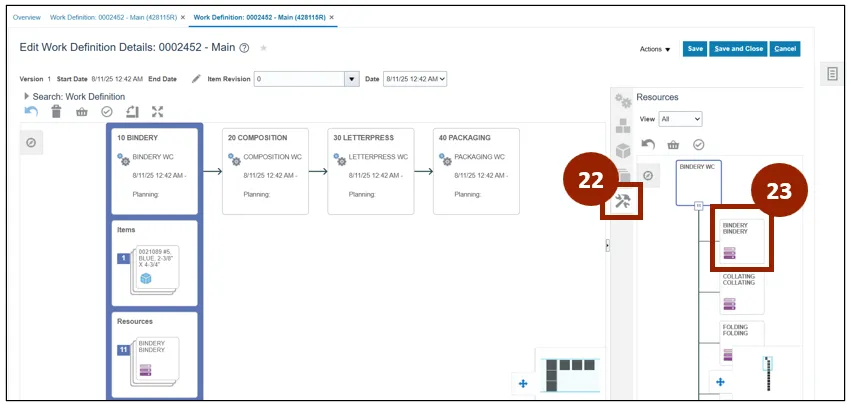
Step 24. Select Bindery from the Resources.
- Drag the selected Resource to the appropriate Standard Operation.
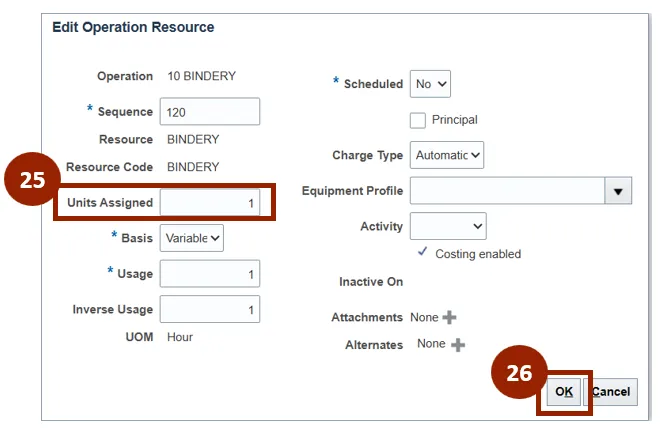
Step 25. In the Units Assigned field, adjust the necessary quantity.
Note: Update the value to Fixed from the Basis drop-down field if the resource usage is fixed per product quantity produced. Update the value to Variable from the Basis drop-down field if the resource usage varies with the product quantity produced.
Step 26. Select OK.
If the appropriate resources are not present, then we can manually add or remove the resource in Edit Work Definition Details.
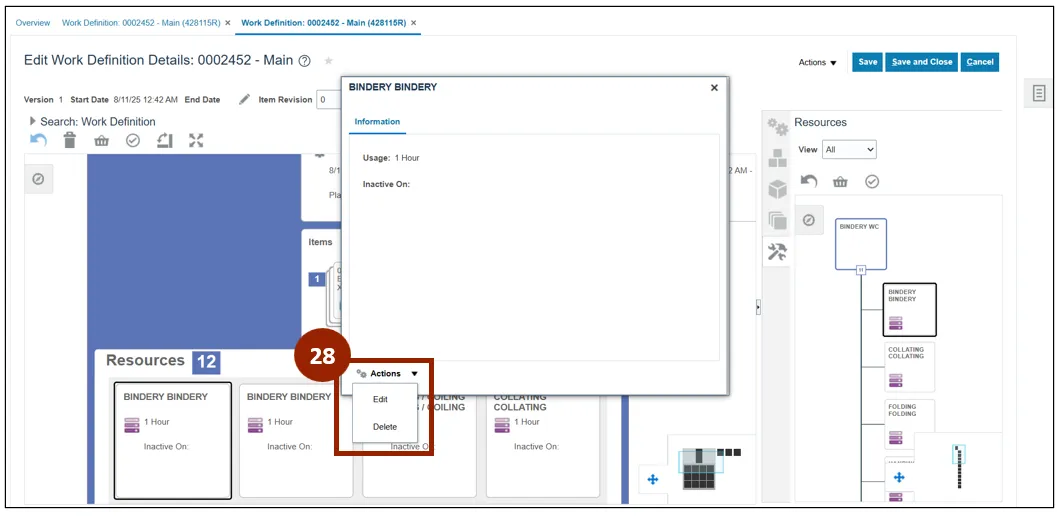
Step 27. To remove a resource from a Standard Operation, select the desired Resource under the respective Standard Operation.
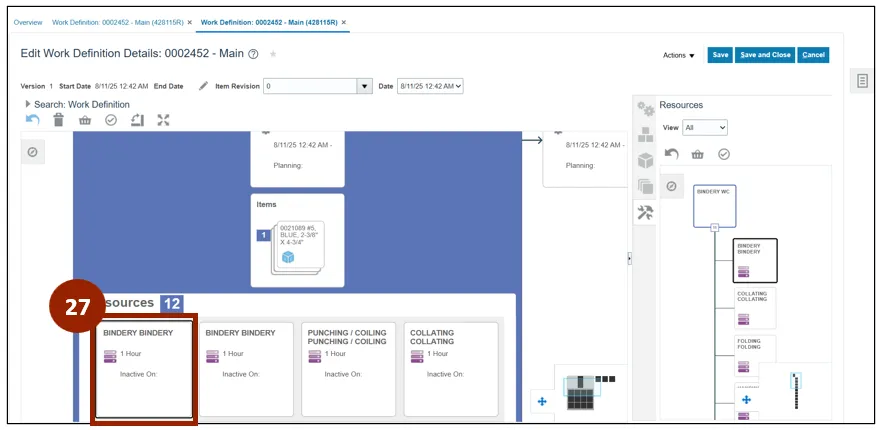
Step 28. From the Actions drop-down, select Delete.
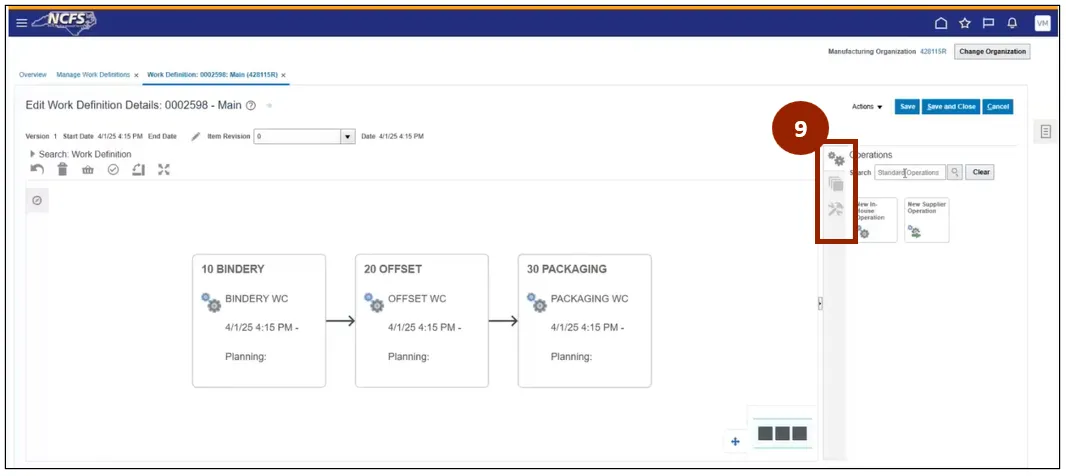
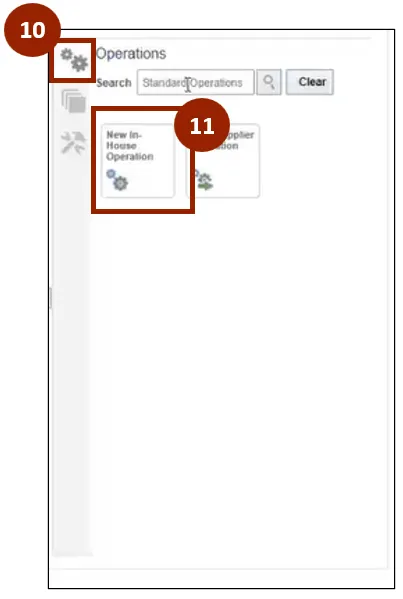
Step 29. On the right-hand pane, select the Operations icon.
Step 30. Search the name of a Standard Operation and click on the displayed Operation.
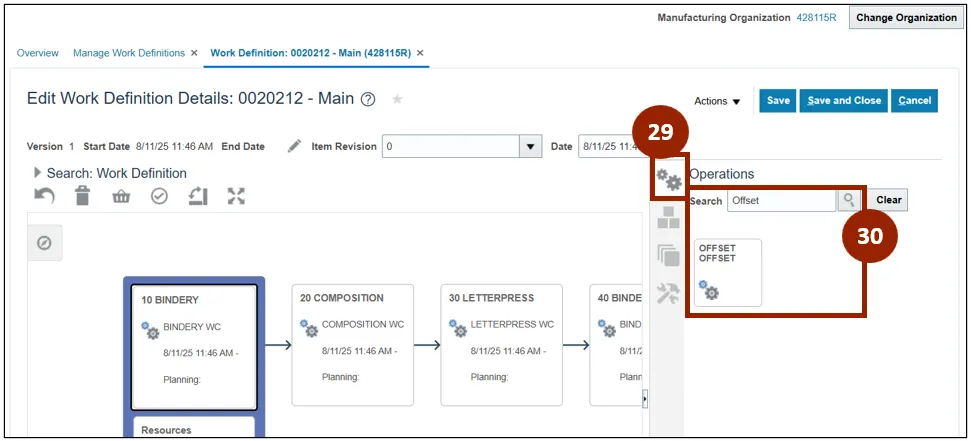
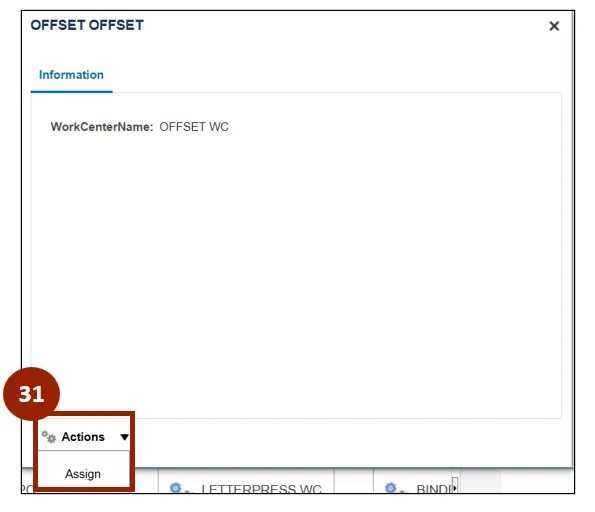
Step 31. From the Actions drop-down, select Assign.
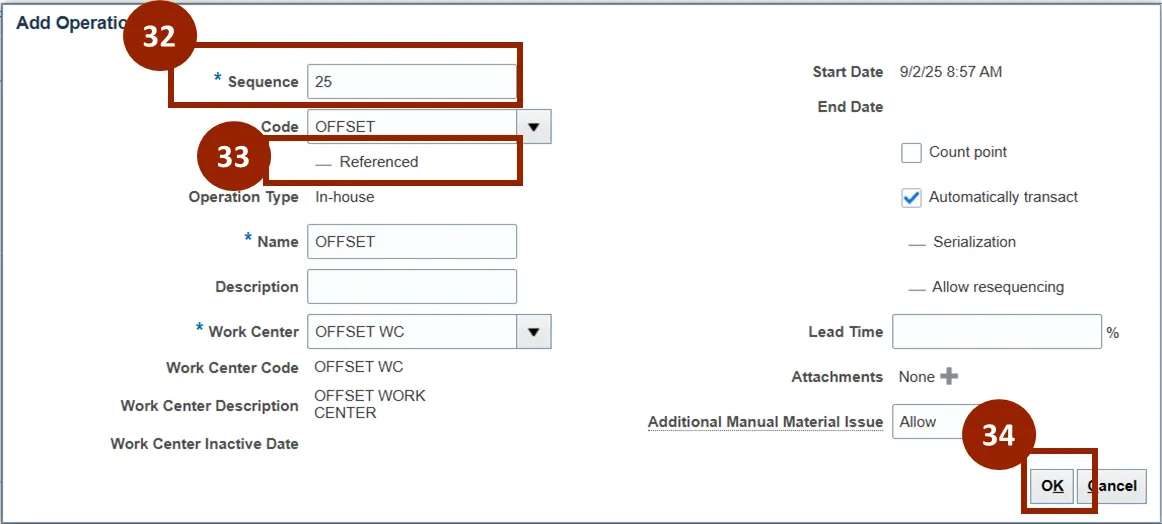
Step 32. Edit the Sequence field.
Step 33. Click the Referenced checkbox to make sure the reference flag is unchecked.
Step 34. Click OK.
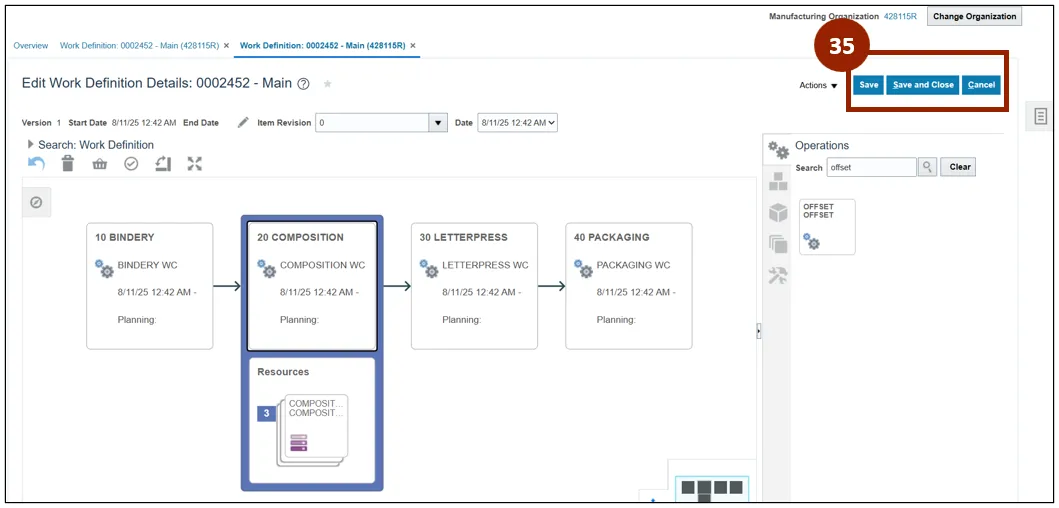
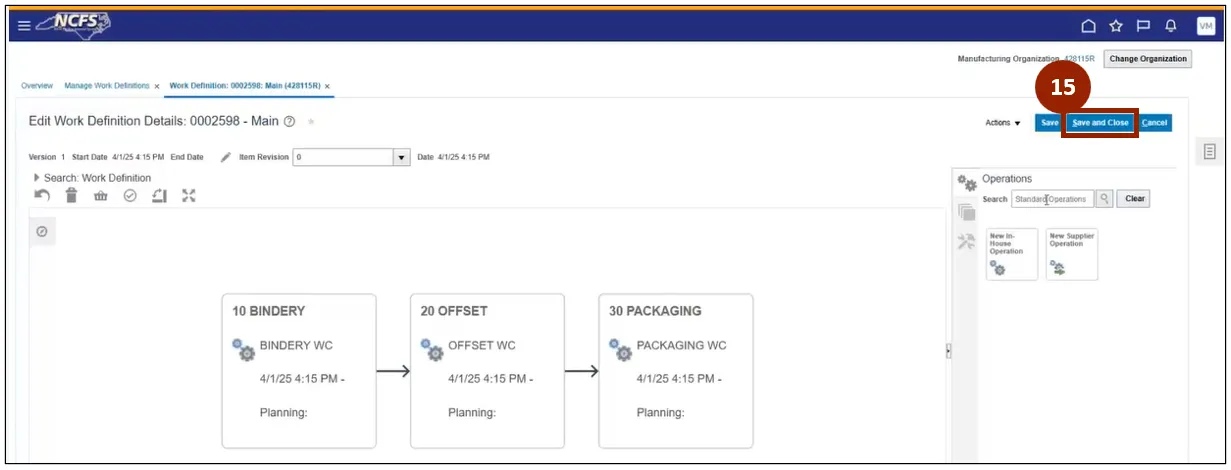
Step 35. Once you are back at the Edit Work Definition Details page and all information has been entered and reviewed, select Save and Close.
Create a Make to Order Work Definition
There are 15 steps to complete this process.
Step 1. On the Work Definition page, click the Task icon.
Step 2. Select Manage Work Definitions.

Step 3. Select the Plus (+) icon to add a new Work Definition.
Step 4. In the Item field, input the item number.
Step 5. For MTO orders, the Structure Name field will remain blank because no item structure is defined.
Step 6. In the Name field, select Main from the drop-down list.
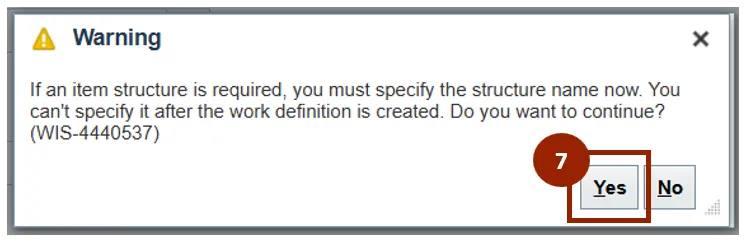
Step 7. In the Warning pop-up window, click Yes.
Step 8. Select the Plus (+) icon and begin adding additional Operations.
- 8a. Confirm Referenced field displays a dash for all operations.
- 8b. The last operation should be marked as a Count Point operation.
Step 9. You are now returned to the Edit Work Definition Details page.
Note: You’ll observe that the Task pane on right side now displays only three icons, reflecting the absence of an item structure.
Step 10. Select the Operations icon.
Step 11. Search for the appropriate operation in the Search bar and drag to add to work definition
Note: Only Operations available for the plant being viewed will be available to add.
Step 12. Select the Resources icon.
Step 13. Select the appropriate Resource.
Step 14. Drag the Resource to the appropriate Work Definition.
Step 15. Once you are back at the Edit Work Definition Details page and all information has been entered and reviewed, select Save and Close.
Wrap-Up
NCFS users can create work definition using the steps above.
Additional Resources
- Instructor Led Training (ILT)