Purpose
The purpose of this Quick Reference Guide (QRG) is to create Payables Payment Requests in the North Carolina Financial System (NCFS) via FBDI spreadsheet upload.
Introduction and Overview
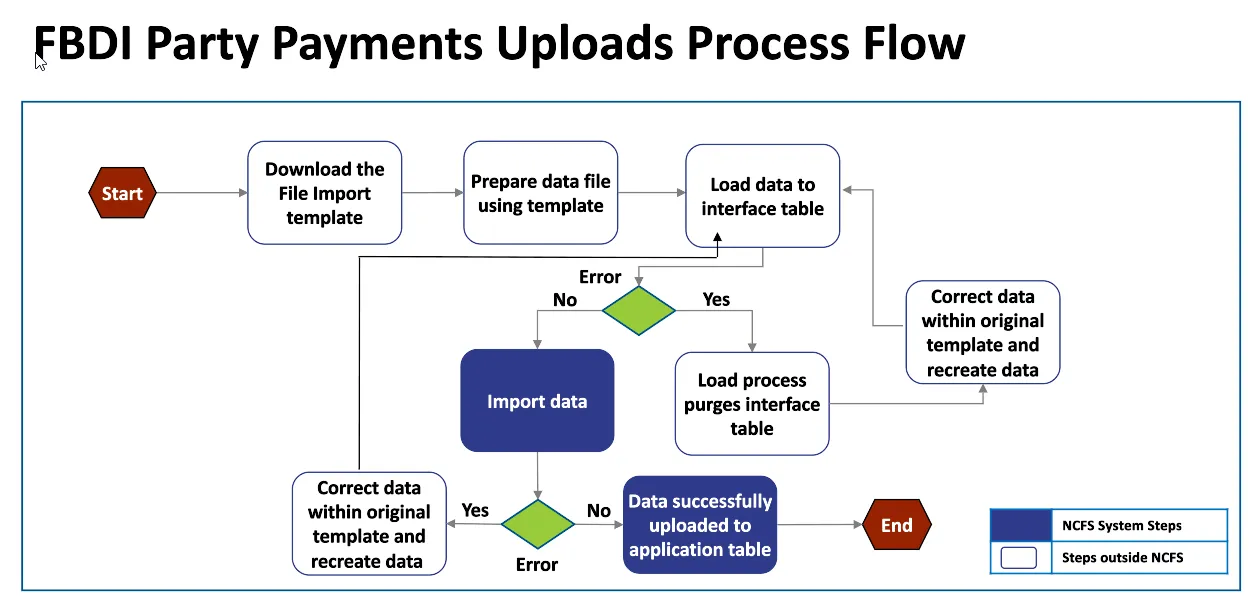
This QRG covers downloading the Oracle FBDI template for Payables Payment Requests (Party Payments or One-time Payments), populating the spreadsheet with payment information, and uploading the payment invoice into NCFS.
Troubleshooting assistance is included at the end of the processing instructions.
Download the FBDI template
Note: The FBDI (File-Based Data Import) template is occasionally updated by Oracle so this process should be frequently referenced to verify you are using the latest version. There are 25 steps to complete this process.
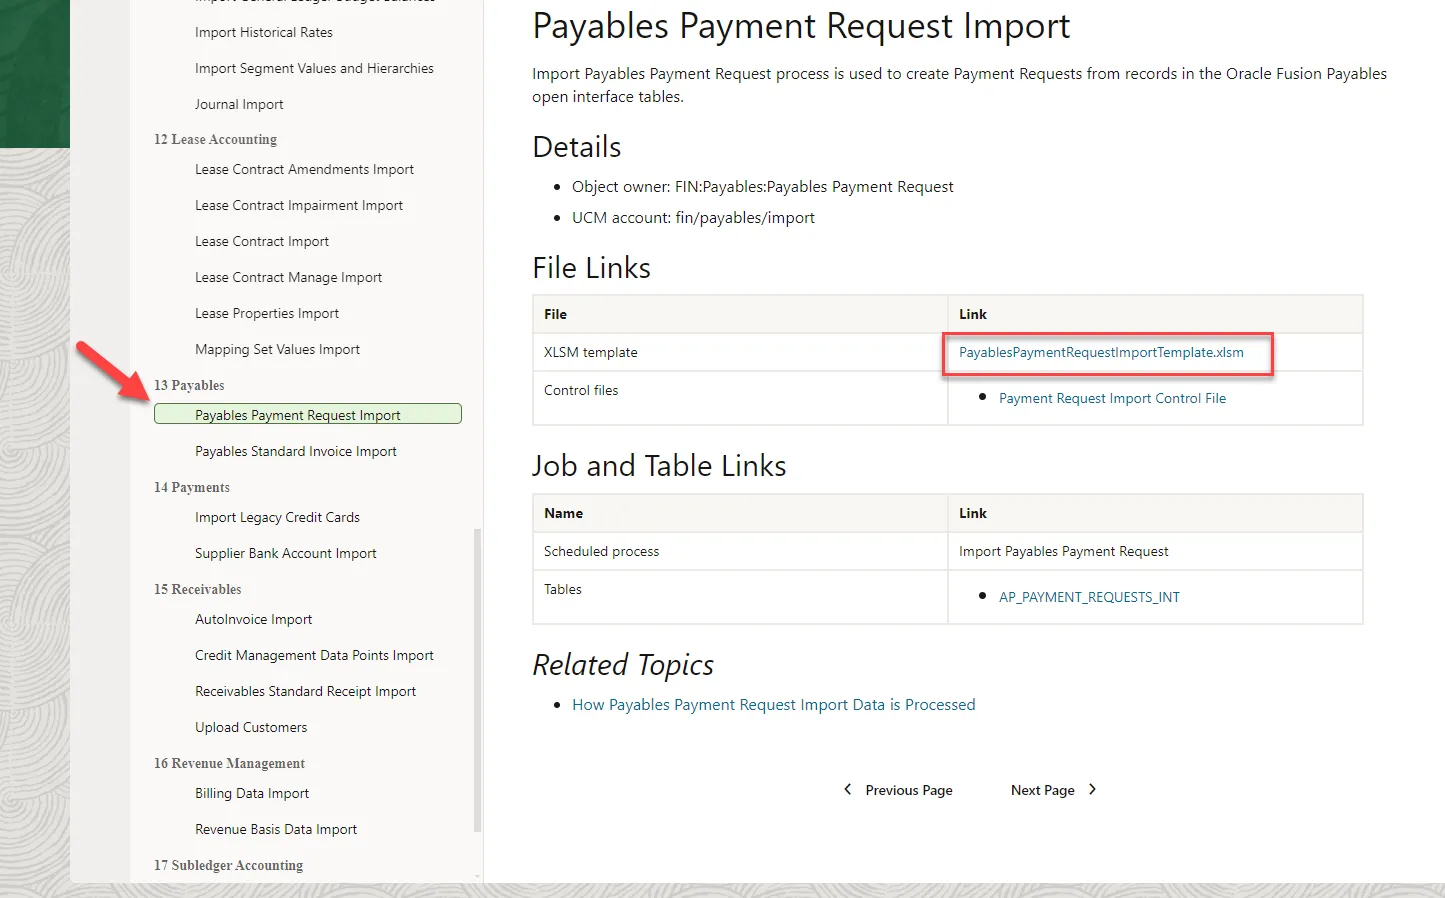
Step 1. From a browser window, search for Oracle FBDI for Financials.
Step 2. Scroll down to the Payables, Payables Payment Request Import section.
Step 3. Click on the PayablesPaymentRequestImportTemplate.xlsm to download the template.
Note: These pages are maintained by Oracle so the exact layout and navigation of this page may change without notice.
Step 4. Right click on the downloaded file, and select Properties.
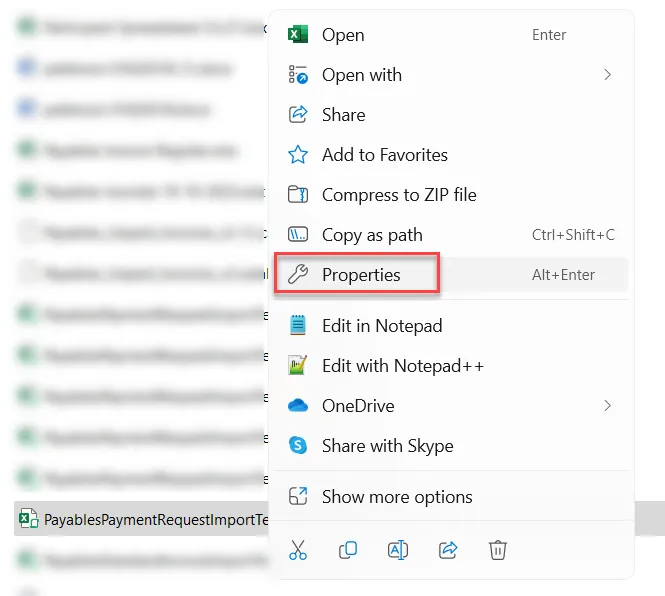
Step 5. At the bottom of the General tab, click to Unblock the macros and Apply. This will enable the spreadsheet to run the macro that will be used to create the file to upload to NCFS.

Note: If you have issues with the spreadsheet and/or running the macro, please review the steps in the QRG for spreadsheet uploads, starting at step 6: “CM-04 – Installing Application (ADFDI)”.
Enter Payment Requests
Step 6. Open the PayablesPaymentRequestImportTemplate.xlsm spreadsheet.
Step 7. Click the Enable Content button at the top of the spreadsheet.

Step 8. Delete the sample payment request transactions that are pre-populated on the sheet.
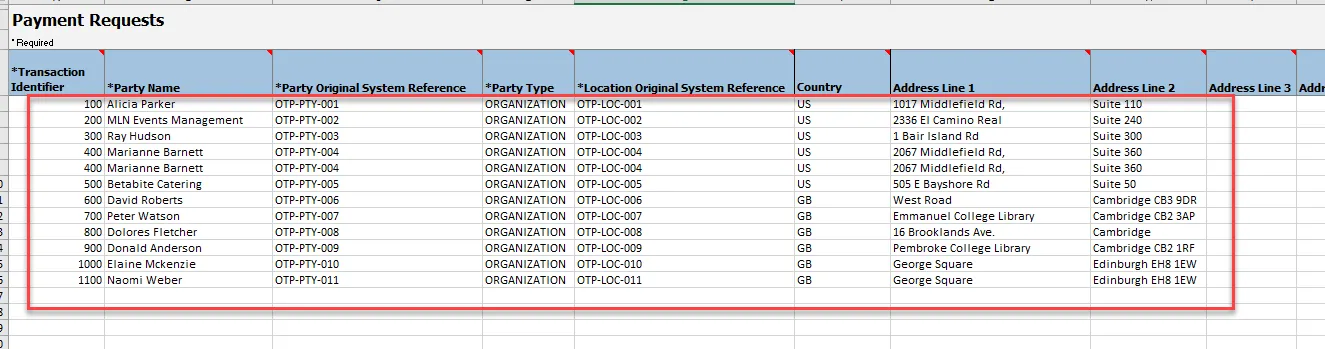
Step 9. Populate the spreadsheet with required fields and review the optional fields in the “NCFS Columns in Payment Request template”. If a field is not listed in this attachment, the field should not be populated on the PayablesPaymentRequestImportTemplate.
Tips:
- If we create a multi-line invoice, all the header columns should be identical for all the invoice lines. These are the columns up to the “Line Number” in column CQ.
- Be careful that system values are exactly what they are in NCFS with the same capitalization, spacing, etc. One way to verify the values is to enter an invoice (without saving it) and capture the values that are selected in the NCFS user interface.
- In the column titled *Source (currently column AY), use the value ‘0000_PARTY_PAYMENTS’. By using this source, the approval workflow will change the status to Workflow Approved when you execute Initiate Approval.
- Credit Memos should NOT be entered using this spreadsheet. While it is possible to enter a negative line in a multiline payment, the overall amount of the payment should be positive.
- Accrual Indicator – The Accrual Indicator can be directly entered in column DQ Line Attribute 15 as shown in the slide below.
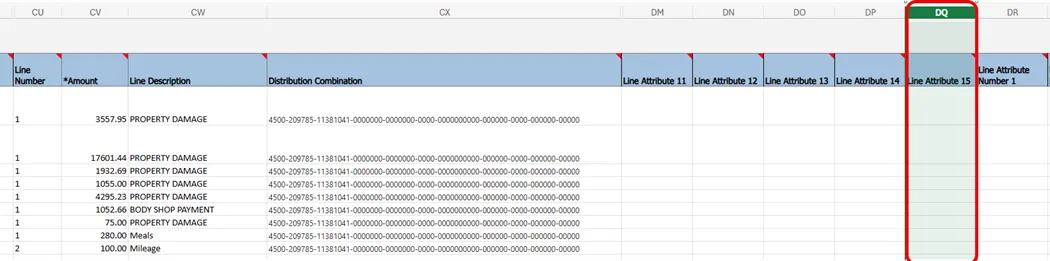
NOTE: Please make sure to use the Headers for each column to ensure you are using the Accrual Indicator column. Updates can be made to the spreadsheet without notification.
Step 10. When the spreadsheet is populated, Save the spreadsheet if AutoSave isn’t on.
Step 11. On the template spreadsheet, navigate to the first tab “Instructions and CSV Generation” and click the “Generate CSV File” (it may take a couple clicks to run the macro).
- If a file is not generated, review the end of the first step of this document, “Download the FBDI template” and ensure that the spreadsheet is Unblocked and macros are enabled. Also, you should have clicked “Enable Content” in the message under the Ribbon and that message should no longer appear.
Step 12. Select a location to save the .zip file and optionally rename it to something more meaningful. This is the file that will be uploaded to NCFS. You will also be prompted to save a .csv file but this file is used only for reference.
Upload File and Review Results
WARNING: The Load Interface File for Import process loads the spreadsheet payment data to interface staging tables, not the core Payables invoice tables. The next process you will run to Import will load the staged data to the core Payables invoice tables.
When the Import process runs, it will process all data for the Business Unit you specify even if it wasn’t in the spreadsheet you uploaded.
- If more than one person in your Business Unit can do this process, there will likely need to be coordination to ensure payment data is processed as intended.
- It is recommended to run the Load and Import processes back-to-back in a timely manner.
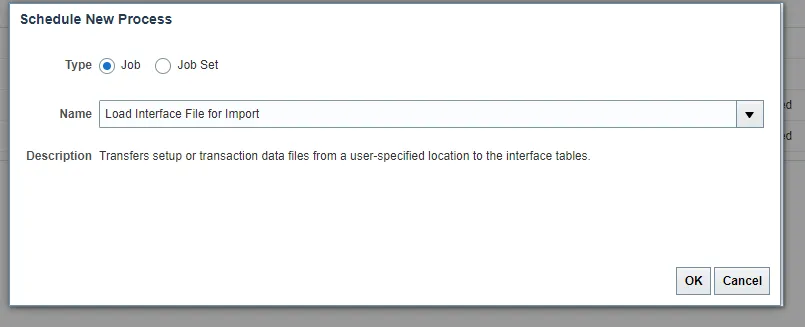
Step 13. Navigate to > Tools > Scheduled Processes.
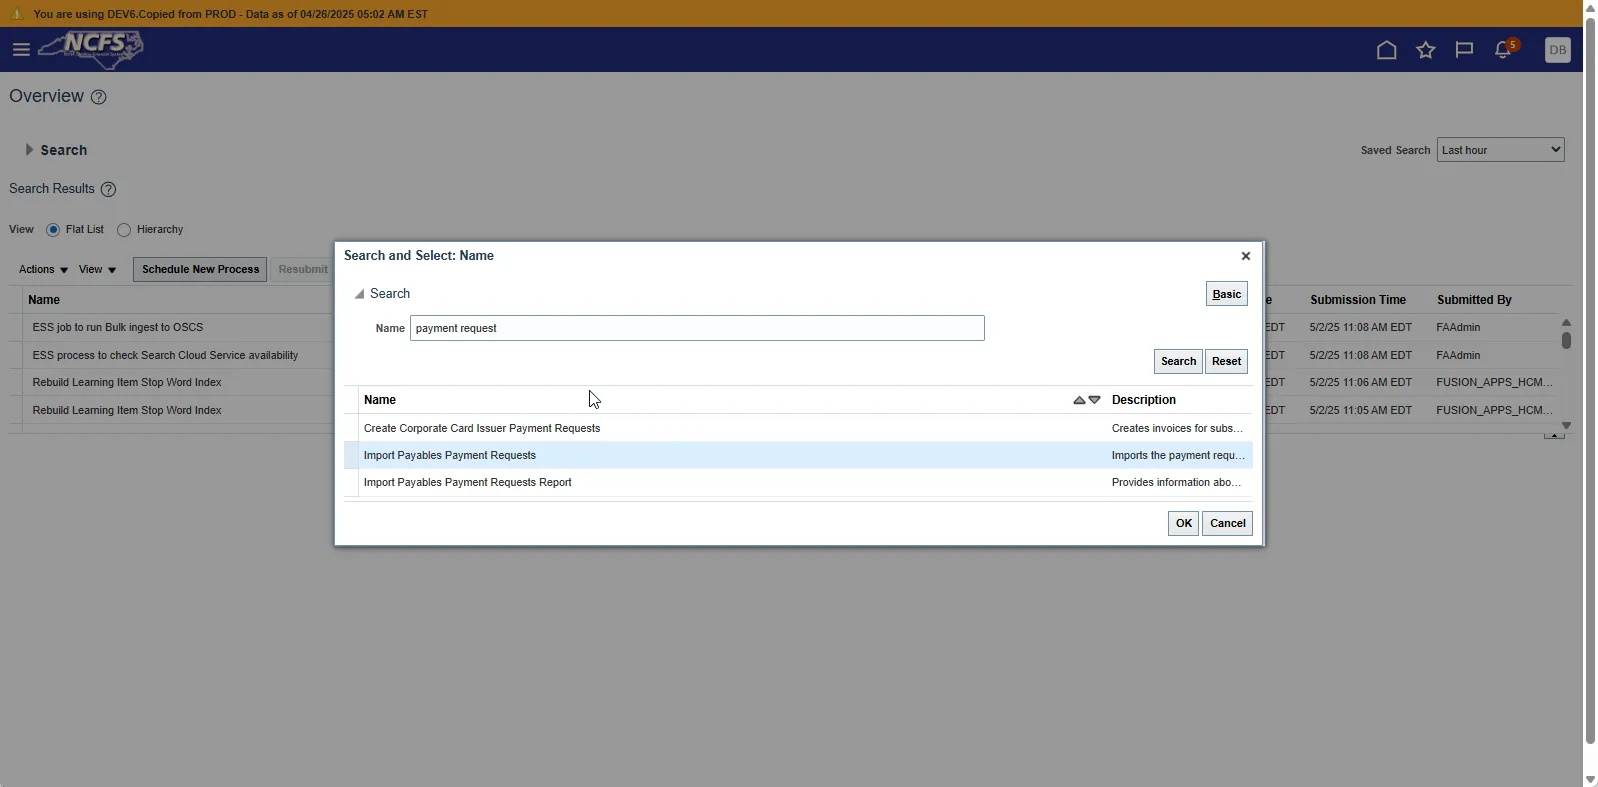
Step 14. Click the Schedule New Process button and search for “Load Interface File for Import” when it is selected, the Description should be populated. Click OK.
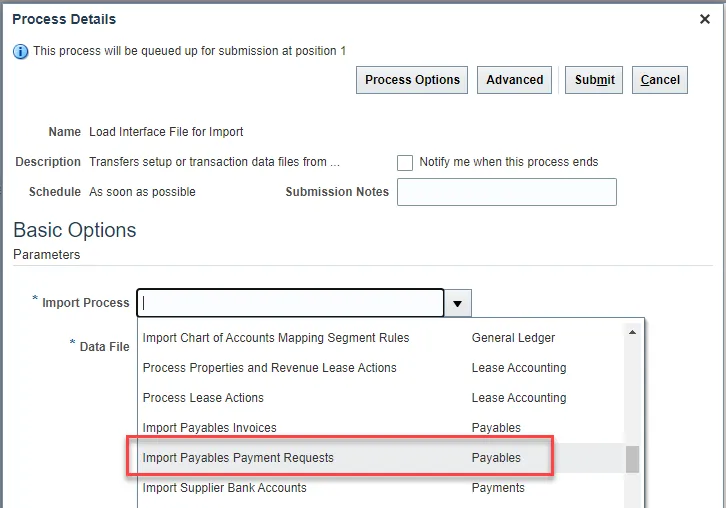
Step 15. Click the dropdown arrow to the right of the Import Process parameter and scroll down to select Import Payables Payment Requests in the Payables section (section is the rightmost alphabetized column).
Step 16. Click the dropdown arrow to the right of the Data File parameter and select Upload a new file.
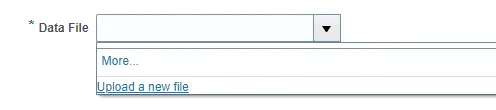
Step 17. Click Choose File and find the .zip file created in the previous section and click Open, then OK in the Upload File window.
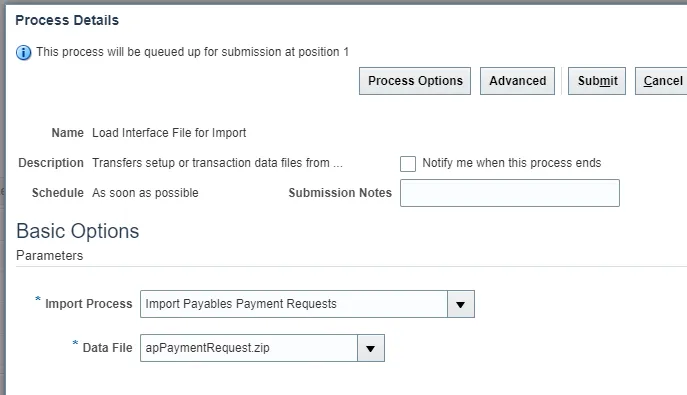
Step 18. Click Submit and in the Confirmation popup window, click OK.
Step 19. Three processes should run and all finish with a status of Succeeded. If they are still running, click the Refresh button until they are complete.

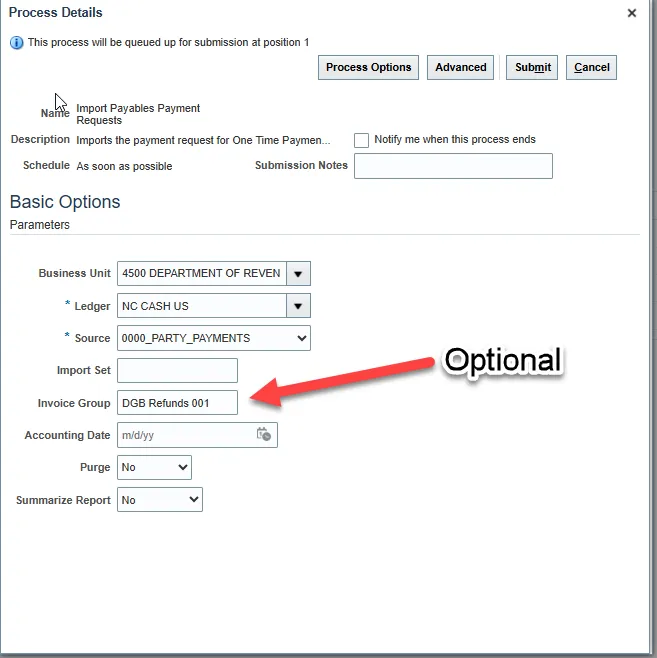
Step 20. After successfully uploading your file, you must now run the second process which takes the uploaded data and builds an invoice. Click the Schedule New Process button and search for Import Payables Payment Requests.
Select the row and click OK twice. This should bring up the following screen.
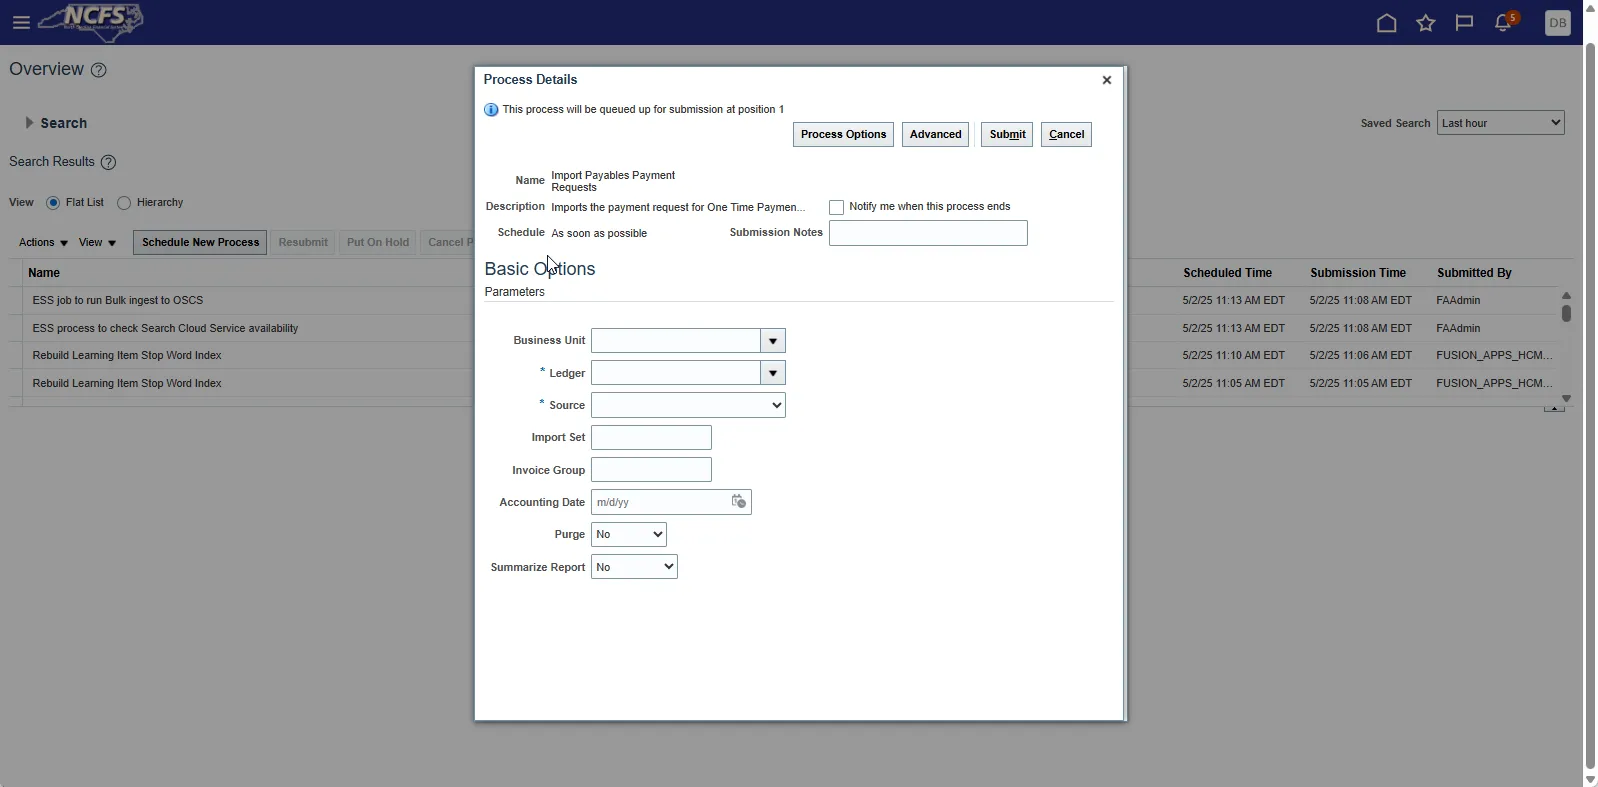
Step 21. Select the Business Unit and Source that was specified on the PayablesPaymentRequestImportTemplate.xlsm spreadsheet (columns AX and AY). The source to select is 0000_PARTY_PAYMENTS which was entered in column AY as shown in the screenshot below. Keep the default for the Ledger. Optionally select to assign an Invoice Group to make it easier to find this group of invoices after processing.
- It is important to specify the Business Unit even though it isn’t required. If you don’t specify this value, the process could pick up data for other Business Units.
Step 22. Click the Submit button and wait. Three processes shown below should finish in Succeeded status (not all three processes will show up immediately).

Step 23. Highlight the Import Payables Payment Request Report and click the report name under the Output Name.
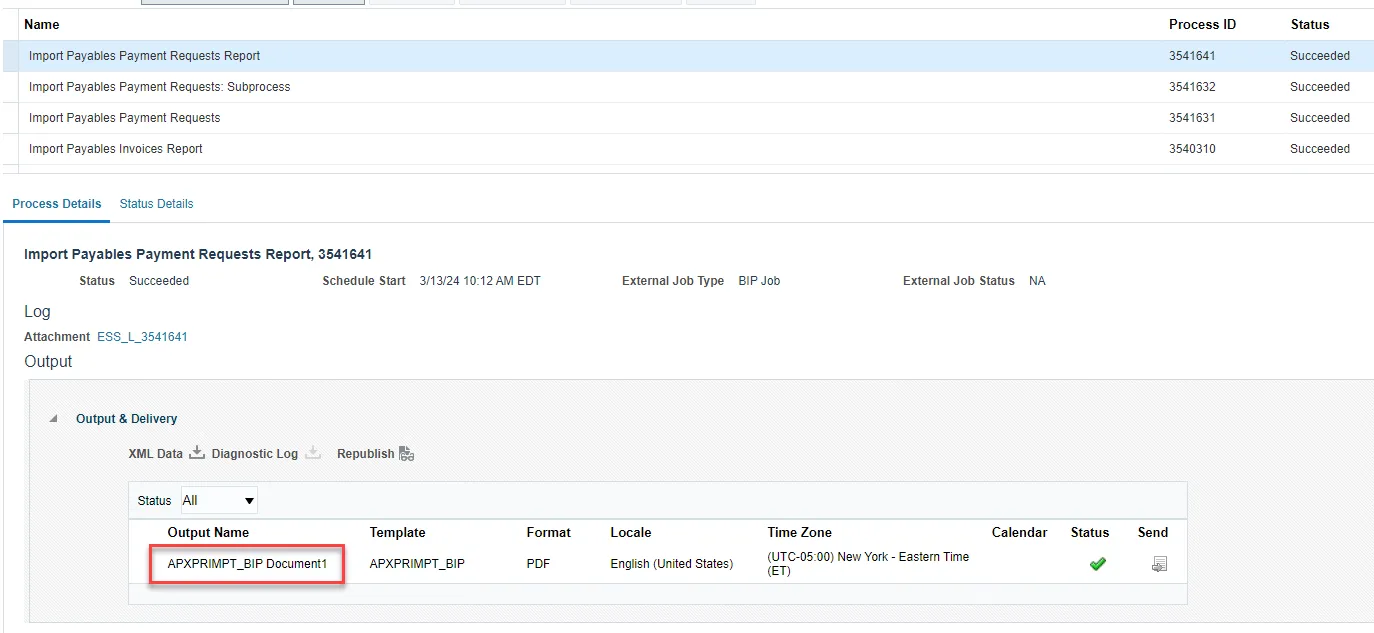
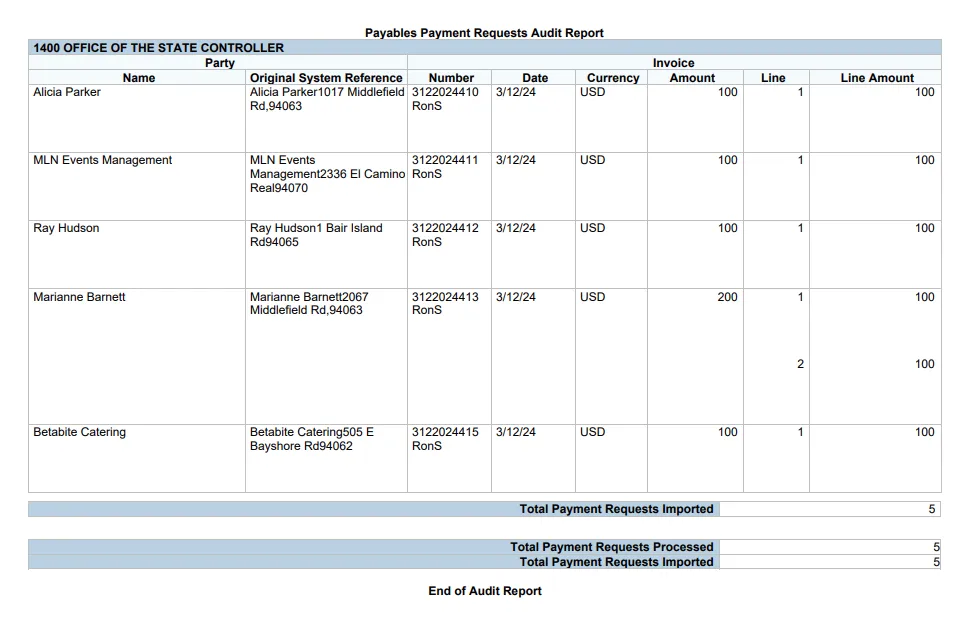
Step 24. Reconcile the payment requests in the Audit Report section of the report to the transactions on the PayablesPaymentRequestImportTemplate.xlsm spreadsheet and verify no payments are on the Rejections Report.
Step 25. Payment Request invoices are now loaded to the core Payables Invoice tables.
Troubleshooting
Reviewing Log Files
When the process fails or there isn’t enough information in the Import Report, you need to review the log files of the processes that ran to find an error message or indication of what failed.
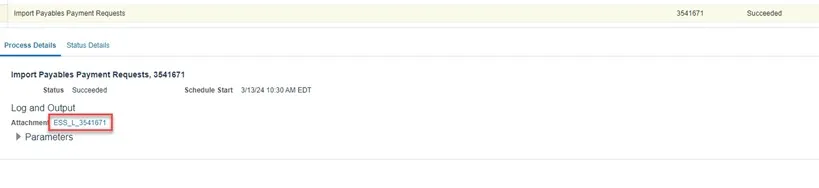
- Highlight the process and select the attachment to download it.
If there are multiple attachments, click on the (…more) hyperlink to download and review the attachments.

Import Process Fails
Follow the instructions above to review the log files.
In this example the Load Interface File for Import went to Error status, but the readable error message was in the log for the Load File to Interface which finished with a Warning status. The issue was the amount contained in the currency formatting like dollar signs and commas.
When the import process fails, nothing on the file was loaded. The template needs to be fixed, and a new file needs to be created and uploaded.

Import Rejections Information Missing
The Import Report Rejections section sometimes contains a total number of rows rejected without an error message or doesn’t include all the rows that were on the spreadsheet upload in the reported totals. In these cases, the log file of the Import process can be reviewed to find the issue.
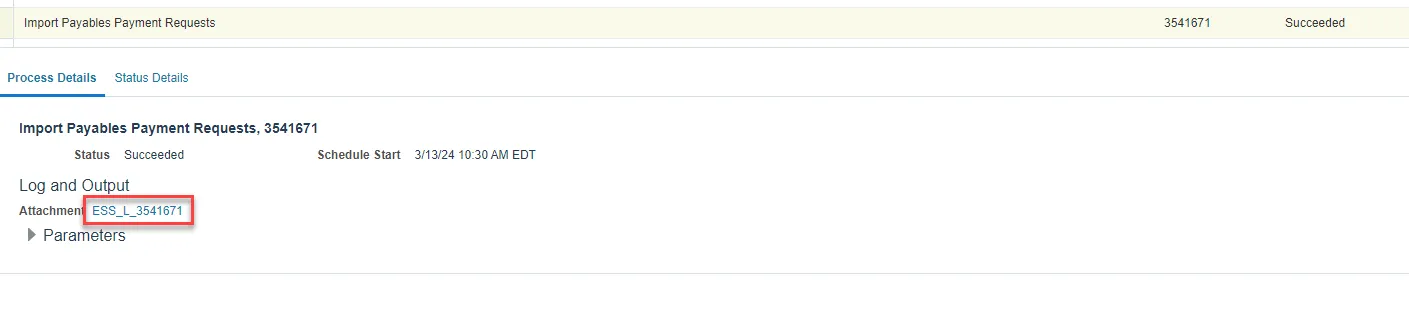
- Highlight the Import Payables Payment Requests process and select the attachment to download it.
- Open the downloaded document and begin a summary review. The log is frequently hard to translate but some suggestions are below. Note that most messages refer to a line number in the text.
-
Error text towards the bottom of the log may indicate a “budget account” related issue but this is likely really an undefined accounting combination.
Image
-
An Invalid Budget Fund value error may look like this.
Image
-
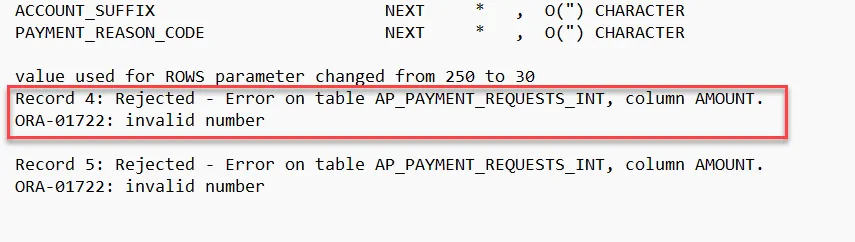
The log may contain no error text but there is text that says lines were not loaded. In this example, the Source on the spreadsheet was invalid.
Image
-
Querying the loaded payments
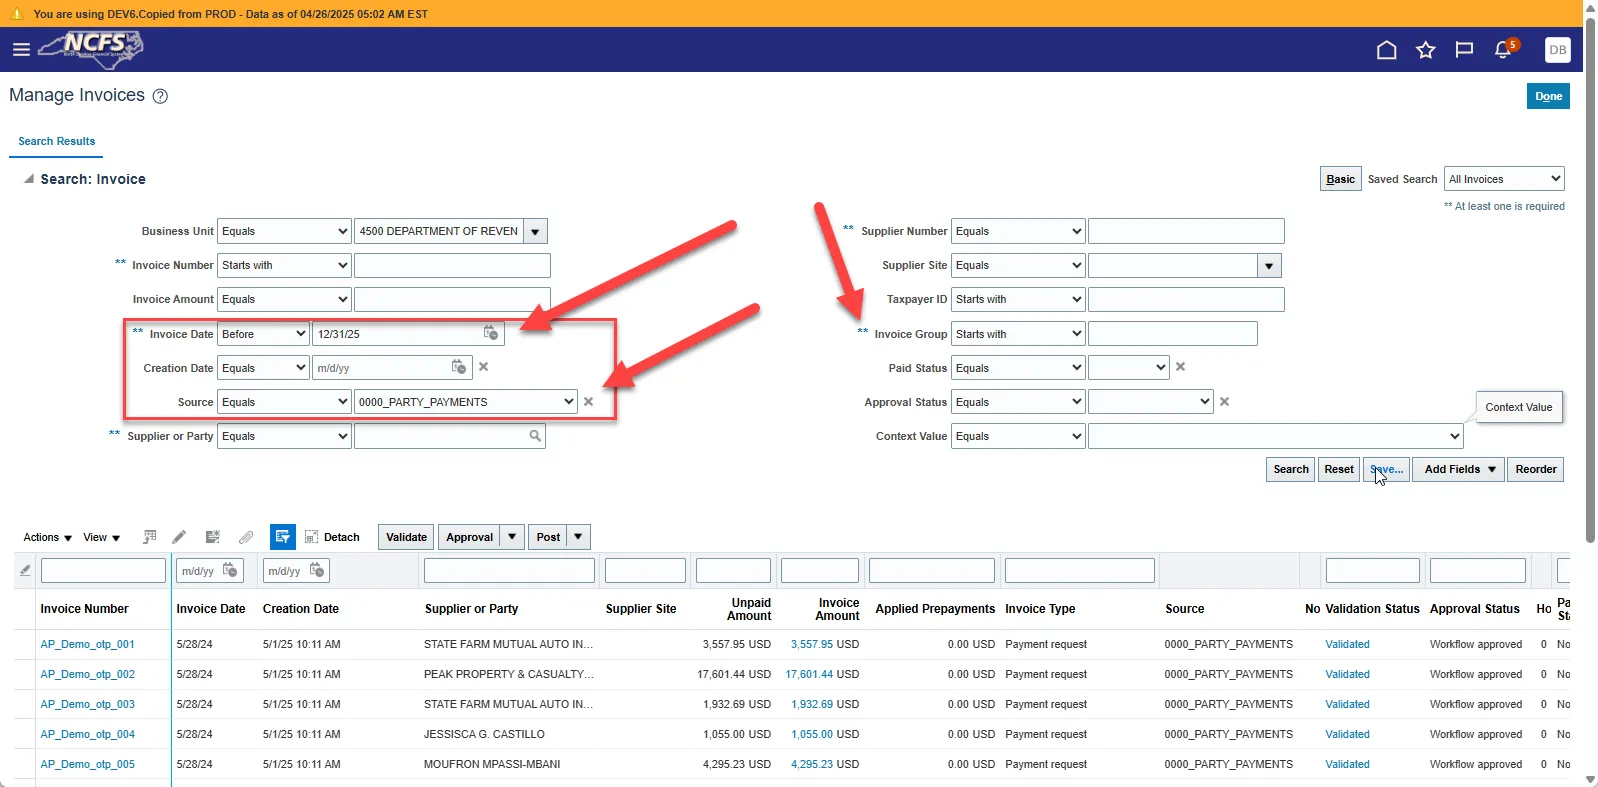
To view the payments that were loaded, navigate to the Manage Invoice screen. We recommend switching to an Advanced search and Adding the fields Source, Creation Date, Approval Status and Paid Status. This will allow great flexibility in how you narrow the search to specific invoices/payment requests. Select the Source ‘Source for one-time payments’ and enter the Creation Date of when the import was performed. You can also use the Invoice Group if one was used on the spreadsheet.
After uploading, you can view the invoice and Initiate approval. There are some fields you can edit, but not nearly as many as can be edited on a Standard invoice. If something needs changed that isn’t available to edit, you will need to cancel the invoice and reupload the correction using the spreadsheet. Be sure to use a different invoice id to prevent a duplicate invoice error.