Purpose
The purpose of this Quick Reference Guide (QRG) is to provide a step-by-step explanation of how to Create and Manage Invoices in the North Carolina Financial System (NCFS).
Introduction and Overview
This QRG covers the steps to Create and Manage Invoices manually. Manual Invoice creation in NCFS involves the Non-PO Invoices method.
NCFS Accounts Payable should only be used for:
- Payments to suppliers for goods or services
- Payment to another state agency pursuant to legislative appropriation
- Payment to non-employees such as citizens or organizations
- Reimbursement of employee expenses
NCFS Accounts Payable should not be used for payments to employees that are non-expense related, unless ordered to by a court or competent jurisdiction. Please consult OSC HR Payroll for questions regarding non-expense related employee payments.
Create and Manage Invoices
To Create and Manage Invoices in NCFS, please follow the steps below. There are 45 steps to complete this process.
Step 1. Log in to the NCFS portal with your credentials to access the system.
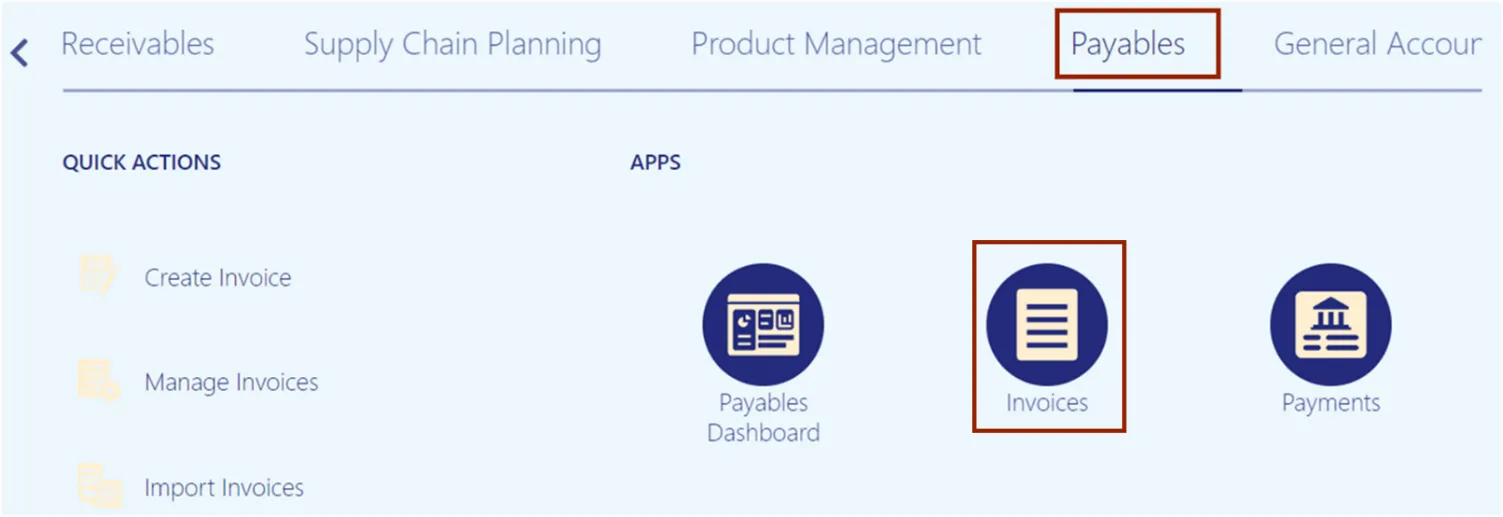
Step 2. Click the Payables Tab. Click the Invoices app.
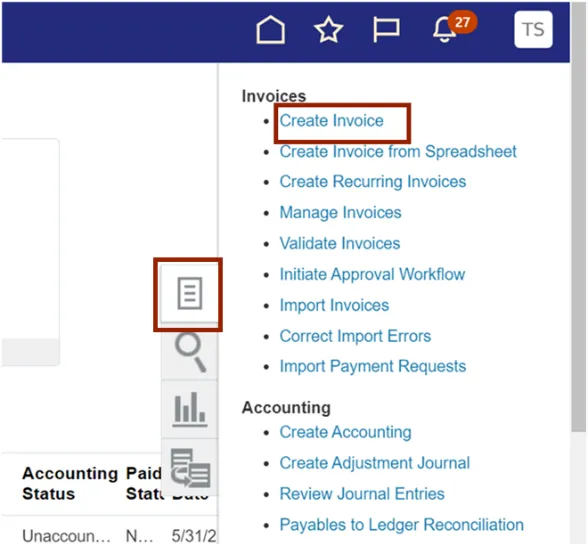
Step 3. Click the Tasks icon. Under Invoices, click Create Invoice.
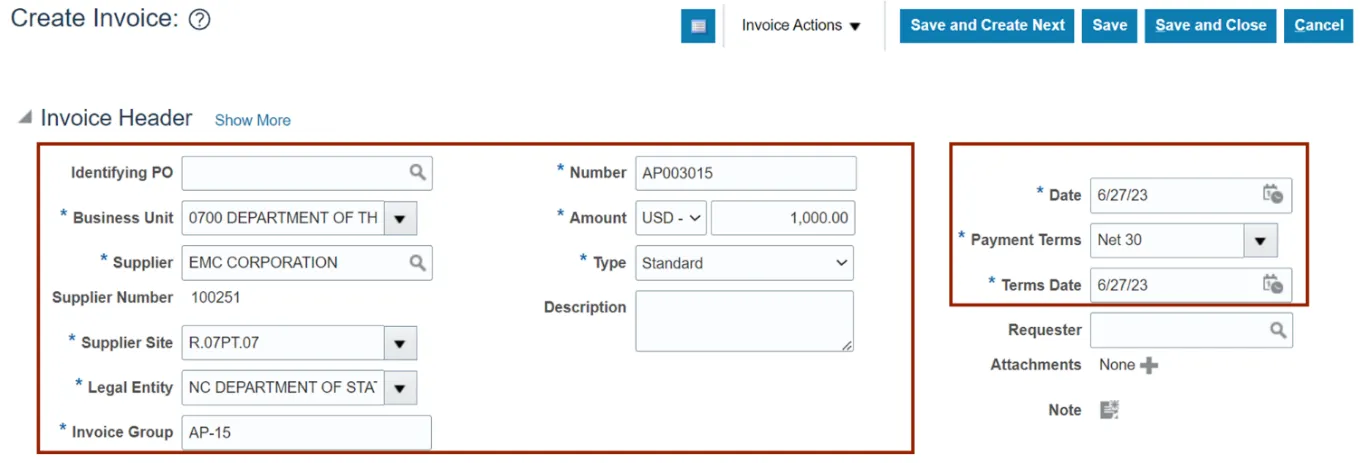
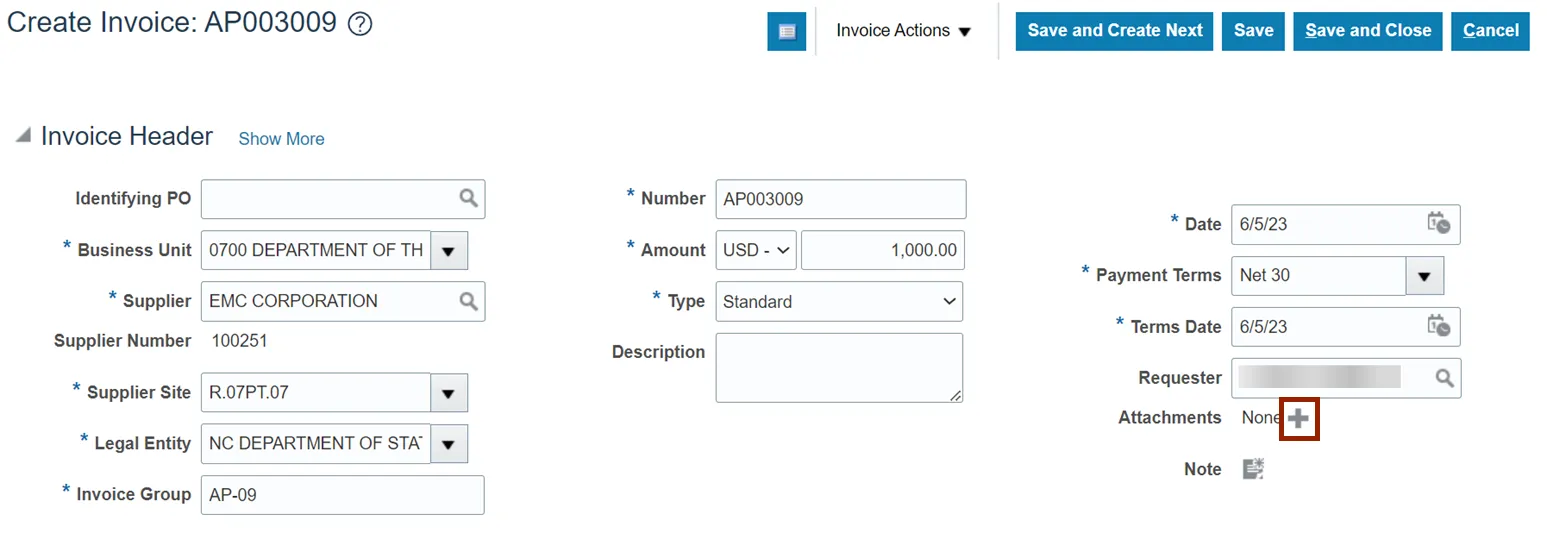
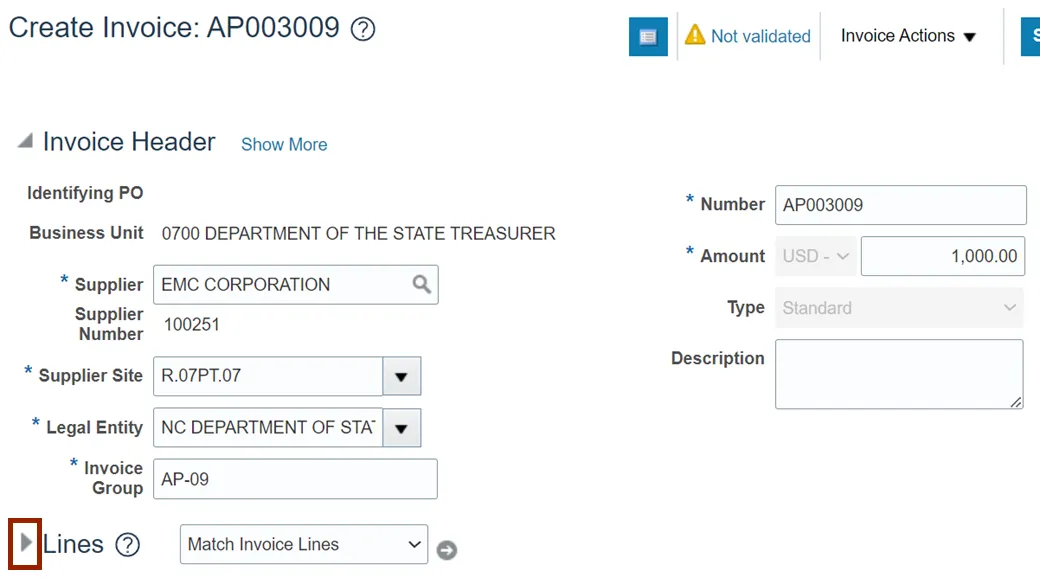
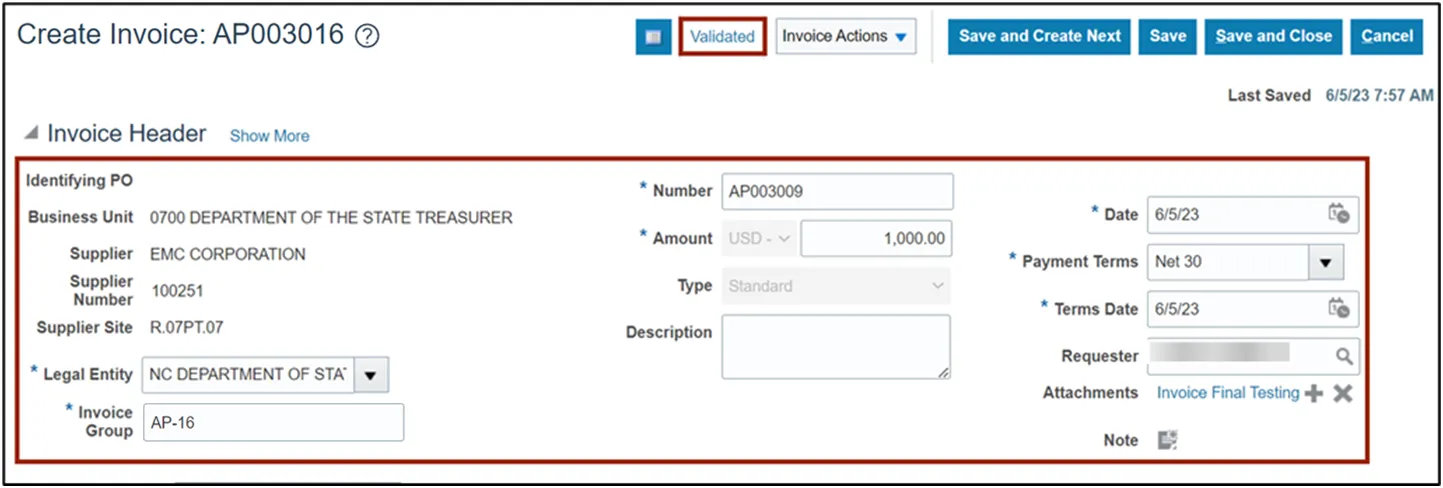
Step 4. The Create Invoice page opens. On the Invoice Header section, enter the required fields.
In this example, we choose 0700 Department of the State Treasurer for *Business Unit, EMC Corporation for *Supplier, R.07PT.07 for *Supplier Site, Once Supplier site is selected; Legal Entity field will be auto-populated, AP-15 for *Invoice Group, AP003015 for *Number, 1,000 for *Amount, Standard for *Invoice Type, 6/27/23 for *Date, Net 30 for *Payment Terms, 6/27/23 for *Terms Date, Requestor(if applicable) and Attachments (if applicable).
*Note: When creating a non-PO invoice, you must enter the Business Unit FIRST so the invoice defaults and settings will be assigned.
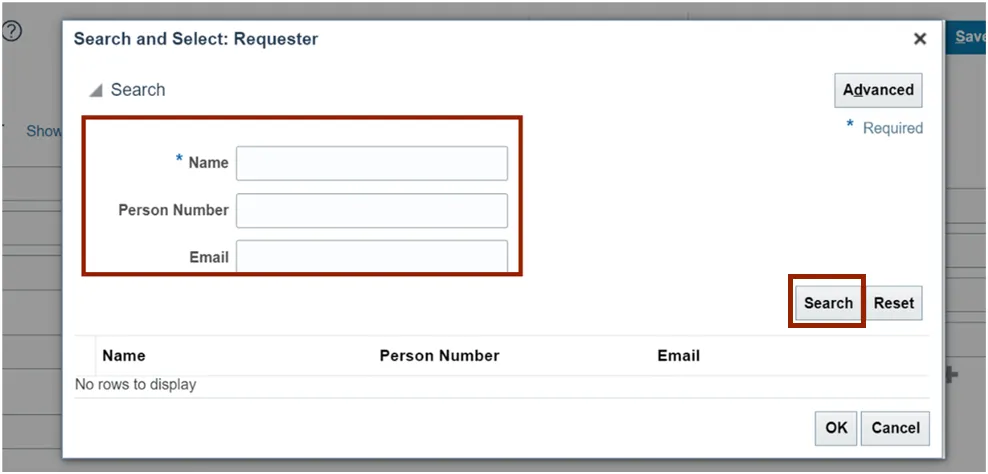
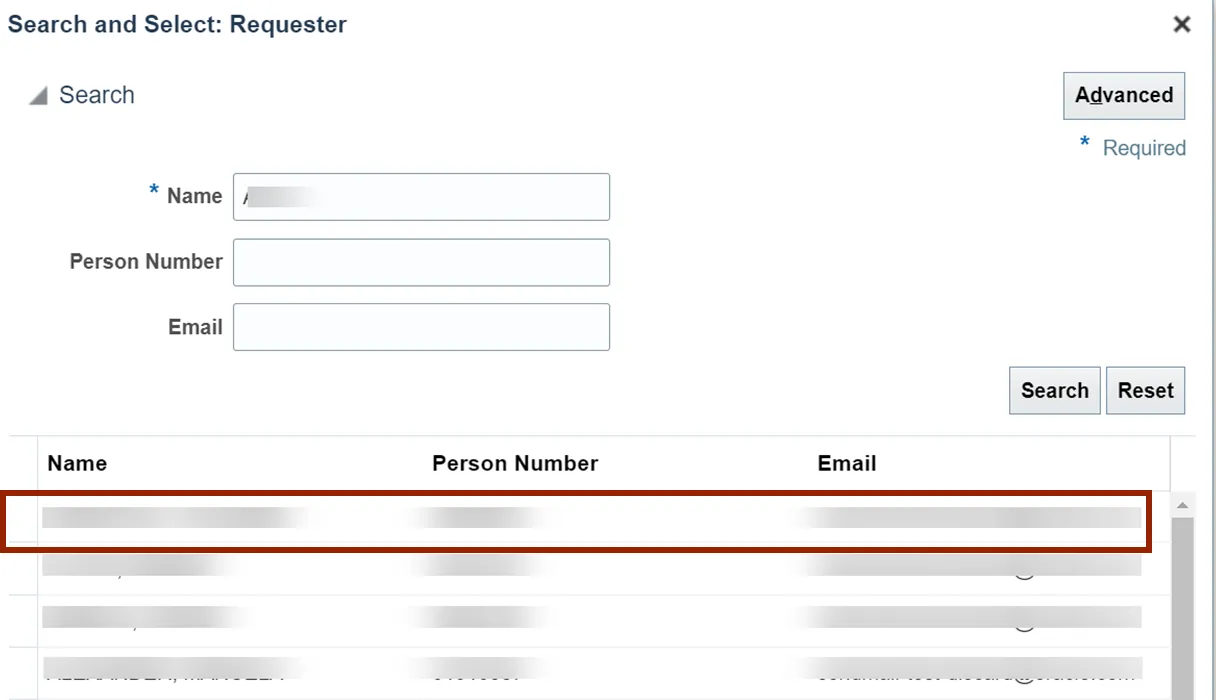
Step 5. For agencies using the Requester invoice workflow, follow steps from 5 to 8, if not skip to step 7. To add a Requester, navigate to Requestor field, click the Search icon.

Step 6. The Search and Select: Requester pop-up will appear. Enter the required Requestor’s information in Name field. Alternatively, add the Person Number and Email. Click Search button.
Step 7. Double click on the required name from the Search Result section. The Requestor name will be updated on the Create Invoice page.
Step 8. If no attachments skip to step 11, on the Attachments field, click the Plus icon.
Note: Do NOT use Copy-Paste, Snip It/Snag It, or drop an image into the NOTES field directly located under Attachments. Please upload as an attachment.
Step 9. The Attachments pop-up appears. Select the Type and Category from the drop-down choice list and click Choose File to upload a required file.
Note: Users can enter the Title and Description as optional fields. The page also displays the Attachment Date and Attached by User fields.
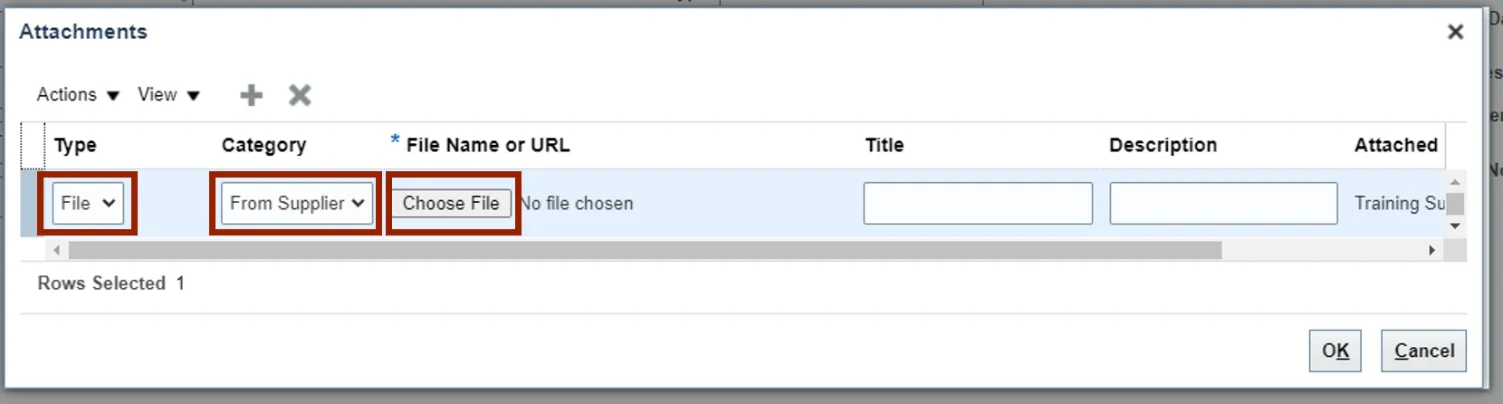
Step 10. Click the OK button.

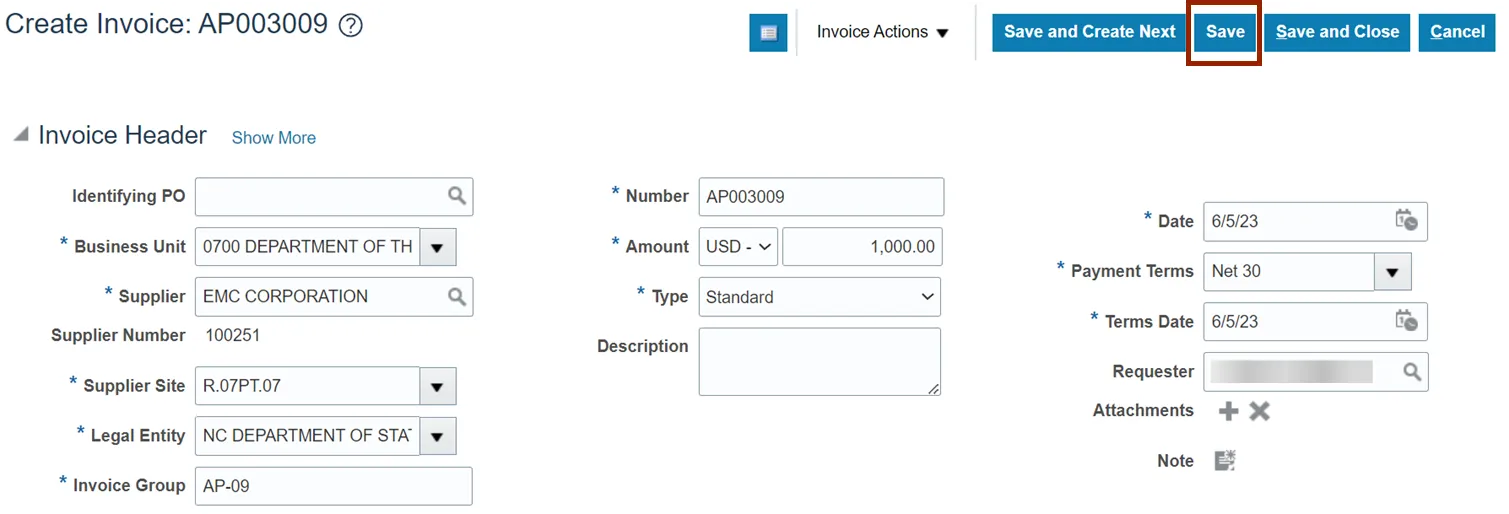
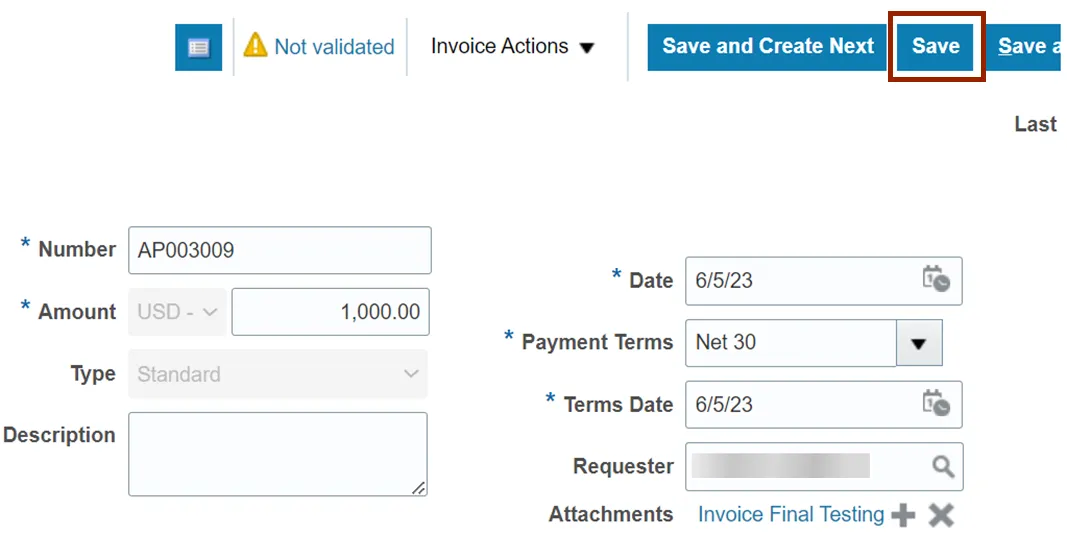
Step 11. On the Create Invoice page, click the Save button.
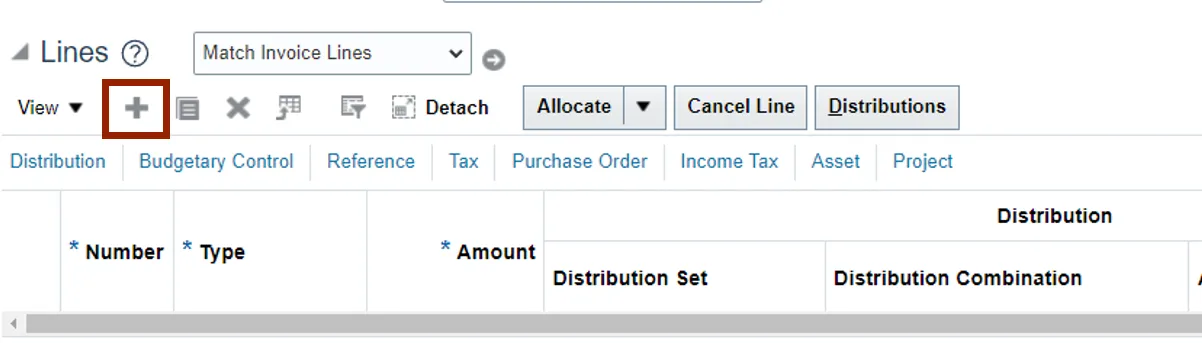
Step 12. Click the Right Arrow icon to expand the Lines section.
Step 13. Click the Plus icon to generate new Invoice line.
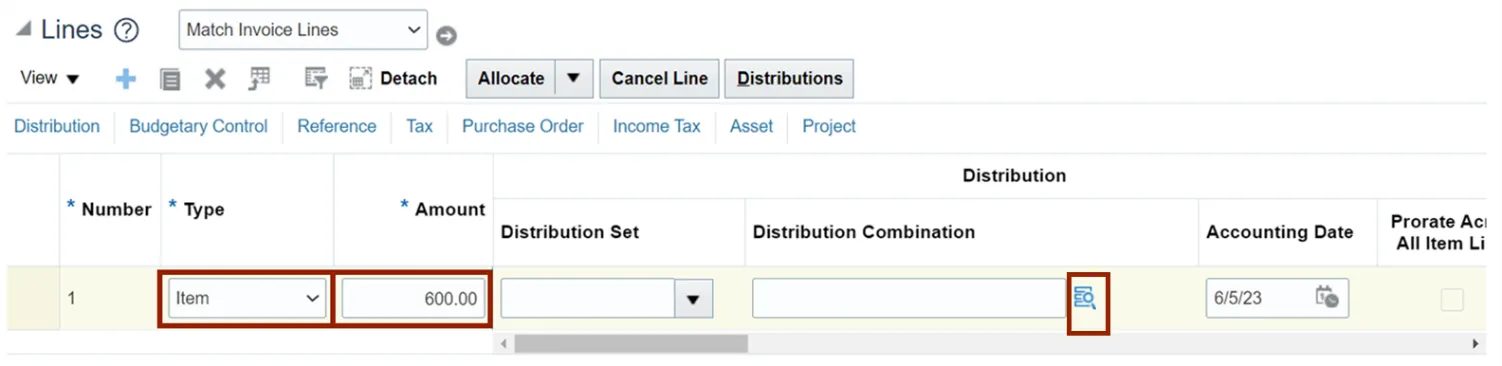
Step 14. Enter the *Type and enter the *Amount. Click the Search icon to search for a distribution combination.
If you cannot find the Search icon, expand the Distribution Combination field by extending the size of the column.
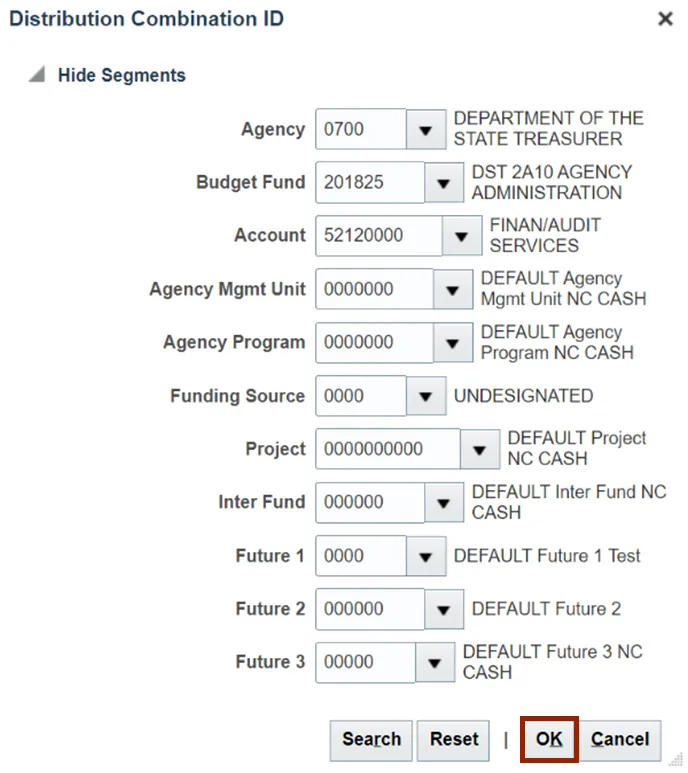
Step 15. The Distribution Combination ID pop-up appears. Enter all the values for Chart of Accounts. Click the OK button.
Note: Zero values are also acceptable. When funds starting with certain zero values are used, these are for Capital purposes.
Step 16. On the right-hand side of the Create Invoice page, click the Save button.
Note: The steps from step 17- 39 are optional. Follow them if you are required to: Add/remove 1099 codes, add withholding tax, add non-Governmental grant codes, track asset flag and choose a third-party remit-to supplier. If not skip to step 40.
To Add/remove 1099 codes:
Step 17. On the Create Invoice page, navigate to Lines section and click on View dropdown menu.
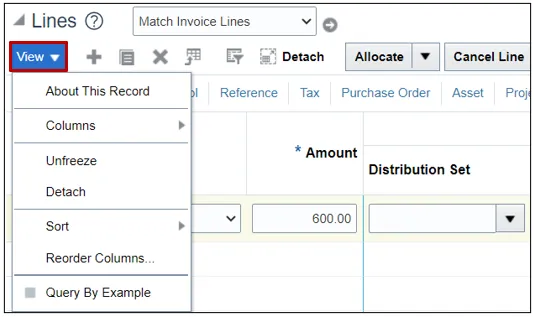
Step 18. Click on Columns option.
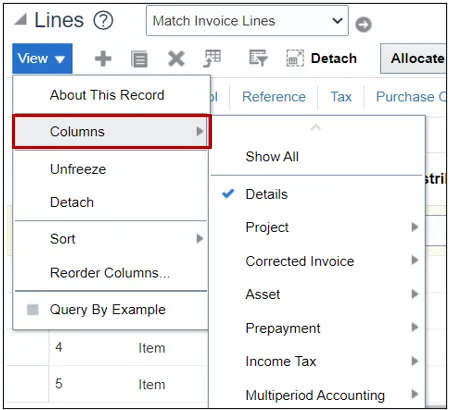
Step 19. Select Income Tax option from the list.
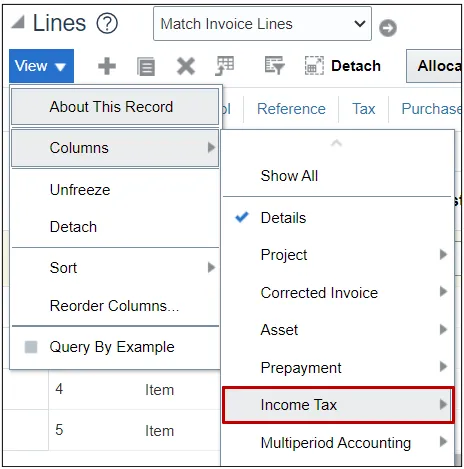
Step 20. Click the Income Tax tab.
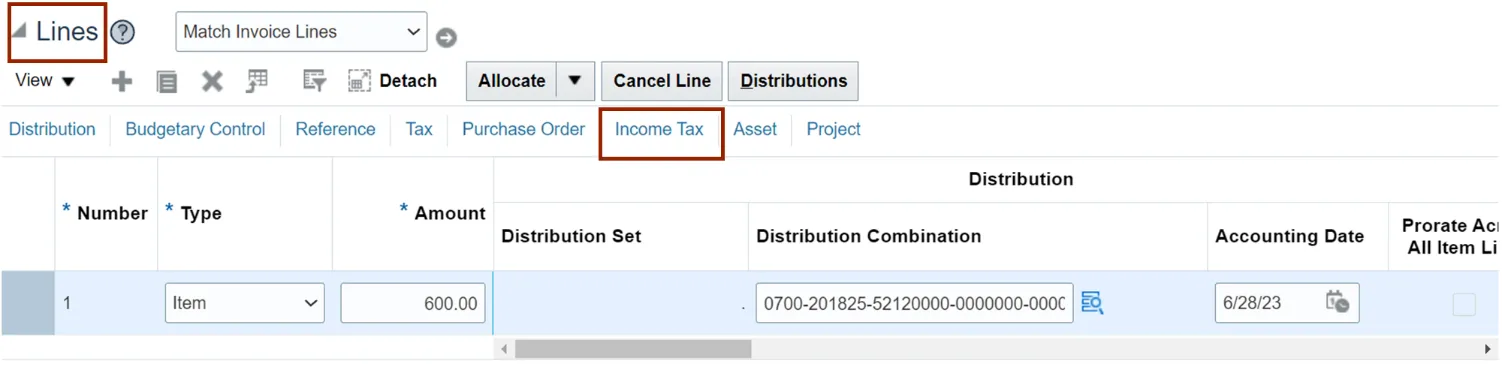
Step 21. The Type field defaults to DAU/AR. Backspace the default value to remove the 1099 code. Then, Click the Down Arrow on the Type drop-down to make the changes. Furthermore, click Search.
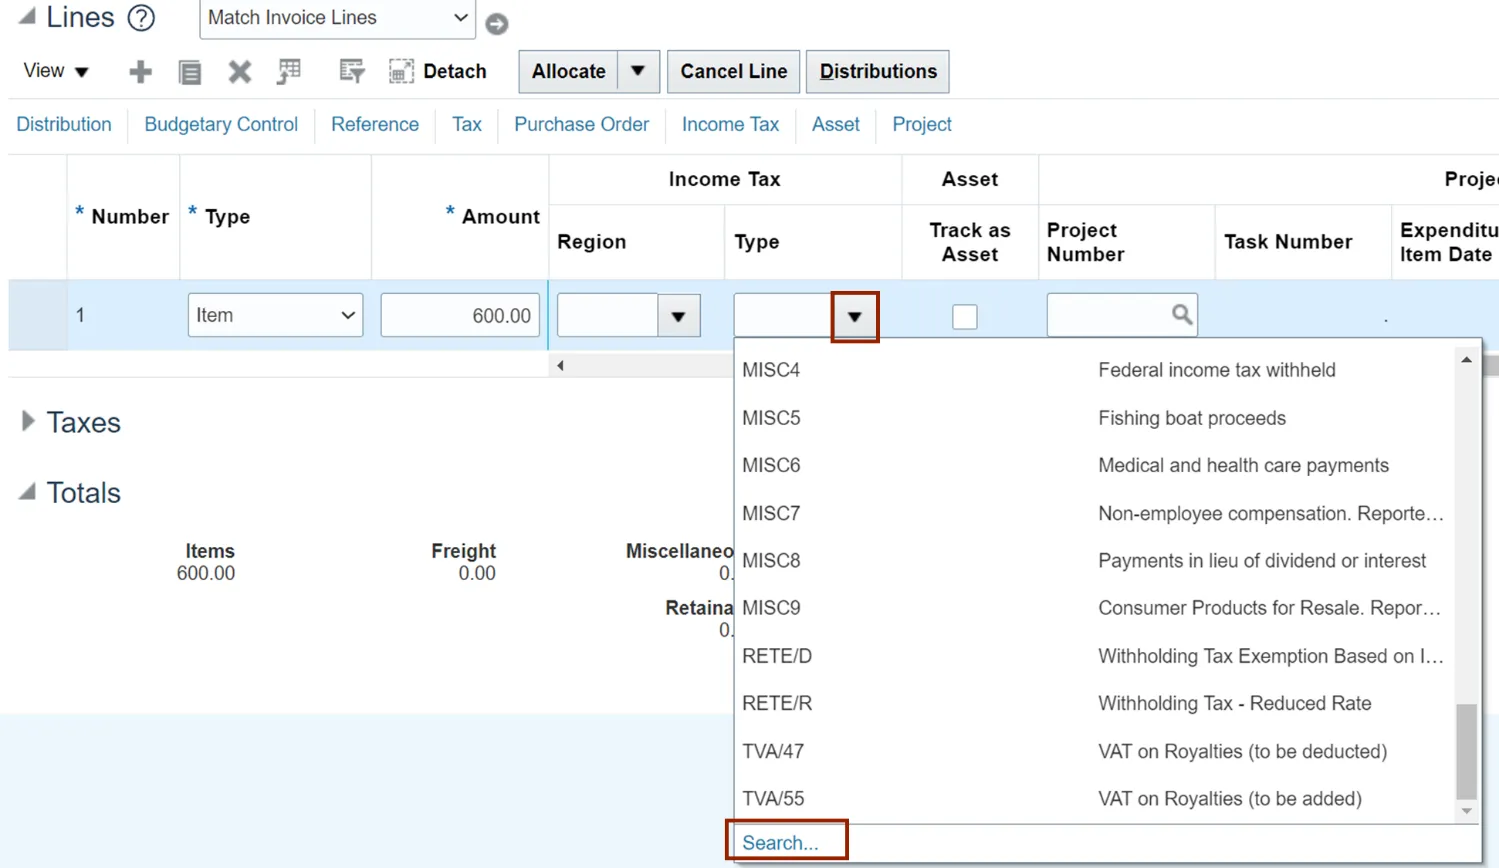
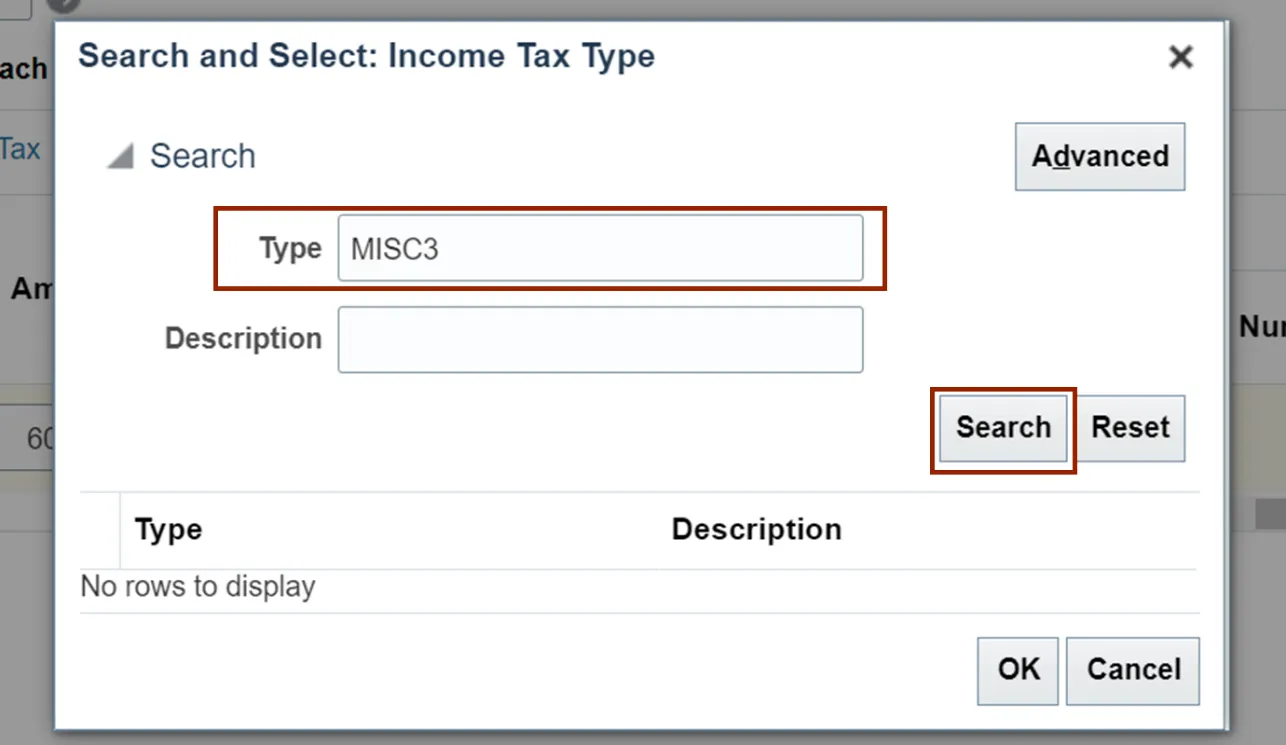
Step 22. The Search and Select: Income Tax Type pop-up appears. Enter the details in the required fields.
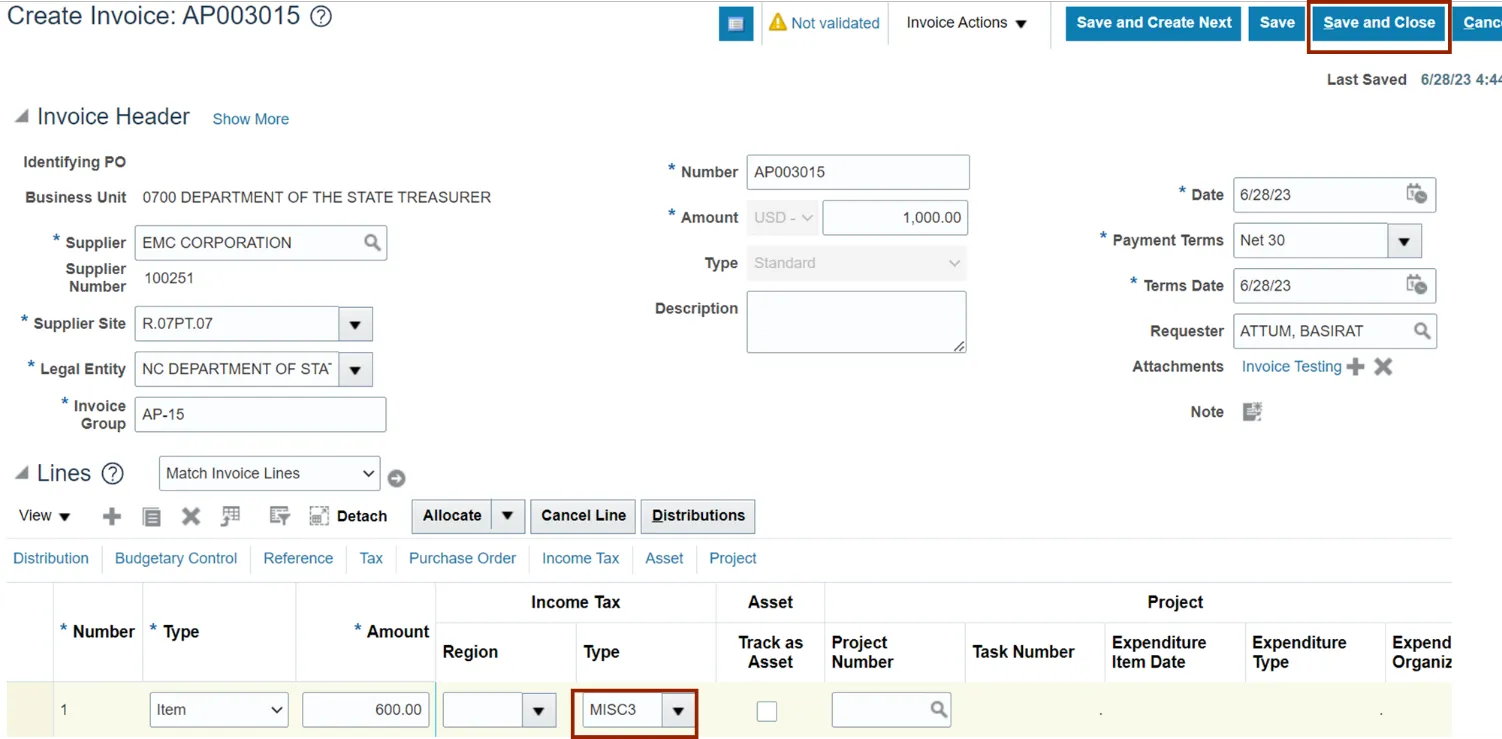
In this example, we choose MISC3 for Type field. Then, click the Search button.
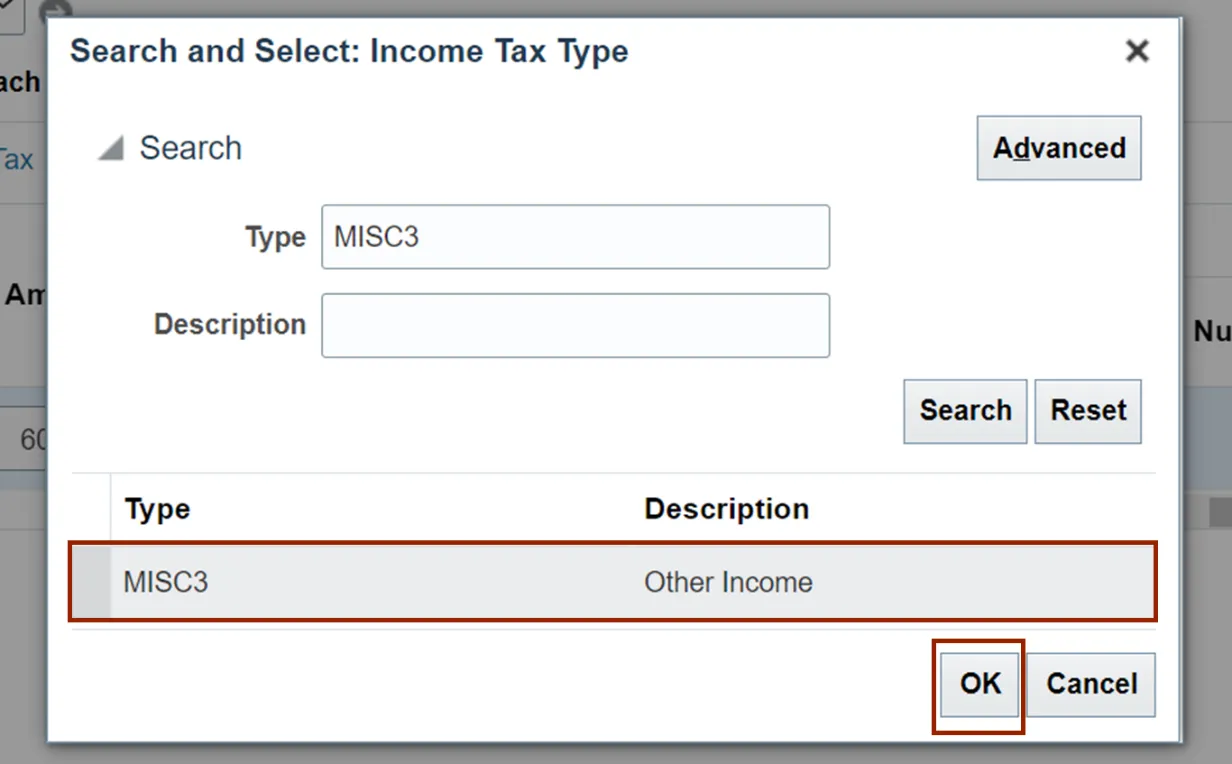
Step 23. Select the Type value and click the OK button.
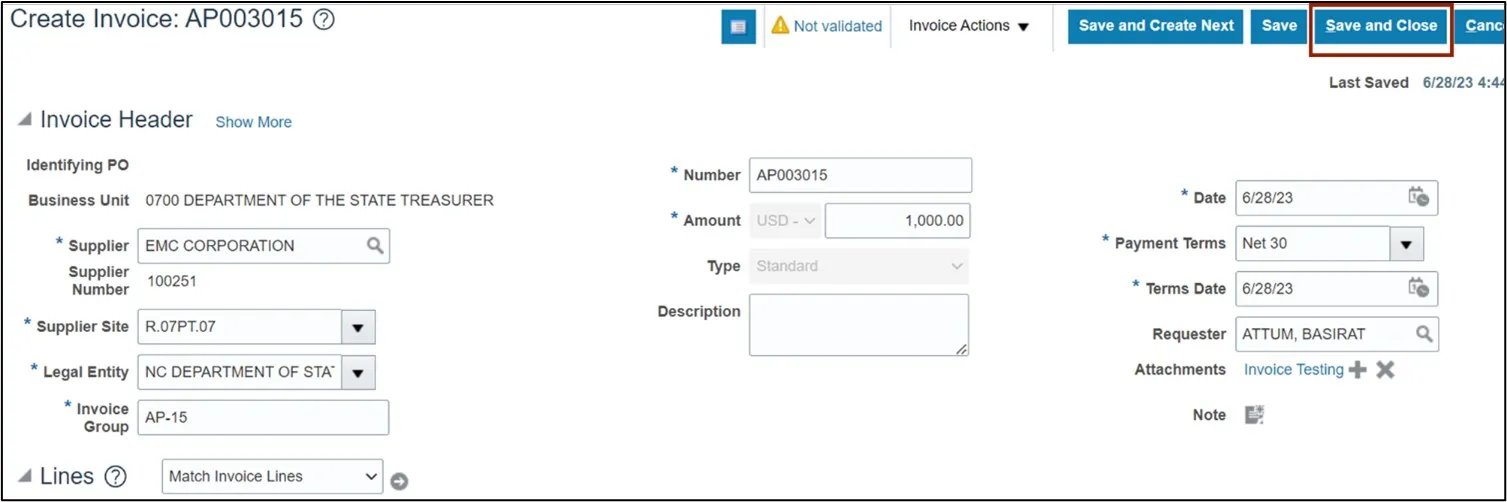
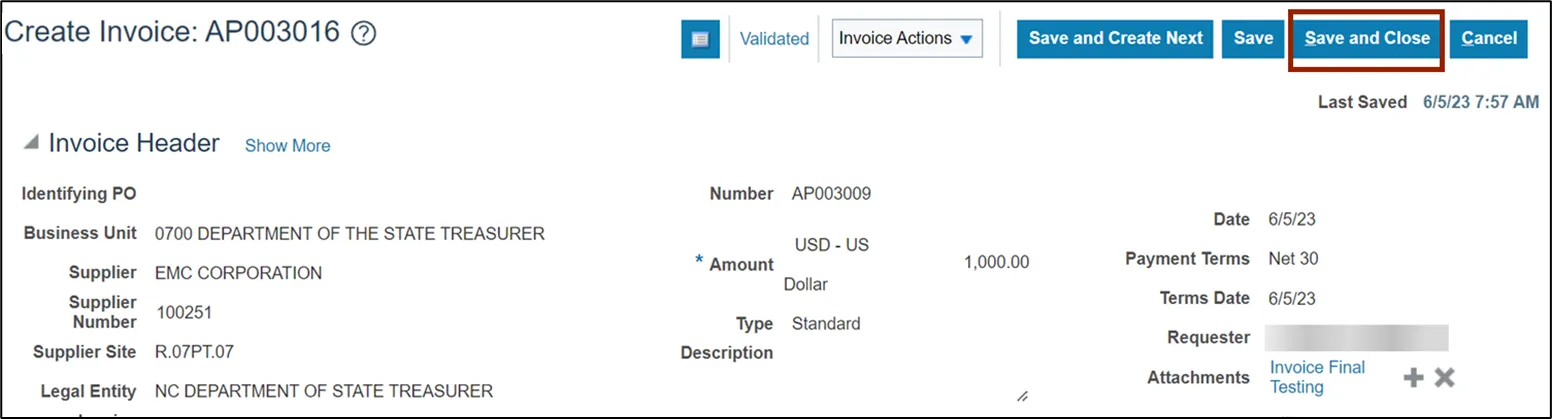
Step 24. On the top right of the Create Invoice page, click the Save and Close button.
To Add withholding tax:
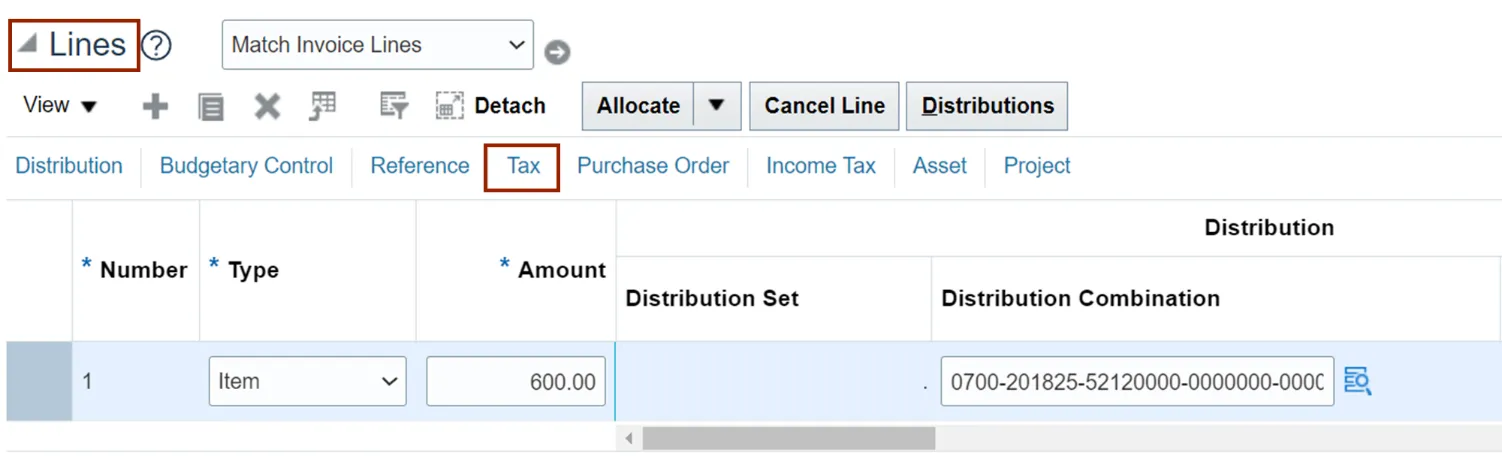
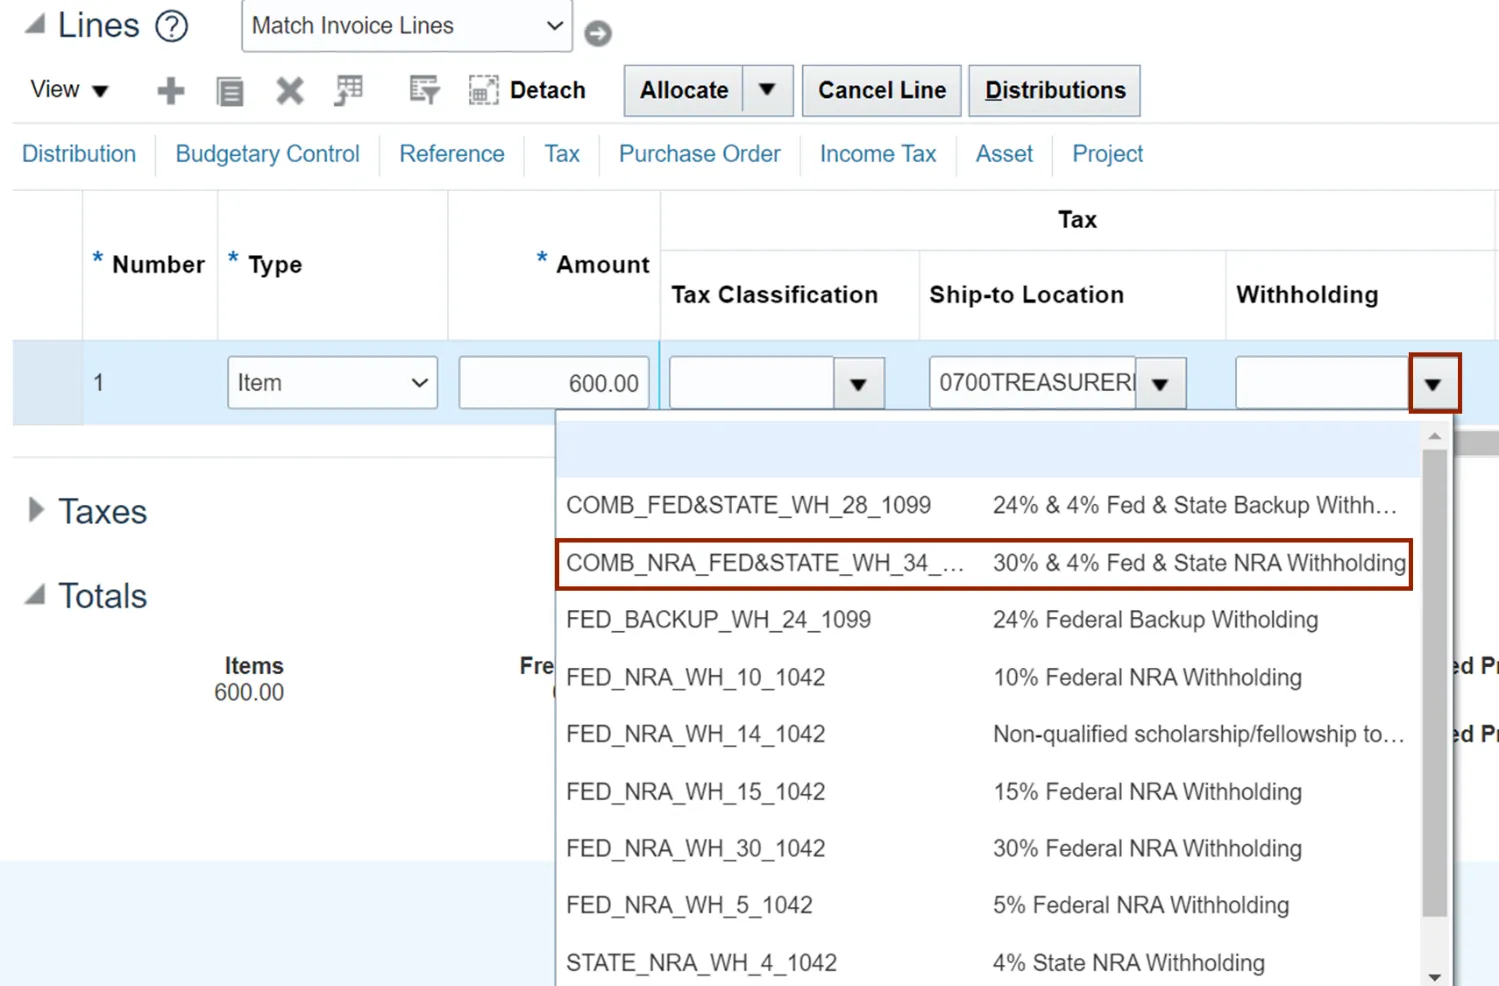
Step 25. On the Create Invoice page, navigate to Lines section. Click the Tax tab.
Step 26. Click the Down Arrow on the Withholding field. Then, select the required Withholding tax from the Withholding drop-down choice list.
Note: If withholding is setup on the supplier record, the withholding rate will default once the invoice header has been saved (step 11).
Step 27. On the top right of the Create Invoice page, click the Save and Close button.

To Add non-Governmental grant codes:
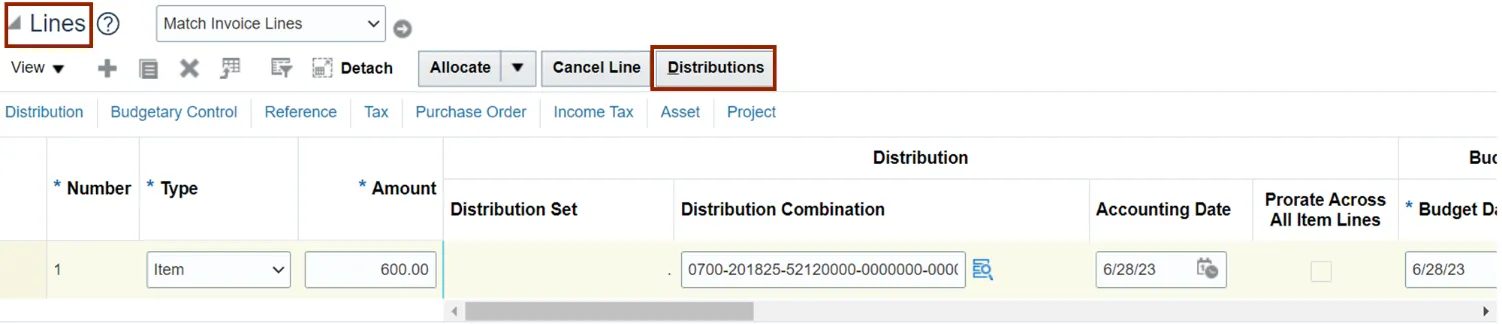
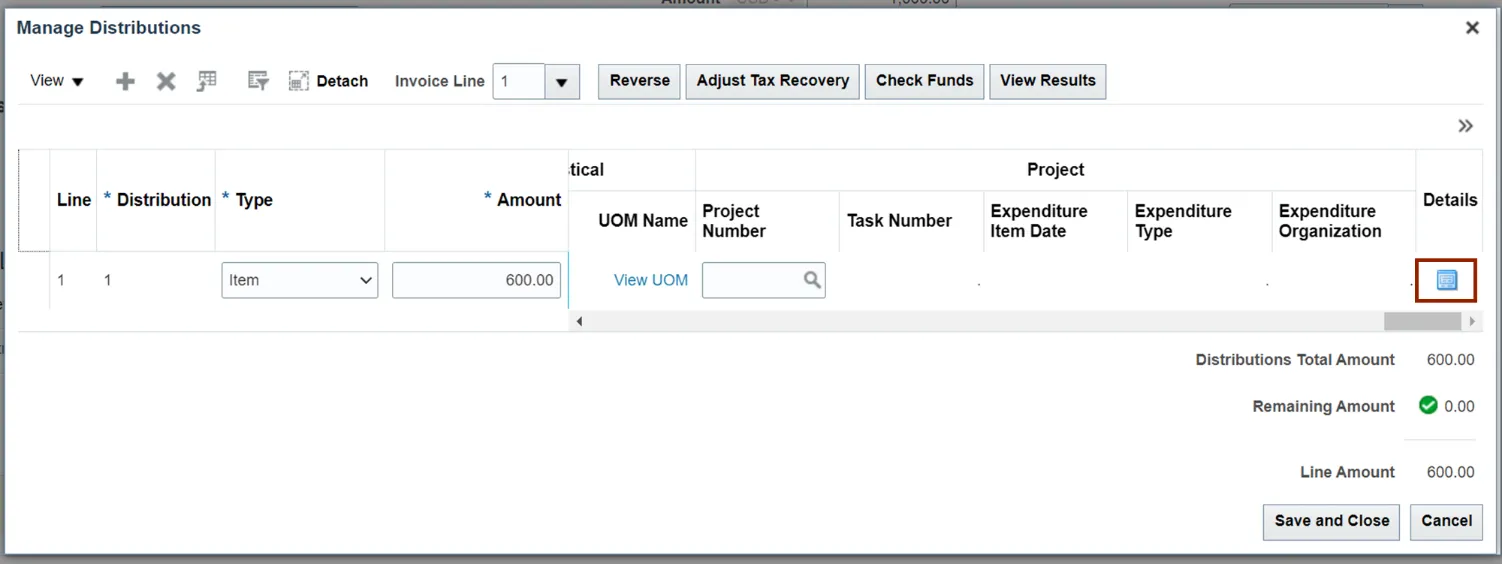
Step 28. On the Create Invoice page, navigate to Lines section. Click the Distributions button.
Step 29. The Manage Distributions pop-up appears. Scroll to the extreme right and click the Details icon.
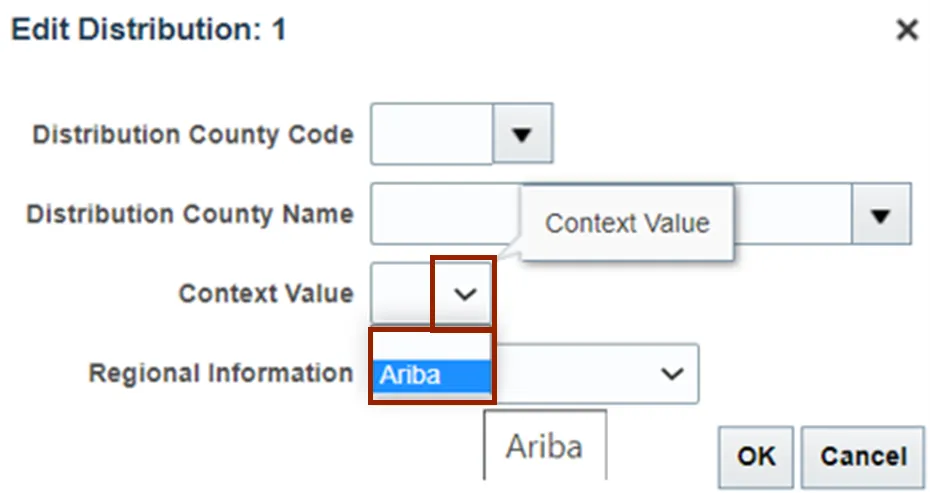
Step 30. The Edit Distribution pop-up appears. Select Ariba from the Context Value drop-down choice list.
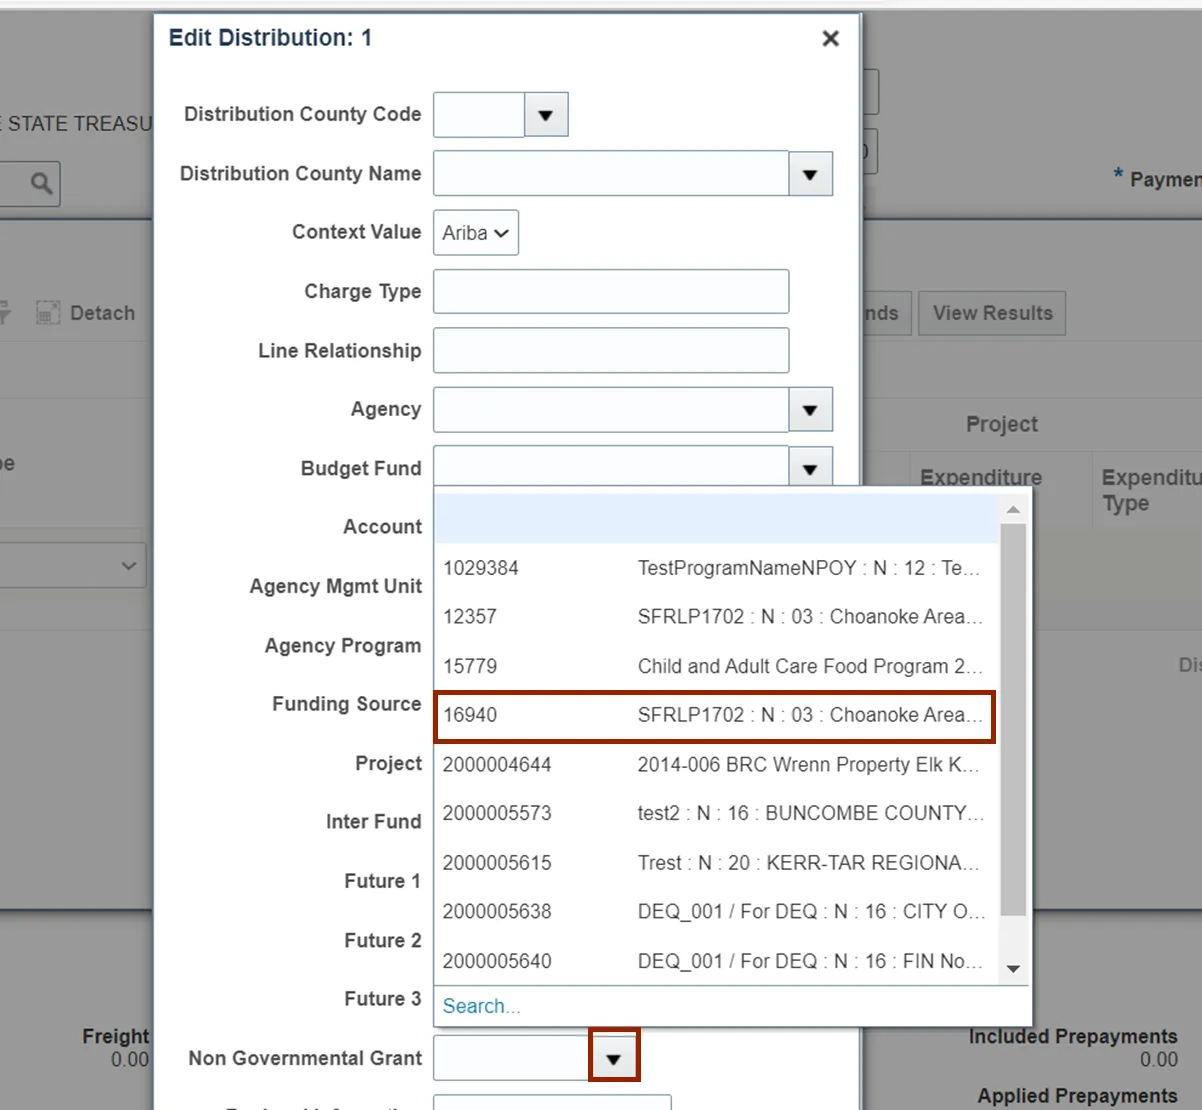
Step 31. Click the Down Arrow on the Non Governmental Grant field. Then, select the required Code from the Non Governmental Grant drop-down choice list.
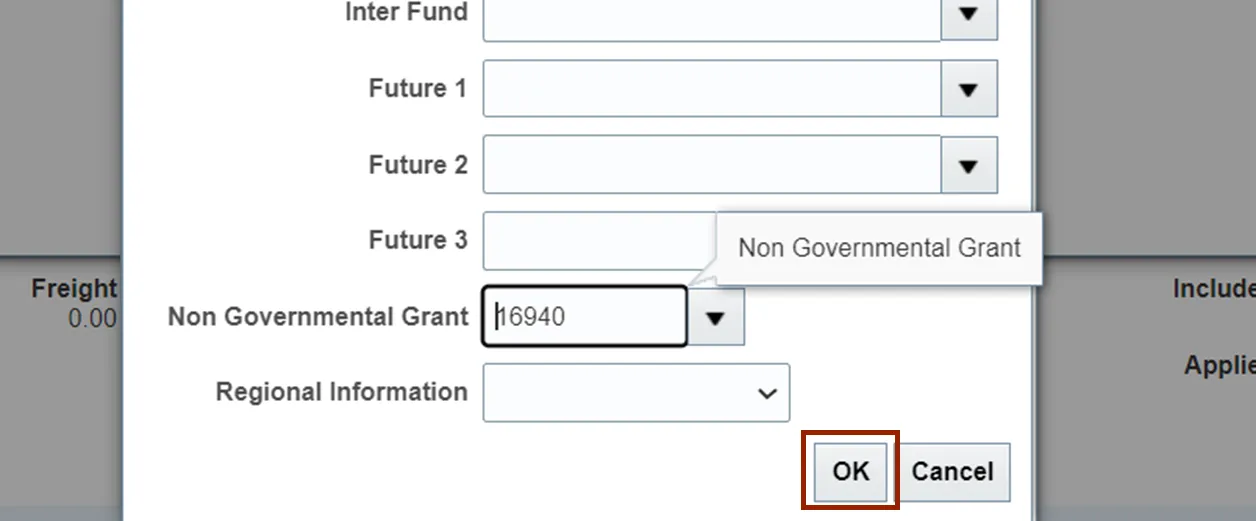
Step 32. Click the OK button.
Step 33. On the Manage Distributions pop-up, click the Save and Close button.
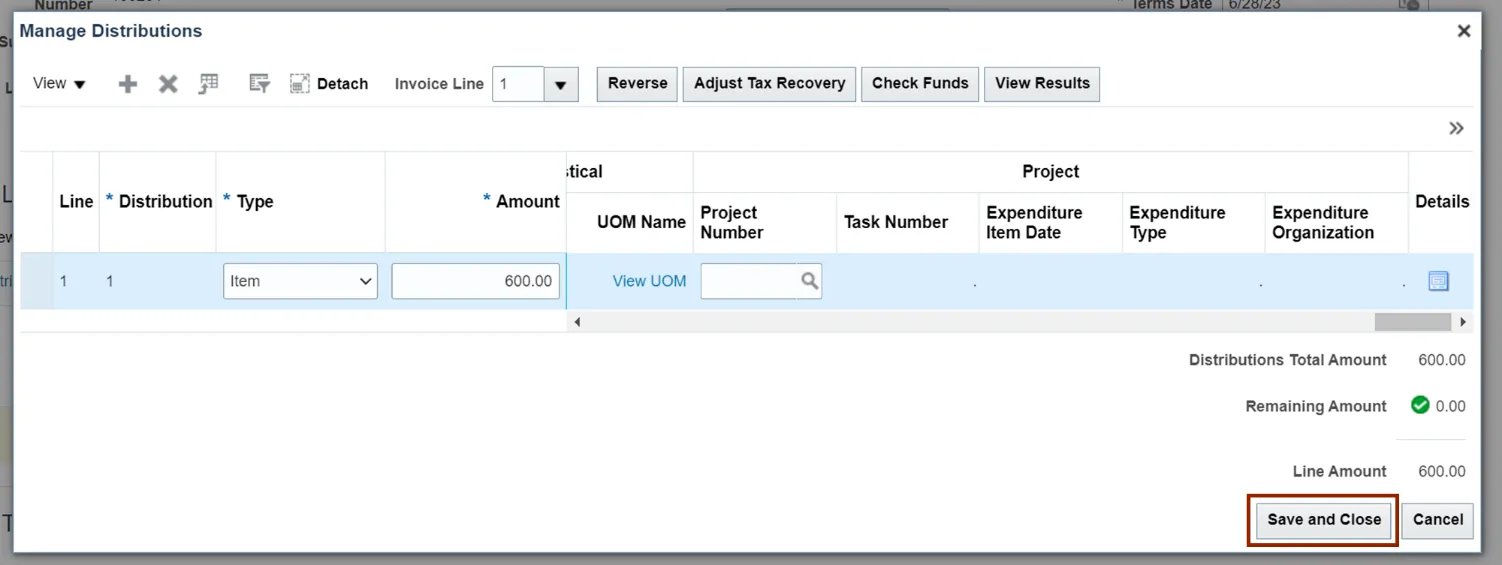
Step 34. On the top right of the Create Invoice page, click the Save and Close button.
To Track Asset Flag:
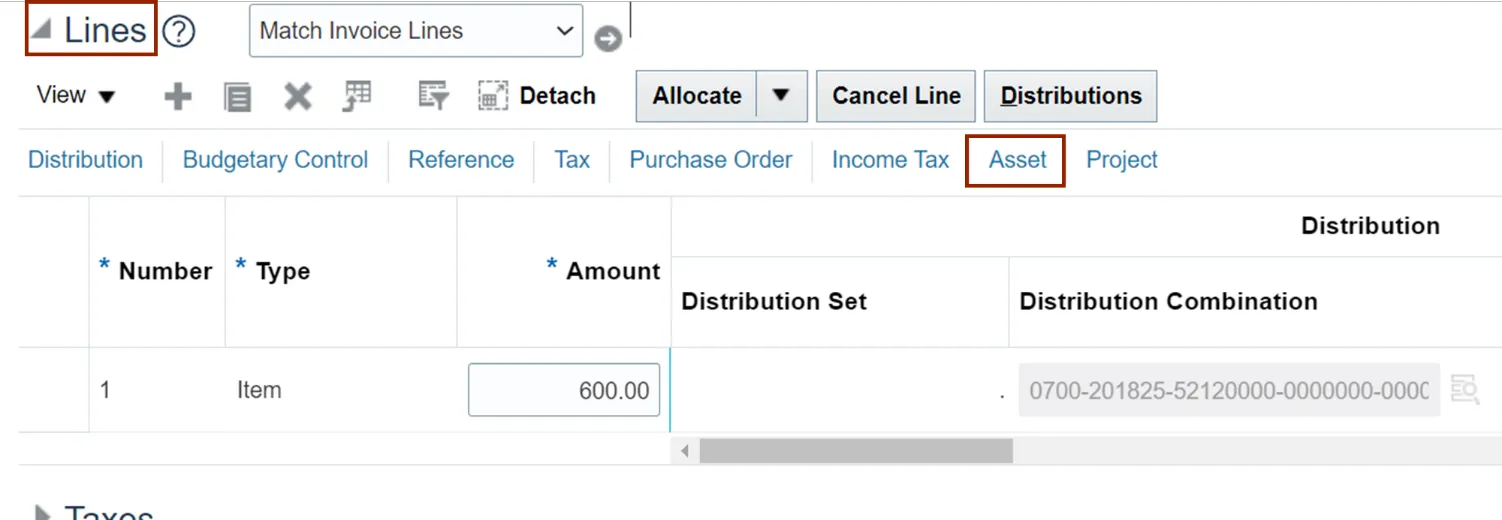
Step 35. On the Create Invoice page, navigate to Lines section. Click the Asset tab.
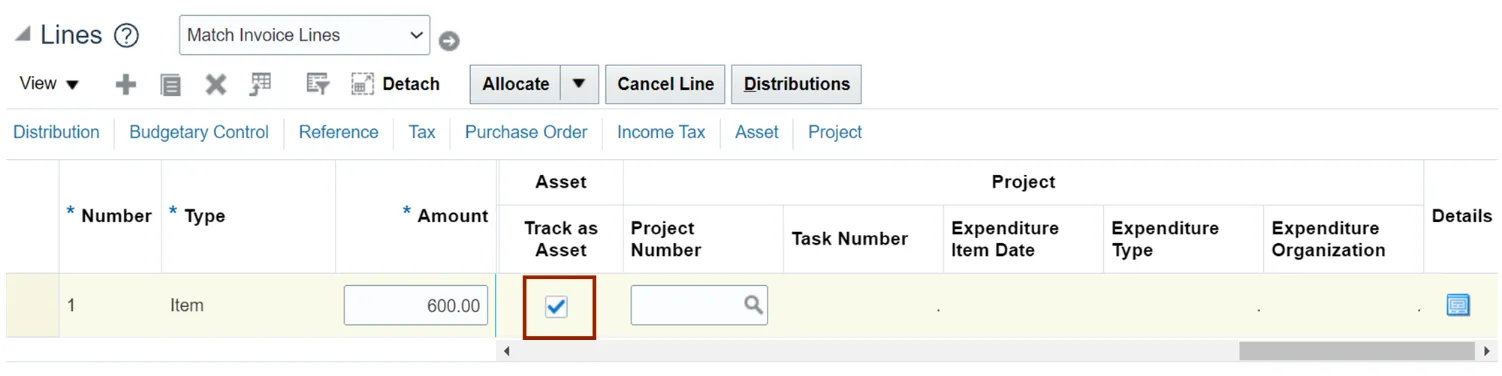
Step 36. Select the Track as Asset check box.
Note: This is not required for all Asset invoices, as the Create Mass Additions will automatically identify invoices eligible to be transferred to Fixed Assets by validating the charge account used on the line (it should contain a valid Asset Natural Account segment).
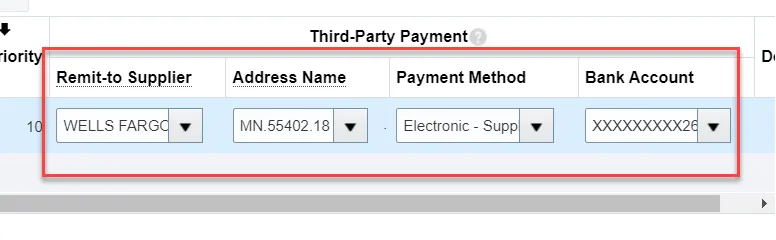
To Add a Third-Party Remit-To Supplier:
NOTE: The remit-to supplier must be set up on the supplier record to view the Remit-to Supplier drop down selection.
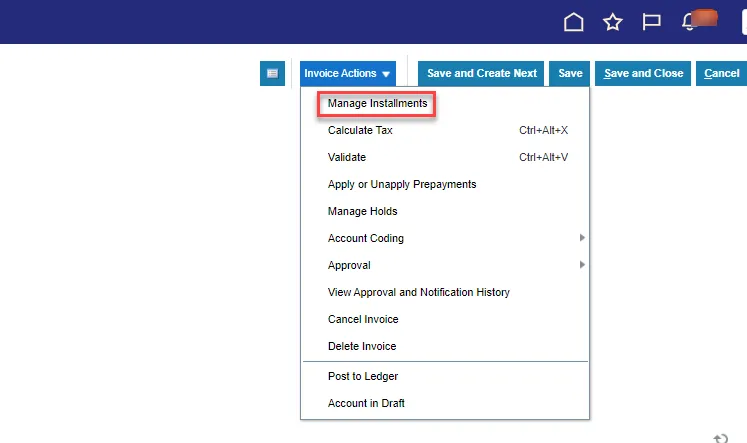
Step 37. On the Create Invoice page, click Invoice Action, then click Manage Installments.
Step 38. Click the drop-down box under Remit-to Supplier.
Note: The remit to supplier must be set up on the supplier record to view the Remit-to Supplier drop-down selection.
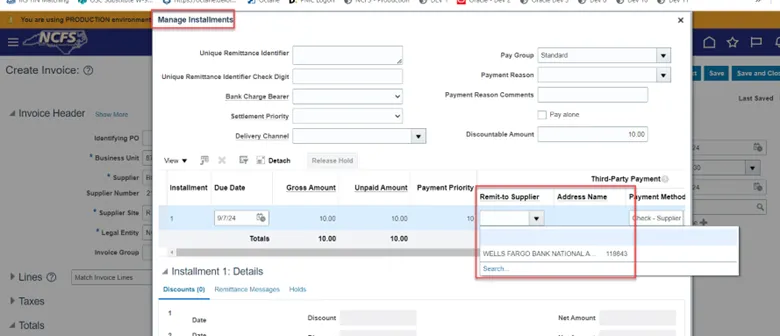
Step 39. Once you choose the Remit-to-Supplier, the payment method information will be populated.
Continuation from Step 16
Step 40. The Create Invoice page appears. Select Validate from the Invoice Action drop-down choice list.
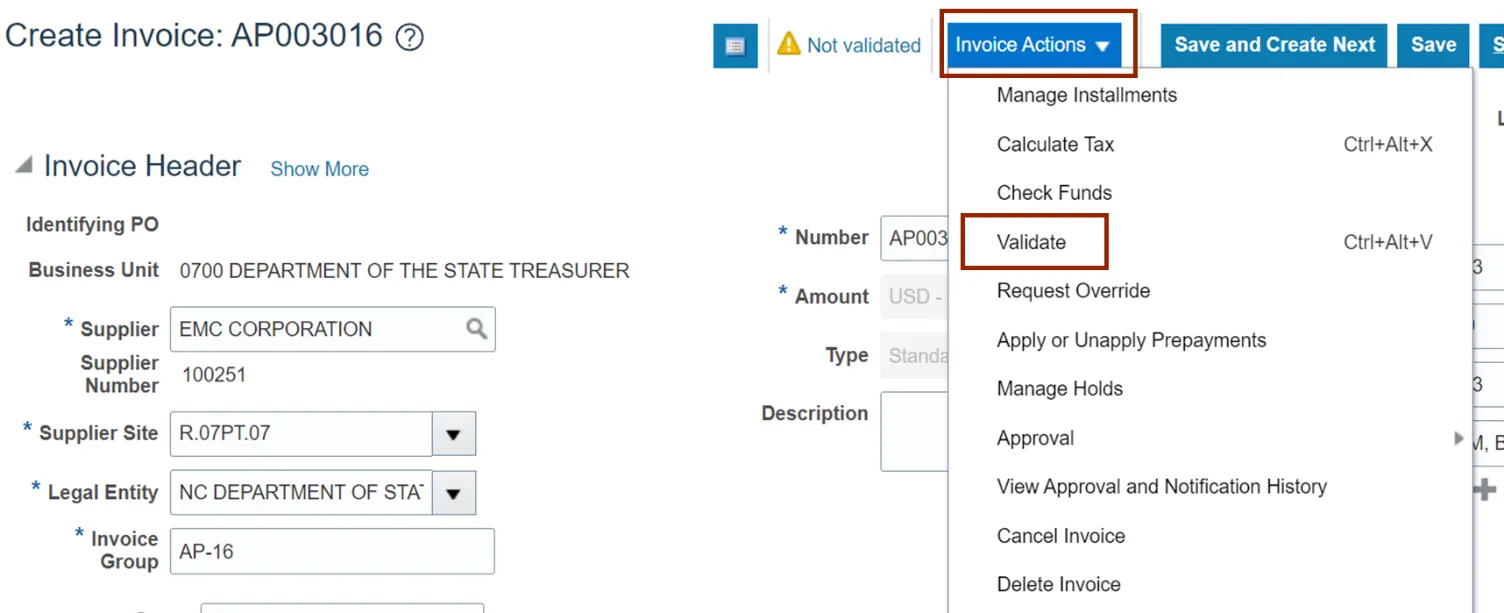
Step 41. Validate the Invoice. The status will be Validated.
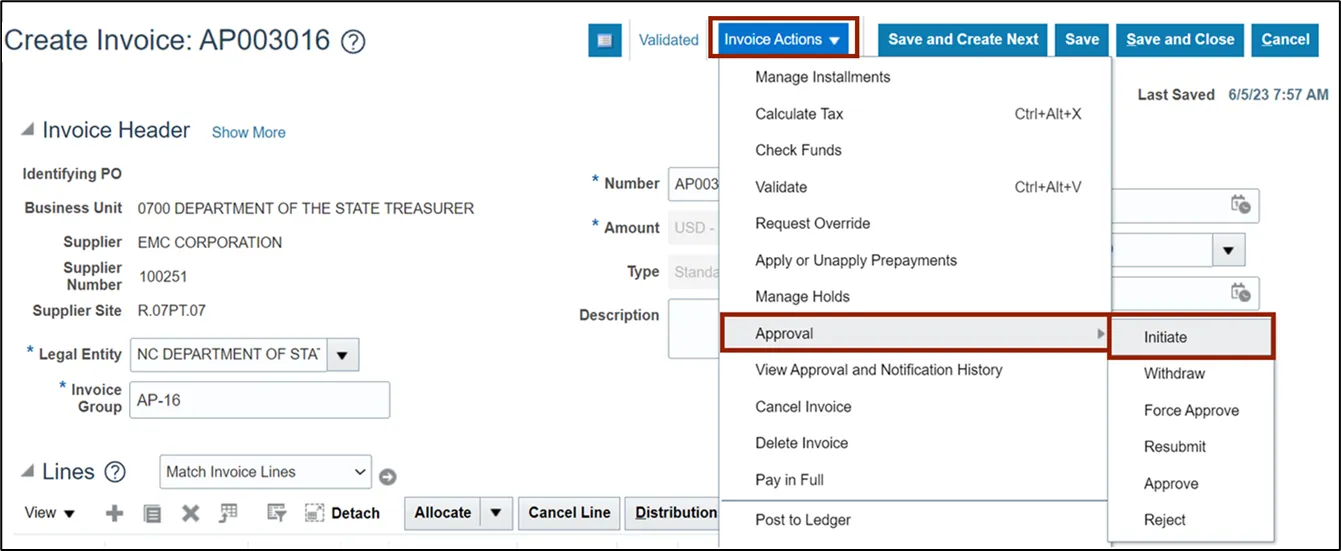
Step 42. Once the Invoice is Validated, click the Invoice Action drop-down button. Select Approval and Initiate from the Invoice Action drop-down choice list.
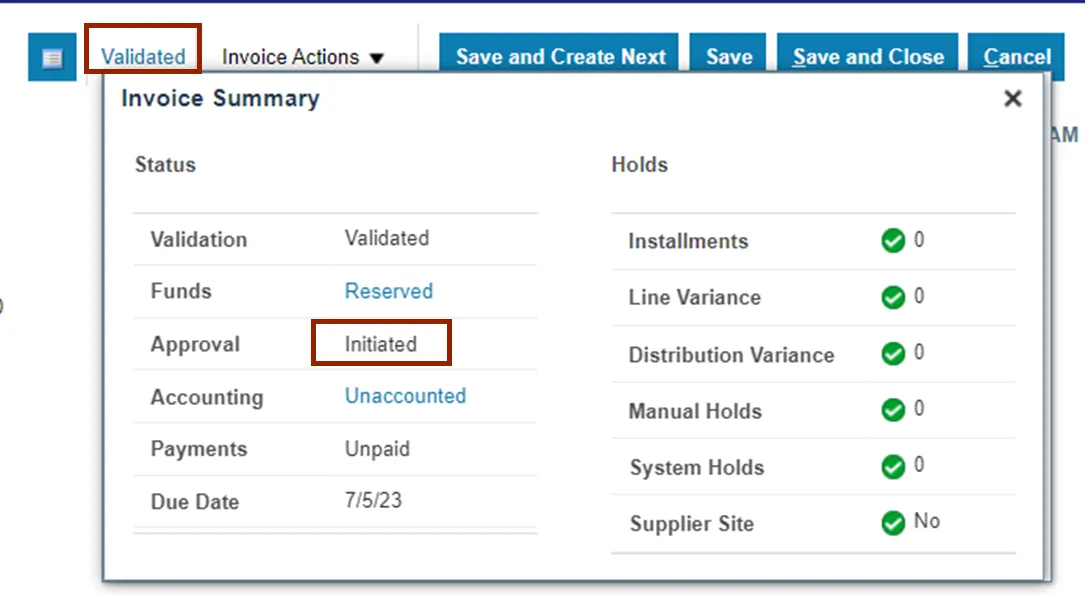
Step 43. Click the Validated status link. The status here is Initiated.
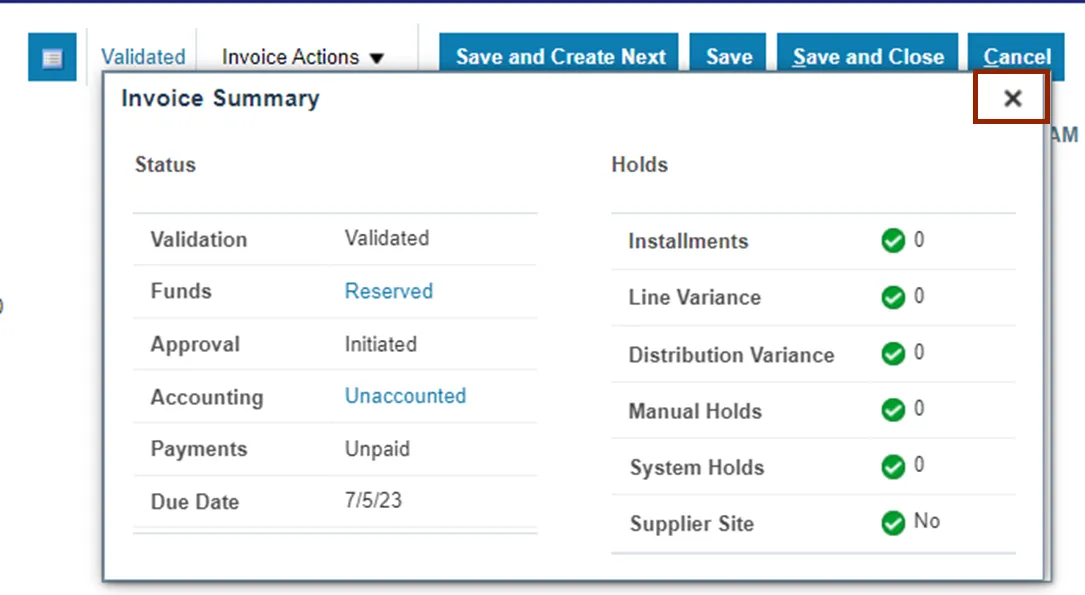
Step 44. Click the X icon in the upper right corner to close the Invoice Summary pop-up.
Step 45. Click the Save and Close button. This directs you back to the Invoice dashboard page.
Wrap-Up
Create and Manage Invoices using the steps above.
Additional Resources
- Virtual Instructor-Led Training (vILT)