Purpose
The purpose of this Business Process Procedure is to explain how to change a position address in the Integrated HR-Payroll System.
Trigger
The address for a position needs to be changed.
Business Process Procedure Overview
The address of a position may need to be created or changed for several reasons.
- When a position is created via Workflow, the Main, Mailing and Courier address should be entered.
- A position can be relocated across the street to another building (in this example) (use the Copy function)
- There may be a spelling error in the position that needs to be fixed (use the Change function)
The address might have been left off when the position was requested and approved, via Workflow (use the Create function).
Positions are required to have both a Main and Mailing address per DIT policy.
Tips and Tricks
See the OM Tips and Tricks Job Aid for a full listing of Best Practices and Tips & Tricks. The job aid is located on the Training HELP website.
- Copy is to be used most of the time. This will delimit the existing record and create a new record with the start date given. Copying keeps a history of the old record.
- Change is to be used only if you make a spelling or other simple error and want to change the record. There is no history tracked on what the record used to be if you use the change functionality.
Access Transaction
Via Menu Path: Your menu path may contain this custom transaction code depending on your security roles.
Via Transaction Code: PO13
Procedure
There are 18 steps to complete this process.
Step 1. Type PO13 in the command field (1). Hit enter on your keyboard (2). Also, you can double click it from your favorites folder if you’ve previously saved it there (3).
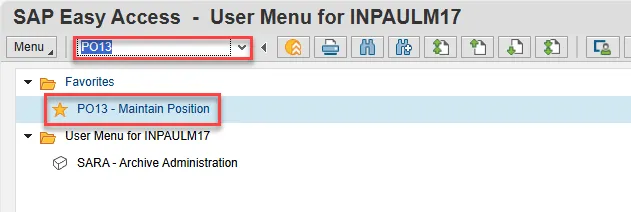
Step 2. Input the position number that needs updating. This document will use 60077228 from the OSC training environment.
Step 3. Click Enter and verify the position displayed is the one you need to change.
Alert! Be vigilant on this step. A position number may already be present when you access the transaction, so be sure to review the position number and name to ensure they are correct.
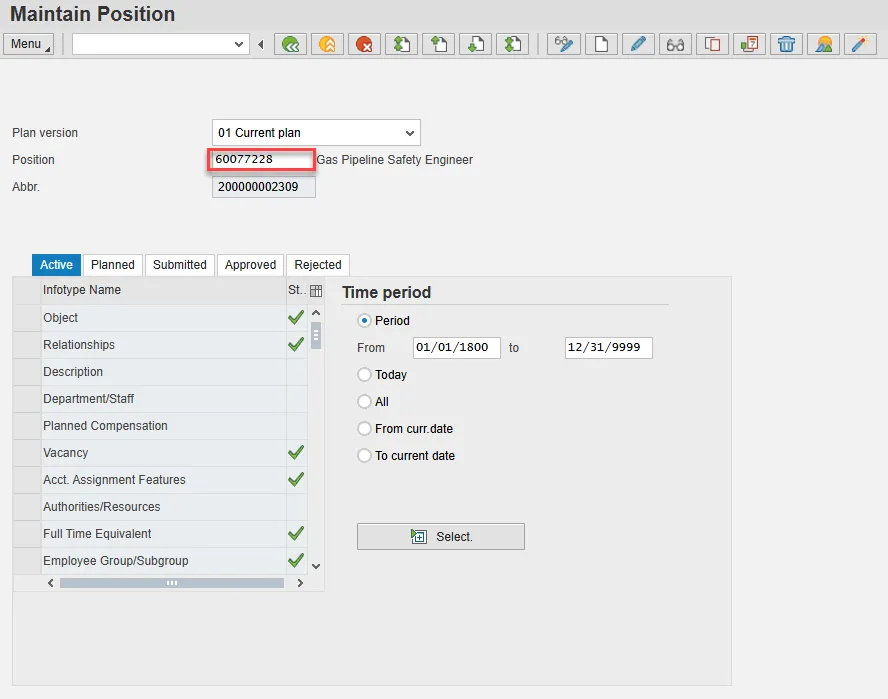
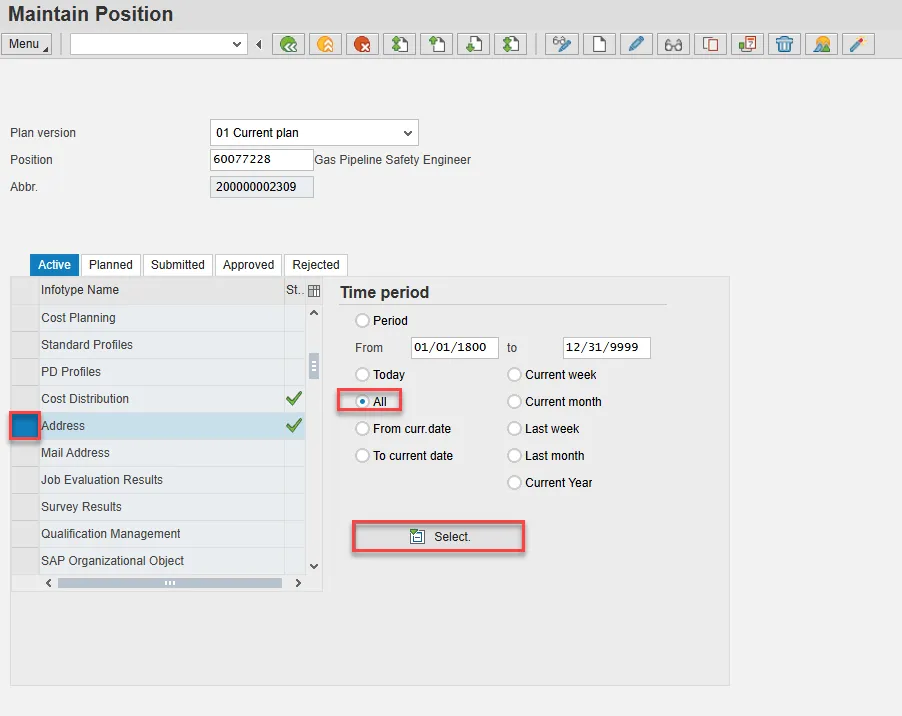
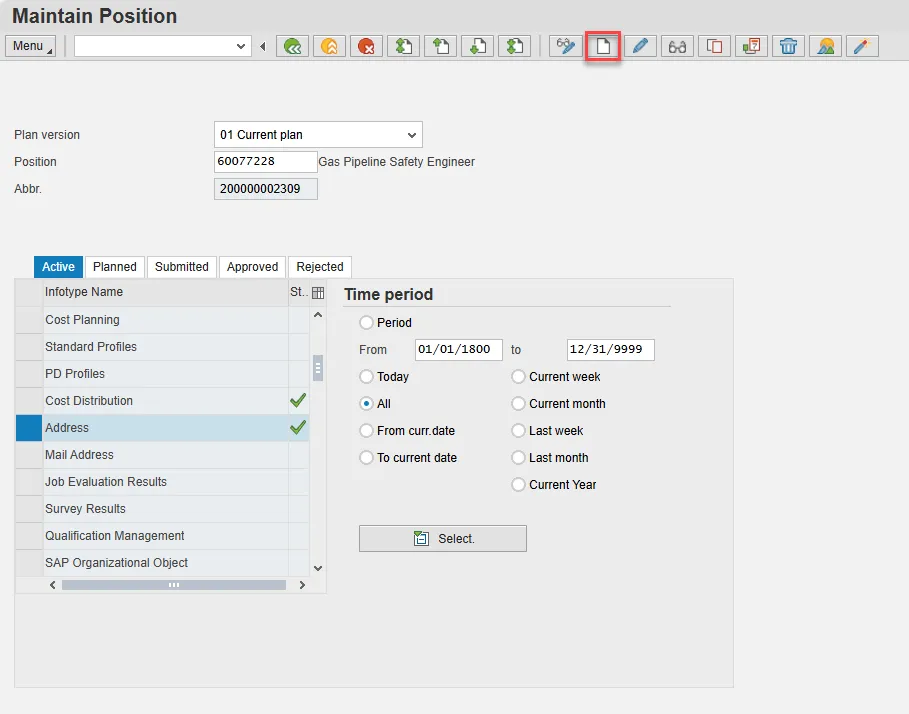
Step 4. Within the Active tab:
- Scroll down the list of position infotypes and click the square in front of the Address row. There may or may not be a green check already present.
- In the Time Period area click into the All radio button and then click Select.
IMPORTANT! If there is no green check as described above, you will need to use the create function. Skip to step 11 below.
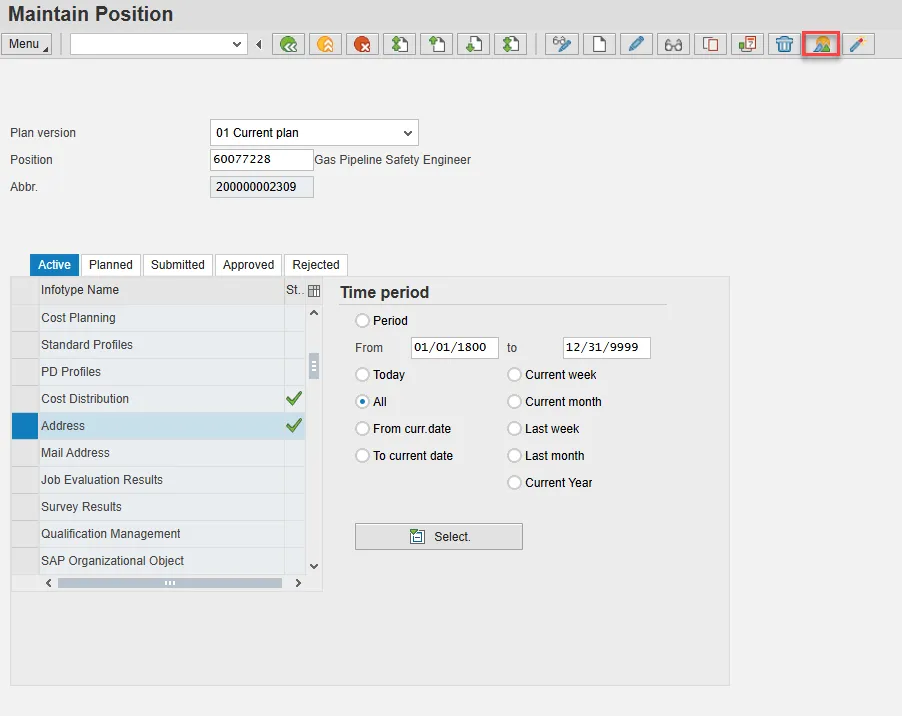
Step 5. Click the Overview button.
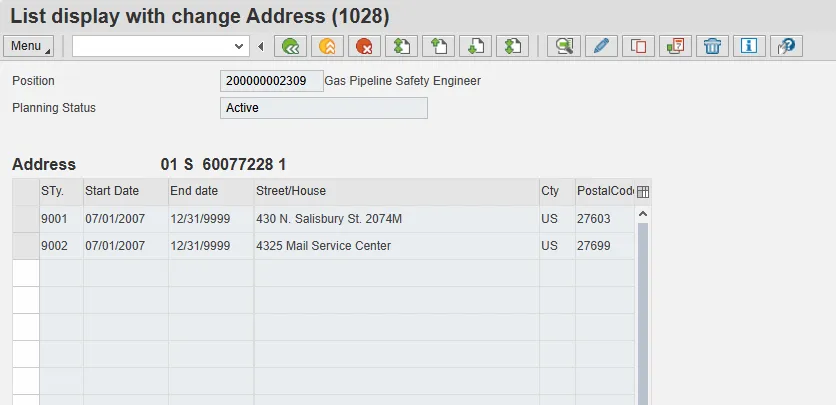
Step 6. Review the listed addresses and determine if the subtype needing the update exists. Clicking on the Matchcode button withing the STy. column will provide a key for the subtype numbers. In the example below, there are records for the Main and Mailing Address subtypes, but there is not one for the Courier subtype.
IMPORTANT! If the subtype needing the update does not exist, you will need to use the create function. Click the back button and proceed to step 11.
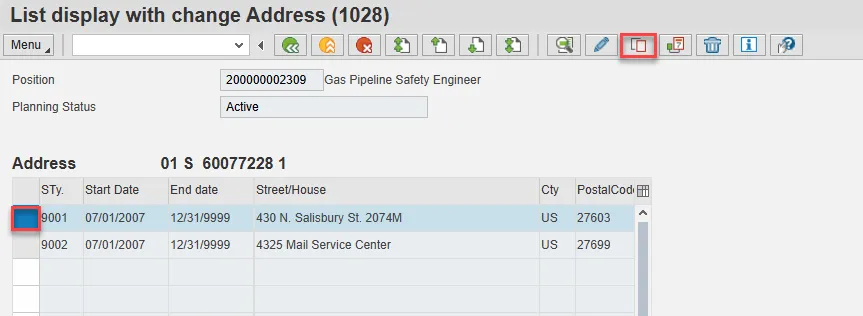
Step 7. Select the current record (it will have an end date of 12/31/9999) of the applicable subtype by clicking on the square to the left of the record. Then click the Copy button.
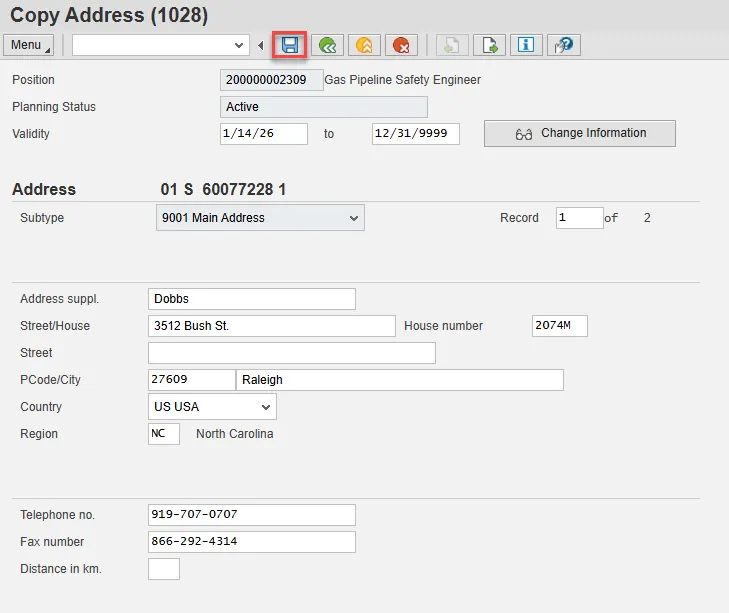
Step 8. Input the Validity date of the new record then update the address as appropriate. Addresses should be contained within the Street, PCode, City, Country, and Region fields. The Telephone no. and Fax number fields also may be updated as necessary.

Step 9. Click the Save button.
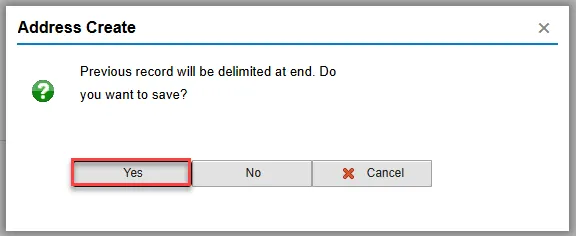
Step 10. Click the Yes button to save the new data and delimit the previous record.
Proceed to step 15.
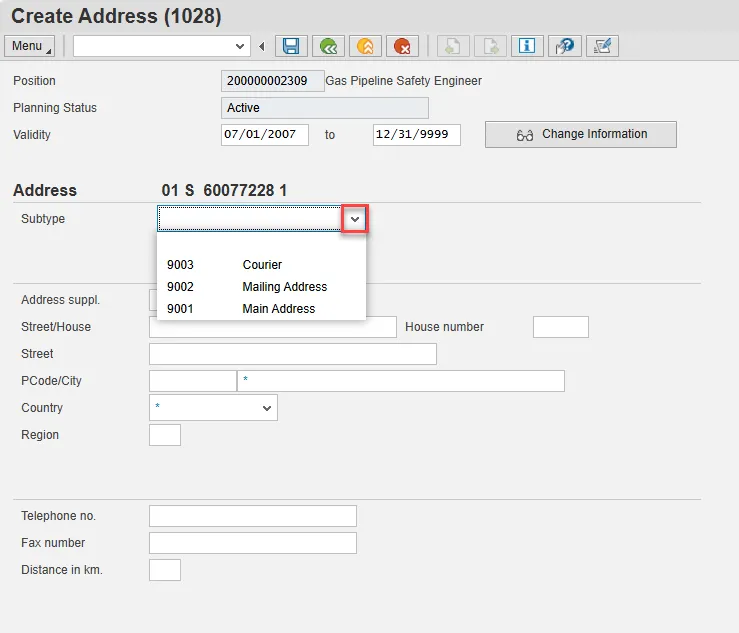
Step 11. Begin at this step to Create a new address record.
From the PO13 position infotype overview screen, and with the Address infotype selected, click the Create button.
Step 12. From the dropdown menu, select the address Subtype being created.
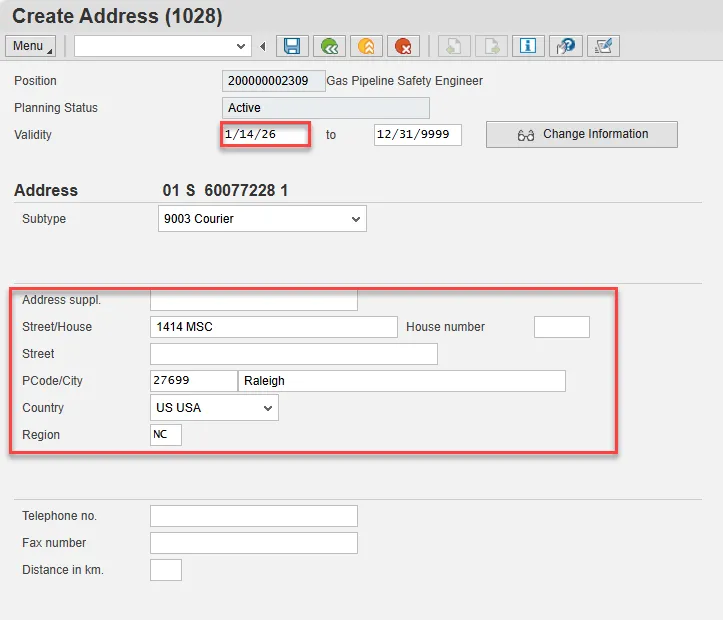
Step 13. Input the Validity date of the new record then update the address as appropriate. Addresses should be contained within the Street, PCode, City, Country, and Region fields. The Telephone no. and Fax number fields also may be updated as necessary.
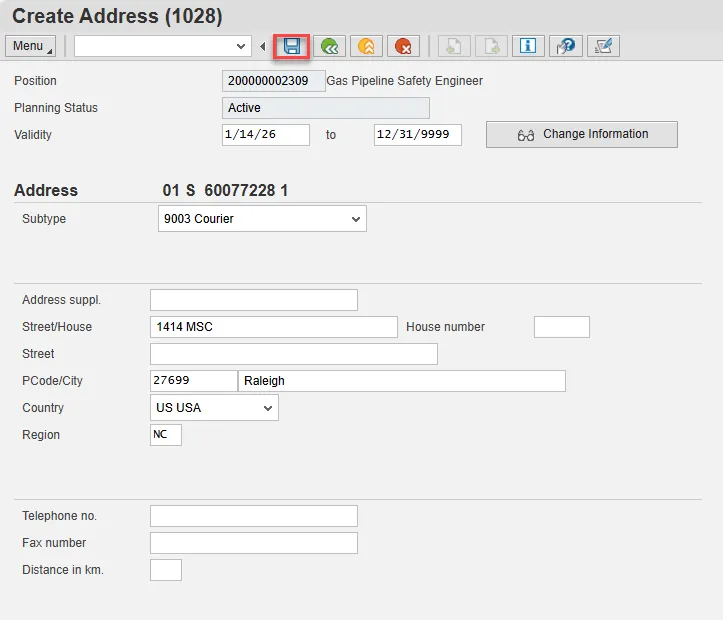
Step 14. Click the Save button.
Step 15. Review to ensure that the address change was implemented correctly. With the Address infotype selected, click the Overview button.
Step 16. Observe the address subtype that has been updated or created.
Step 17. Optional step: Include a note. Click on the right side of the Services for Object button. In the resulting drop-down menu, hover over the Create option and then choose Create Note.
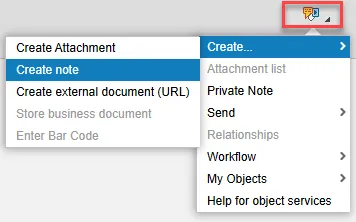
Note: Although a note is not required when updating a position’s Address, OSC staff recommends that one be created, nonetheless.
Enter in today’s date and your name (or initials) and a brief note with information used to justify the change.
Click the Green check to save your note.
Step 18. Click the Back button.
The system task is complete.