Purpose
The purpose of this Quick Reference Guide (QRG) is to provide a step-by-step explanation of how to create a Zero-Dollar Invoice for 1099 corrections in the North Carolina Financial System (NCFS).
Introduction and Overview
This QRG covers the steps on how and when to create zero-dollar invoice for 1099 corrections in NCFS. A few of the possible scenarios are provided as examples in this QRG.
The following are a few of the possible scenarios discussed in this QRG.
- Supplier was not flagged in the original 1099.
- Supplier was flagged with the wrong amount and /or wrong 1099 code.
- The wrong supplier was flagged, and a new supplier needs to be added.
- Supplier was flagged in error.
Note: 1099 Correction invoices should always have a total amount of $0. The invoices have an equal positive and negative line amounts. Amounts entered on the 1099 lines are the amount to add or subtract from the original 1099 amount filed with the IRS.
If adding amounts from the initial 1099 amount, the amount must be placed in the positive line with the appropriate 1099 code being increased.
If subtracting amounts from the initial 1099 amount, the amount must be placed in the negative line with the appropriate 1099 code being decreased.
The Pay Group used for these $0 invoices is 1099 Corrections.
1099 Correction – Zero Dollar Invoice
Each of the following four scenarios requires creating a zero-dollar invoice to begin the process. Follow steps one through five to create a zero-dollar invoice.
Step 1. Login to the NCFS portal.
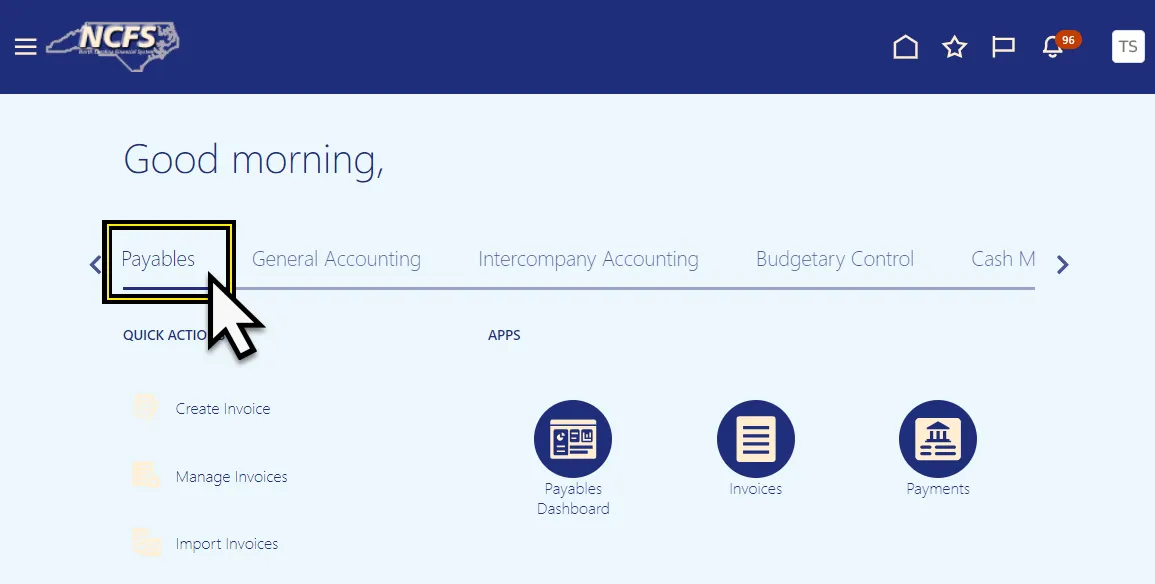
Step 2. Click the Payables tab from the home page.
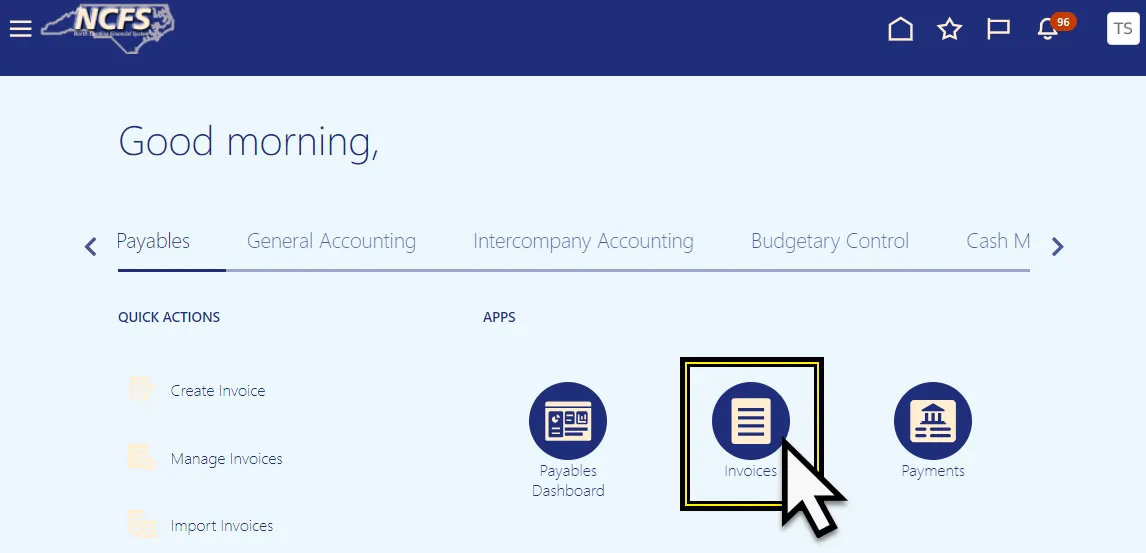
Step 3. Click the Invoices app.
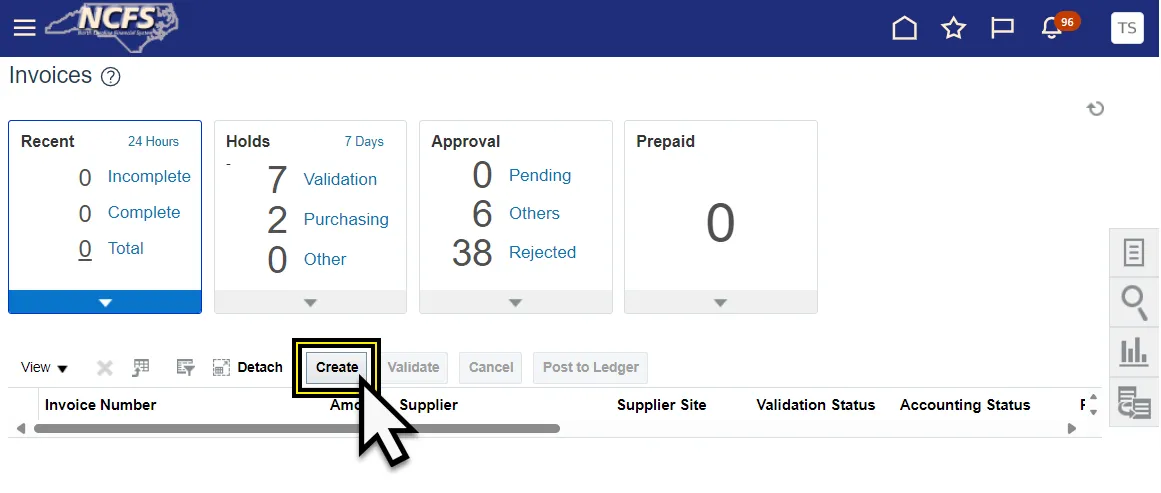
Step 4. Click Create to create a zero-dollar invoice.
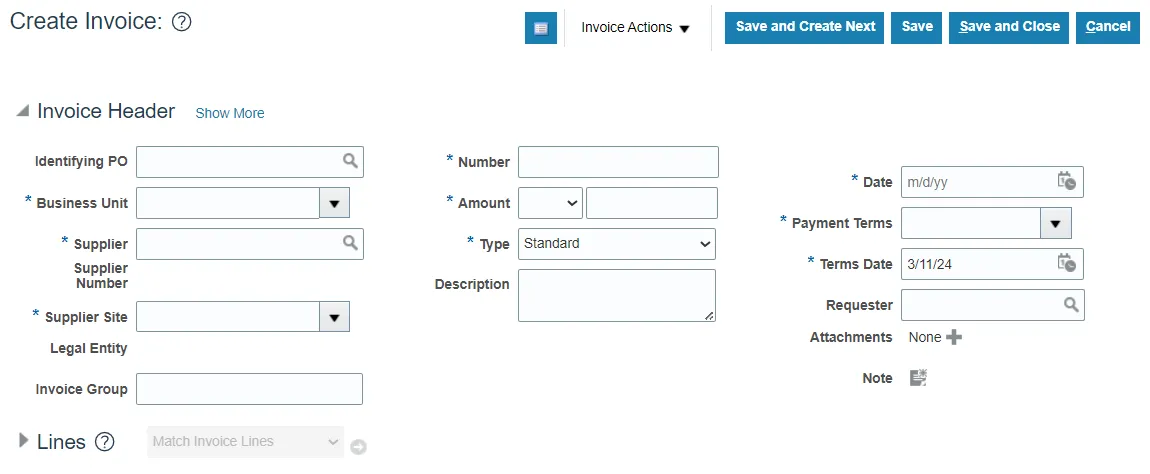
Step 5. The Create Invoice page is displayed.
Scenario 1 – Supplier was not flagged in the original 1099.
Follow the steps below to enter 1099 Correction Invoice. There are 19 steps to complete this process.
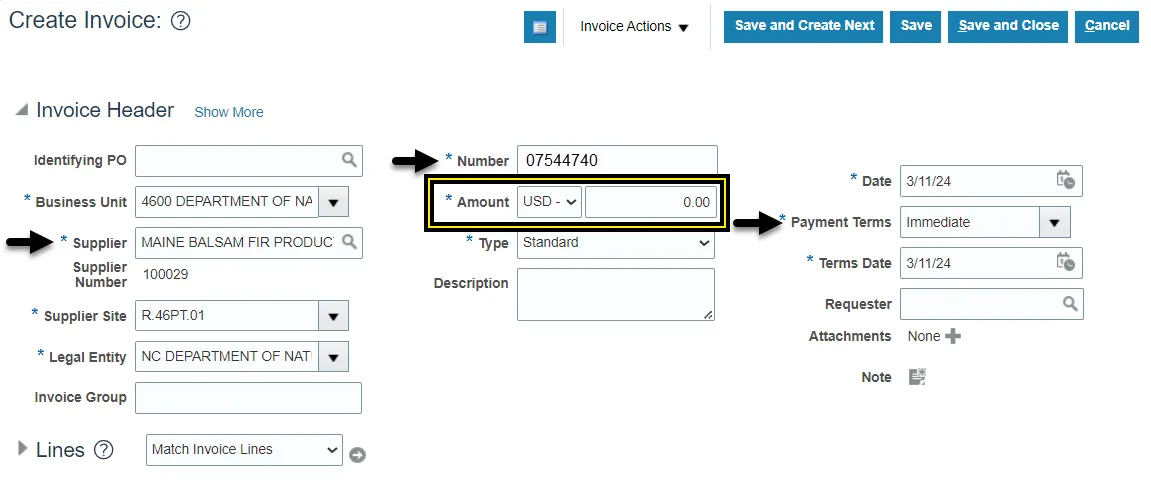
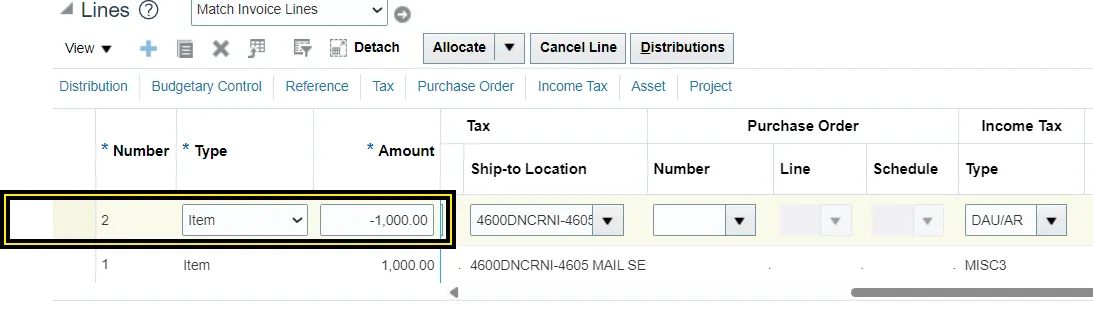
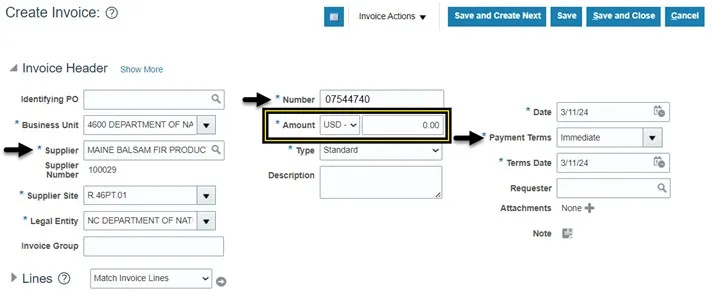
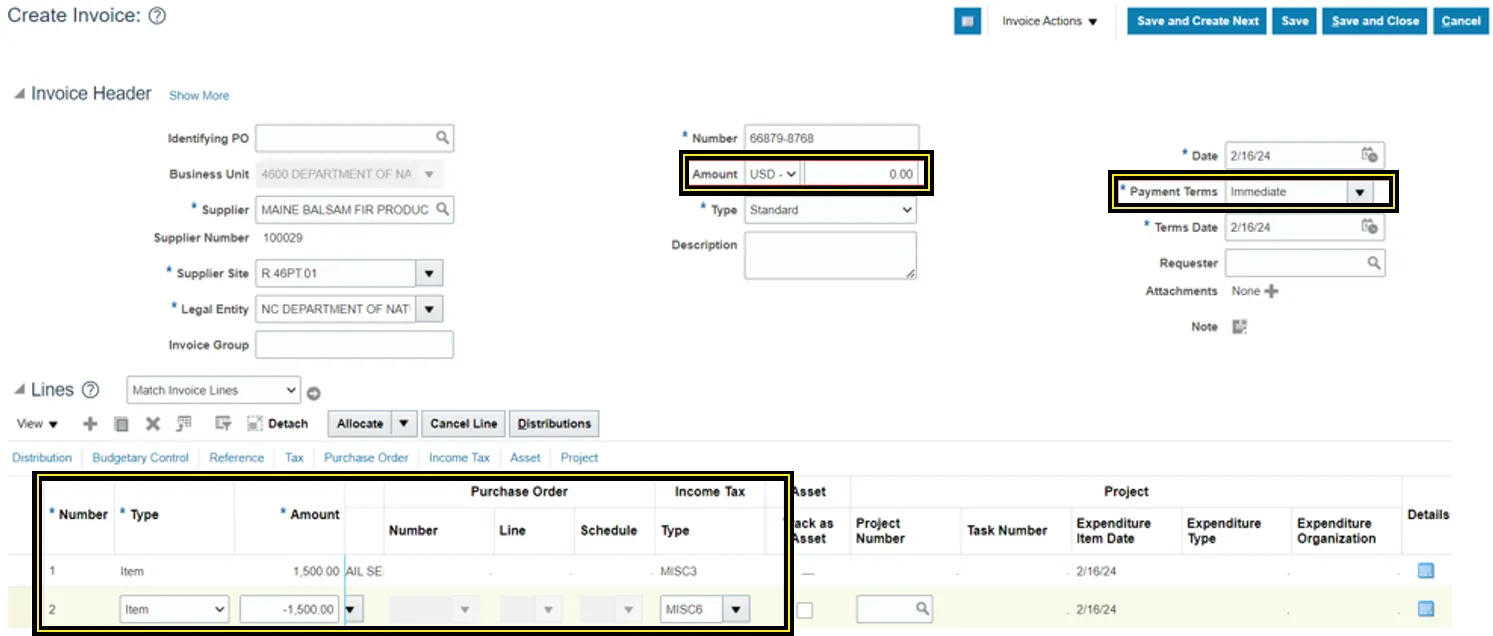
Step 1. Enter the Supplier Information, Invoice Number, set the Payment Terms to Immediate, and enter Zero (0.00) in the Amount field.
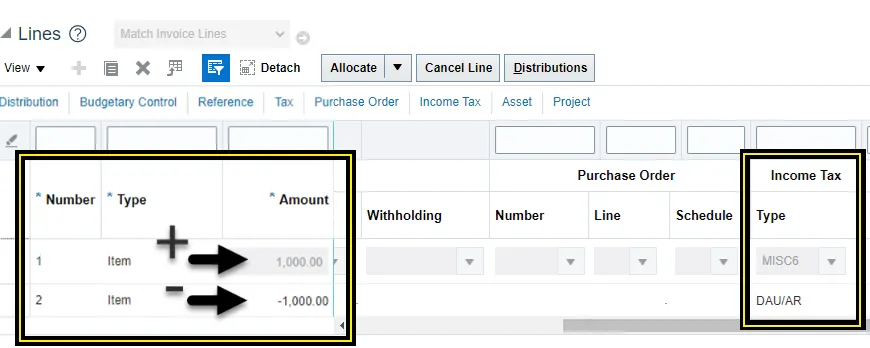
Step 2. Enter the Line Information. Be sure to enter the right distribution combination.

Step 3. Click Income Tax.

Note: If the Income Tax column is not visible. The Income Tax Type column can be added from the View option on the line menu; by selecting the Columns option and then Income Tax and Type.
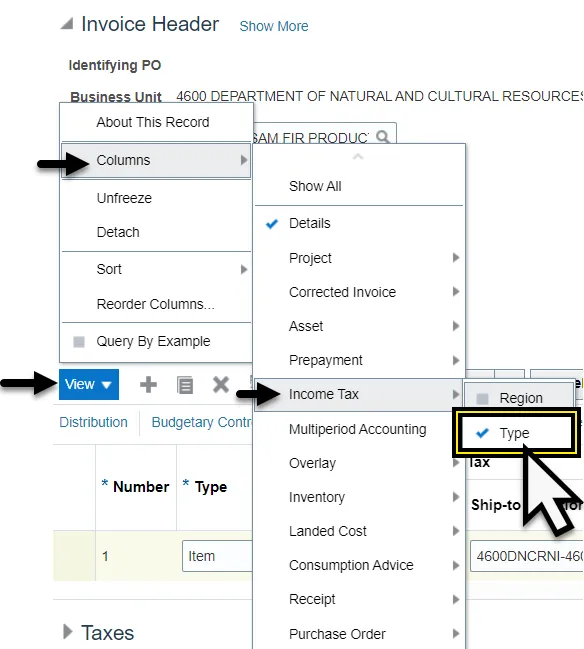
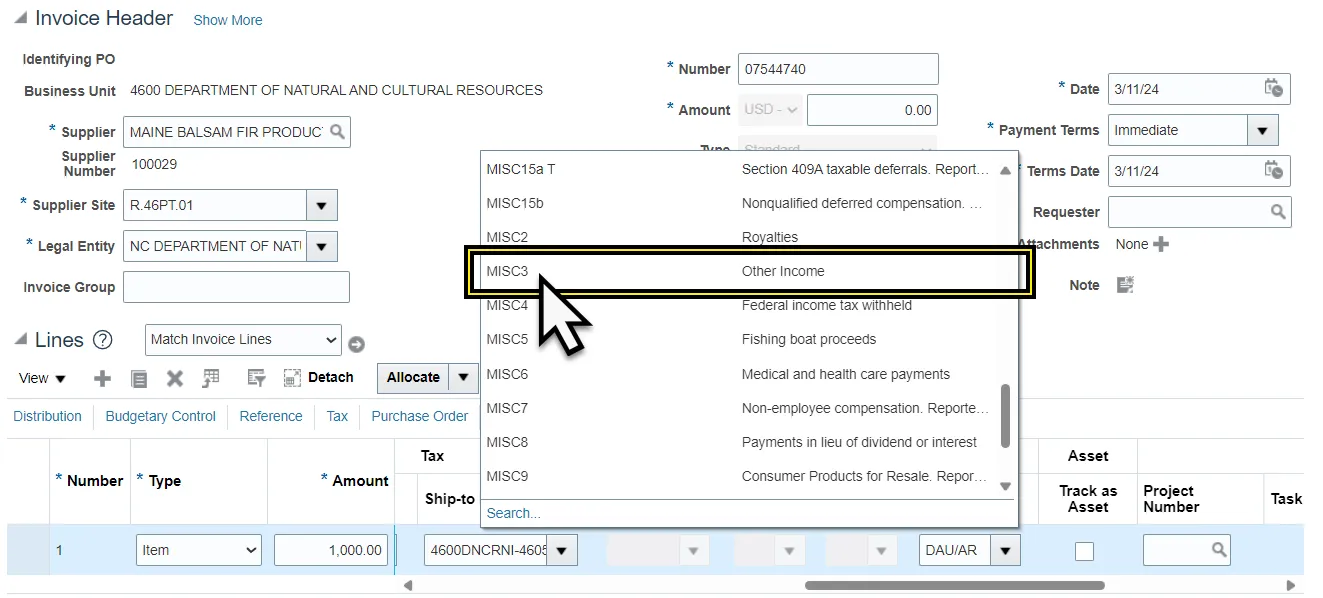
Step 4. Click the Income Tax Type drop-down menu.
Step 5. Select the appropriate income tax type. In this example, we selected MISC3.
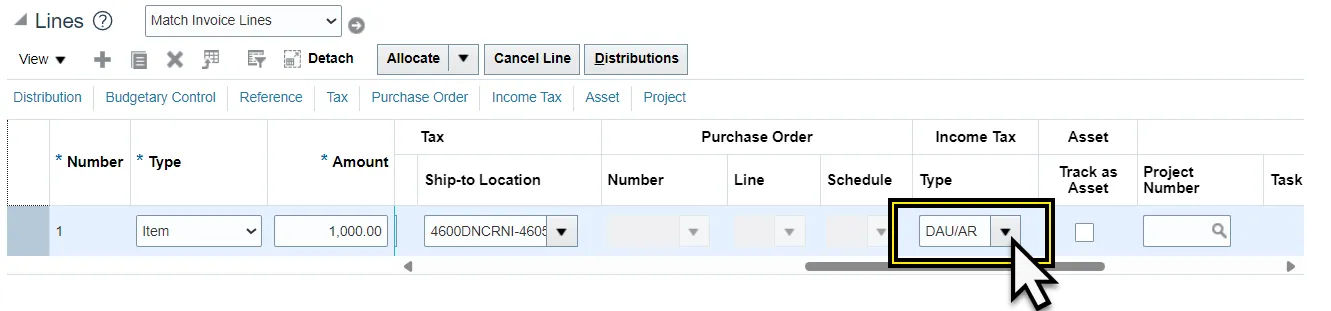
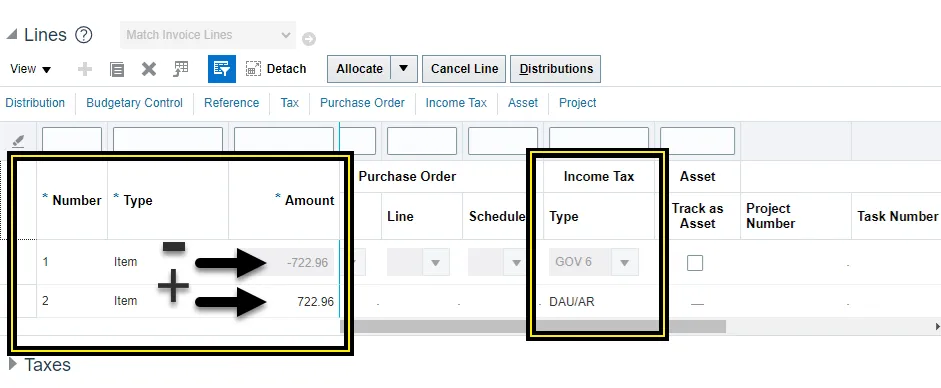
Step 6. Add a new line and the negative amount. The two lines must net to 0.00.
Please ensure that the negative line has Income Tax type DAU/AR 1099 code which will not flag a 1099 code for that line.
Step 7. Click Save.

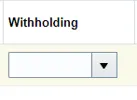
Step 8. If the Income Tax is MISC4, remove the withholding description from the Withholding column if one is listed under the Tax Category. The invoice must be saved before the withholding description appears.
- Scroll over to the Withholding column.
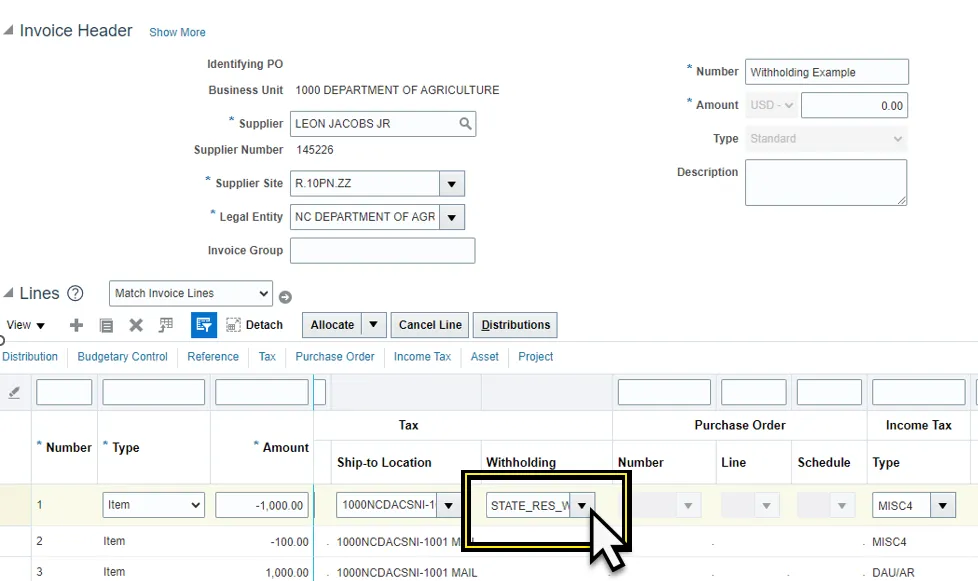
- Click the Withholding drop-down menu.
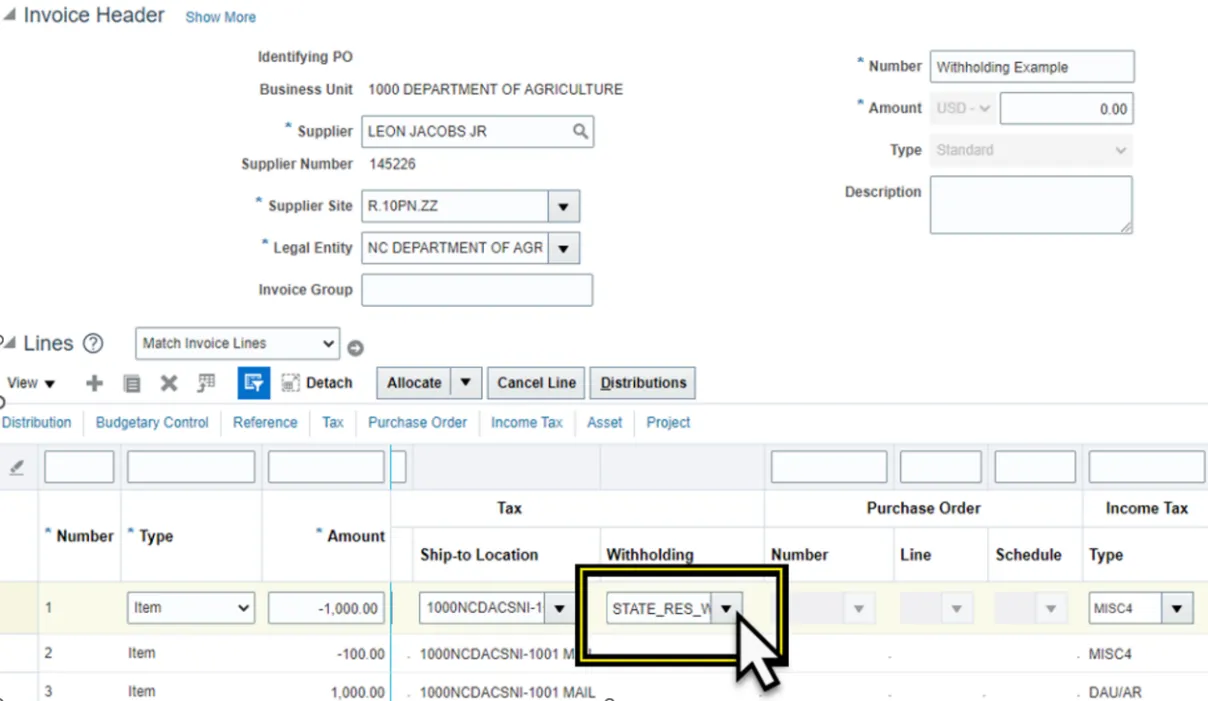
- Select the top empty description.
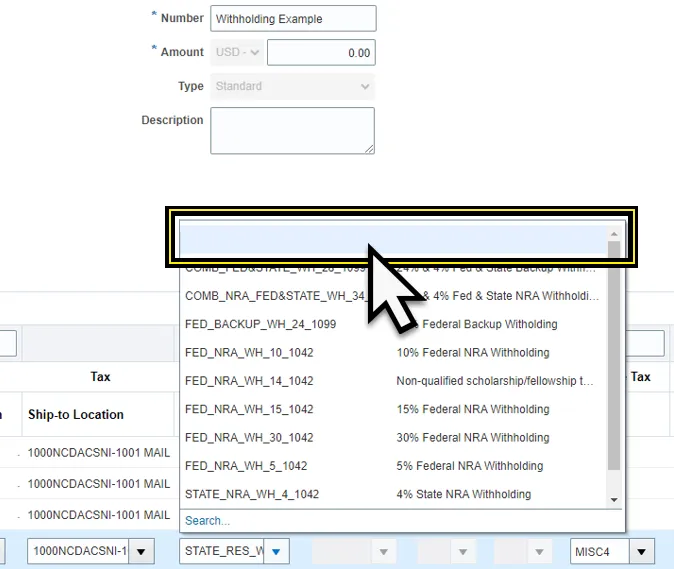
- Withholding should appear empty.
Step 9. Click Save to save the invoice.
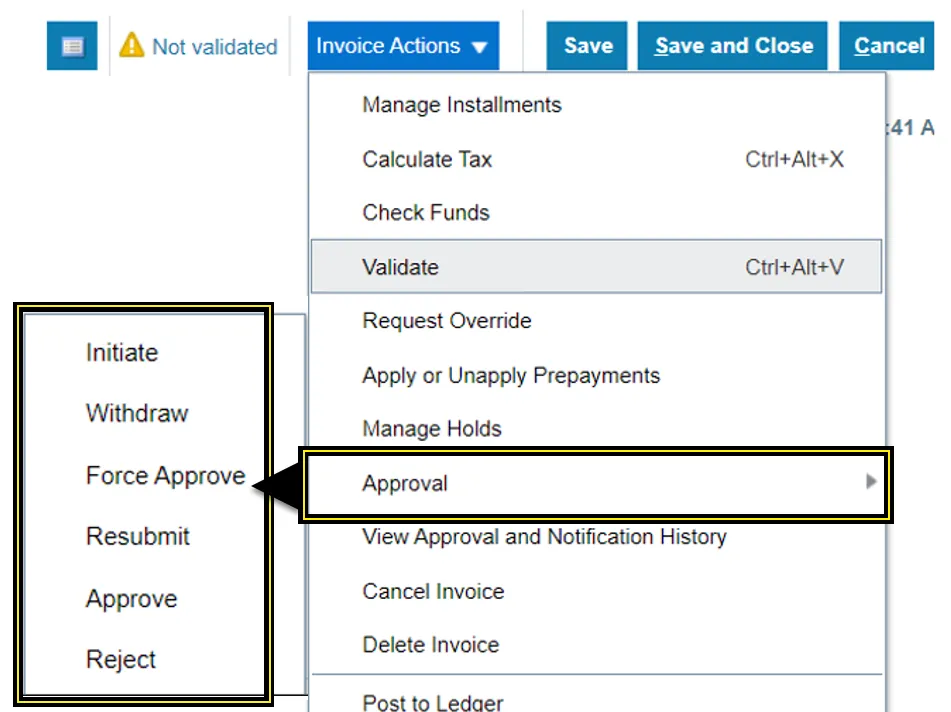
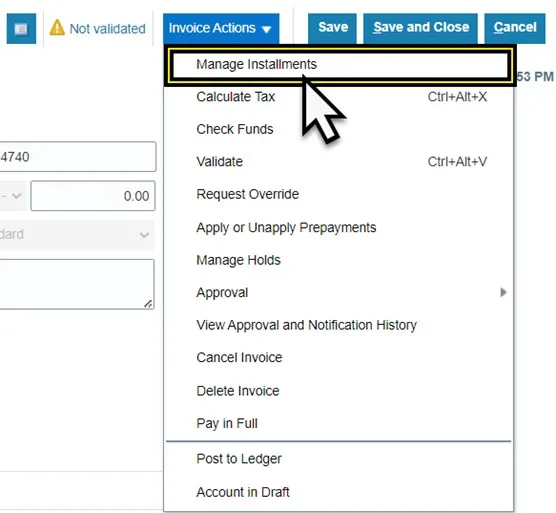
Step 10. Click the Invoice Actions drop-down menu.

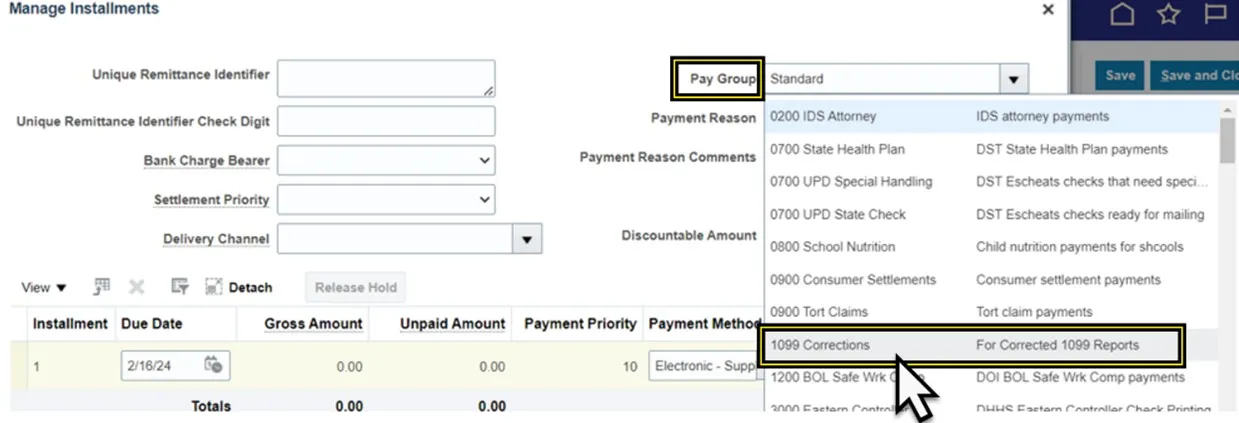
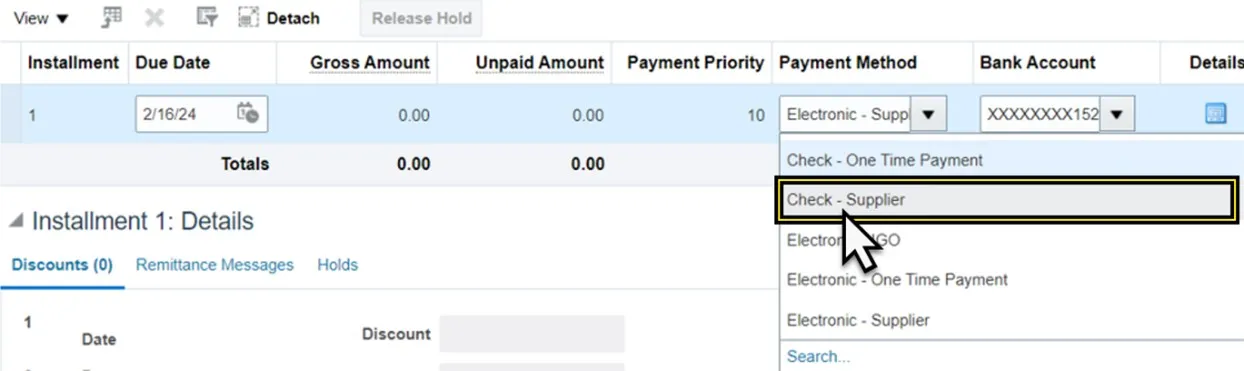
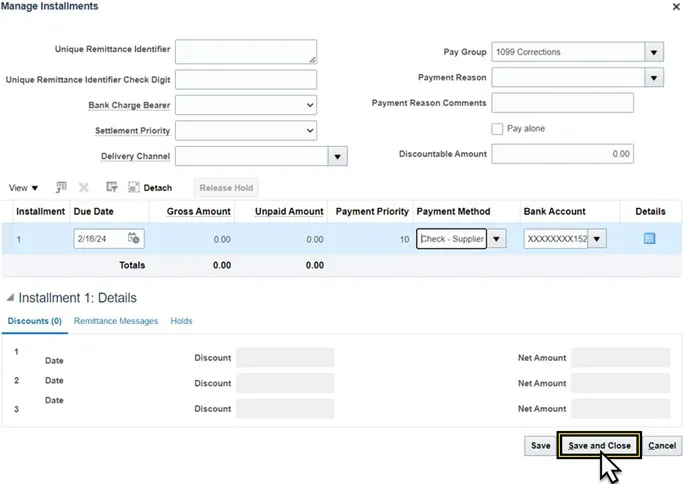
Step 11. Select Manage Installments.
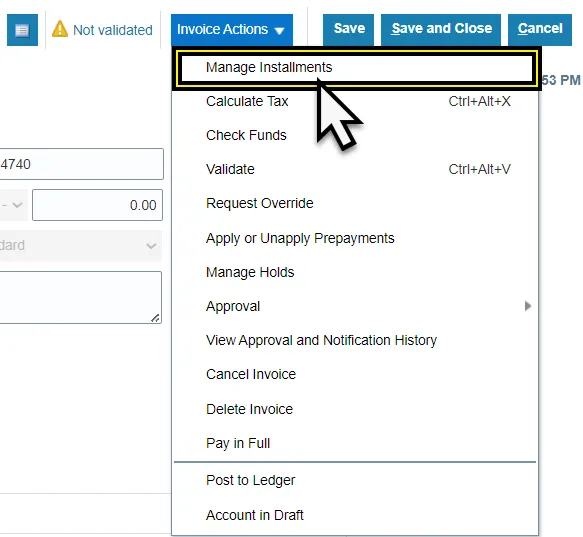
Step 12. Select 1099 Corrections under Pay Group from the Manage installments page.

Step 13. Select Check Supplier option under Payment Method.
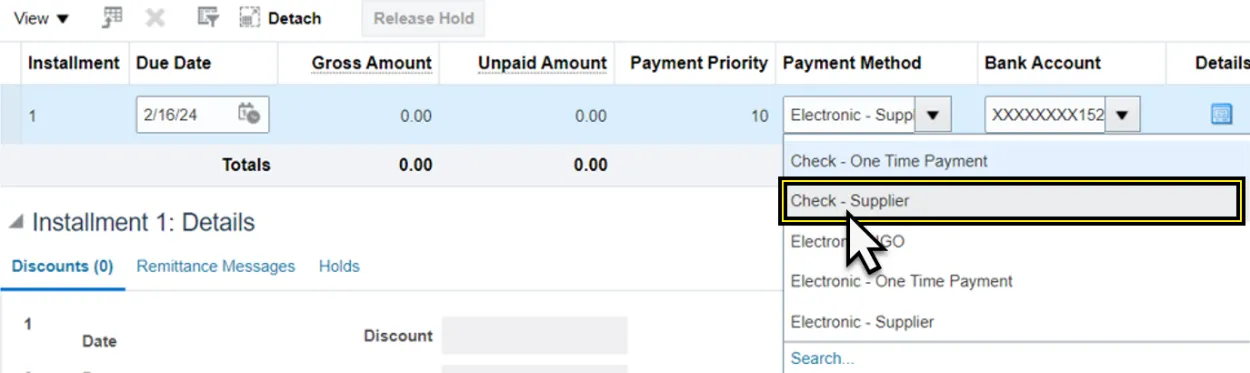
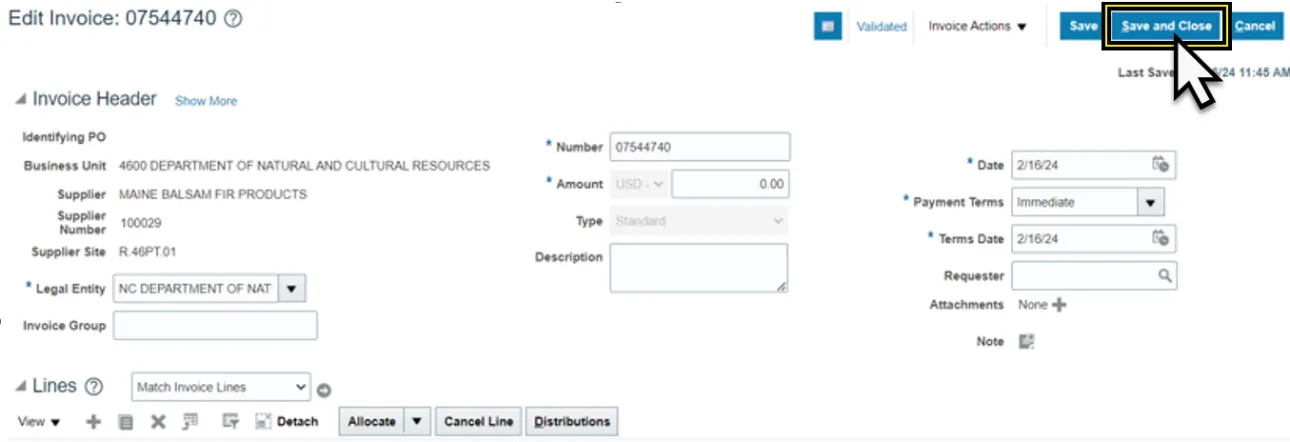
Step 14. Click Save and Close.
Step 15. Return to the invoice page and click the Invoice Actions drop-down menu.

Step 16. Select Validate.

Step 17. Click the Invoice Actions drop-down menu.

Step 18. Select Approval and approve the invoice, based on your agency policy for the approval process.
Step 19. Click Save and Close. The process is complete.
Scenario 2 - Supplier was flagged with the wrong amount and /or wrong 1099 code.
This example will show you how to correct the original 1099 amount and the 1099 code. This may vary depending on your specific situation that needs correcting. There are 8 steps to complete this process.
Step 1. Select the Supplier that was flagged with the incorrect amount.
Step 2. Enter the supplier information, Invoice Number, amount set to $0.00, and set the payment terms to Immediate on the create invoice header.
Step 3. Zero-dollar invoice will need to be for the amount to correct the initial amount reported to the IRS.
Note: When adding to the initial amount, put the additional amount on the positive line of the zero-dollar invoice. When subtracting the initial amount, put the amount to subtract on the negative line of the zero-dollar invoice.
Step 4. If the original 1099 amount needs to be increased, enter the additional amount into the positive line of the invoice with the 1099 code, and a negative line for the same amount, with the 1099 default DAU/AR in the Income Tax Type column.
Step 5. If the original 1099 amount needs to be decreased, enter the amount to decrease on the negative line of the invoice with the 1099 code, and a positive line for the same amount, with the 1099 default DAU/AR in the Income Tax Type column.
Step 6. If the original 1099 amount is correct but the 1099 code needs to be changed. Enter the amount on the positive line of the invoice with the 1099 code to change it to, and a negative line for the same amount with the 1099 code to change it from.
Step 7. Follow steps 7 through step 14 in scenario 1 to change the pay group to 1099 Corrections from the Manage Installments page.
Step 8. Use steps 15 through 19 in scenario 1 to Validate and Approve the zero-dollar invoice.
Scenario 3- Wrong supplier was flagged and new supplier needs to be added.
This scenario requires 2 zero-dollar invoices to correct. One invoice to zero out the 1099 for the wrong supplier and one zero-dollar invoice to flag the correct supplier with the correct 1099 code. There are 17 steps to complete this process.
Step 1. Select the supplier that was flagged incorrectly.
Step 2. Enter the supplier information, Invoice Number, amount set to $0.00, and set the payment terms to Immediate on the create invoice header.
Step 3. The zero-dollar invoice for this supplier should have the total amount to zero the initial reported amount on the negative line of the invoice with the 1099 code that is being removed for this supplier. Please ensure that the positive line has Income Tax DAU/AR 1099 code which will not flag a 1099 code for that line.
Step 4. Click Save.

Step 5. Click the Invoice Actions drop-down menu.

Step 6. Select Manage Installments.
Step 7. Select 1099 Corrections under Pay Group from the Manage installments page.
Step 8. Select Check - Supplier option under Payment Method.
Step 9. Click Save and Close.
Step 10. Use steps 15 through 19 in scenario 1 to Validate and Approve the zero-dollar invoice.
Step 11. Create a second zero-dollar invoice from the Invoices app in the Payables tab.
Step 12. Choose the correct supplier to be flagged.
Step 13. Enter the supplier information, Invoice Number, amount set to $0.00, and set the payment terms to Immediate on the create invoice header.
Step 14. Enter the invoice lines. The zero-dollar invoice for this supplier should have the total amount to zero the amount to report to the new supplier on the positive line of the invoice with the 1099 code that is being added for this supplier. Please ensure that the positive line has Income Tax DAU/AR 1099 code which will not flag a 1099 code for that line.
Step 15. Follow steps 7 through step 14 in scenario 1 to change the pay group to 1099 Corrections from the Manage Installments page.
Step 16. Make sure to click on Manage installments and select the 1099 corrections Pay Group and change the Payment method to Check-Supplier.
Step 17. Use steps 15 through 19 in scenario 1 to Validate and Approve the zero-dollar invoice.
Scenario 4 - Supplier was flagged in error.
There are 5 steps to complete this process.
Step 1. Choose the supplier that was flagged incorrectly.
Step 2. Enter the supplier information, Invoice Number, amount set to $0.00, and set the payment terms to Immediate on the create invoice header.
Step 3. The zero-dollar invoice for this supplier should have the amount to zero out on the negative line with the 1099 code that is being removed for this supplier. Please ensure that the positive line has Income Tax DAU/AR 1099 code which will not flag a 1099 code for that line.
Step 4. Follow steps 7 through step 14 in scenario 1 to change the pay group to 1099 Corrections from the Manage Installments page.
Step 5. Use steps 15 through 19 in scenario 1 to Validate and Approve the zero-dollar invoice.
Payment Process Request (PPR) Template for 1099 corrections
There are 11 steps to complete this process.
Step 1. Login in to NCFS using your credentials.
Step 2. Navigate to the Payables tab from the home page.
Step 3. Click the Payments app.
Step 4. Click the Tasks icon.
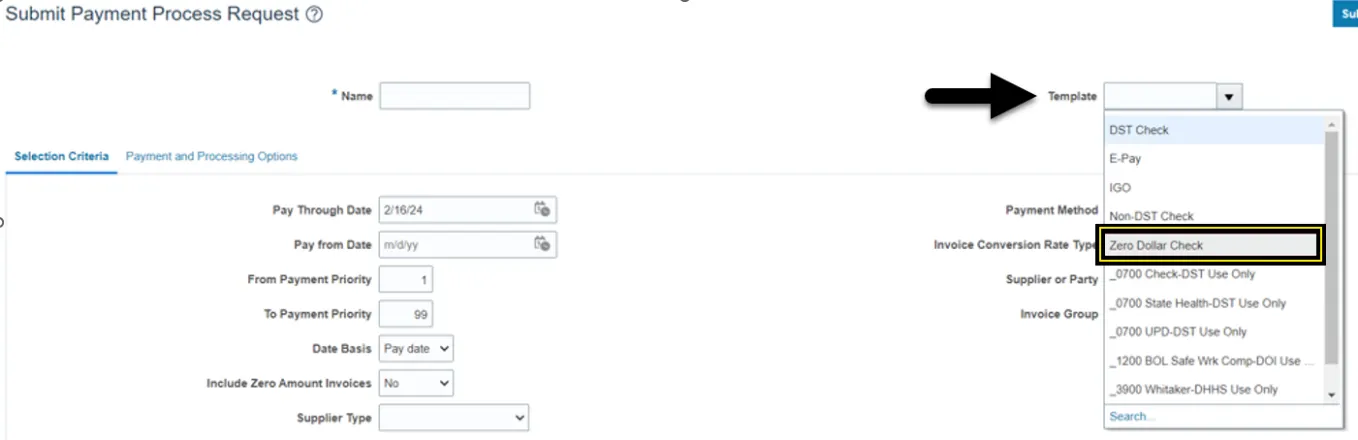
Step 5. Click Submit Payment Process Request from the Payments section of the Task panel.
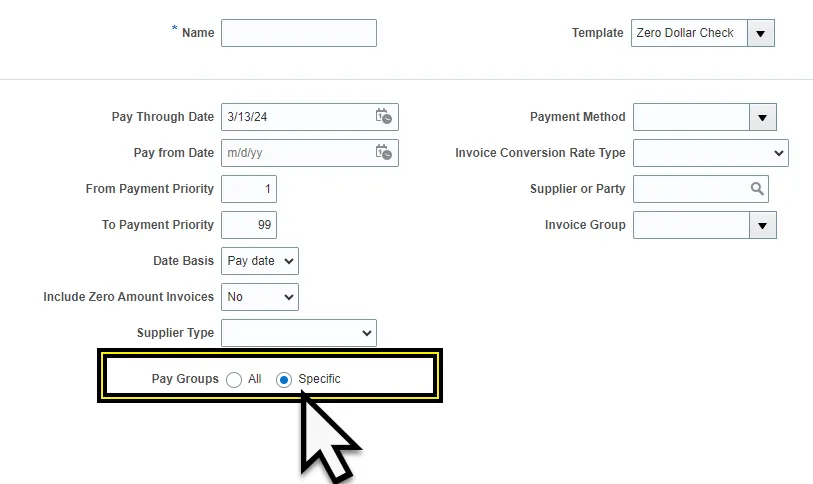
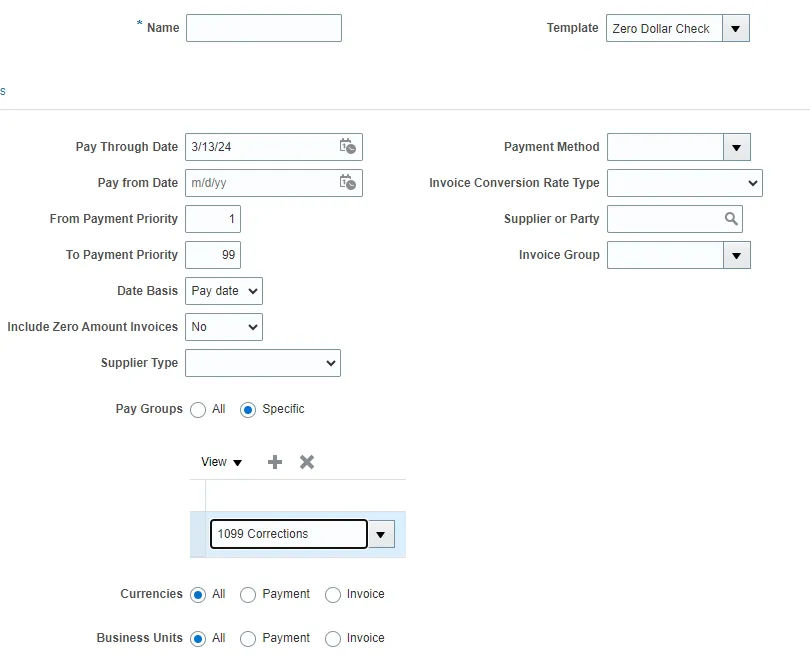
Step 6. Select the Template – Zero Dollar Check (Use this template to pay zero-dollar invoices without checks being printed).
Step 7. Scroll down in the Selection Criteria.
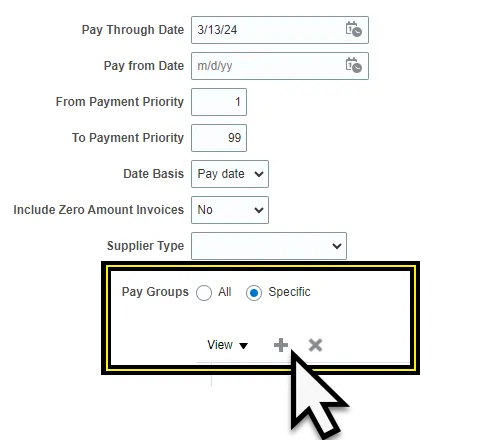
Step 8. Click the radio button Specific next to the Pay Groups option.
Step 9. Click the Plus icon in the menu that expands below Pay Groups.
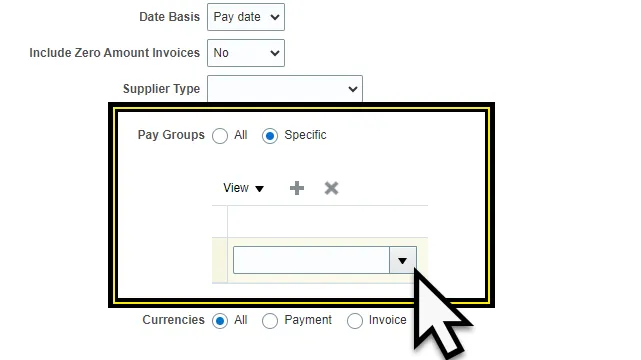
Step 10. Click the drop-down menu under the Pay Groups.
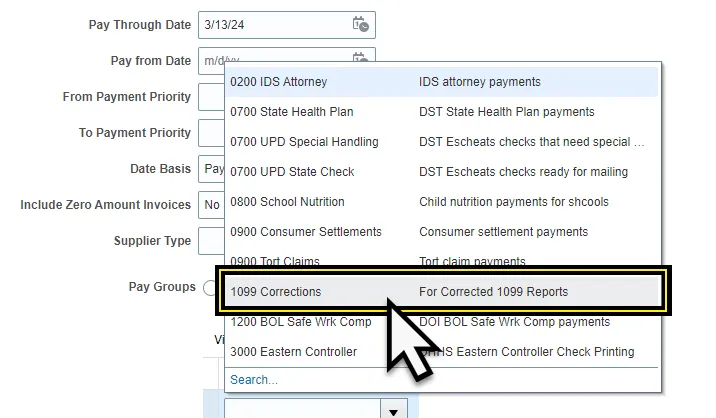
Step 11. Select the 1099 Corrections from the drop-down menu in the Pay Groups option to pay only the $0 1099 Correction Invoices.
Note: Complete all the stages of the PPR. The PPR will not have to be approved by the cash management team. The PPR will be completed with a payment file that has no checks to print. This payment file does not need to be recorded.