Purpose
The purpose of this Quick Reference Guide (QRG) is to provide a step-by-step explanation of how to Create Invoices from Spreadsheet in the North Carolina Financial System (NCFS).
Introduction and Overview
This QRG covers the steps to create invoices from spreadsheet in NCFS.
User Tip
The following are prerequisites to creating and uploading a journal from spreadsheet:
-
User must download desktop integration installer for using ADFDI spreadsheet (Navigation: Tools >> Download Desktop Integration Installer).
-
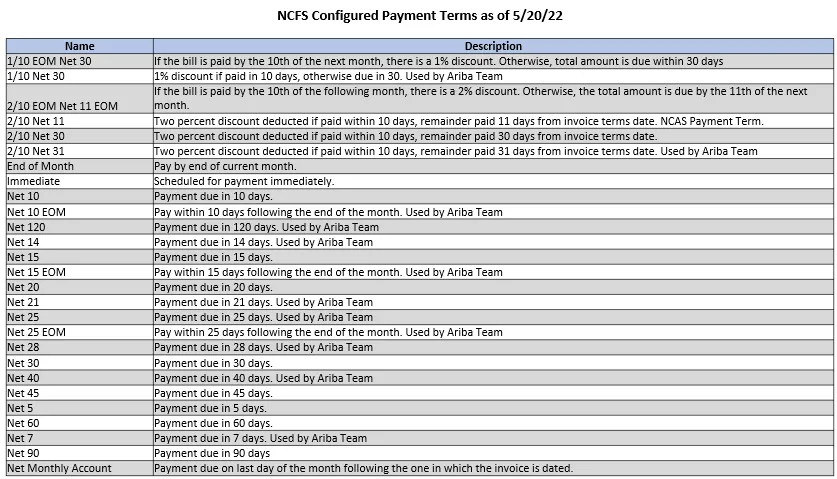
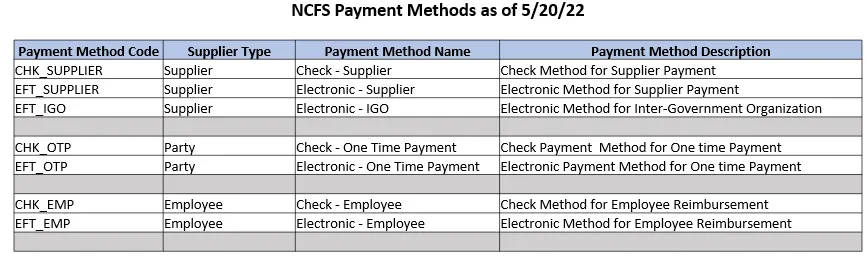
Payment Terms and Payment Method are not required, but if you are entering them, please refer to Payment Terms and Payment Method under the additional resources.
Create Invoices from spreadsheet.
To create invoices from spreadsheet in NCFS, please follow the steps below. There are 20 steps to complete this process.
Step 1. Log in to the NCFS portal with your credentials to access the system.
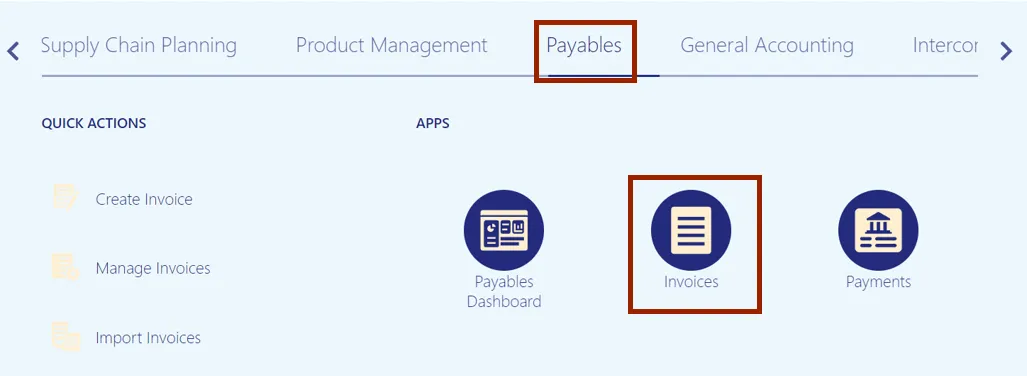
Step 2. On the Home page, click the Payables tab and click the Invoices app.
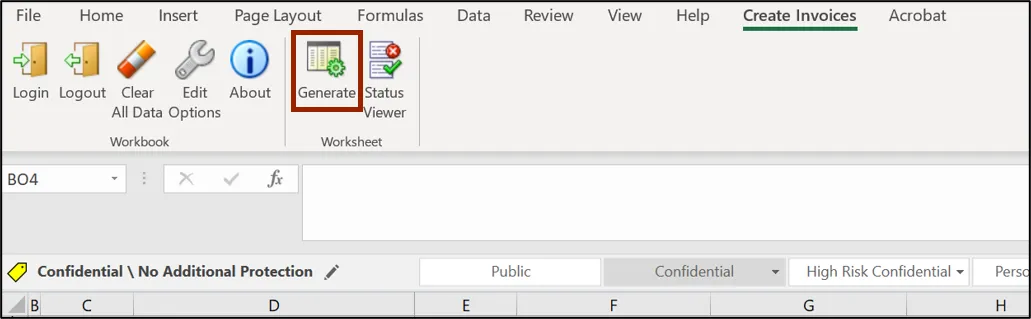
Step 3. The Invoices dashboard opens. Click the Tasks icon and click Create Invoices from Spreadsheet.
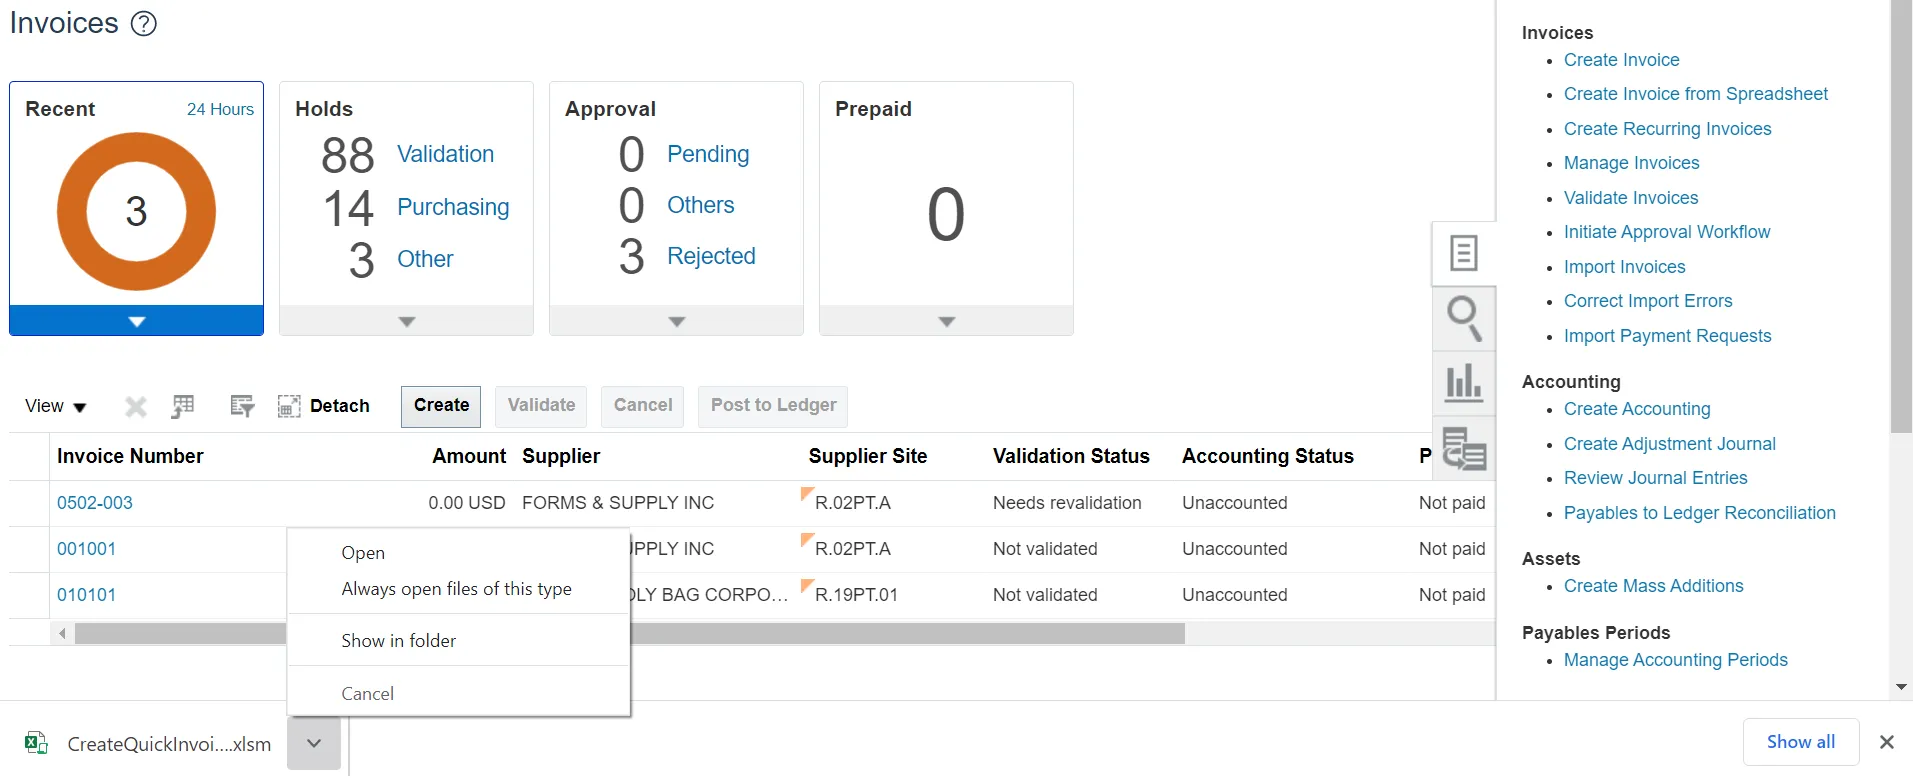
Note: CreateQuickInvoices.xlsm file is downloaded. Open the excel file.
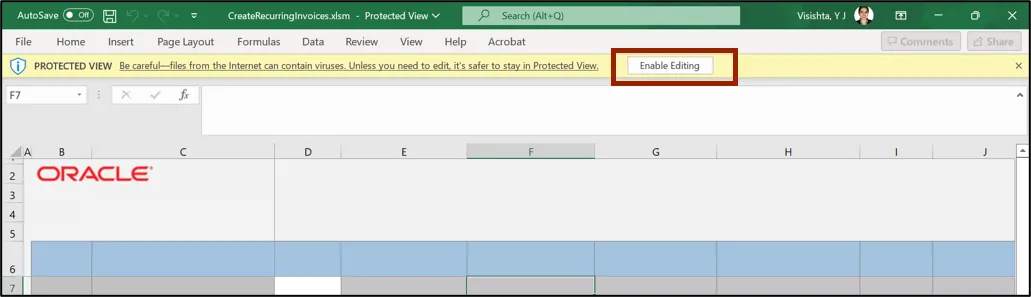
Step 4. On the CreateQuickInvoices.xlsm file, click the Enable Editing button.
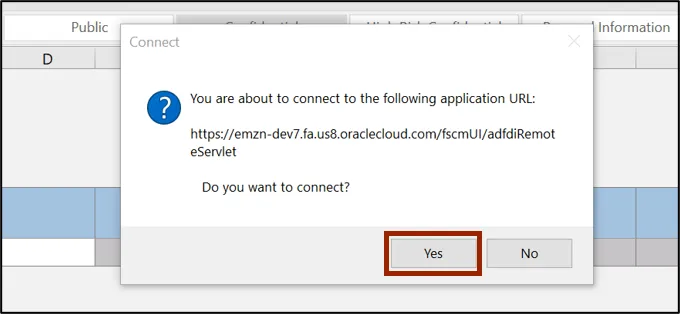
Step 5. The Connect pop-up appears. Click the Yes button.
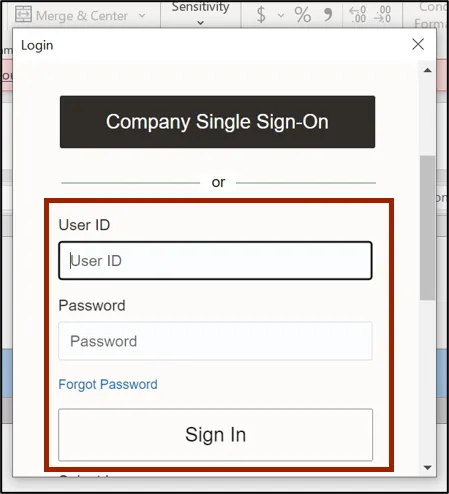
Step 6. The NCFS Login pop-up appears. Enter your credentials and click the Sign In button.
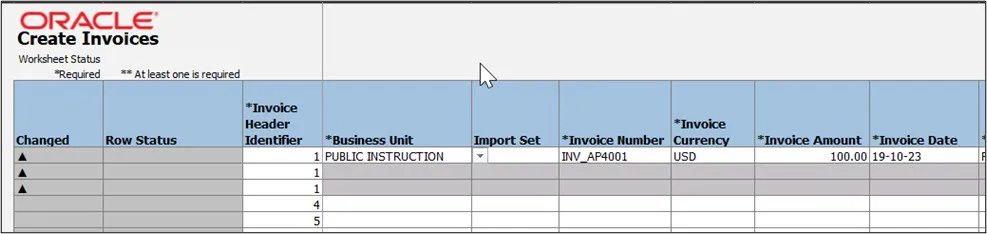
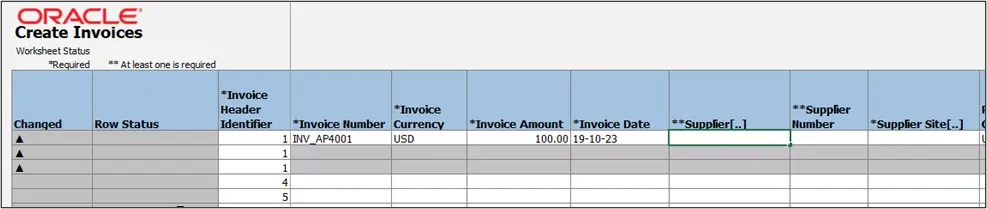
Step 7. The CreateQuickInvoices.xlsm file displays a table to enter the invoice details. Enter the invoice details in all the mandatory fields (marked with *). Update the Invoice Header Identifier to match the spreadsheet rows to the number of invoice lines in the invoice.
In this example, we chose to create three (3) invoice lines in this invoice. In this example, we also choose 0800 DEPARTMENT OF PUBLIC INSTRUCTION for Business Unit, INV_AP4001 for Invoice Number, USD for *Invoice Currency, 100.00 for *Invoice Amount, 10/19/2023 for *Invoice Date.
Step 8. For fields marked with [..], double-click the cells to fill in the details. In this example, we choose the Supplier[..] field. Double-click the Supplier[..] field to enter the Supplier name details.
Step 9. The Search and Select pop-up appear. Enter the Supplier name in the Supplier field and click the Search button. Click the OK button.
In this example, we choose FORMS & SUPPLY INC.
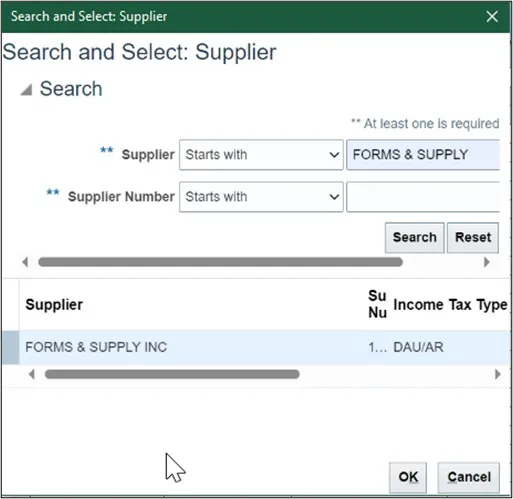
Note: The Supplier Number field gets auto populated on the file when Supplier field details are entered.
Step 10. Scroll to the right and enter the details in the mandatory (marked with *) and applicable fields.
In this example, we choose:
- Supplier Site: R.08PT.A
- Payment Currency: USD
- Description: Training Invoice
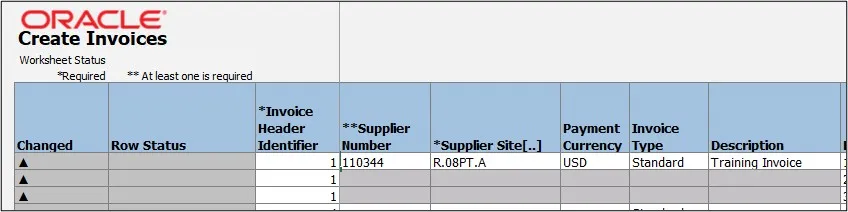
Note: For fields marked with [..], follow steps 8 and 9 to fill in the details.
Step 11. Scroll to the right and enter the details in the mandatory (marked with *) and applicable fields for each invoice line. In this example, we choose:
- Line: 1
- Amount: 30.00
- Distribution Combination: 0800-000000-54110000-0000000-0810103-0000-0000000000-000000-0000-000000-00000
- Line: 2
- Amount: 20.00
- Distribution Combination: 0800-000000-52199000-0000000-0810103-0000-0000000000-000000-0000-000000-00000
- Line: 3
- Amount: 50.00
- Distribution Combination: 0800-000000-54110000-0000000-0810103-0000-0000000000-000000-0000-000000-00000

Note: For fields marked with [..], follow steps 8 and 9 to fill in the details.
Step 12. For PO matched invoice lines, select columns CC and CH then unhide the columns to reveal columns CD, CE, CF, CG.
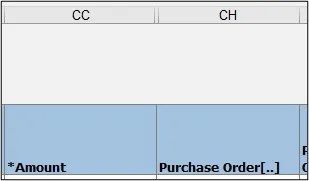
Step 13. For PO matched invoice lines, enter the details in the mandatory (marked with *) and applicable fields for each invoice line that is matched to a PO line. In this example, we choose:
- Line: 1
- Amount: 1.00
- Invoice Quantity: 1
- Unit Price: 1.00
- UOM: Dollar
- Purchase Order: EP5003492M3
- Purchase Order Line: 2
- Line: 2
- Amount: 1.00
- Invoice Quantity: 1
- Unit Price: 1.00
- UOM: Dollar
- Purchase Order: EP5003492M3
- Purchase Order Line: 3

Note: For fields marked with [..], follow steps 8 and 9 to fill in the details. Do not enter the Distribution Combination value if the invoice line is PO matched, this value will be derived by the PO line that is matched to the invoice line.
Step 14. On the Create Invoices tab, click the Generate or Save and Submit Invoice Import button.
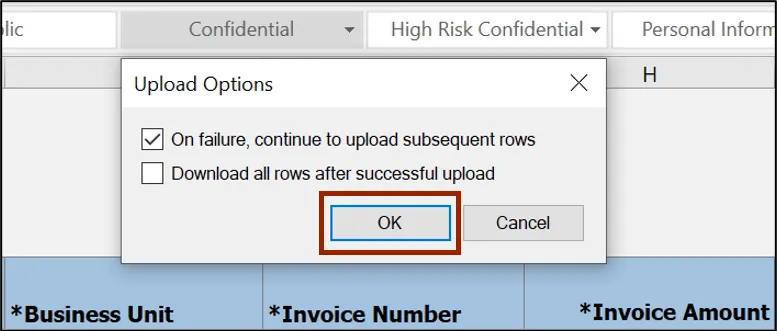
Step 15. The Upload Options pop-up appears. Click the OK button.
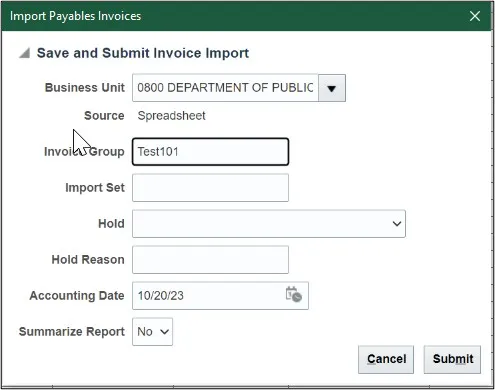
Step 16. The Import Payables Invoices pop-up appears. Enter the Business Unit, Invoice Group (if desired), and Accounting Date.
In this example we choose:
- Business Unit: 0800 DEPARTMENT OF PUBLIC INSTRUCTION
- Invoice Group: Test101
- Accounting Date: 10/20/23
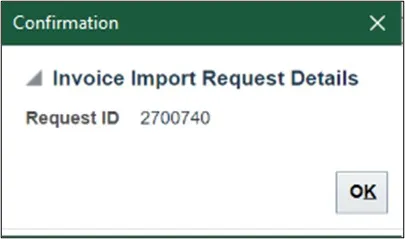
Step 17. The Confirmation pop-up appears. Click the OK button.
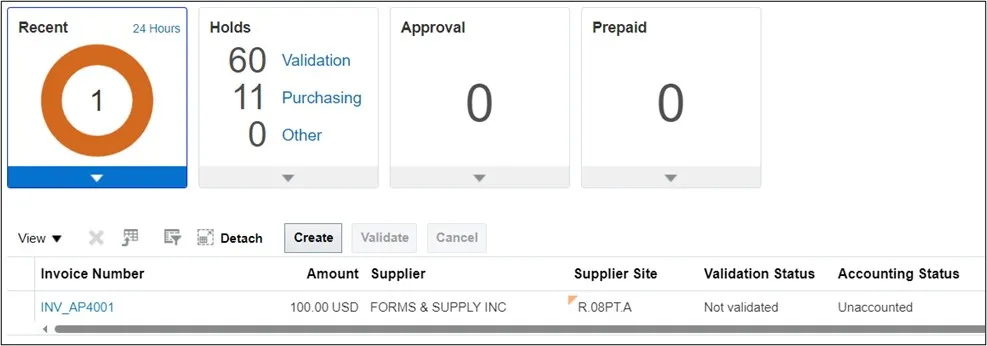
Step 18. Navigate to NCFS Login >> Payables >> Invoices. The Invoices dashboard opens. Click the Recent info tile. The invoice from spreadsheet INV_AP4001 is generated. Click the Invoice Number link to validate the invoice from spreadsheet.
In this example, we choose INV_AP4001 invoice.
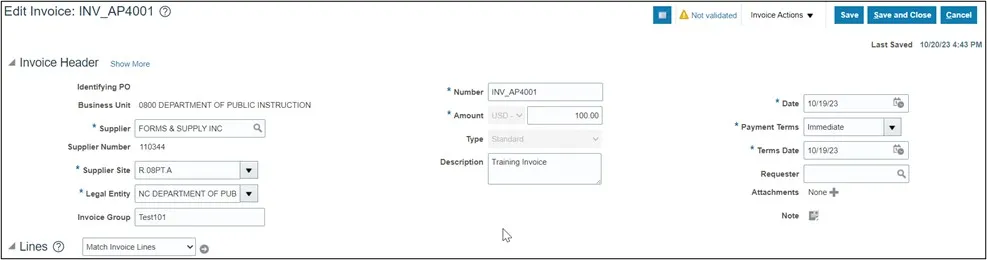
Step 19. The Edit Invoice page is displayed. Validate and update the invoice details if necessary. Click the Show More link to access more information on the invoice.
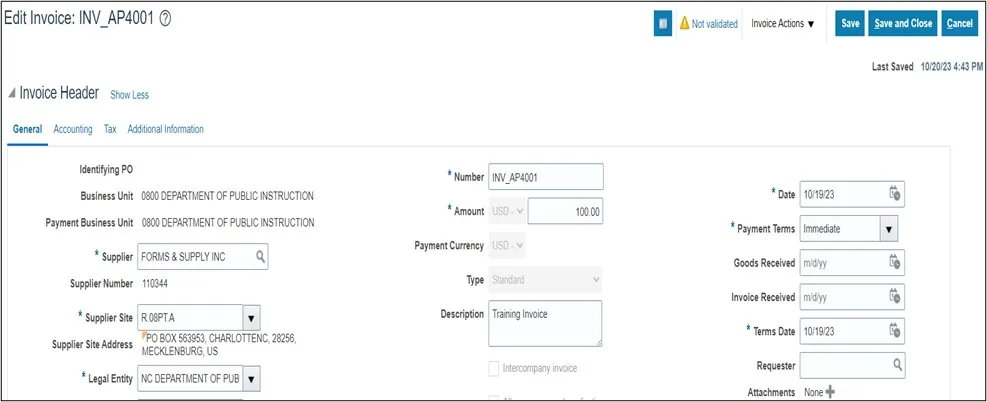
Step 20. More information on the invoice is displayed. Click the Save and Close button. The updates are saved. You are now redirected to the Invoices dashboard.
Invoice creation via spreadsheet Tips and Tricks
General
- If an invoice has been successfully loaded to NCFS but isn’t available in the Manage Invoices page, check if there was an issue after the load to NCFS by referring to the “AP-22 Correct Errors from Invoice Upload (Spreadsheet)” QRG. If the invoice isn’t on the correction spreadsheet in the QRG, navigate to the Scheduled Processes area for the “Import Payables Invoices Report” to review successful and unsuccessful invoice lines, especially the “Rejections” section at the bottom of the report. Note: To look up reports in the Schedules Processes refer to GEN106 (WBT) course.
- If all the invoice lines in the spreadsheet are not uploaded, make sure there is a black triangle in the “Changed” column for all the rows to be loaded to NCFS. This can be toggled by double clicking in that column.
- When entering supplier information, you can enter the number or double click and search for the supplier name.
- If you need more rows in the spreadsheet, right click an existing row and select “Insert” to add a row. Repeat as needed. After inserting, select columns F-EM on a row that existed prior to the inserts and copy and paste the columns to the newly inserted rows. Pasting from an existing row will make sure formatting and defaults are on the new rows.
Copy/Paste
- Copy/Paste often adds a space to the end or the beginning of a value. This extra space can cause a mismatch if Oracle is expecting a defined value.
- When pasting, right click and use the paste “Values” option to avoid overlaying formatting or functionality associated with the cell.
Upload Errors
-
When you submit the spreadsheet, “Row Inserted” in Col D means that specific invoice line is good, but the row may not have loaded to NCFS. If you see any rows with “Insert Failed”, the invoice did not load. The key is to look at the worksheet status in the Status Viewer at the top right after a Save and Submit action and if that failed as shown in the screenshot below, the invoice wasn’t loaded to NCFS. When the invoice is going to be loaded to NCFS, you’ll get the Import Payables Invoices popup window mentioned in the steps of this QRG.
Image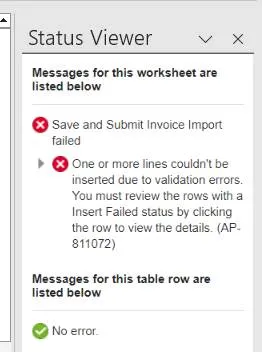
- If a data element is erroring unexpectedly because it’s an invalid value, try double clicking and using the Search functionality to select the value. If that fixes the row, you can try copy/pasting the value on additional rows.
- If you get an error on a line row saying you must enter a valid value that is on the header row (like the Business Unit), copy the header values from the header line (col F thru col Q) and paste them on the line with the error. The new values are grayed out and can’t be seen but they are there, and this should resolve the error.
Wrap-Up
Create invoices from a spreadsheet using the steps above.
Additional Resources
Virtual Instructor-Led Training (vILT)
• AP101: Invoice Management
• PO001: PO Inquiry