Purpose
The purpose of this Quick Reference Guide (QRG) is to provide a step-by-step guide of how to set up and maintain price lists in the North Carolina Financial System (NCFS).
Introduction and Overview
This QRG covers the process of the two available methods of updating item prices on the price list on NCFS: 1) Single Item Update via Manage Price List Screens or 2) Bulk Update via ADFDI Excel Template. Single Item Updates allow prices to be updated manually for individual items which is suitable for small-scale changes but can be time-consuming when updating multiple items. Bulk updates allow for mass updates, allowing users to update prices for multiple items simultaneously.
Updating Price Using the Single Item Update via NCFS Manage Price List Screens
Single Item Update
There are 18 steps to complete this process.
Step 1. From the Home screen, click the Order Management tab.
Step 2. Click the Pricing Administration application.
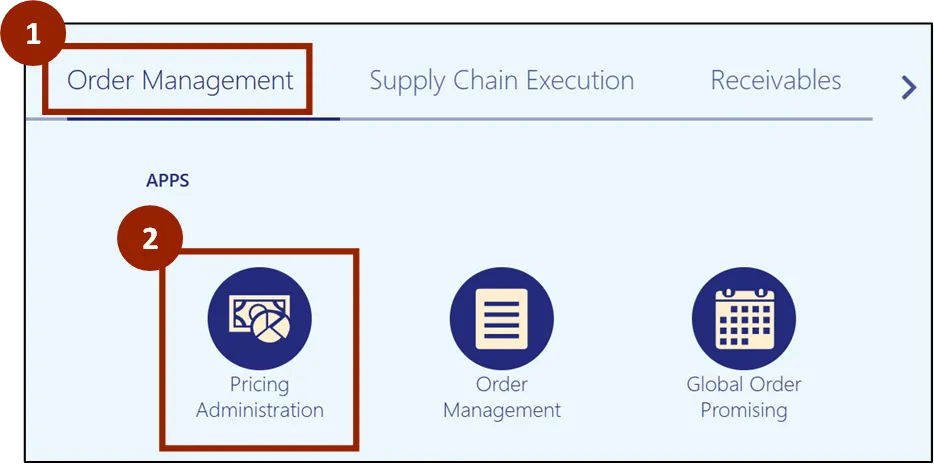
Step 3. Click the Task icon.
Step 4. Within the Pricing Charges section, click Manage Price Lists.

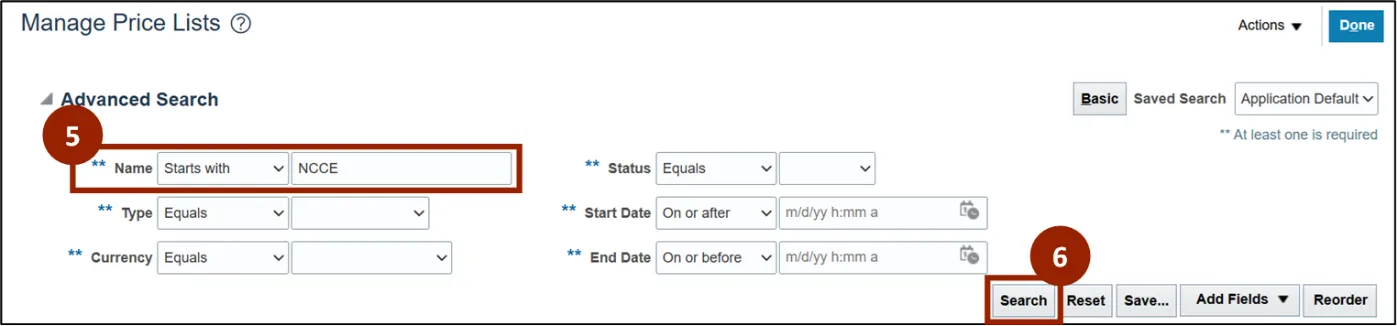
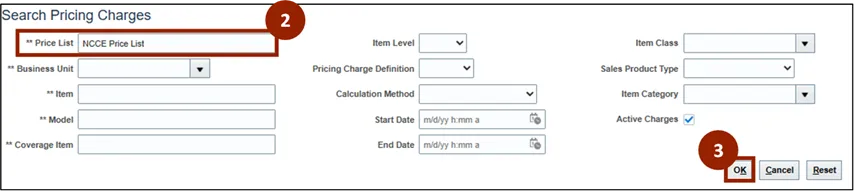
Step 5. In the Name search field, Enter NCCE.
Note: Before clicking the Search button, make sure to complete at least one field marked with a double asterisk (**). If you need more search options, switch from Basic search to Advanced search by clicking the Basic button in the top right corner. In Advanced search, the Name search field automatically displays as Starts With, and it’s recommended to use this option for best results.
Step 6. Click Search.
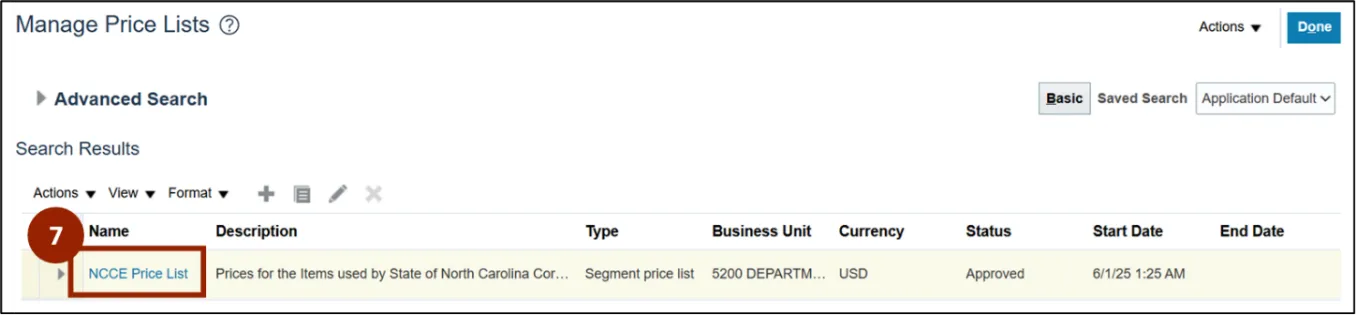
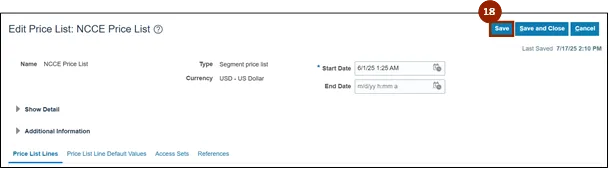
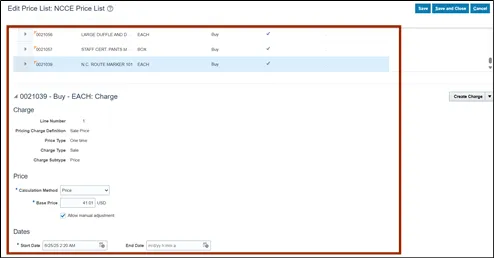
Step 7. From the Name column of the Search Results, Click the NCCE Price List link.
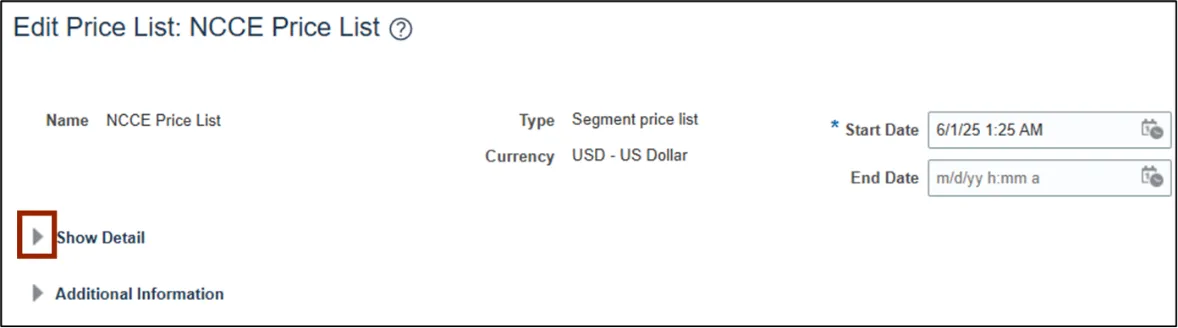
The Edit Price List: NCCE Price List screen shows detailed information about the Price List. You can access additional details by clicking the arrow next to Show Detail to expand the fields.
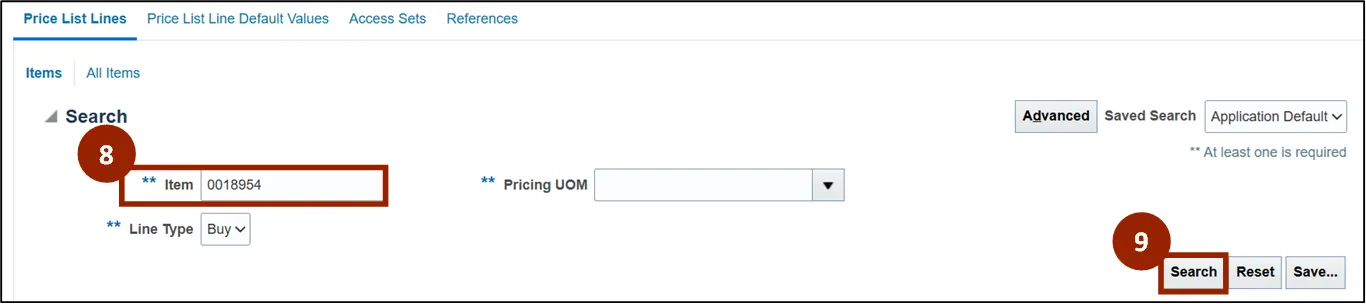
Step 8. In the Price List Lines tab, within the Item search field, enter the Item Number (e.g., 0018954).
Step 9. Click the Search button.
Note: At least one of the fields marked with a double asterisk (**) must be completed before clicking the Search button. If the Item number is unknown, select the Buy option from the Line Type drop-down field to display all Buy item records within the Search Results.
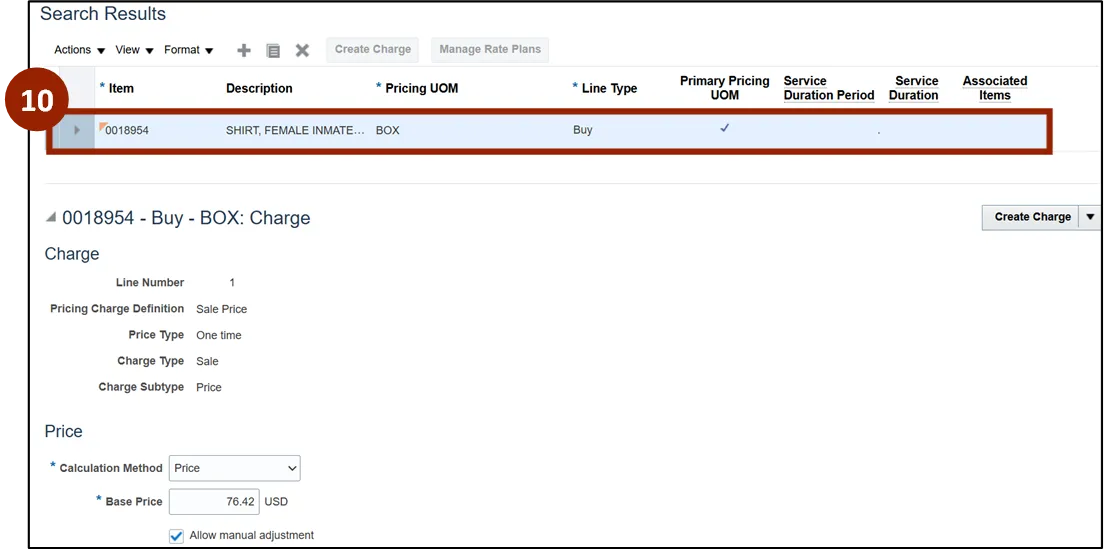
Step 10. From the Search Results, click the row associated with the item.
Note: Charge, Price, and Dates section details display for the selected Item, unlocked fields may be edited and adjusted.
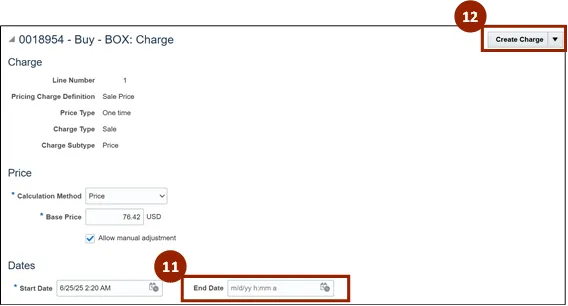
Step 11. In the End Date field, enter or select the desired end date in MM/DD/YY H:MM AM/PM format.
Note: When the date is selected using the Calendar icon, the format is automatically aligned to system requirements.
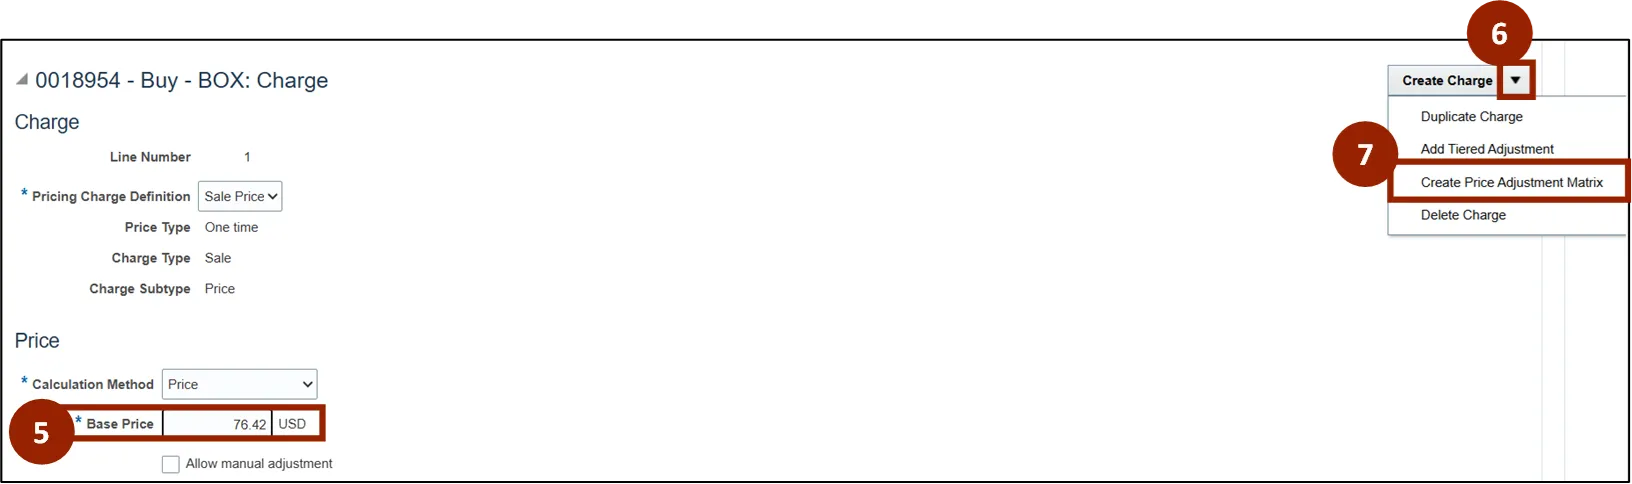
Step 12. Select Create Charge.
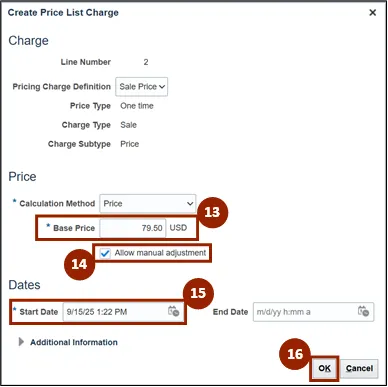
The Create Price List Charge pop-up will appear.
Step 13. Update new Base Price.
Step 14. Check Allow Manual Adjustment.
Step 15. Enter new Start Date field, enter or select the new desired start date in MM/DD/YY H:MM AM/PM format (e.g., 6/25/25 2:20 AM).
Step 16. Click OK.
Step 17. You can now see a record of the price changes.
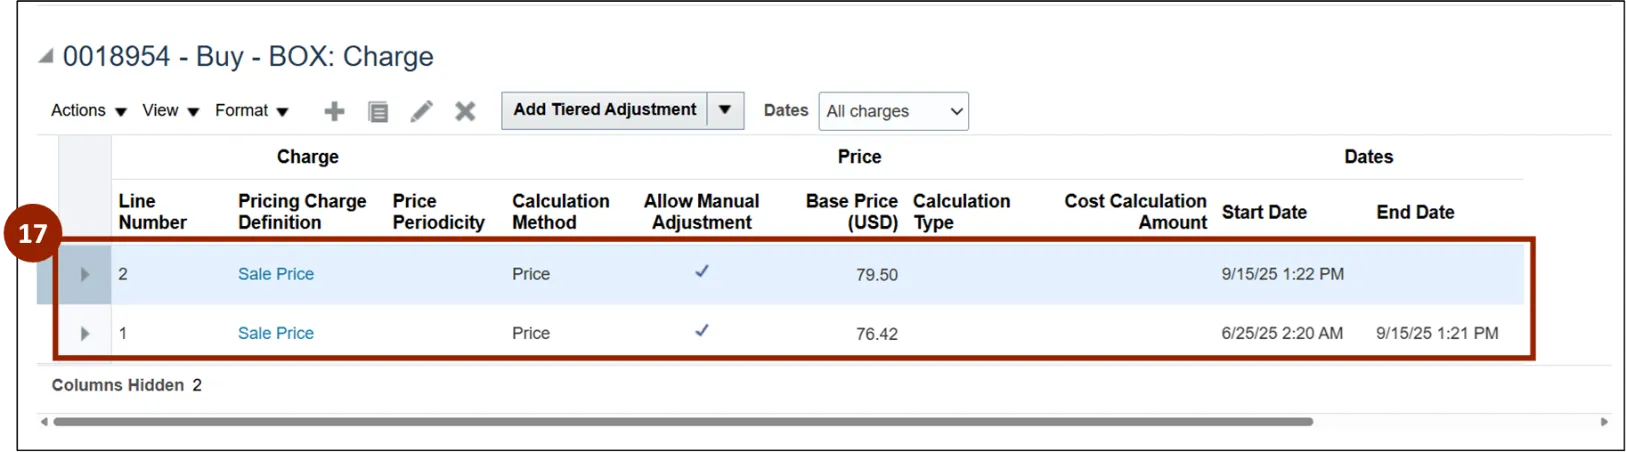
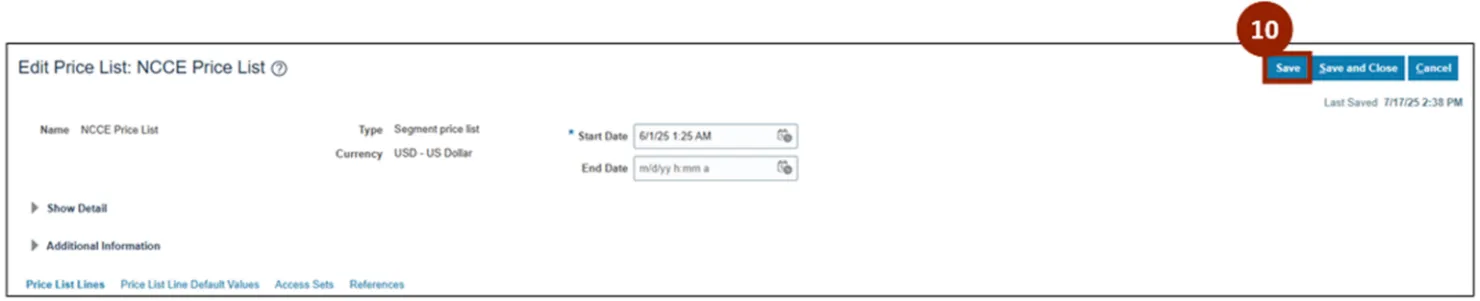
Step 18. Once all changes have been made, click the Save button.
Newly Created Item to Price List via NCFS
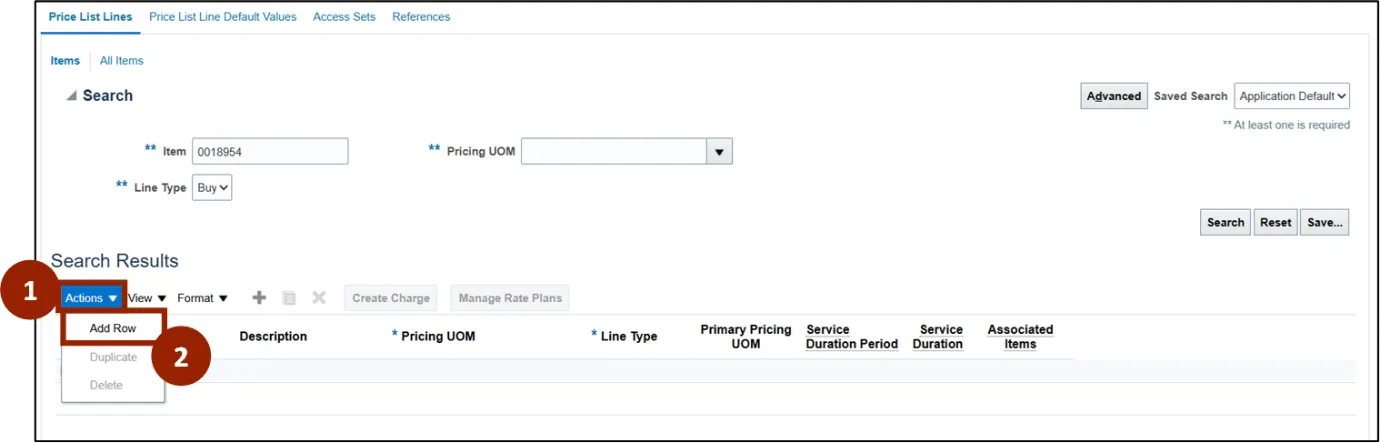
When a newly created item is not displaying within the Search Results, follow these steps. There are 9 steps to complete this process.
Step 1. Under Search Results, click Actions.
Step 2. In the Actions drop-down, click Add Row.
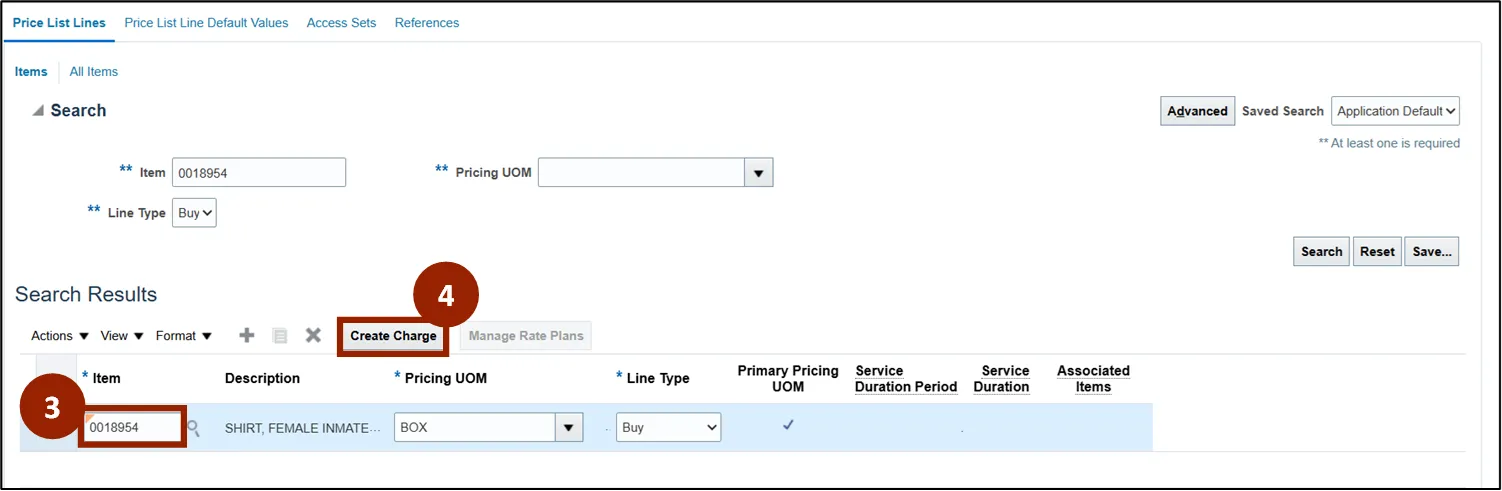
Step 3. Within the Item column field, enter or search for the Item Number (i.e., 0018954).
Step 4. Click the Create Charge button.
Note: Other fields within the Search Results table auto populate.
Step 5. Within the Base Price field, add the base price for the item in dollar and cents format (i.e., 76.42).
Step 6. Click the Create Charge drop-down.
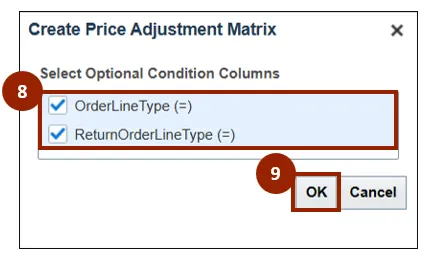
Step 7. Select Create Price Adjustment Matrix.
Step 8. Within the Create Price Adjustment Matrix pop-up window, select the OrderLineType (=) and ReturnOrderLineType (=) checkboxes.
Step 9. Click OK to return to the Edit Price List: NCCE Price List screen.
Note: The Edit Price List: NCCE Price List screen will display both selected condition columns within the Sales Price: Price Adjustments section.
Price Adjustments Matrix
The NCFS Price List Price Adjustments Matrix is configured for two Line Types: No Cost Ship and Repair and Ship.
- No Cost Ship: For the "Ship Only" Order Type, that has the Line Type as No Cost Ship, the NCCE Price Adjustment applies a 100% discount, so the price automatically becomes $0.
- Repair and Ship: For the “Repair” Order Type, that has the Line Type as Repair and Ship, the NCCE Price Adjustment applies a 100% discount, so the price automatically becomes $0.
Note: The Price Adjustments Matrix should not be updated for existing items; it should only be configured for new items.
Within the Edit Price List: NCCE Price List screen, you’ll find the Sales Price: Price Adjustments section located below the Charge section for that record:

To complete the Price Adjustment Matrix via NCFS, add two rows for price adjustments—one for the No Cost Ship OrderLineType field and one for the Repair and Ship ReturnOrderLineType field.
To do this, follow these steps. There are 10 steps to complete this process.
Step 1. Click the Plus (+) icon twice to add two new price adjustment rows.
Step 2. For the first row, in the OrderLineType drop-down field, select No Cost Ship.
Step 3. For the first row, in the ReturnOrderLineType drop-down field, select the blank option.

Step 4. For the first row, in the Adjustment Type drop-down field, select Discount Percent (N/A for SO Reports).
Step 5. For the first row, in the Adjustment Amount field, enter the adjustment amount in percentage format (e.g., 100 for 100%).
Step 6. For the first row, in the Adjustment Basis field, select NCCE Price Adjustment for Ship Only orders.

Step 7. For the second row, in the OrderLineType drop-down field, select the blank option.
Step 8. For the second row, in the ReturnOrderLineType drop-down field, select Repair and Ship.
Note: The OrderLineType drop-down should not be selected when the ReturnOrderLineType drop-down is selected and vice versa.
Step 9. For the second row, in the remaining fields, select or enter the same options as the first row (e.g., Discount Percent, 100, NCCE Price Adjustment for Ship Only orders).

Step 10. Once all changes have been made, click the Save button.
Note: Once saved, the system will automatically update the price within the sales order and display a time stamp verification “Last Saved:” directly below the blue button options.
Updating Price Using the Bulk Update via ADFDI Excel Template
Install ADFDI Plug-In on your Desktop using the following steps. There are 7 steps to complete this process.
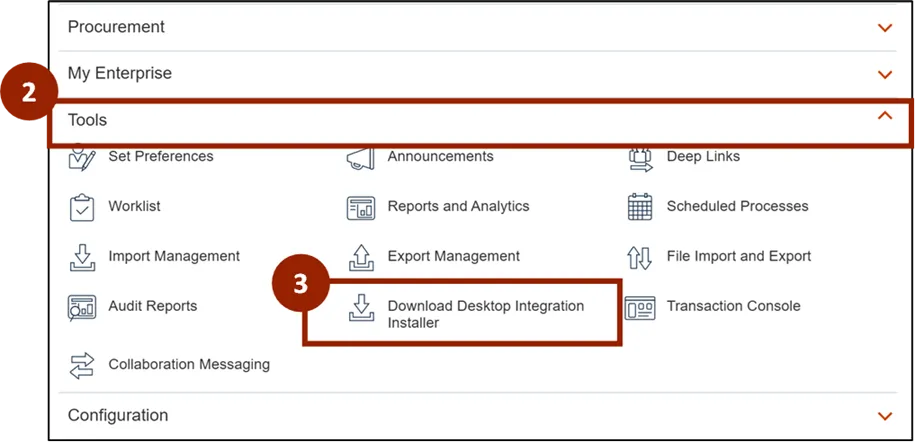
Step 1. From the Home page, click the Navigator icon.
Step 2. Click the Tools header to expand the options.
Step 3. Within the Tools menu, click Download Desktop Integration Installer.
Note: Options may vary based on user roles and responsibilities. If the Download Desktop Integrator option is not displayed, contact the DAC Security Team and request the Download Desktop Integrator privilege.

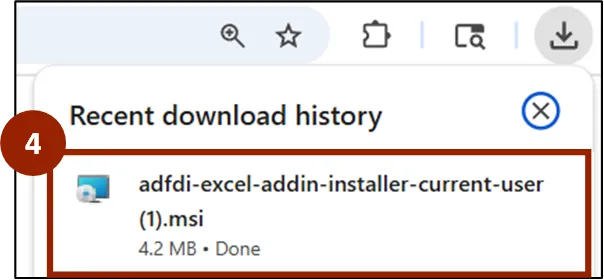
Step 4. Within your recent downloads, click the downloaded file to open the installer
Note: This may display differently depending on your browser, if recent downloads does not display, check the Downloads folder on your computer.
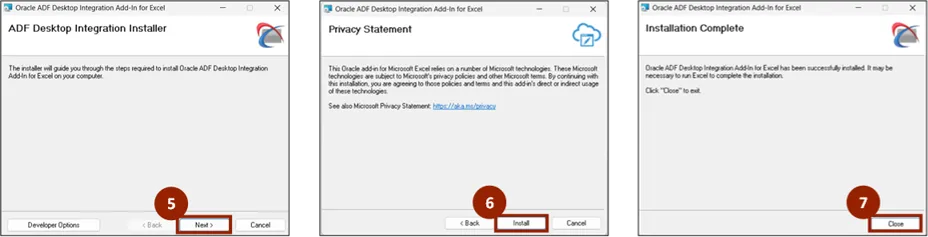
Step 5. Within the ADF Desktop Integration Installer window, click Next.
Step 6. Click Install.
Step 7. Once installation is complete, click Close.
Enable Macros in Excel
To enable the macros needed to use the ADFDI Excel Template, follow these steps. There are 9 steps to complete this process.
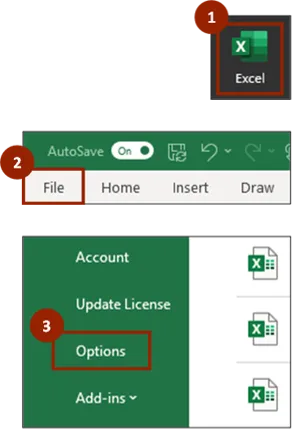
Step 1. Open Microsoft Excel.
Step 2. Click File.
Step 3. Click Options.
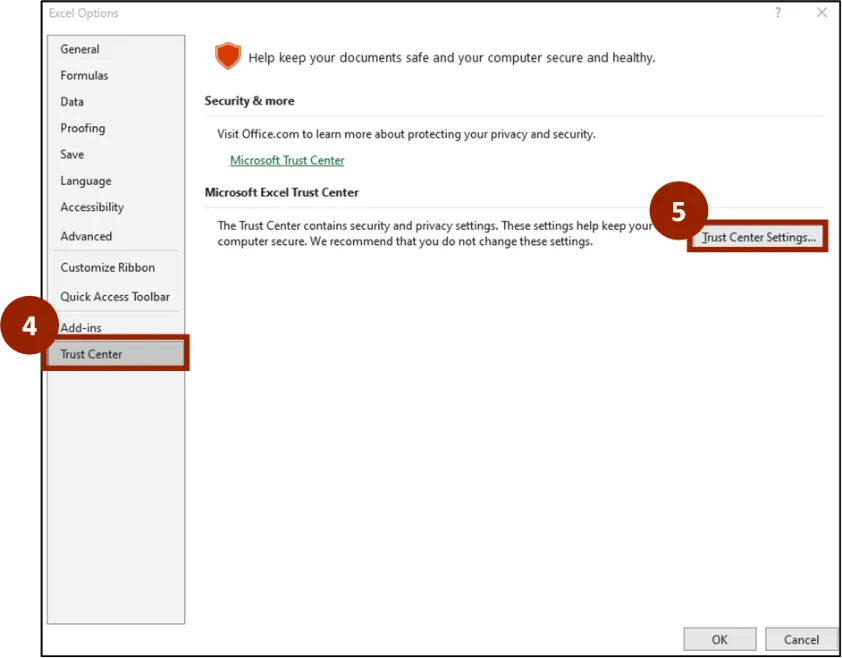
Step 4. Click Trust Center.
Step 5. Click the Trust Center Settings… button.
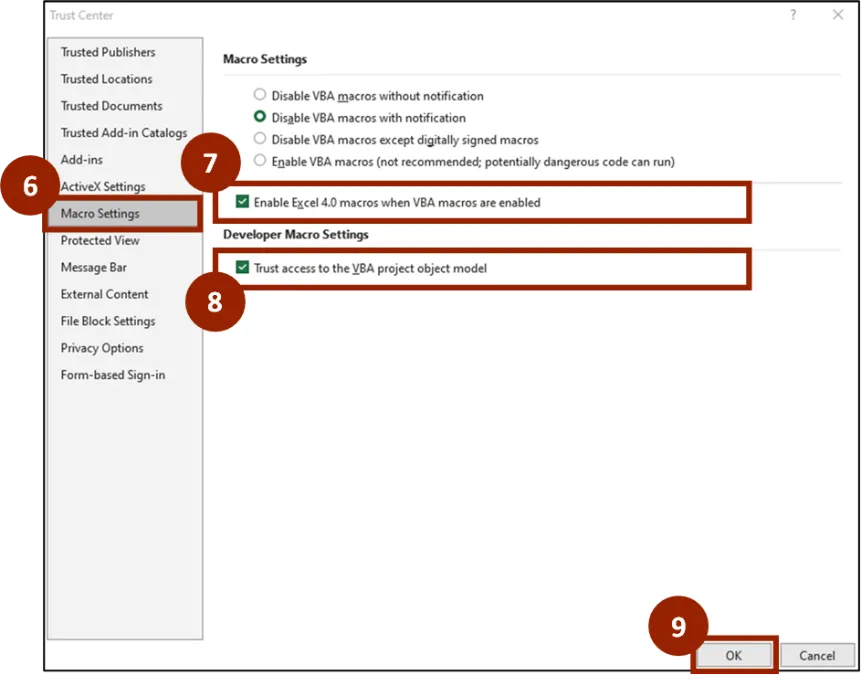
Step 6. Within the Trust Center settings list, click Macro Settings.
Step 7. Select the Enable Excel 4.0 macros when VBA macros are enabled option.
Step 8. Select the Trust access to the VBA project object model option.
Step 9. Click OK.
Download and Open the ADFDI Excel Template
To access the ADFDI Excel Template for the first time, follow these steps. There are 11 steps to complete this process.
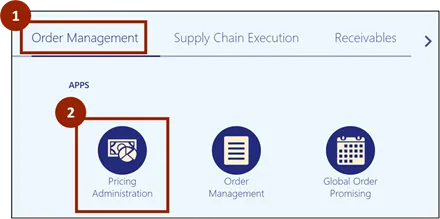
Step 1. From the Home screen, click the Order Management tab.
Step 2. Click on Pricing Administration.
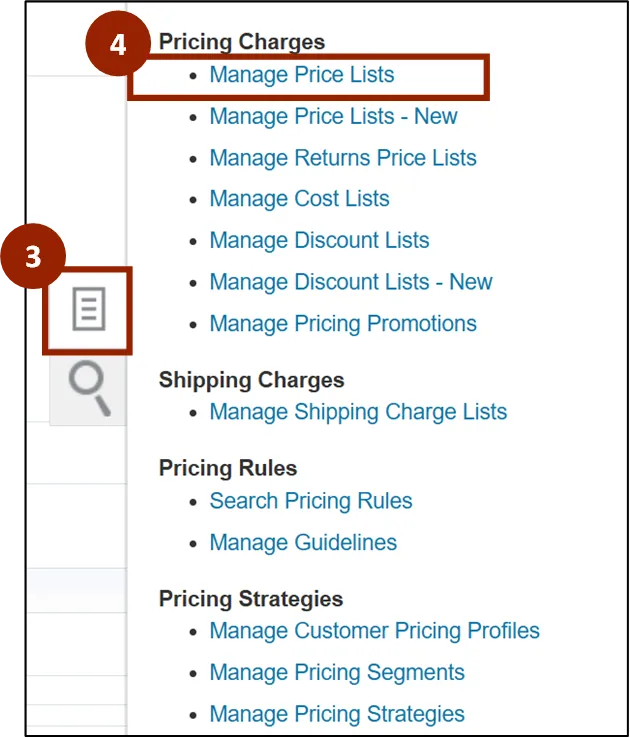
Step 3. Click the Task icon.
Step 4. Under the Pricing Charges header, click Manage Price Lists.
Step 5. Click the Actions drop-down.
Step 6. Click Download Spreadsheet to Maintain Price List Data.

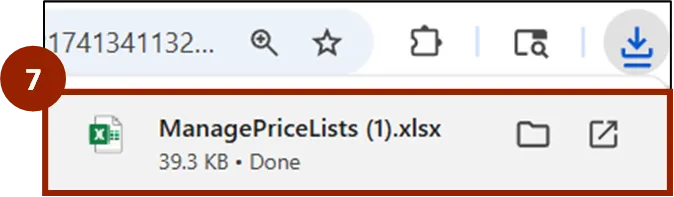
Step 7. Within your recent downloads, Click the downloaded file to open.
Note: This may display differently depending on your browser, if recent downloads does not display, check the Downloads folder on your computer.
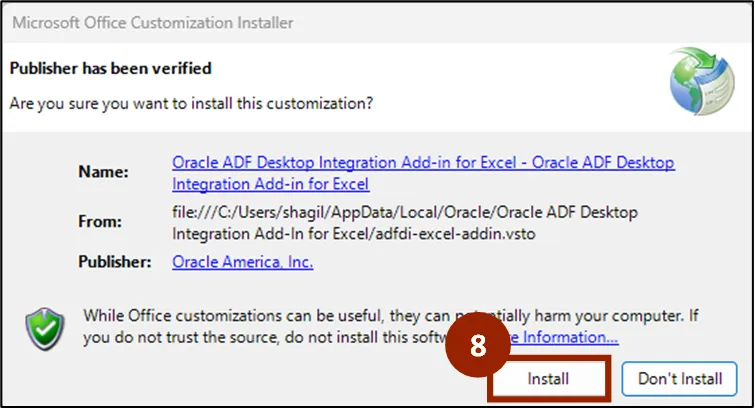
Step 8. Once opened, a Microsoft Option Customization Installer window displays, Click Install.
Note: If this window does not display, continue to the next step.
Step 9. Within the PROTECTED VIEW notification ribbon, click Enable Editing.

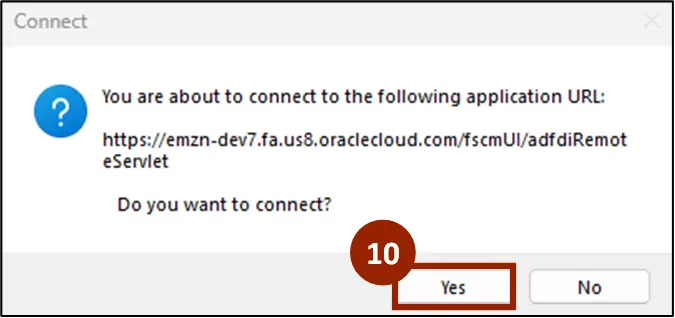
Step 10. The Connect pop-up window displays, click Yes.
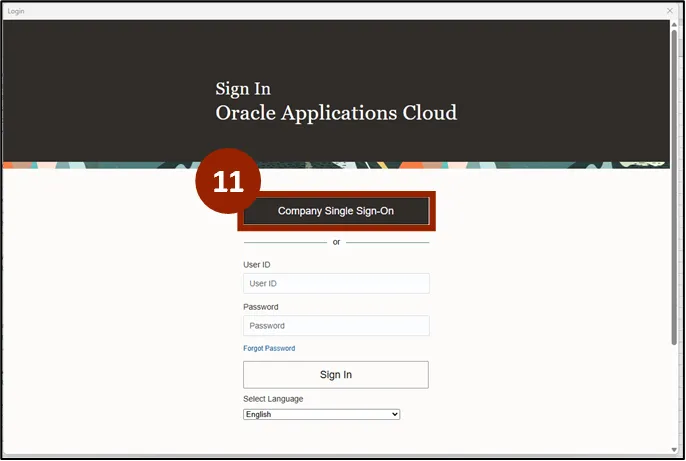
Step 11. Click the Company Single Sign-On button and enter your credentials.
Note: Within the spreadsheet, you will find an Instructions tab, along with three additional tabs: Manage Pricing Charges, Manage Tiered Adjustment Rules, and Manage Matrix Adjustment Rules. To update pricing, use the Manage Pricing Charges tab.
Access the NCCE Price List
To access the NCCE Price List for the first time, follow these steps. There are 3 steps to complete this process.
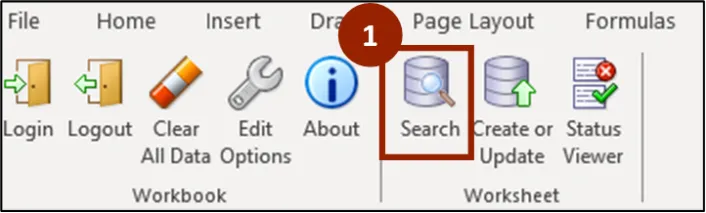
Step 1. Within the Manage Pricing Charges tab of the ADFDI Excel Template, click Search.
Step 2. Within the Price List field, enter NCCE Price List.
Step 3. Click OK.
Note: Since the search retrieves all items from the NCCE Price List, it may take some time to complete.
Create or Update Items in the ADFDI Excel Template
Please note, the only active price list for DAC is the NCCE Price List. Follow these steps to update an item’s price. There are 8 steps to complete this process.
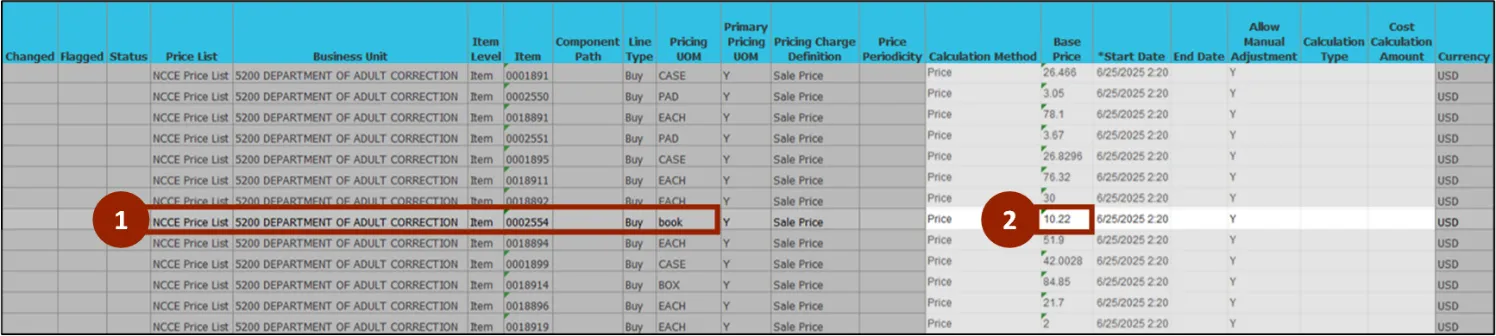
Step 1. From the search results, navigate to the item you want to update (i.e., Item #0002554).
Step 2. Within the Base Price column of the item, enter the new price.
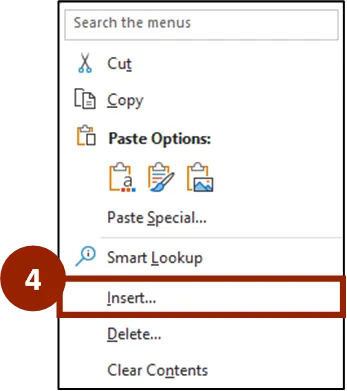
Step 3. To add a new item to the Price List, select a row within the spreadsheet.

Step 4. Right-click to display options, Select Insert… from the menu.
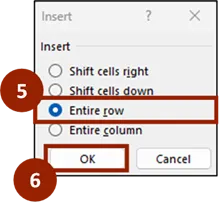
Step 5. Select Entire row.
Step 6. Click OK.
Step 7. Within the newly created row, Enter all information related to that item including the NCCE Price List, the Item Name and the Base Price of that item.
Note: The Start Date and End Date columns for the item can be updated, the Start Date is the only field required to move forward.

Step 8. Click the Create or Update button to process the changes.
Once the changes are processed, verify the changes for the item within the NCFS Manage Price List.
Wrap-Up
NCFS users can use two methods to set up and maintain price lists using the steps above.
Additional Resources
- Virtual Instructor Led Training (vILT)
- Web-based Training (WBT)