Purpose
The purpose of this Quick Reference Guide (QRG) is to explain how to schedule reports to run automatically in the North Carolina Financial System (NCFS) Cash Management System.
Introduction
The purpose of this Quick Reference Guide is to explain how to schedule reports to run automatically in the North Carolina Financial System. This also covers how to schedule report output.
Scheduling is a very important feature for any reporting system. It enables you to schedule long-running reports to be run when the system load is lowest or to have frequently used reports delivered to your email daily, weekly, hourly, or monthly.
NCFS is configured with a Report Scheduler by default.
Schedule a Report: Overview
Reports can be scheduled to run from different work areas. However, the process remains the same. There are 2 steps to complete this process.
Step 1. From Home > Tools > Reports and Analytics
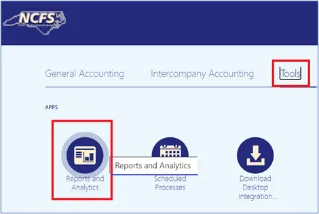
Step 2. From Home > Financial Reporting Center

Schedule a Report - Tasks
There are 3 steps to complete this process.
Step 1. Select a Report. Parameter choices appear.
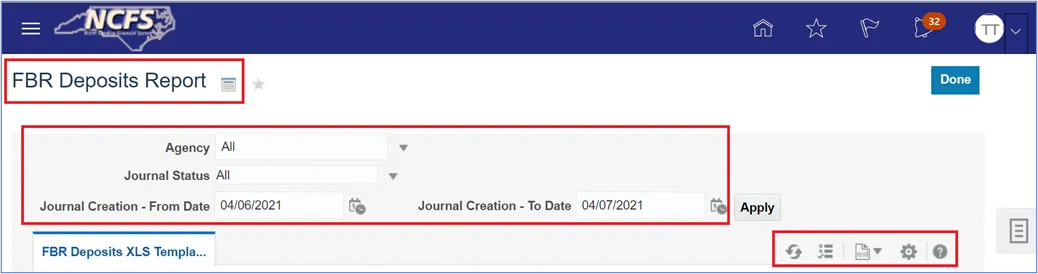
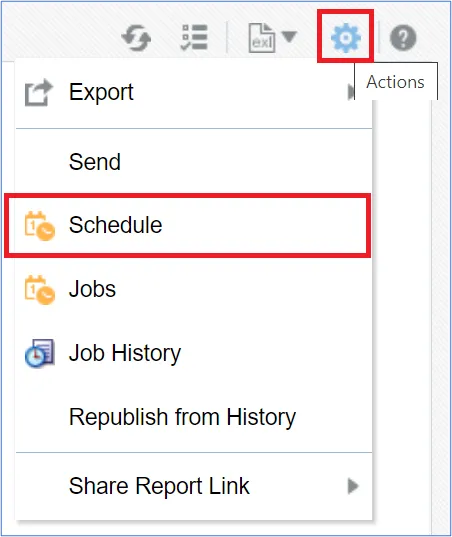
Step 2. From the toolbar on the right, click on the Actions icon. Then select Schedule.
Step 3. The Schedule Report Job page contains four tabs to define the options for your report job:
- General
- Output
- Schedule
- Notification
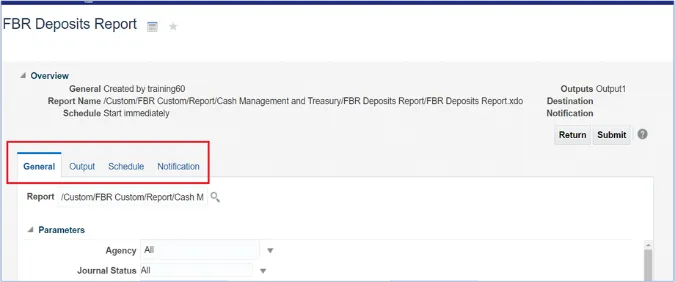
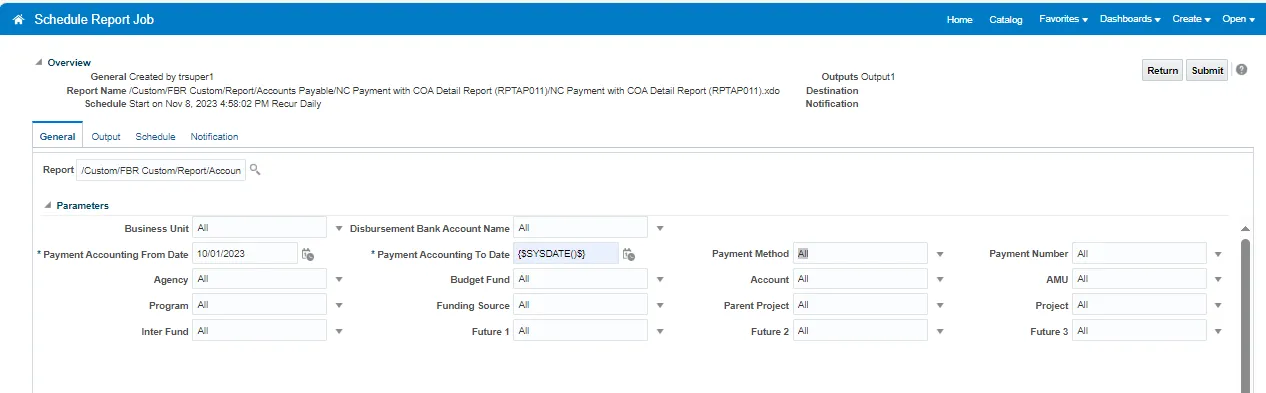
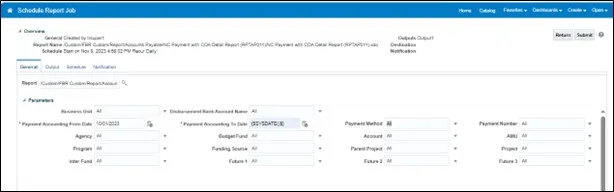
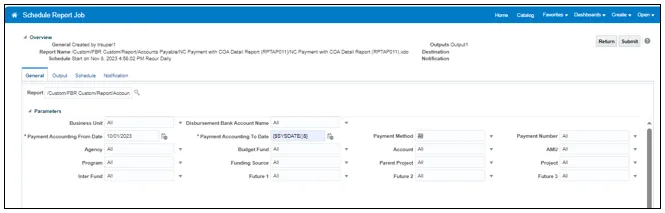
1. General Tab
The Schedule Report Job page activates the General tab by default.
Leave the default selected parameters as they are or change them to suit your requirement.
Note: Many FBR pre-built reports now have ‘Current’ and ‘Prior’ as valid parameter values for Accounting Period.
2. Output Options Tab
On the Schedule Report Job page, click the Output tab.
- The tab has two sections: Output and Destination. You can accept the default values in each section or update them, based on your needs.
- The Output Table creates multiple outputs for one or more layouts by using a combination of output format, locale, time zone, and calendar.
- In the Destination section, you can enter an email address. To deliver a report to multiple destinations, click Add Destination and continue adding destinations as needed.
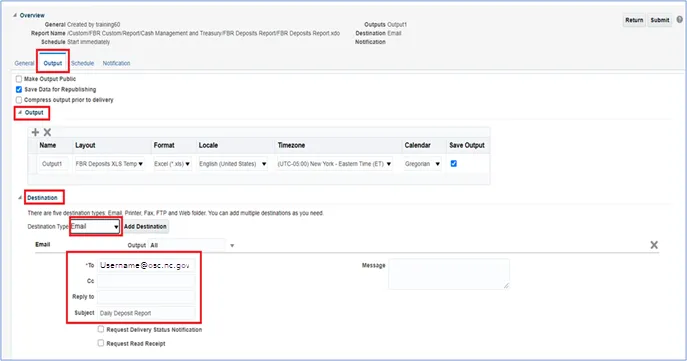
- When running any report, always use the default Destination Type: Email.
- Please do not click on the dropdown and do not select ‘Printer’. If you select ‘Printer’ option, it MAY let you select one of the Check Printers, which will cause additional issues.
- After report completion, you can download the report to laptop and print from your laptop to local printer.
NOTE: If the output file is too big to send to the email destination, you will need to click on Output1 link and the report will be downloaded. From your Downloads folder, you may select this output for printing. Navigation steps are detailed in the Managing Report Output section of this QRG.
3. Schedule Options Tab
On the Schedule Report Job page, click the Schedule tab.
- Select Frequency options that meet your specific timing requirements. For example, you might want to generate reports every Friday, or every morning, or according to some other date pattern.
- Once
- Hourly
- Minute
- Daily
- Weekly
- Monthly
- Annually
- On specific dates (Use the date selectors to specify the start and end dates.)
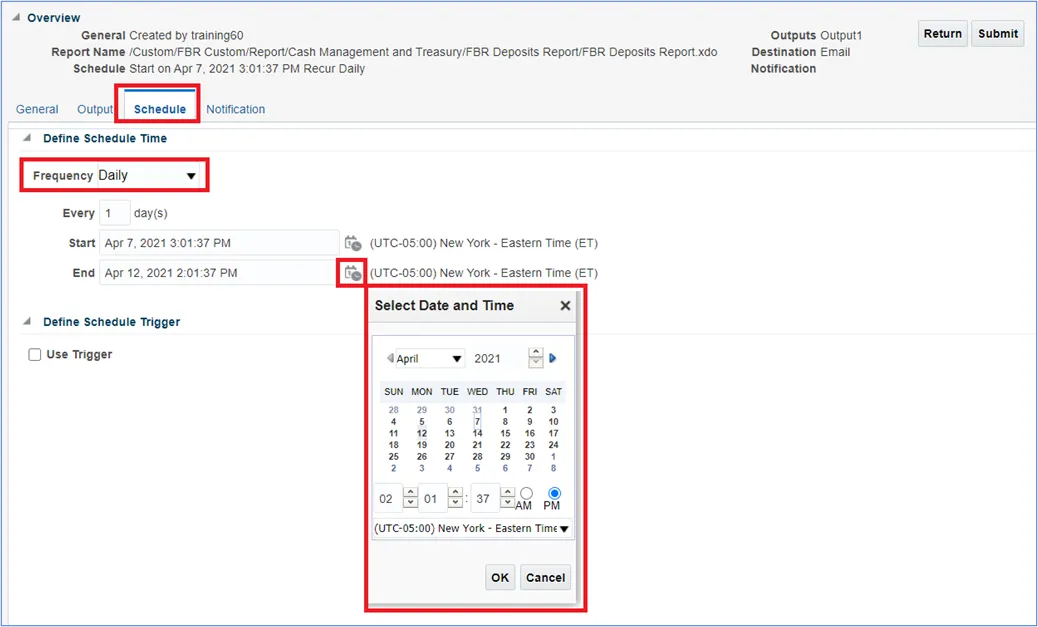
Note: Scheduled process reports will run on weekends if set to daily.
For every other day, set the report daily frequency to 2.
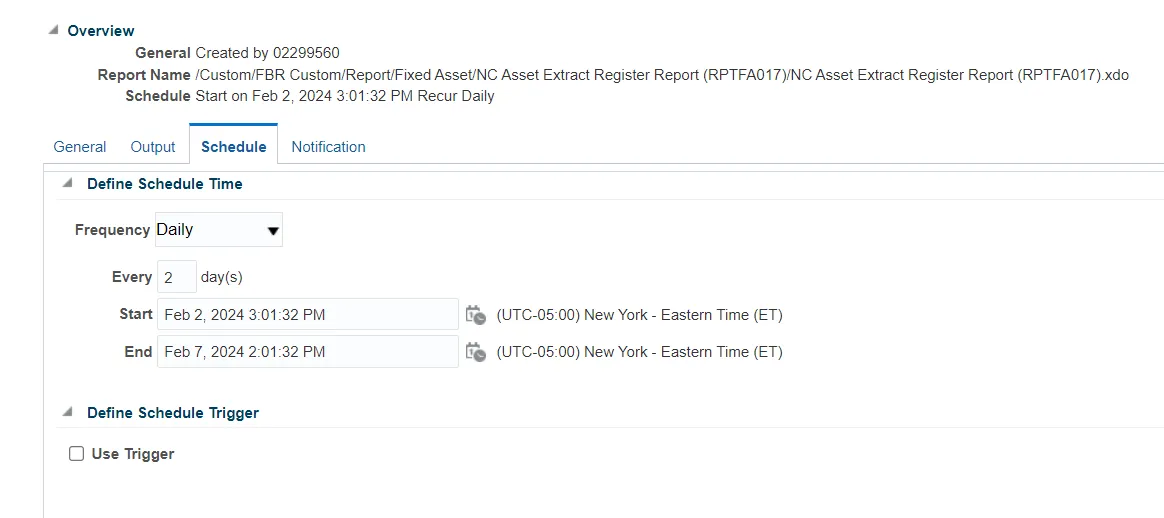
This will cause every other day, week 1 will run M/W/F, week 2 will run T/Th. If you need every M/W/F, run 3 scheduled reports set weekly for M, W, and F.
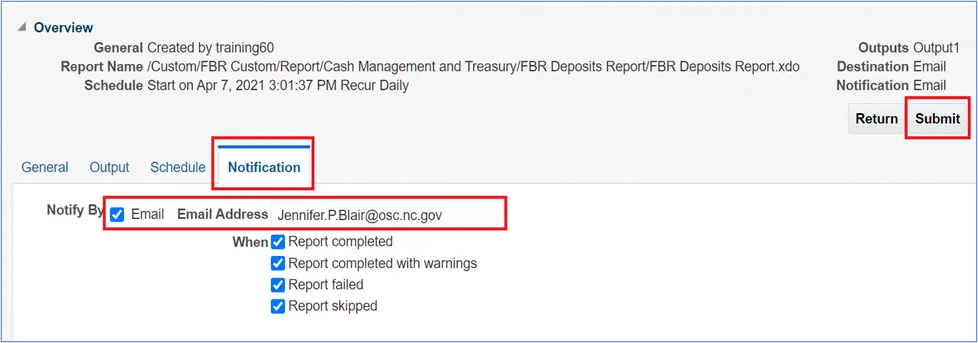
4. Notification Tab
On the Schedule Report Job page, click the Notification tab.
- A notification is a message that indicates that a job has finished processing. NCFS supports four notification statuses to which you can subscribe. They are all optional.
- Report completed
- Report completed with warnings
- Report failed
- Report skipped
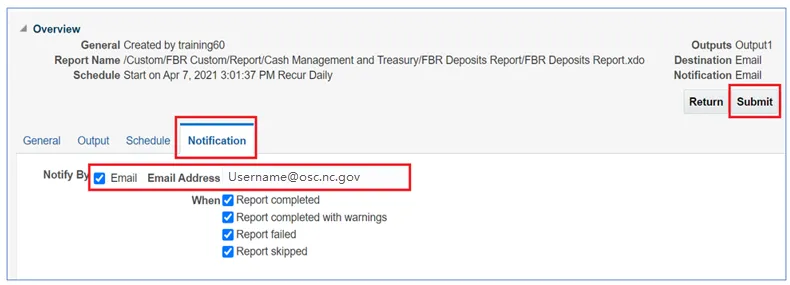
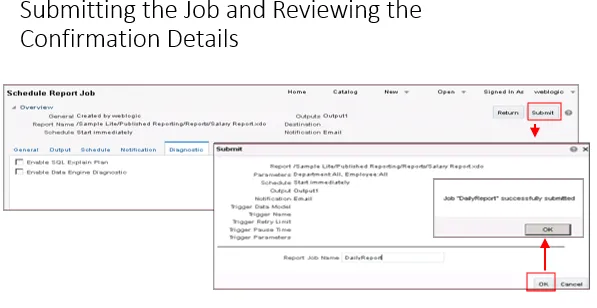
Submitting the Job
After defining all Schedule Report options, click the Submit button.
This invokes the Submit Job dialog box with confirmation details for you to review. The confirmation details include a summary of the job, such as parameters, schedule, output, and notification.
Enter a name for this job and click OK. A confirmation message will appear.

Congratulations! You have successfully scheduled a report!
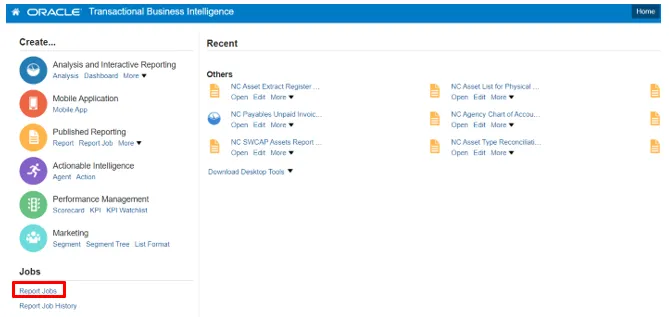
Using the Actions Menu
The Actions menu provides more actions that you can take on the report.
Browse Catalog > Open (desired report) > Actions icon (gears)
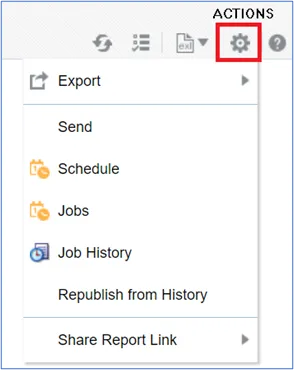
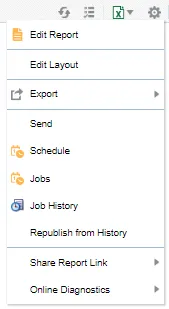
- Export exports the report to Microsoft Excel (NCFS default).
- Send launches a simplified version of the Schedule Report Job page - where you can select the output, destination, and notification options, but you cannot Schedule the Report. Basically, it allows you to immediately email the report.
- Schedule creates a job to run and distribute the report, as documented in the beginning of this job aid.
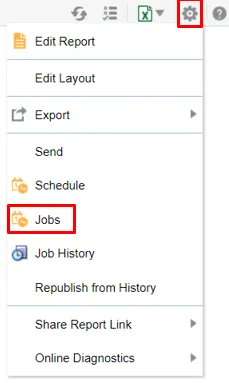
- Jobs enables you to view and manage currently scheduled jobs for this report.
- Job History enables you to view completed and running report jobs.
- Republish from History enables you to select a previously scheduled, completed job and specific output for viewing in the report viewer.
- Share Report Link enables you to generate a link that you can copy and reuse, based on the report that you are currently viewing. When you select an option, a dialog displays the URL to the report.
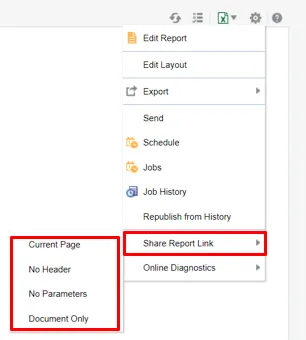
- Current Page displays the current page as shown.
- No Header displays the current report without the BI Publisher logo, tabs, or navigation path.
- No Parameters displays the current report without the header or any parameter selections. The Actions menu, Export, and View Report menus are still available.
- Document Only displays the URL to the current report document only. No other page information or options are displayed.
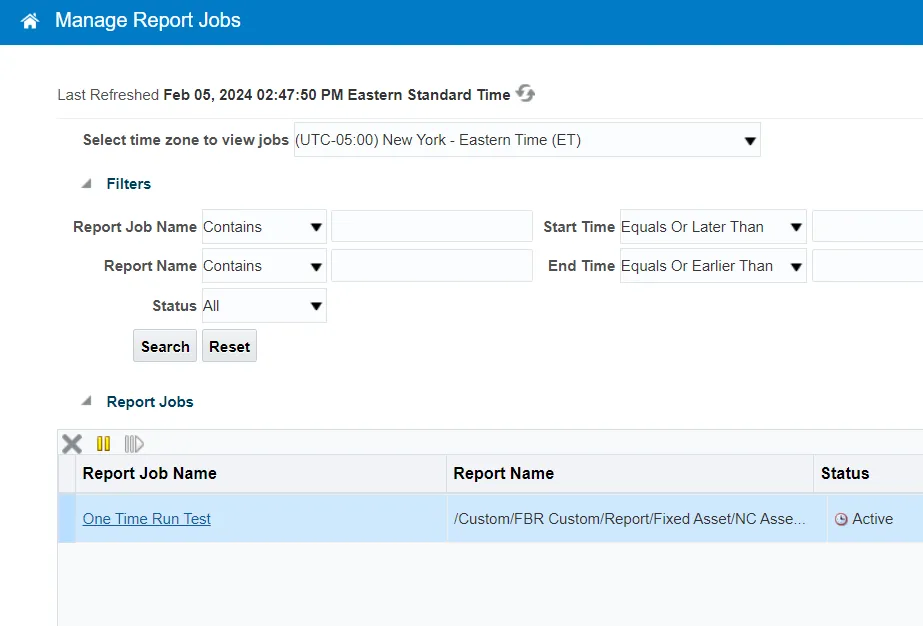
Jobs – Manage Report Jobs
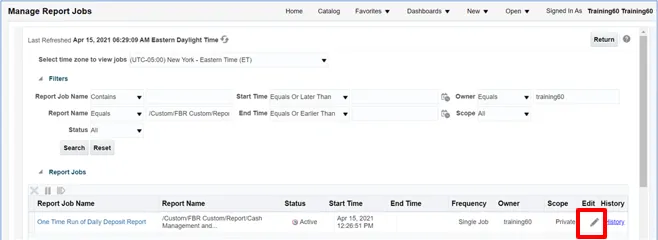
The Manage Report Jobs page displays information about future scheduled/recurring report jobs and enables you to take actions on these jobs.
From the Actions menu, select Jobs.
Use the Manage Report Jobs page to:
- Edit a report job
- Delete a report job
- Suspend/Resume a report job
- View the job details
Note: Use Oracle’s online help to obtain more information on this page!

A. Edit a Job
- Step 1: Click the Edit icon for the job in the results table.
- Step 2: Edit the job details using the General, Output, Schedule, and Notification tabs.
- Step 3: Click Update Job to save your changes to this job; or, to save the edited job as a new job, click Submit as New and enter a name for the new job.
B. Delete a Job
- Step 1: Select the job by clicking anywhere in the table row that lists the job information. You can select multiple jobs by clicking additional rows.
- Step 2: Click the Delete button.
C. Suspend/Resume a Report Job
- To pause a job:
- Step 1: Select the job by clicking anywhere in the table row that lists the job information (do not click the job name link).
- Step 2: Click the Pause button. The status of the job changes to Paused.
- To resume a job:
- Step 1: Select the job by clicking anywhere in the table row of the paused job (do not click the job name link).
- Step 2: Click the Resume button. The status of the job changes

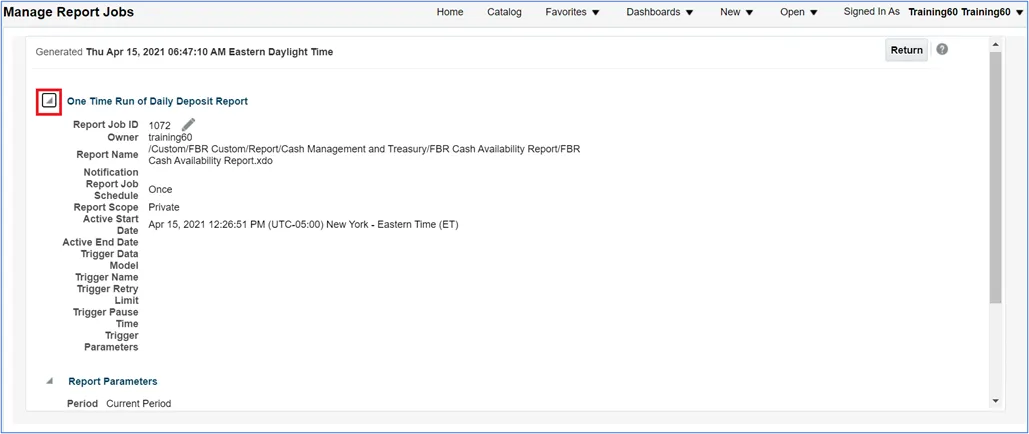
D. View the Job Details
- Step 1: Click the Report Job Name to view a detail page for the job.
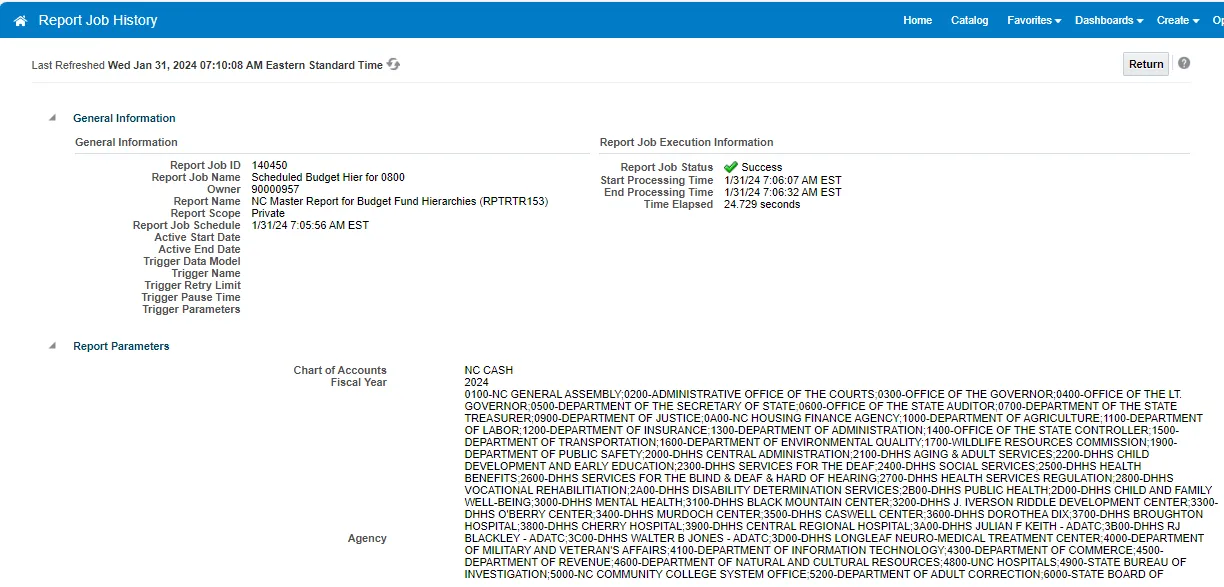
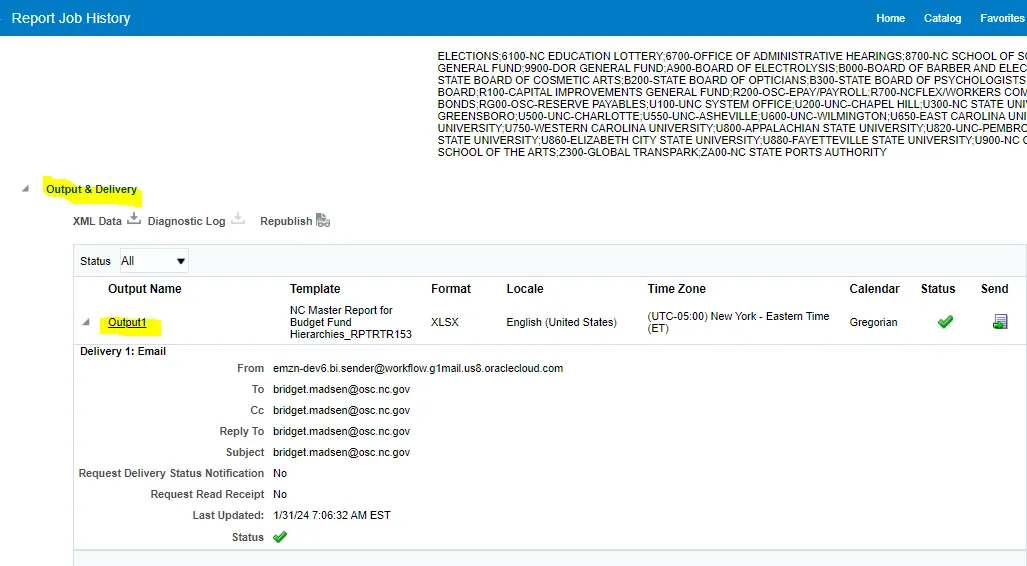
- Step 2: To view delivery information for each output, click the Expand icon next to the output name.
- Step 3: Click Return to return to the Manage Report Jobs page.
Managing Report Output
After defining the Schedule options, submit the job. Perform the following steps. There are 5 steps to complete this process.
Step 1. Click Submit. This invokes the Submit Job dialog box with confirmation details for you to review. The confirmation details include a summary of the job, such as parameters, schedule, output, and notification. Enter a name for this job and click OK. A message confirms that the job has been successfully submitted.
Step 2. To monitor or edit your job, navigate to the Manage Report Jobs page. You access the Manage Report Jobs page by clicking Home > Report Jobs on the global header. You will check this report job in the next section.
Step 3. To see the results of your job, navigate to the Report Job History page. Click Open > Report Job History on the global header. You can see the job on the Report History page if it is running or completed. If the job is still active, the job will be listed under Report Jobs.
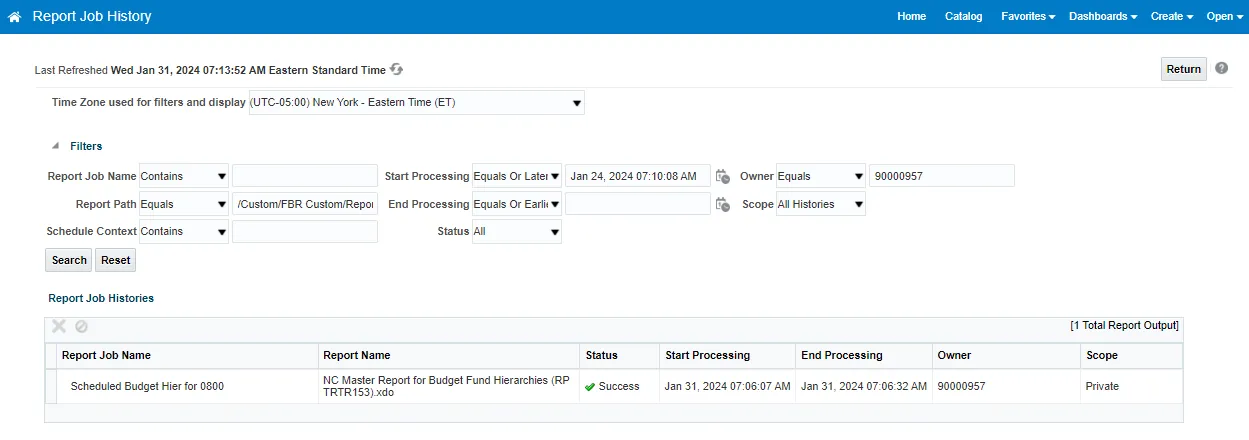
Step 4. Click the Report Job Name hyperlink.
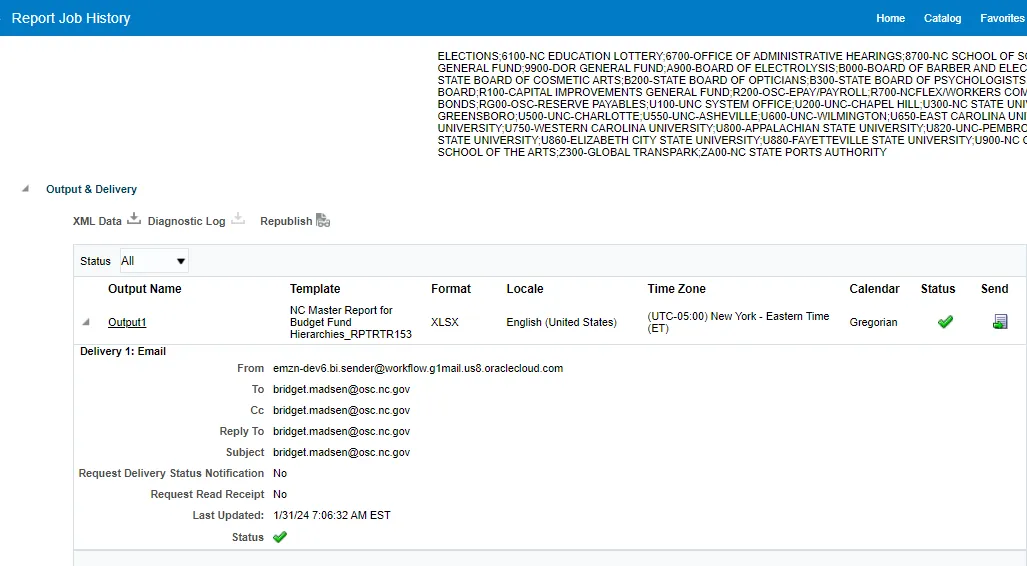
Step 5. To print (or simply view) output…click on Output1 link and the report will be downloaded. From your Downloads folder, you may select this output for printing.
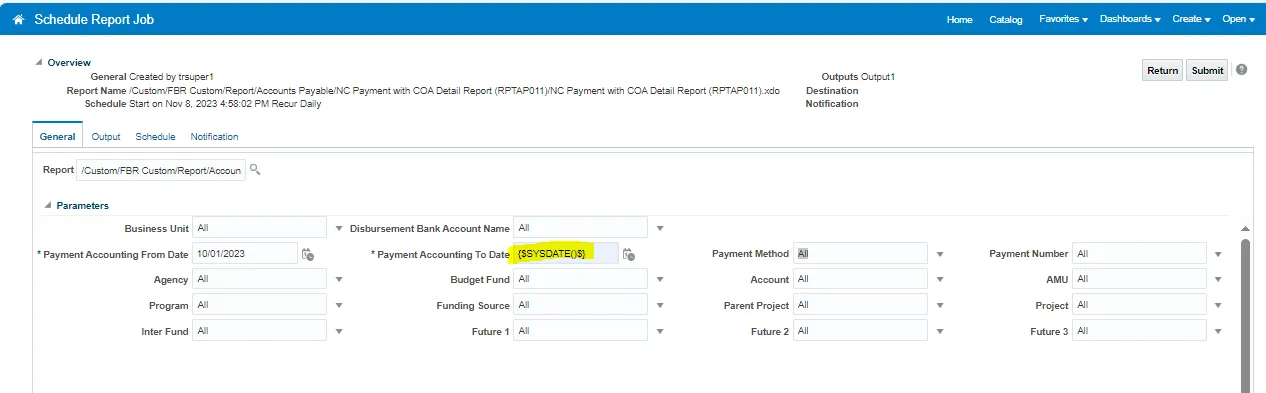
Increment Date Parameters
You can provide expressions in the report's date parameter fields.
If the scheduled report includes date parameters, when you enter values for the schedule dates, you can't change the date values. Every time a scheduled instance of the report is run, the same date parameters are used. If changing the date parameters is required for each run, you can enter an expression in the date parameter field of the scheduler to calculate the date each time the report job runs.
For example, if you create a schedule for a report that runs every Monday to capture data from the previous week, you need to update the date parameters for the report to increment to the first and last days of the previous week.
Enter one of the following functions using the syntax shown to calculate the appropriate date at the scheduled runtime for the report:
- {$SYSDATE()$} - Current date, the system date of the server on which Publisher is running.
- {$FIRST_DAY_OF_MONTH()$} - First day of the current month
- {$LAST_DAY_OF_MONTH()$} - Last day of the current month
- {$FIRST_DAY_OF_YEAR()$} - First day of the current year
- {$LAST_DAY_OF_YEAR()$} - Last day of the current year
The date function calls in the parameter values aren't evaluated until the report job is processed by the Scheduler.
You can also enter expressions using the plus sign (+) and minus sign (-) to add or subtract days as follows:
- {$SYSDATE()+1$}
- {$SYSDATE()-7$}
For this example, to capture data from the previous week, each time the schedule runs, enter the following in the report's date parameter fields:
- Date From: {$SYSDATE()-7$}
- Date To: {$SYSDATE()-1$}
You can set up the date functions as default parameter values in the data model. In this case, every time a user views the report from the report viewer, the date parameter is calculated according to the expression supplied for the default value.
Note: Numerous FBR pre-built reports now have ‘Current’ and ‘Prior’ as valid parameter values for Accounting Period.
Wrap Up
This example of scheduling reports uses the FBR Deposit Report and the FBR Cash Availability Reports.
Additional Resources
- WBT Courses
• GEN106
- Quick Reference Guides (QRGs)
• CM-36 NCFS Transaction Category Value