Purpose
The purpose of this Quick Reference Guide (QRG) is to provide a step-by-step explanation on how to Setup/Configure the General Ledger (GL) such as updating mapping sets, importing Code Combinations, creating Cross Validation Rules (CVR), and manually assigning Legal Entity Balancing Segment Value (LE BSV) in the North Carolina Financial System (NCFS).
Introduction and Overview
This QRG covers the setups and configurations of GL in NCFS.
Add/Update a Value in XXNC_COMM_ALLO_MAP Mapping Set Using Charge Objects in NCFS
To Add/Update a Value in XXNC_COMM_ALLO_MAP Mapping Set Using Charge Objects in NCFS, please follow the steps below. There are 8 steps to complete this process.
Step 1. Log in to the NCFS portal with your credentials to access the system.
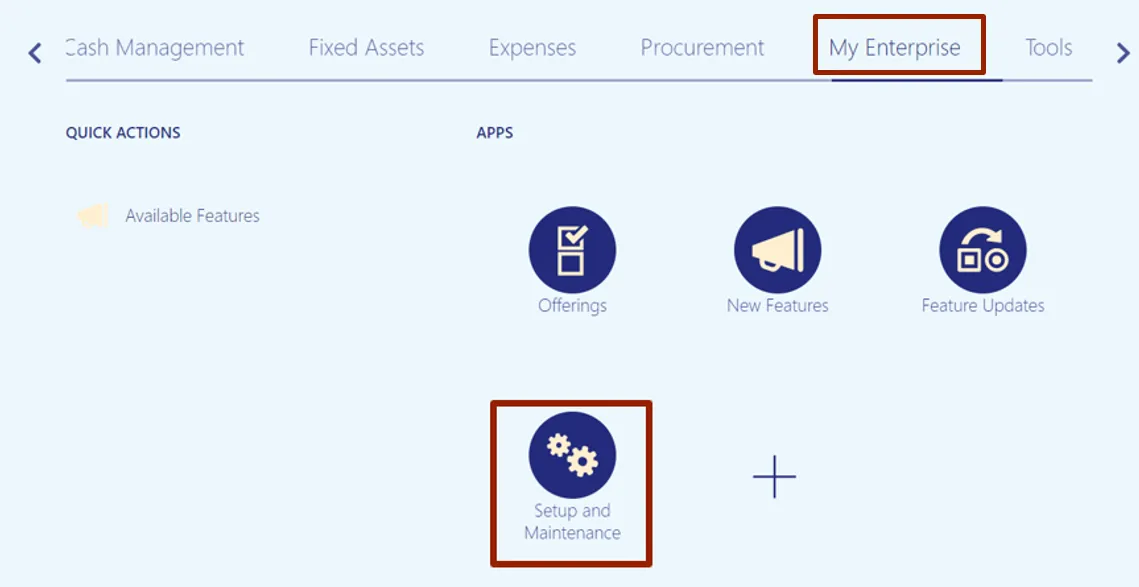
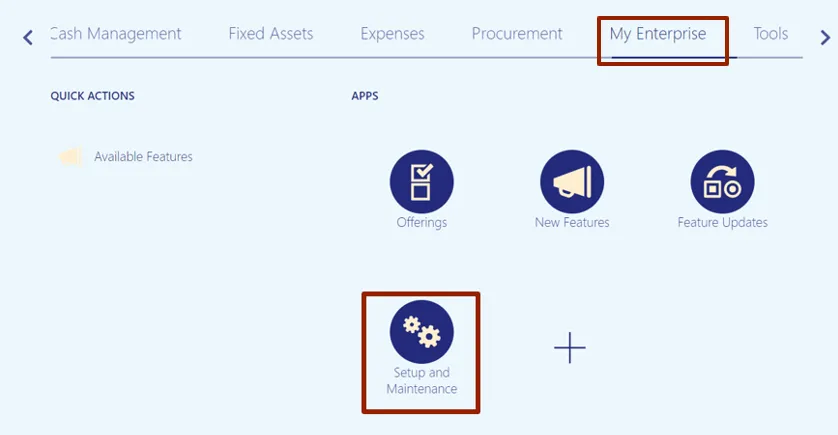
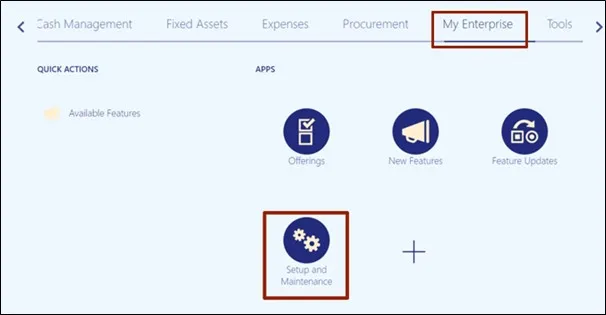
Step 2. On the Home page, click the My Enterprise tab and then click the Setup and Maintenance app.
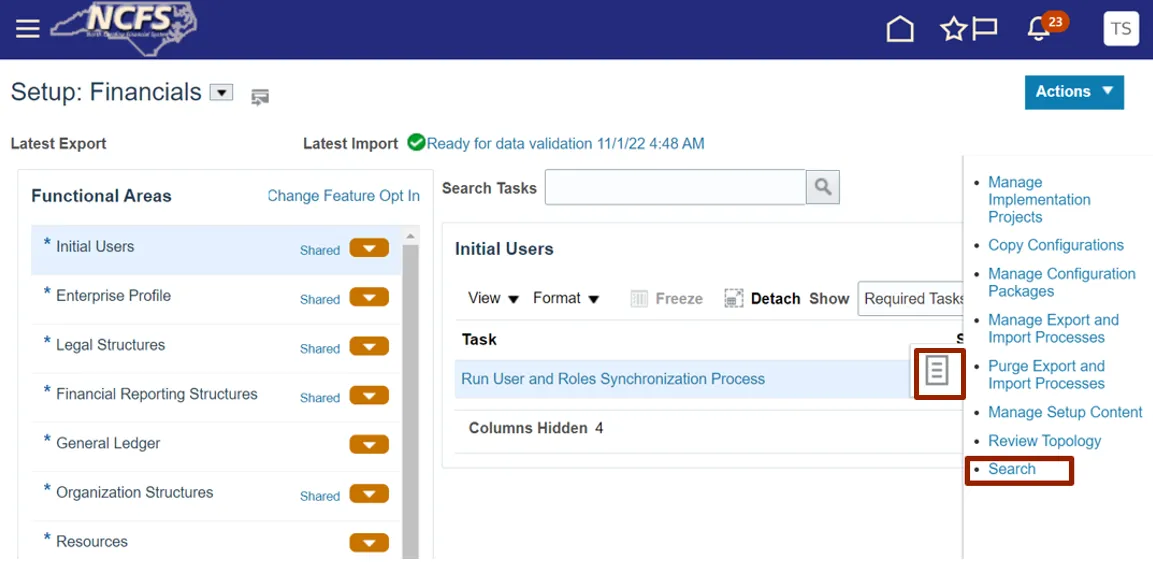
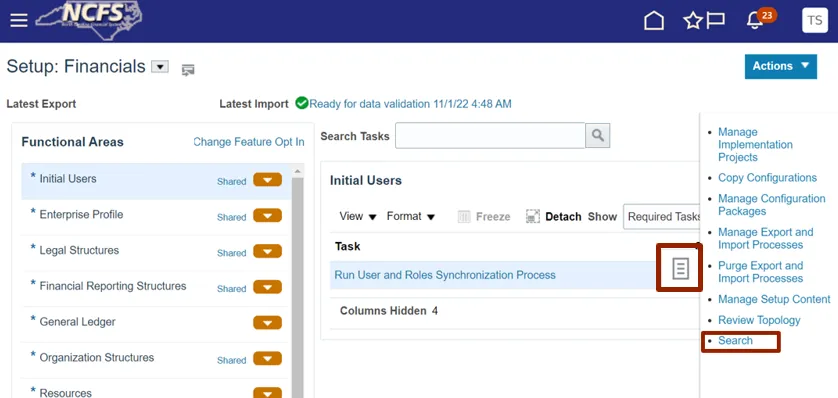
Step 3. On the Setup: Financials page, click the Tasks icon, and then click Search.
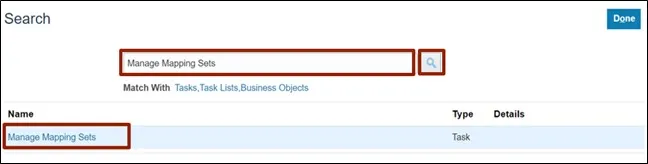
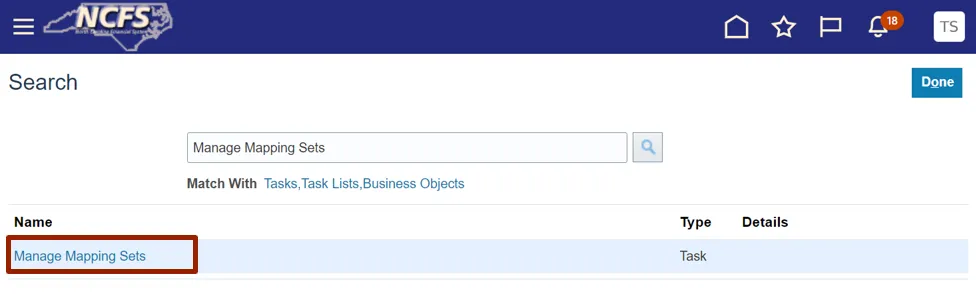
Step 4. On the Search page, enter Manage Mapping Sets in the Search bar, and click the Search icon. Click Manage Mapping Sets.

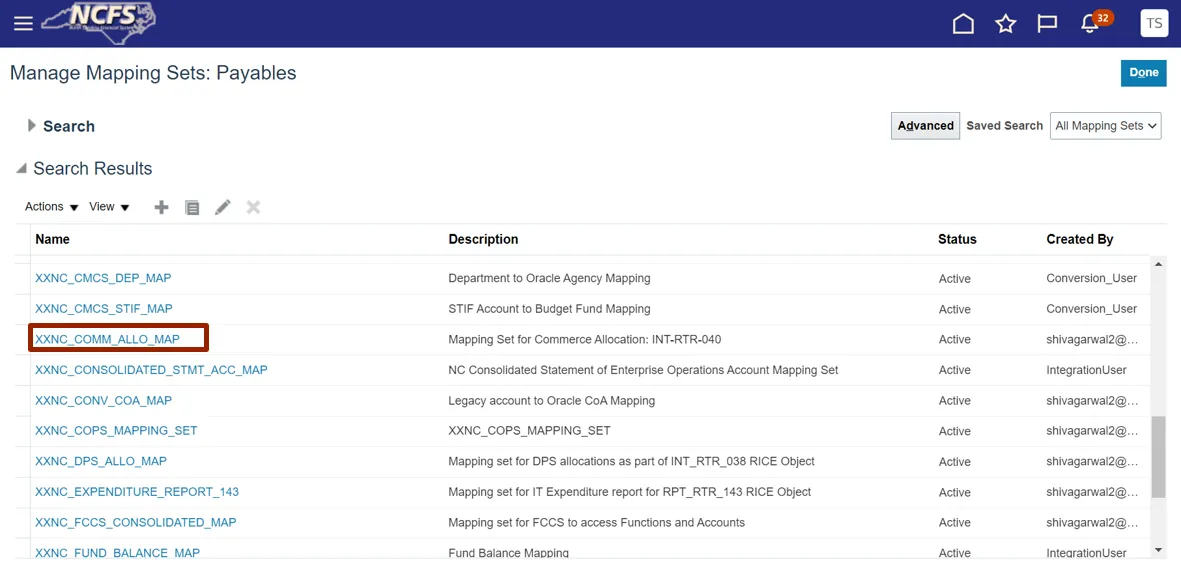
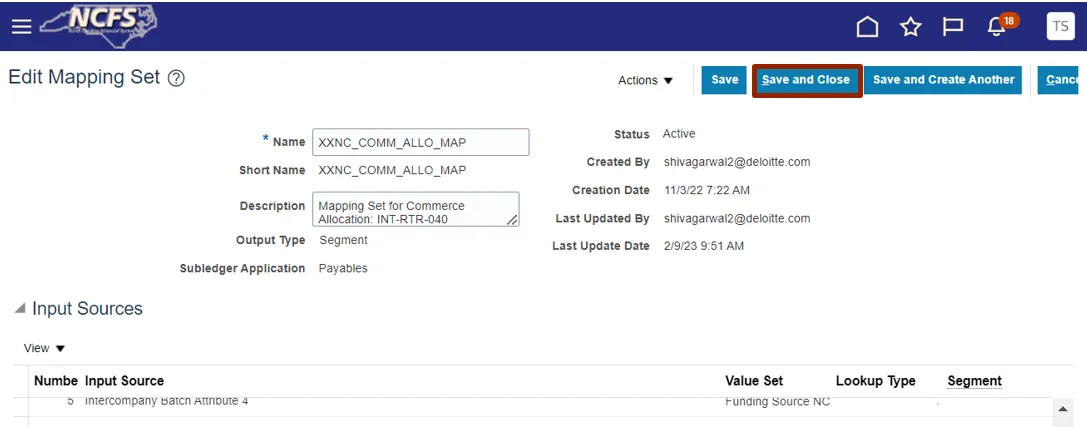
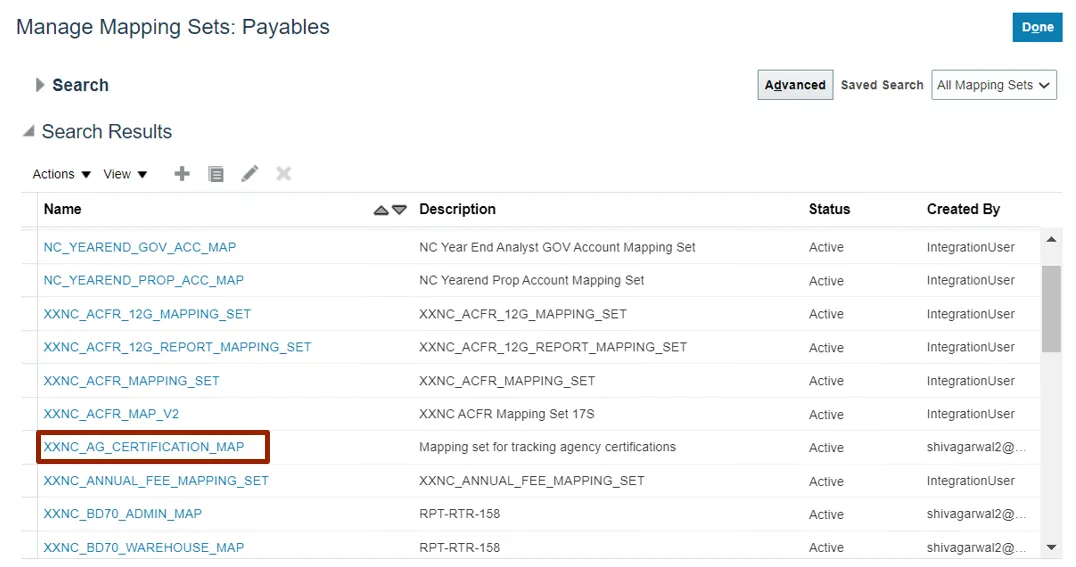
Step 5. On the Manage Mapping Sets: Payables page, under the Search Results section, click the Name link.
In this example, chose XXNC_COMM_ALLO_MAP.
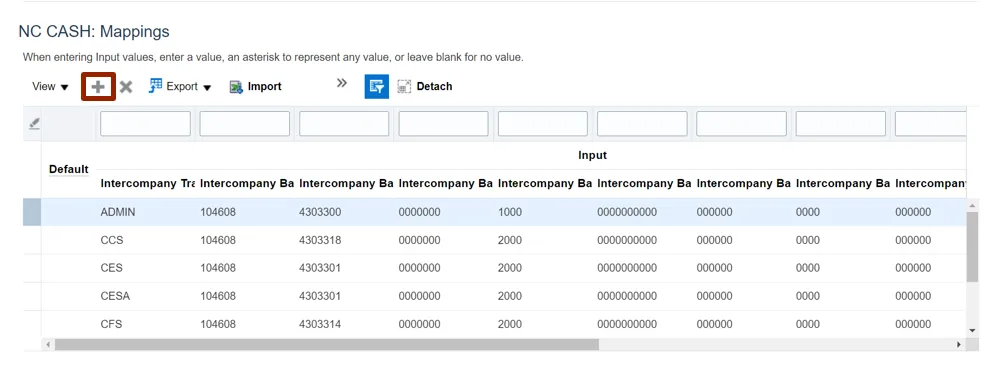
Step 6. Scroll down to the NC CASH: Mappings section, and then click the Add icon.
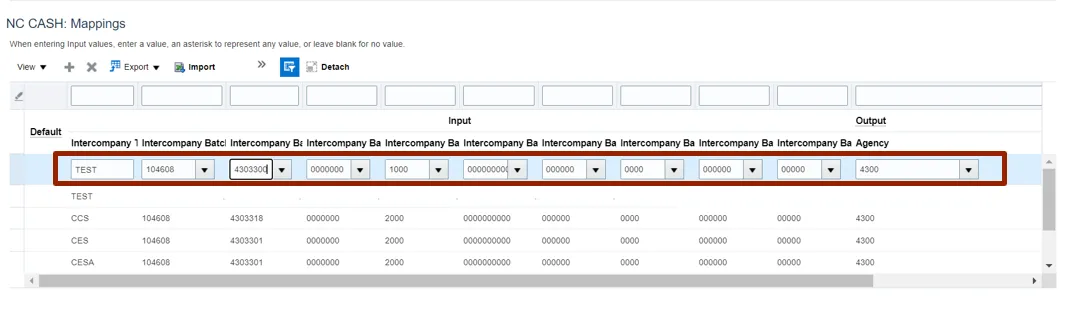
Step 7. On the NC Cash Mappings page, enter details in the required fields.
In this example, choose:
- Intercompany Transaction Attribute: TEST
- Intercompany Batch Attribute 1: 104608
- Intercompany Batch Attribute 2: 4303300
- Intercompany Batch Attribute 3: 000000
- Intercompany Batch Attribute 4: 1000
- Intercompany Batch Attribute 5: 0000000000
- Intercompany Batch Attribute 6: 000000
- Intercompany Batch Attribute 7: 0000
- Intercompany Batch Attribute 8: 000000
- Intercompany Batch Attribute 9: 00000
- Agency: 4300
Step 8. Scroll to the top of the page and click the Save and Close button.
Add Fiscal Year and Periods to Agency Certification Mapping Set in NCFS
To add fiscal year and periods to agency certification mapping set in NCFS, please follow the steps below. There are 14 steps to complete this process.
Step 1. Log in to the NCFS portal with your credentials to access the system.
Step 2. On the Home page, click the My Enterprise tab and then click the Setup and Maintenance app.
Step 3. On the Search page, enter Manage Mapping Sets in the Search bar, and click the Search icon. Click Manage Mapping Sets.
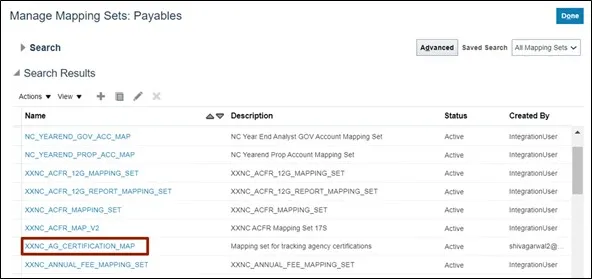
Step 4. On the Manage Mapping Sets: Payables page, under the Search Results section, click the Mapping Set link.
In this example, choose XXNC_AG_CERTIFICATION_MAP.
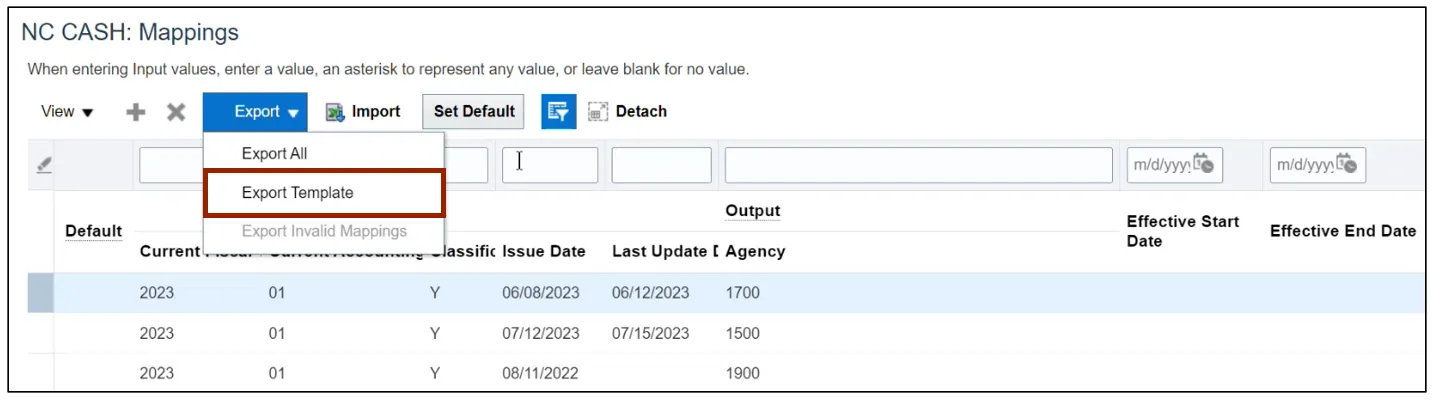
Step 5. Scroll down to the NC CASH: Mappings section. Click the Export drop-down choice list and select the Export Template option.
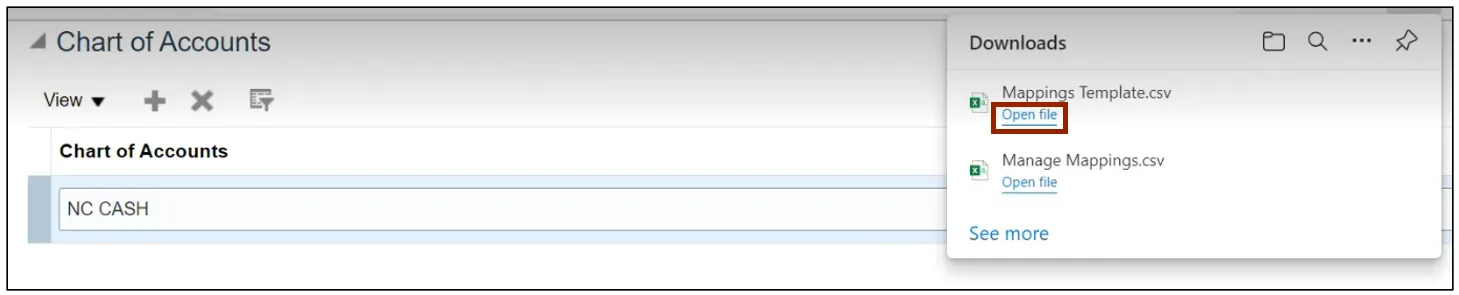
Step 6. After the Mappings Template is downloaded into the local device, click the Open File link.
Note: Be mindful that opening a csv directly into Excel will result in the loss of leading zeros.
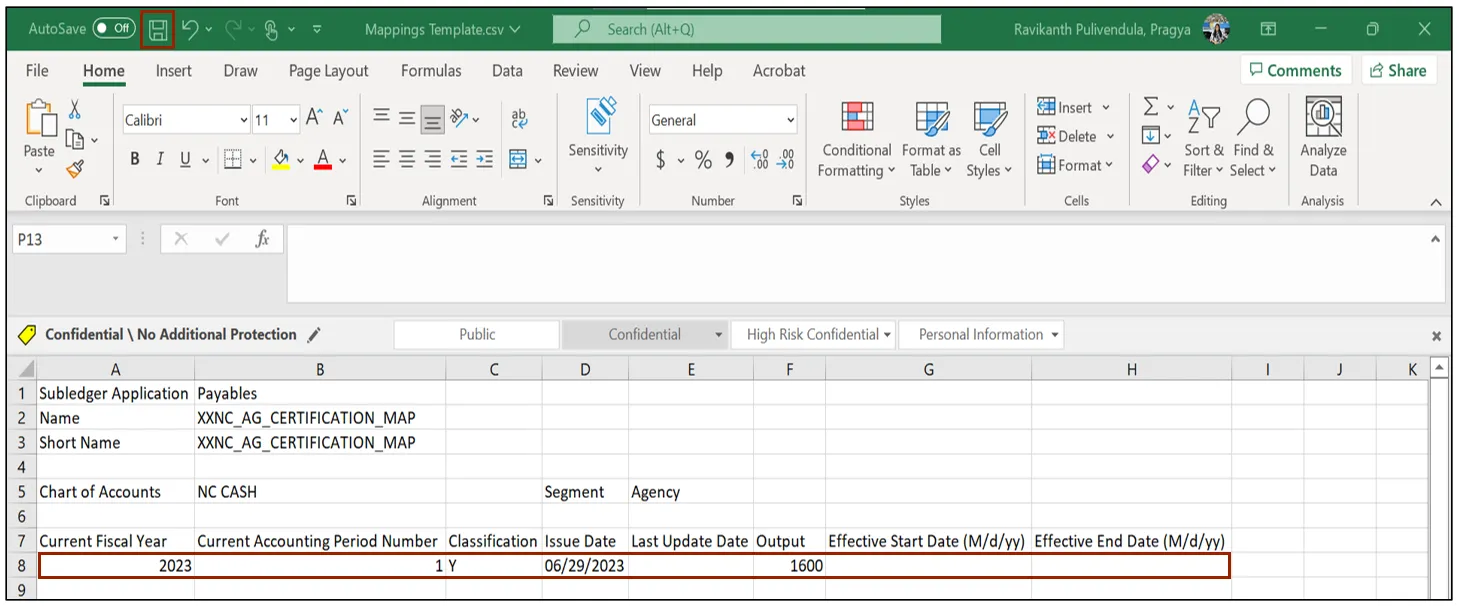
Step 7. In the Mappings Template, enter the data in the required fields and then click the Save icon.
In this example, choose:
- Current Fiscal Year: 2023
- Current Accounting Classification: 01
- Issue Date Last: Y
- Update Date: 07/15/2023
- Agency: 1500
Step 8. Go back to the NC CASH: Mappings section on NCFS and click the Import button.
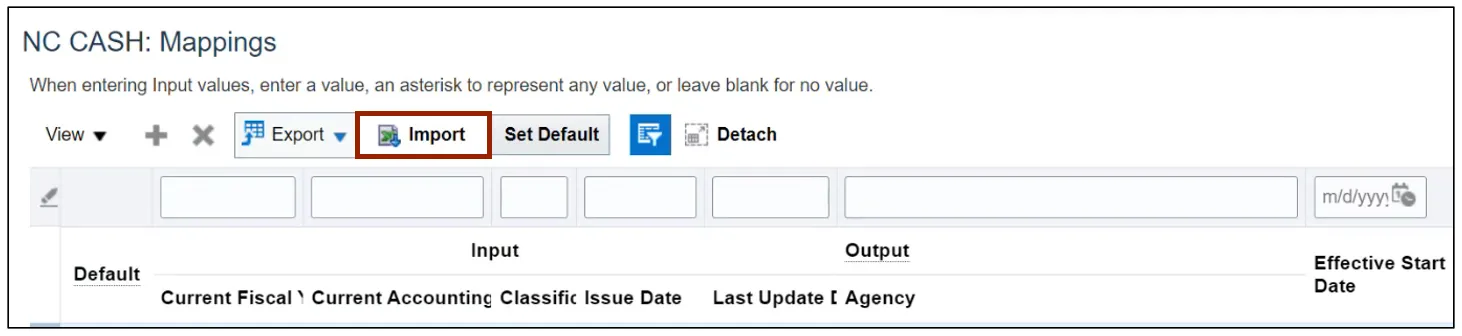
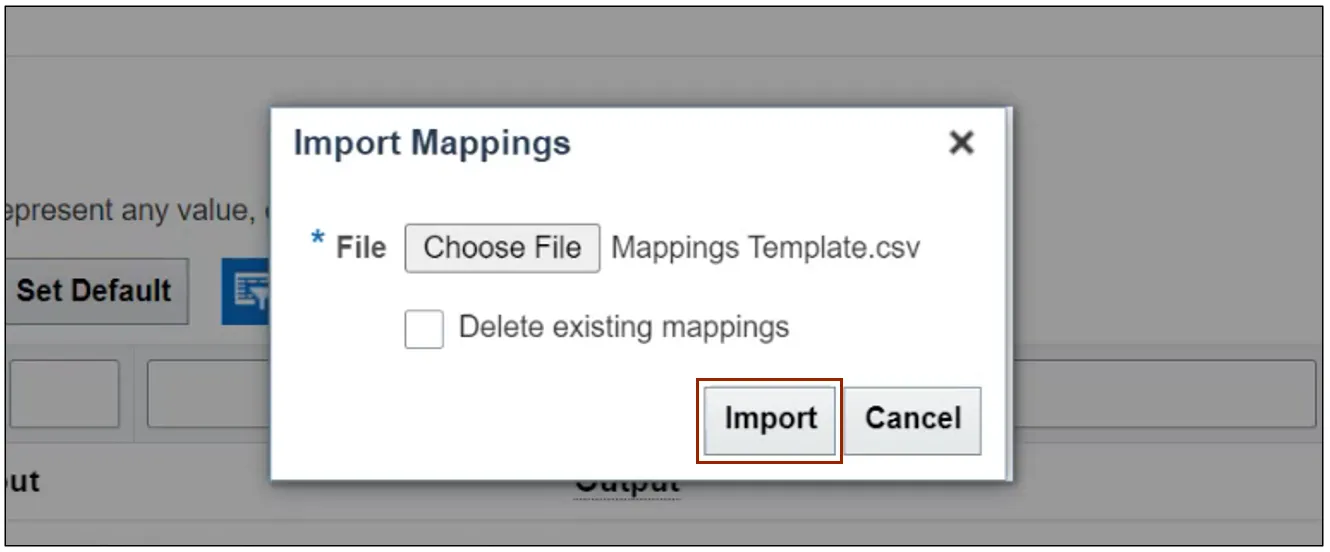
Step 9. The Import Mappings pop-up appears. Click the Choose File button.
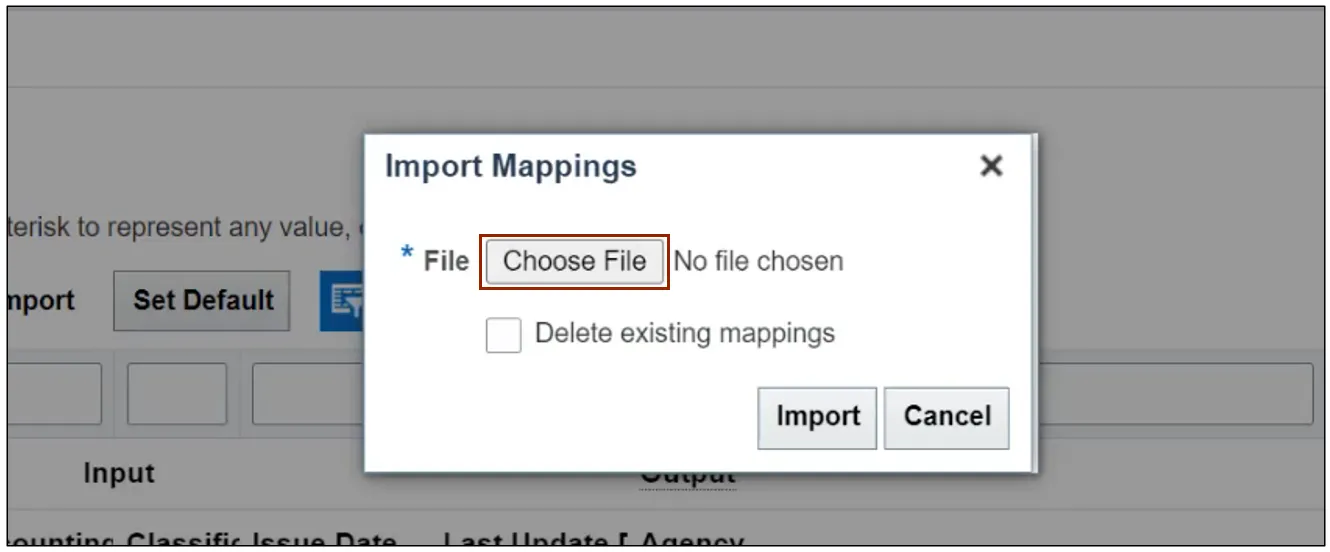
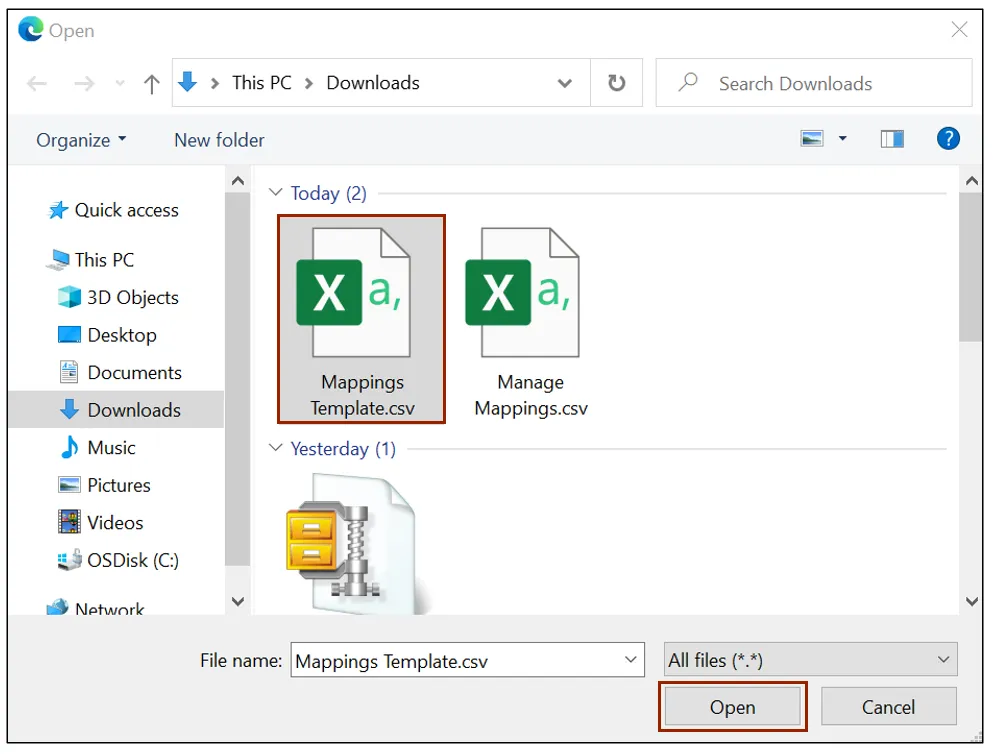
Step 10. The Open pop-up appears. Select the Mappings Template file to be imported and click the Open button.
Step 11. Click the Import button.
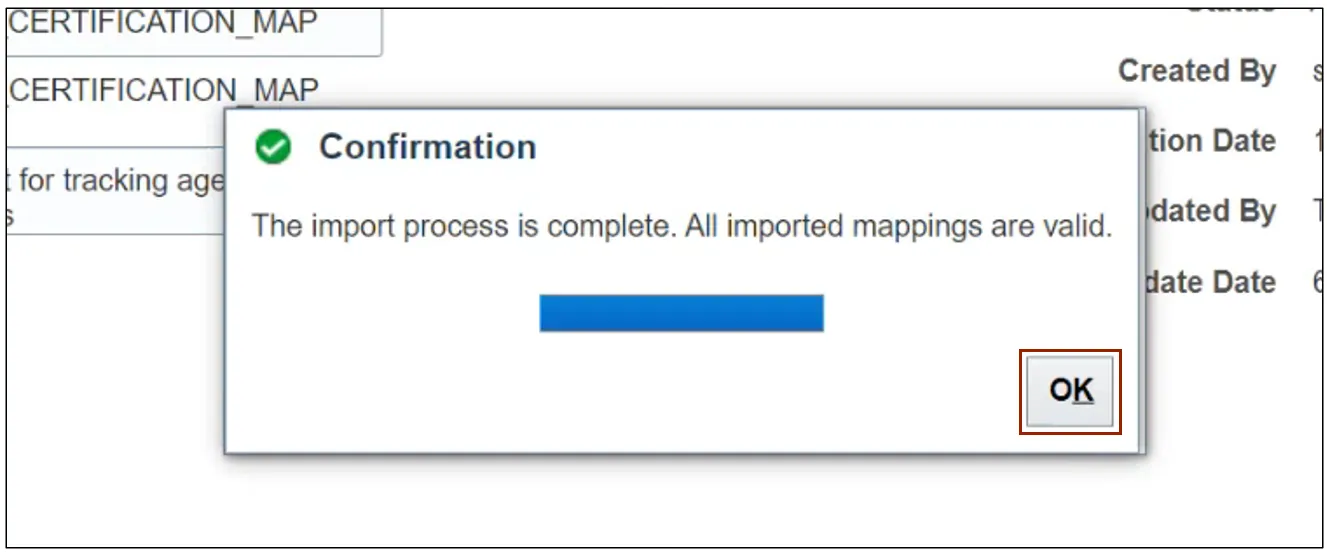
Step 12. A Confirmation pop-up appears. Click the OK button.
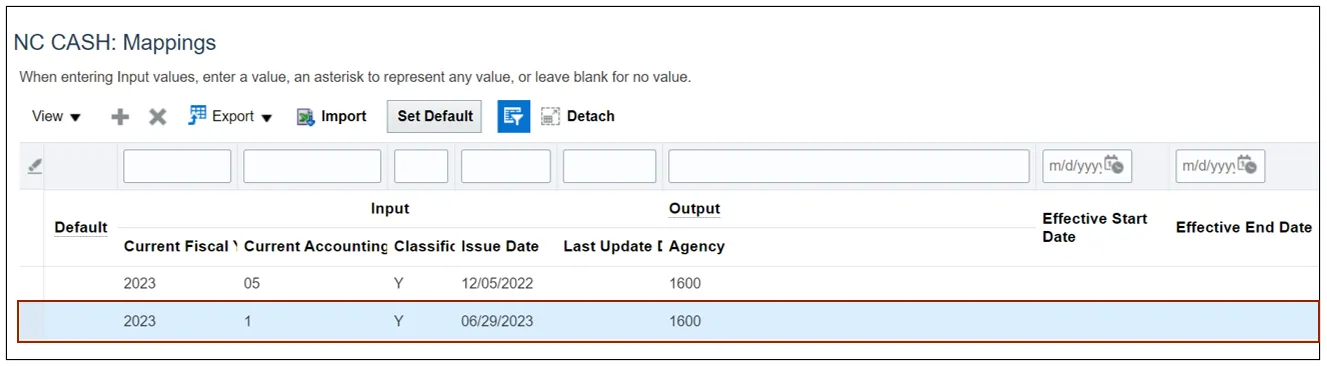
Step 13. The details from the imported file are added in the NC CASH: Mappings section.
Step 14. Scroll up and click the Save and Close button. You will be redirected to the Manage Mapping Sets: Payables page.
Update Agency Certification Date Mapping Set
To Update Agency Certification Date in NCFS, please follow the steps below. There are 8 steps to complete this process.
Step 1. Log in to the NCFS portal with your credentials to access the system.
Step 2. On the Home page, click the My Enterprise tab, and click the Setup and Maintenance app.

Step 3. On the Setup and Maintenance page, click the Tasks icon, and then click the Search link.
Step 4. On the Search page, enter Manage Mapping Sets in the Search bar, and click the Search icon. Click Manage Mapping Sets.
Step 5. On the Manage Mapping Sets: Payables page, under the Search Results section, click the Mapping Set link.
In this example, choose XXNC_AG_CERTIFICATION_MAP.
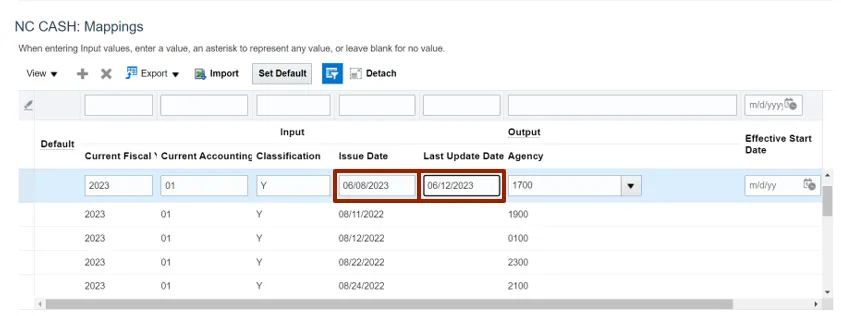
Step 6. Scroll down to NC CASH: Mappings section and click the Issue Date field for the desired mapping set.
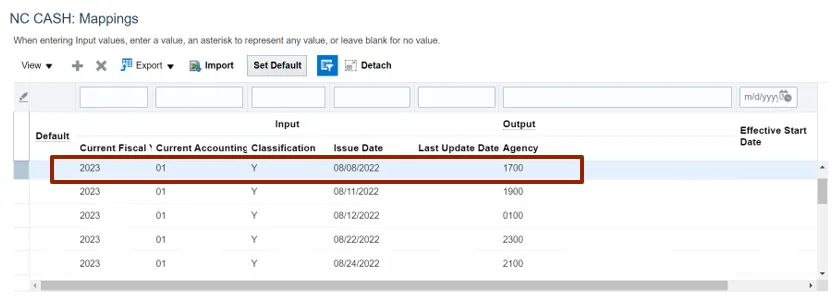
Step 7. Enter the required data.
In this example, choose:
- Issue Date: 06/08/2023
- Last Update Date: 06/12/2023
Note: The Issue Date was 08/08/2022 and has been updated to 06/08/2023. The Last Update Date was not previously updated but has now been updated to 06/12/2023.
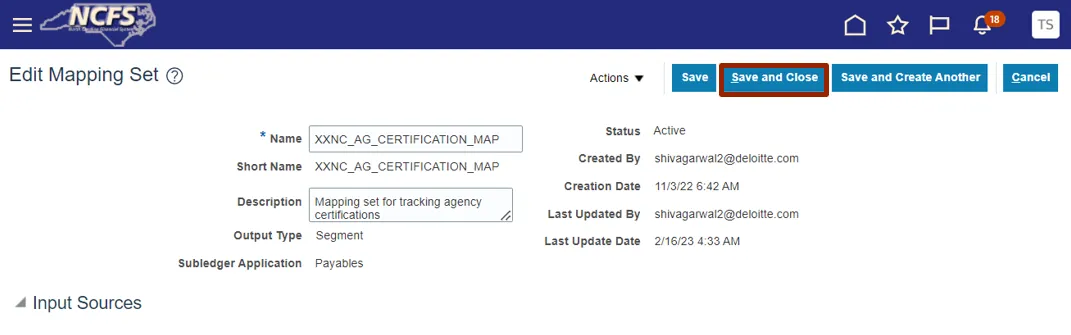
Step 8. Click Save and Close button. Manage Mapping Sets: Payables page appears.
Create Code Combination Using FBDI
To Create Code Combination using FBDI in NCFS, please follow the steps below. There are 12 steps to complete this process.
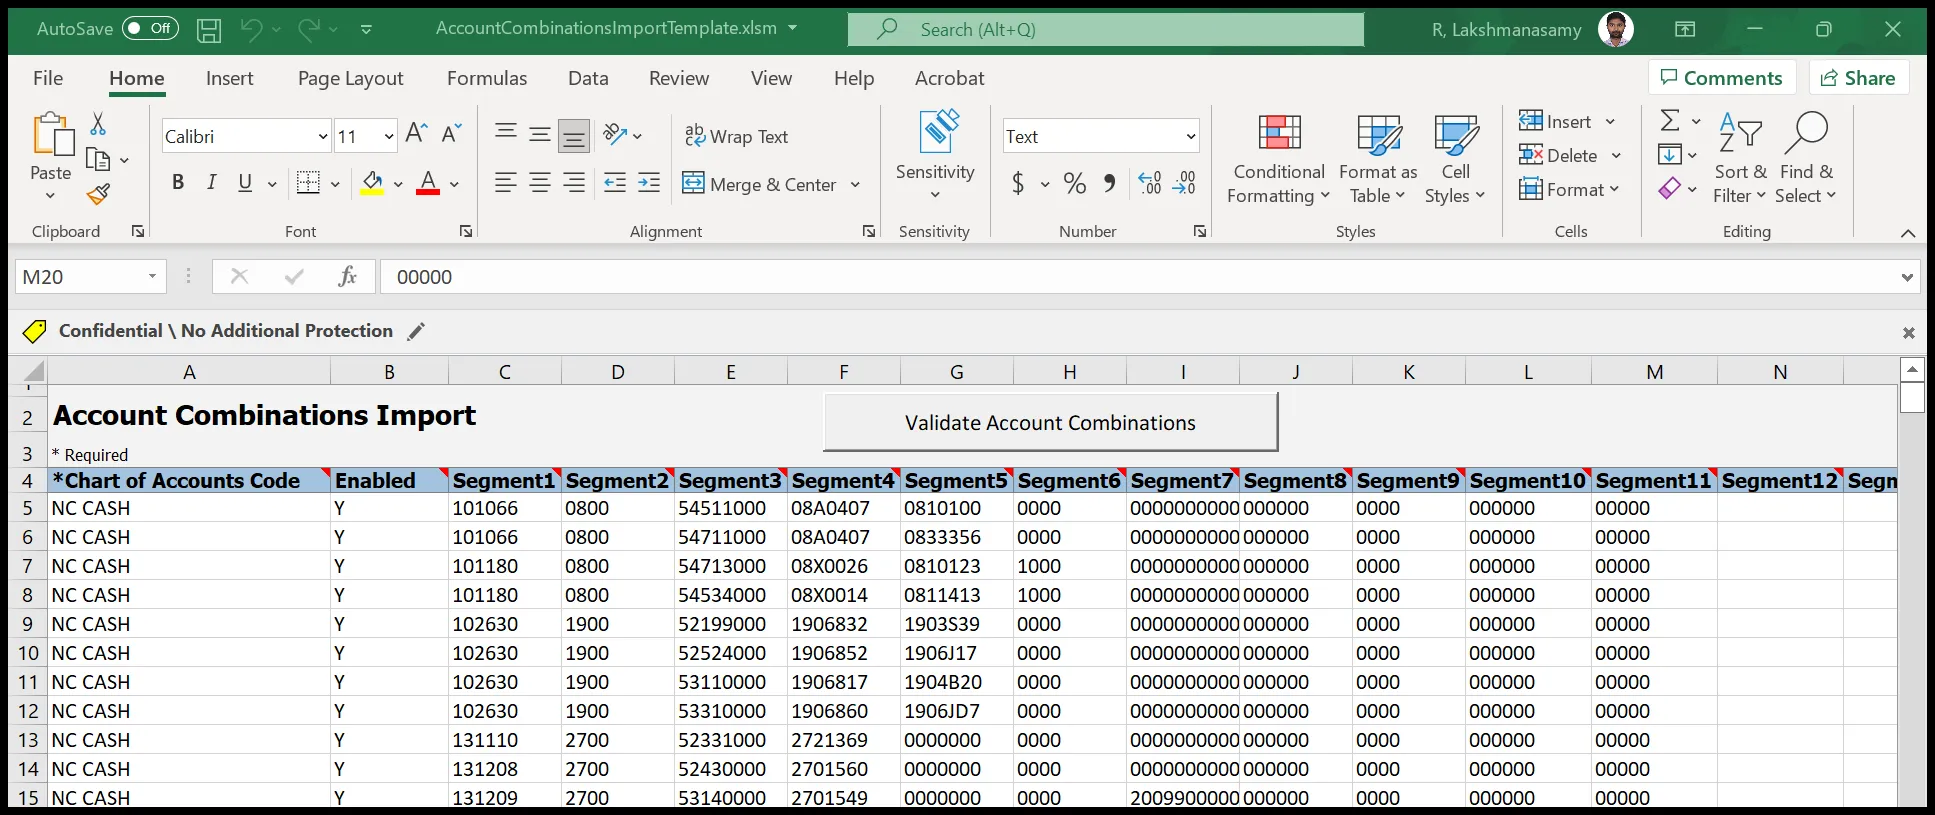
Step 1. Prepare the data for each interface table using Account Combinations Import Interface FBDI template.
Segments are as follows:
- Segment1: Budget Fund
- Segment2: Agency
- Segment3: Account
- Segment4: Agency Management Unit (AMU)
- Segment5: Agency Program
- Segment6: Funding Source
- Segment7: Project
- Segment8: Interfund
- Segment9: Future1
- Segment10: Future2
- Segment11: Future3
You must also populate the following fields:
- Chart of Accounts Code
- Enabled
- Allow Posting
- Interface Group Identifier
Note: Make note of the Group ID (Interface Group Identifier) used in the FBDI template.
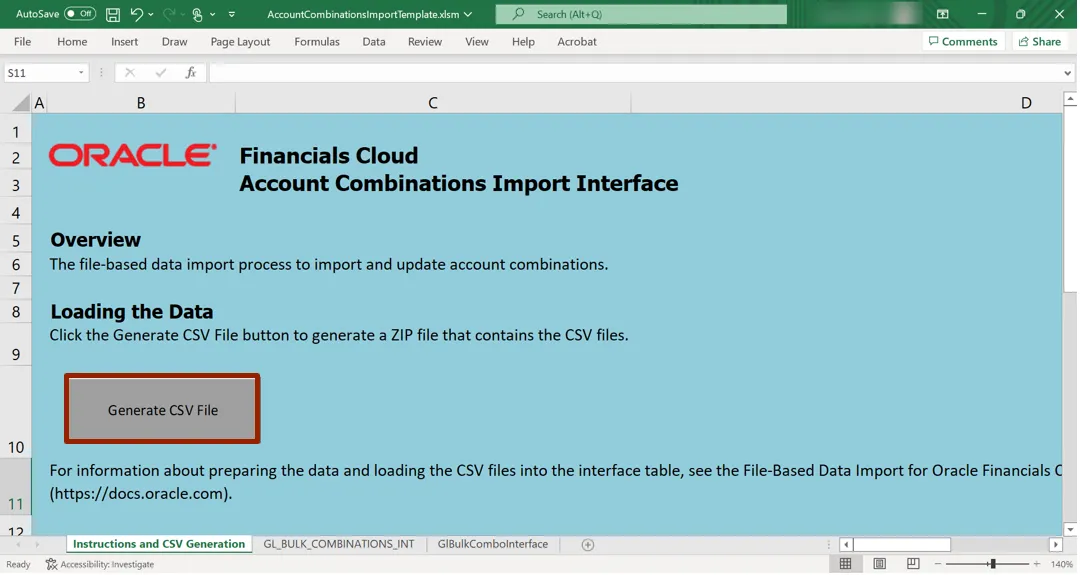
Step 2. Once the data has been prepared, click the Generate CSV File button. This will generate a CSV file and then place it in a zip file. The zip file containing one or more CSV files is generated.
Step 3. Log in to the NCFS portal with your credentials to access the system.
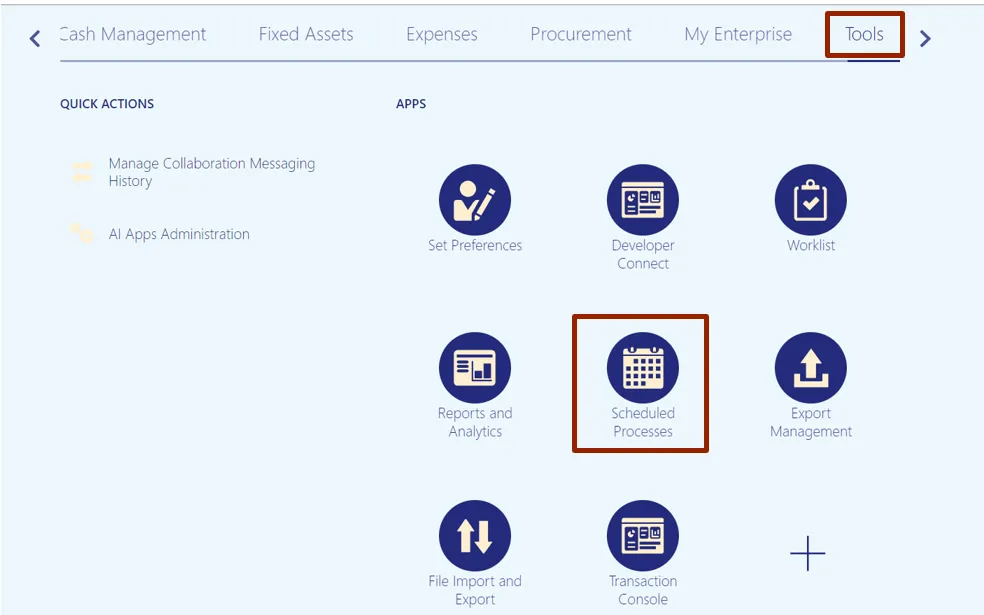
Step 4. On the Home page, click the Tools tab, and then click Scheduled Process app.
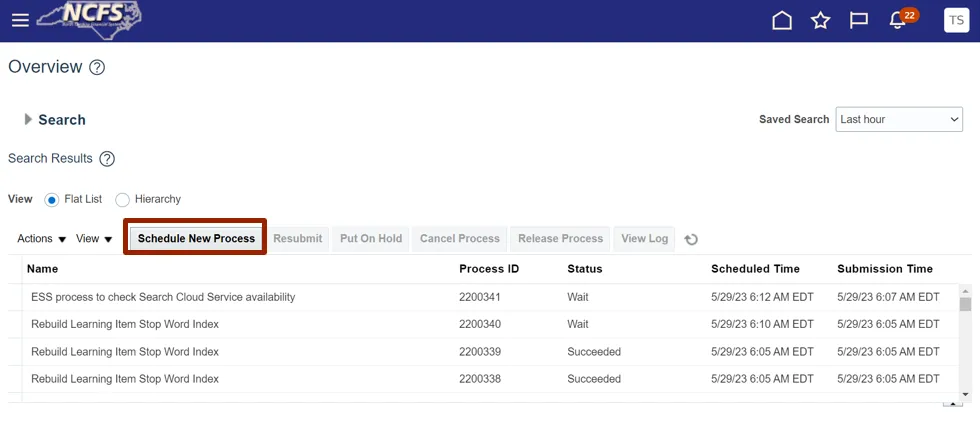
Step 5. Click the Schedule New Process button.
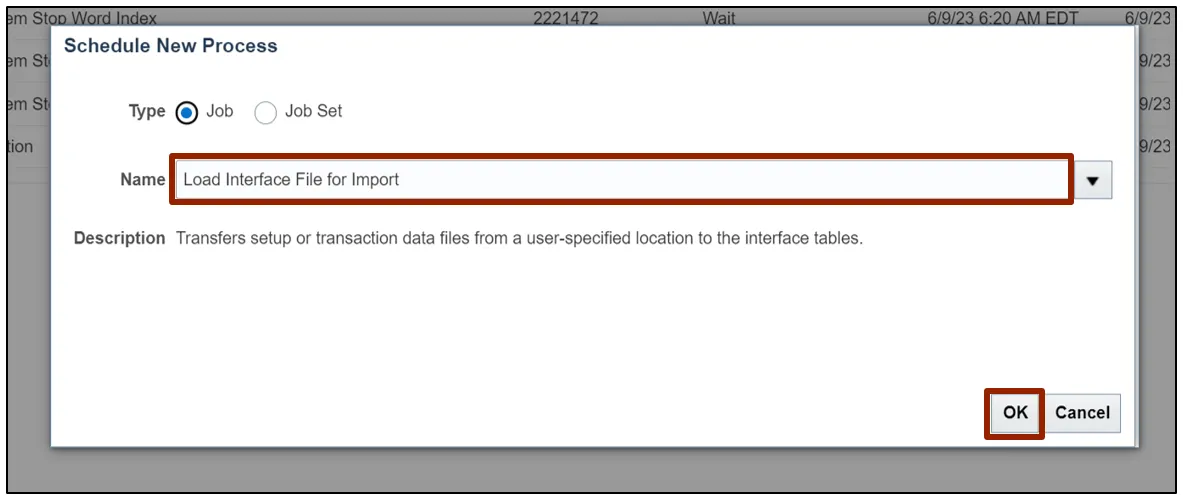
Step 6. The Schedule New Process pop-up appears. In the Name field, enter Load Interface File for Import. Alternatively, you can search from the drop-down choice list. Click the OK button.
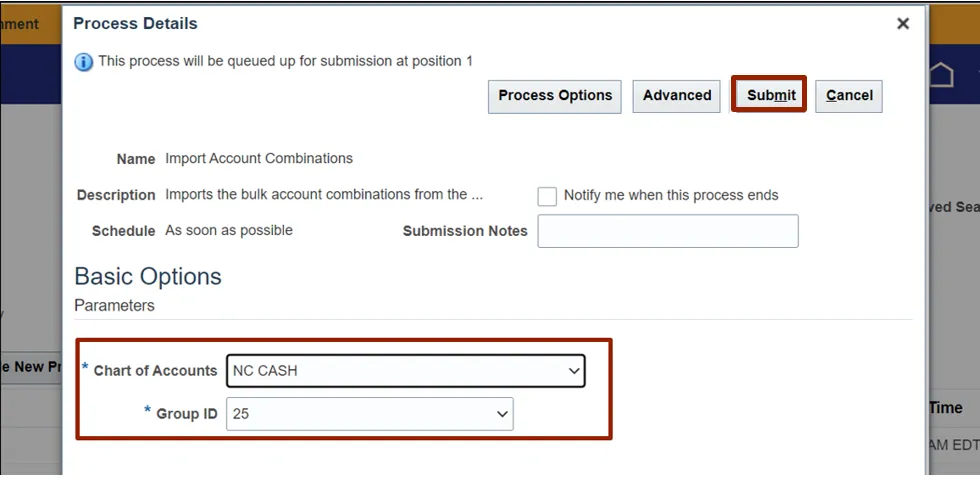
Step 7. A Process Details pop-up appears. Select the applicable choices from the respective drop-down choice lists for the mandatory fields (marked with *) and click the Submit button.
In this example, choose Import Account Combinations for Import Process, and Gljournals.zip for Data File.

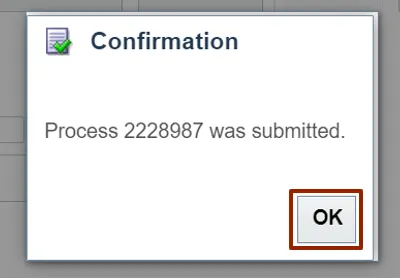
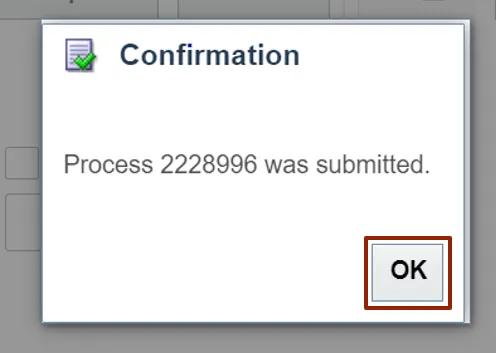
Step 8. A Confirmation pop-up appears. Click the OK button.
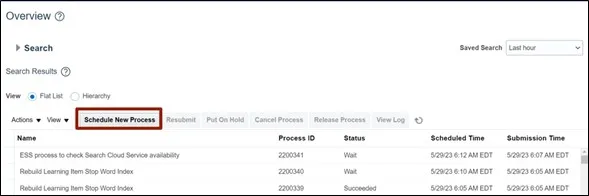
Step 9. Click the Schedule New Process button.
Note: Proceed with the step after the Load Interface File for Import process has successfully completed.
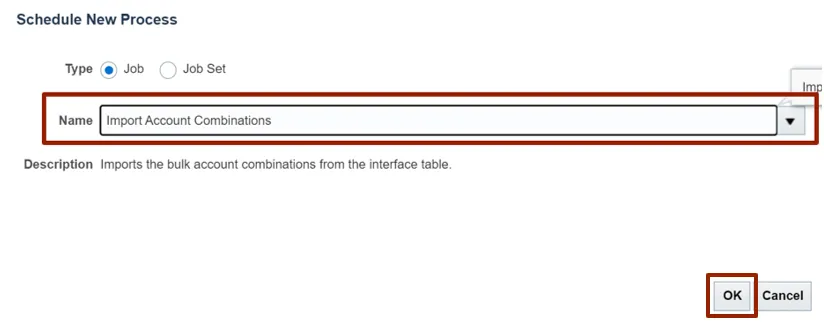
Step 10. A Schedule New Process pop-up appears. In the Name field, enter Import Account Combinations. Alternatively, you can search from the drop-down choice list. Click the OK button.
Step 11. A Process Details pop-up appears. Select the applicable choices from the respective drop-down choice lists for the mandatory fields (marked with *) and click the Submit button.
In this example, choose NC Cash for Chart of Accounts, and 25 for Group ID.
Note: User can reference the Group ID from the file imported or from the FDBI details from the excel template populated by the user.
Step 12. A Confirmation pop-up appears. Click the OK button.
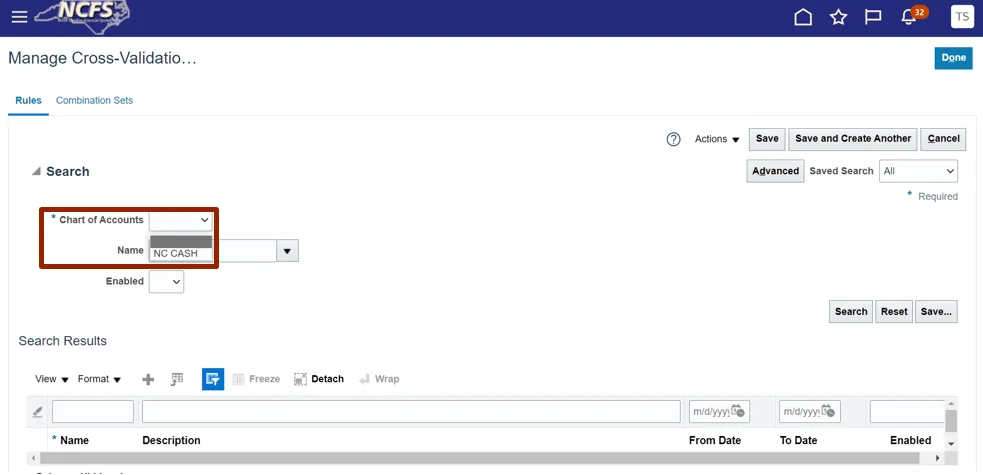
Create CVR that Restricts AMU Values by Agency
To Create CVR that Restricts AMU Values by Agency in NCFS, please follow the steps below. There are 16 steps to complete this process.
Step 1. Log in to the NCFS portal with your credentials to access the system.
Step 2. On the Home page, click the My Enterprise tab, and click the Setup and Maintenance app.
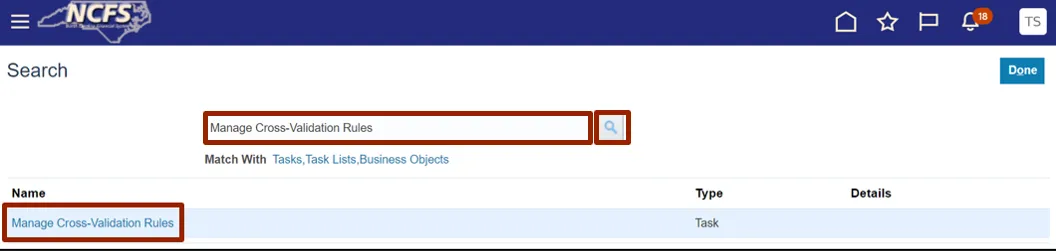
Step 3. On the Setup: Financials page, click the Tasks icon and click Search on the Tasks pane.

Step 4. On the Search page, enter Manage Mapping Sets in the Search bar, and click the Search icon. Click Manage Mapping Sets.
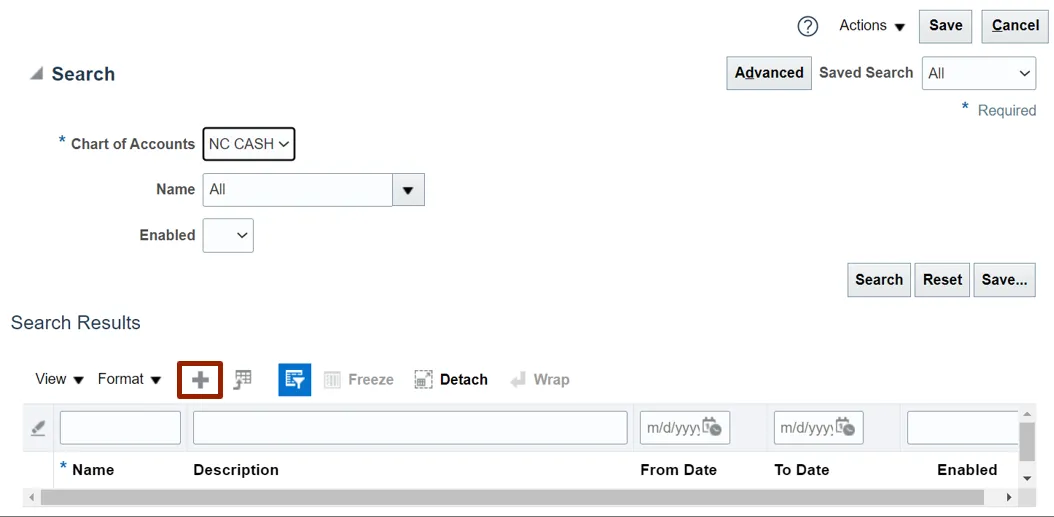
Step 5. Select NC CASH from Chart of Accounts drop-down checklist.
Step 6. Click the Add icon to add a rule.
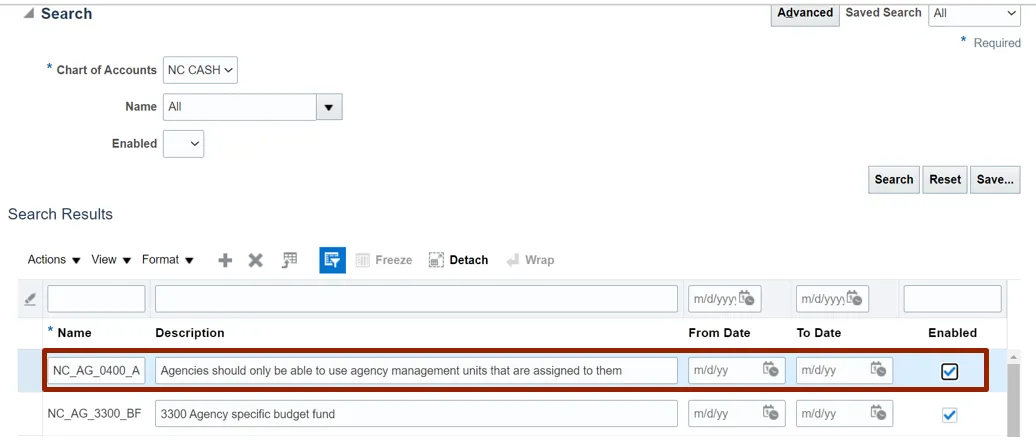
Step 7. Enter details in the required fields.
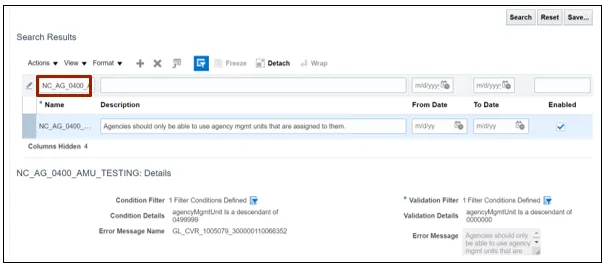
In this example choose:
- Name: NC_AG_0400_AMU_TESTING
- Description: Agencies should only be able to use agency management units that are assigned to them.
- Enabled: Yes
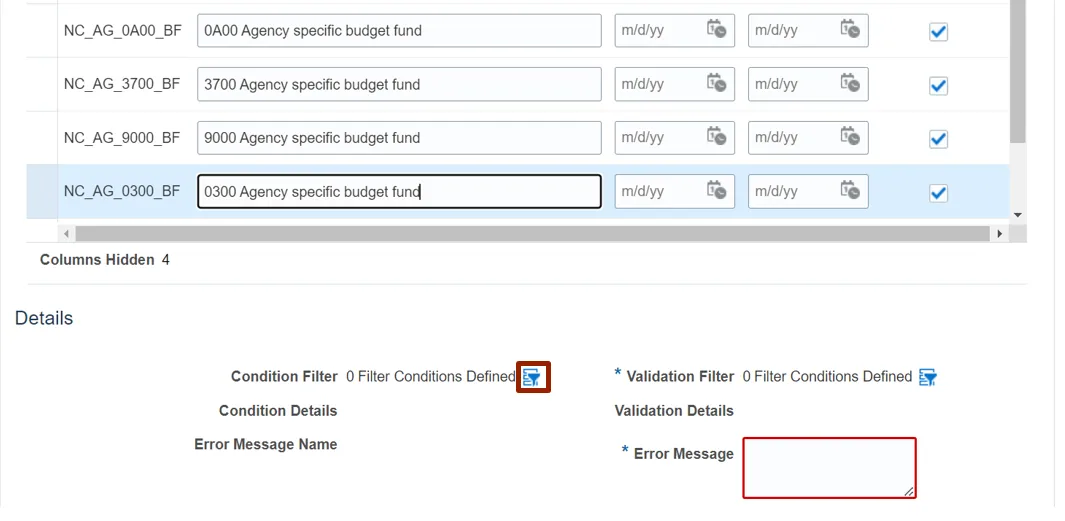
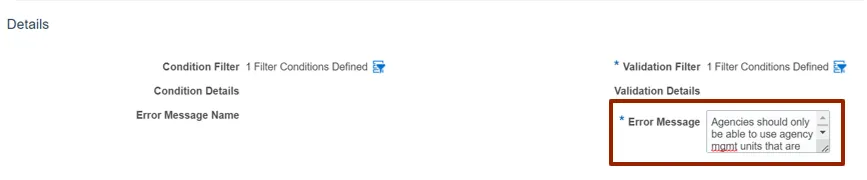
Step 8. Scroll down to Details section, and click the Filter icon adjacent to the Condition Filter field.
Note: The red highlight on Error Message is system generated to bring user’s attention to populate this required field.
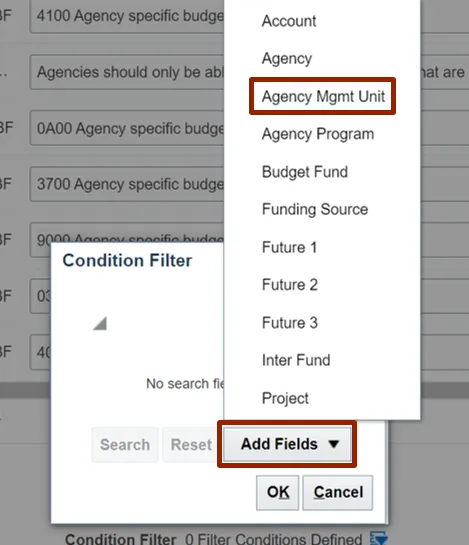
Step 9. The Condition Filter pop-up appears. Click the Add Fields drop-down choice list and select Agency Mgmt Unit.
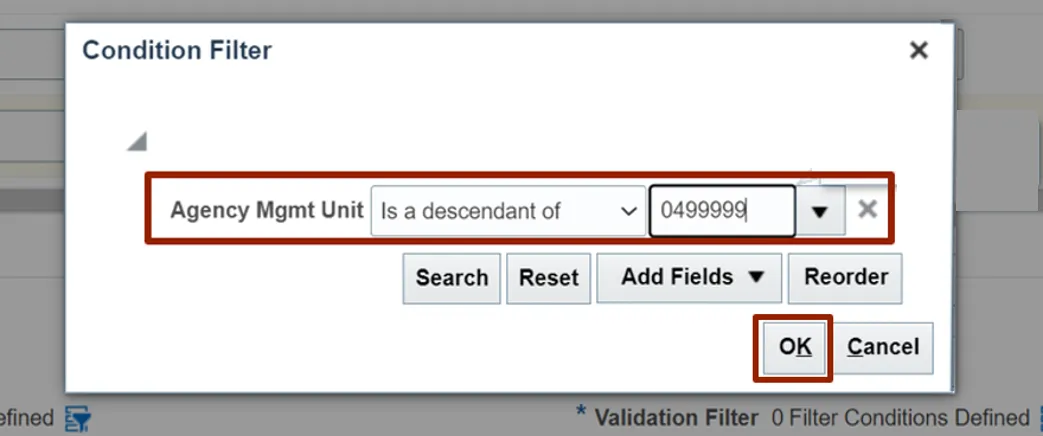
Step 10. Click the Agency Mgmt Unit drop-down choice list and select Is a descendant of and 0499999. Click the OK button.
Step 11. Under the Details section, click the Filter icon adjacent to the Validation Filter field.

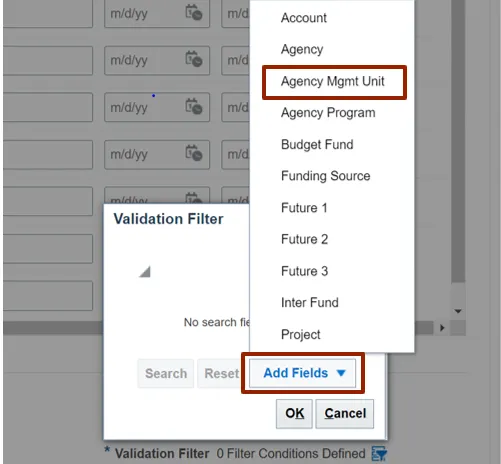
Step 12. The Validation Filter pop-up appears. Click the Add Fields drop-down choice list and select Agency Mgmt Unit.
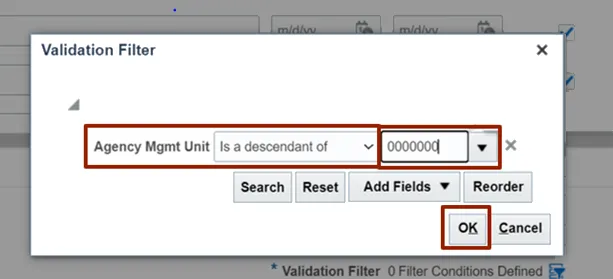
Step 13. Click the Agency Mgmt Unit drop-down choice list and select Is a descendant of and 0000000. Click the OK button.
Step 14. On the Details section, add the error message in the Error Message field. This is the verbiage that will appear to the end user when they violate this CVR.
In this example, choose Agencies should only be able to use agency mgmt units that are assigned to them.
Note: The Name of the CVR should be included as the final characters within each Error Message.
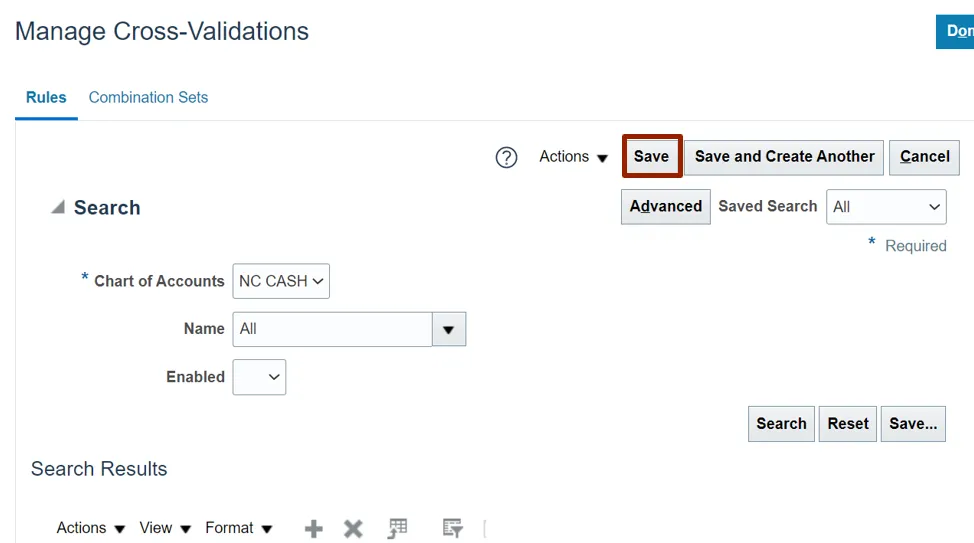
Step 15. Click the Save button.
Step 16. In the Search Results section, search the name of the newly created CVR to view all details.
Manual LE BSV Assignment
To assign LE BSV Manually in NCFS, please follow the steps below. There are 11 steps to complete this process.
Step 1. Log in to the NCFS portal with your credentials to access the system.
Step 2. On the Home page, click the My Enterprise tab, and click the Setup and Maintenance app.

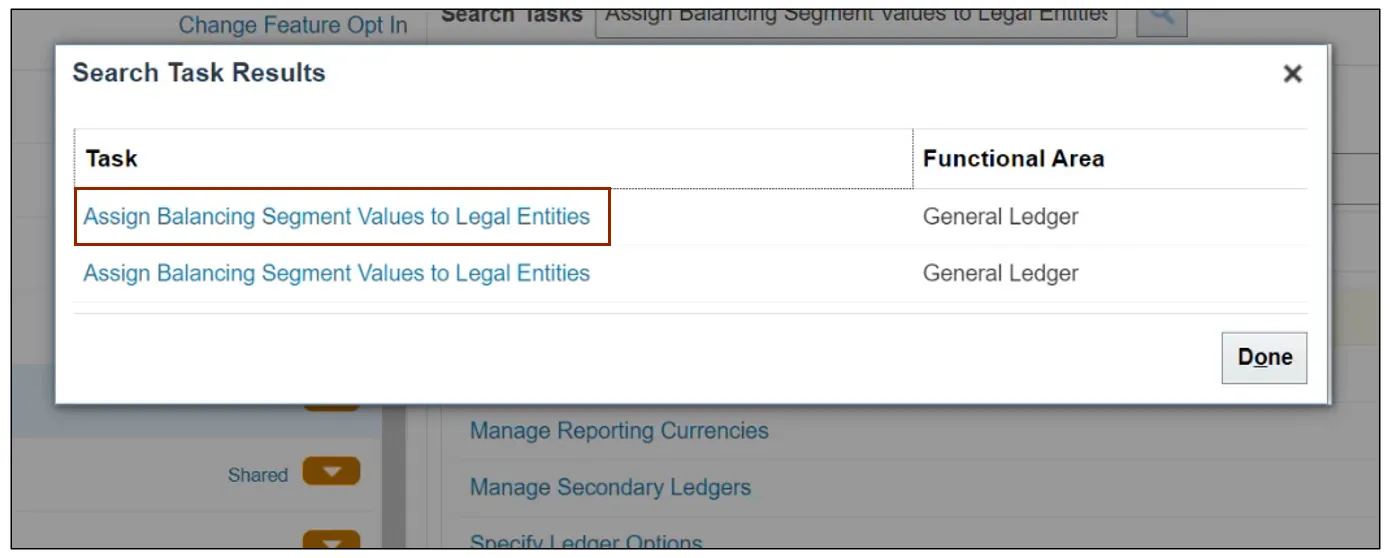
Step 3. On the Setup: Financials page, enter Assign Balancing Segment Values to Legal Entities in the Search Tasks bar and click the Search icon.

Step 4. Click Assign Balancing Segment Values to Legal Entities.
Step 5. On the Assign Balancing Segment Values to Legal Entities page, click the Add icon.
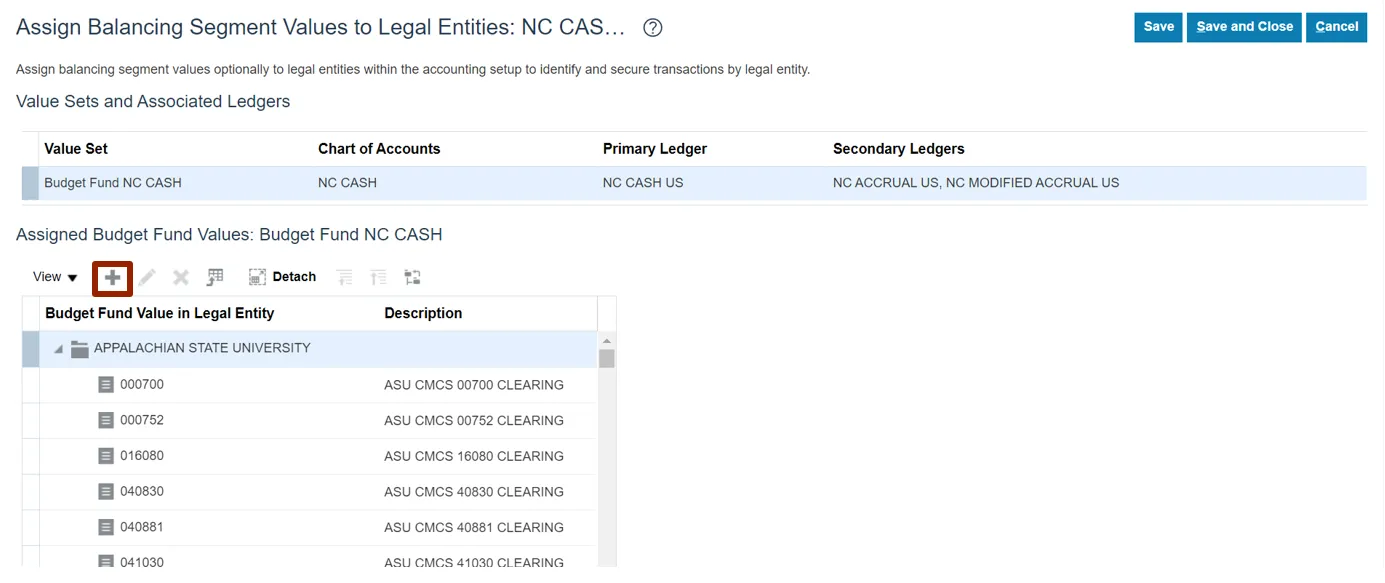
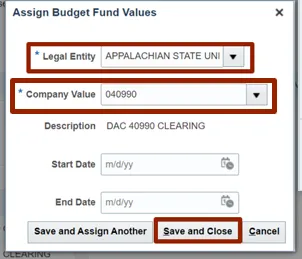
Step 6. The Assign Budget Fund Value pop-up appears. Click the Legal Entity drop-down choice list and select APPALACHIAN STATE UNIVERSITY. Click the Company Value drop-down choice list and select 040990. Click the Save and Close button.
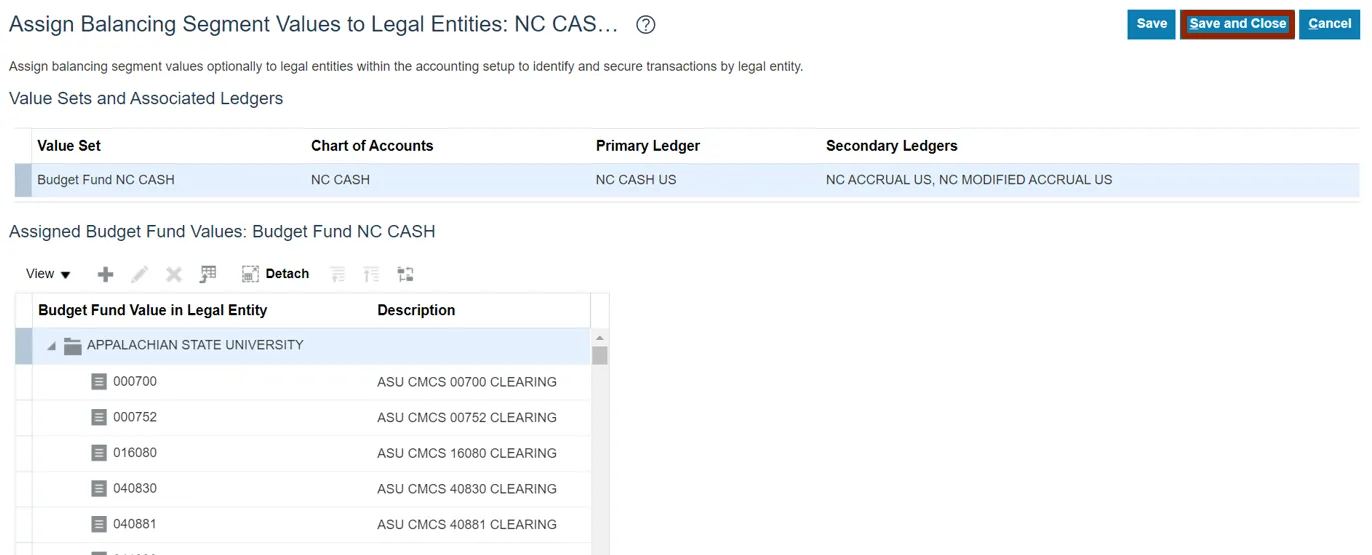
Step 7. On Assign Balancing Segment Values to Legal Entities page, click the Save and Close button.
Step 8. On the Setup and Maintenance page, click the Tasks icon and click Search.
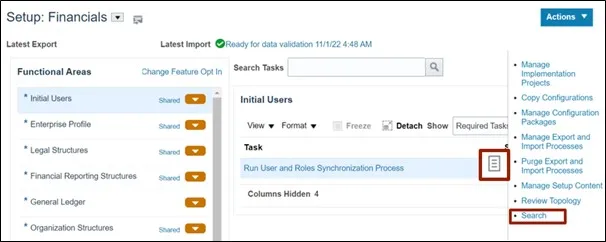
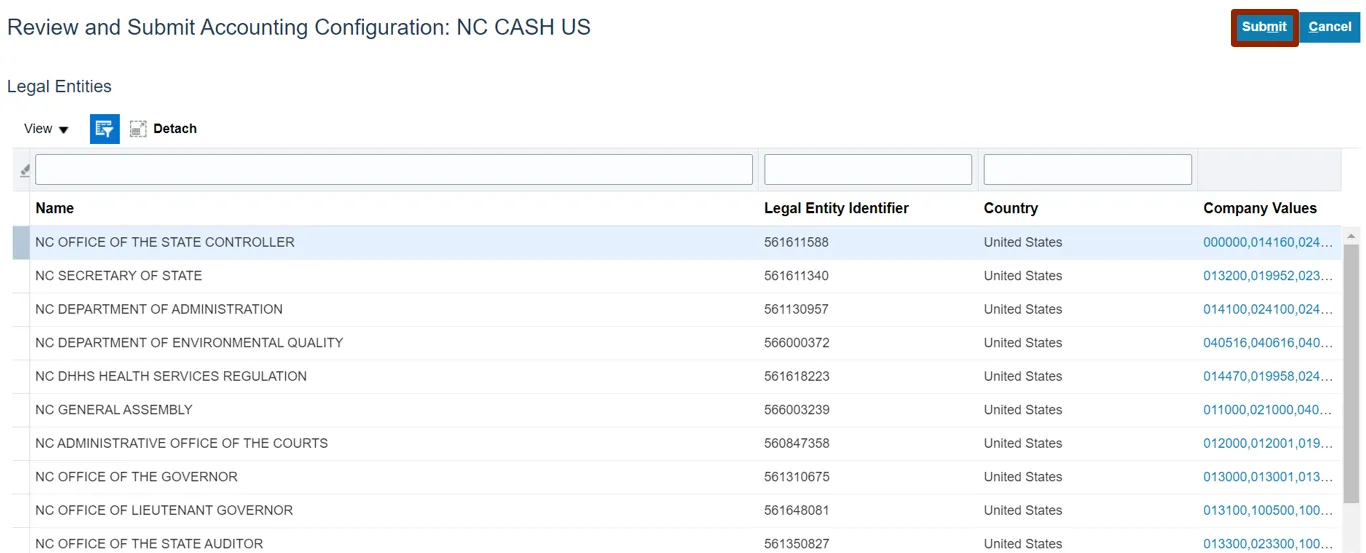
Step 9. On the Search page, enter Review and Submit Accounting Configuration in the Search bar and click the Search icon. Click Review and Submit Accounting Configuration.

Step 10. On the Review and Submit Accounting Configuration page, click the Submit button.
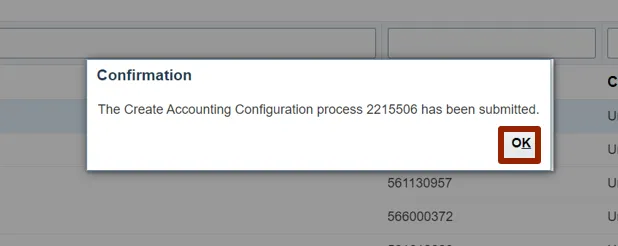
Step 11. A Confirmation Pop-up appears. Click the OK button.
Wrap-Up
Setup and configuration related to General Ledger such as updating mapping sets, importing code combinations, creating CVRs, and manually assigning LE BSV can be performed using the steps shown above.