Purpose
The purpose of this Quick Reference Guide (QRG) is to provide a step-by-step explanation on how to Create/Manage Asset Transactions, including Additions, Transfer, Adjustments, and Retirements in the North Carolina Financial System (NCFS).
Introduction and Overview
This QRG covers how to add or create an asset record, transfer asset to accommodate business requirement, adjust the number of units transferred, and retire them when no longer in use either completely or partially in NCFS.
Manual Asset Addition in NCFS
To perform manual asset addition in NCFS, please follow the steps below. There are 28 steps to complete this process.
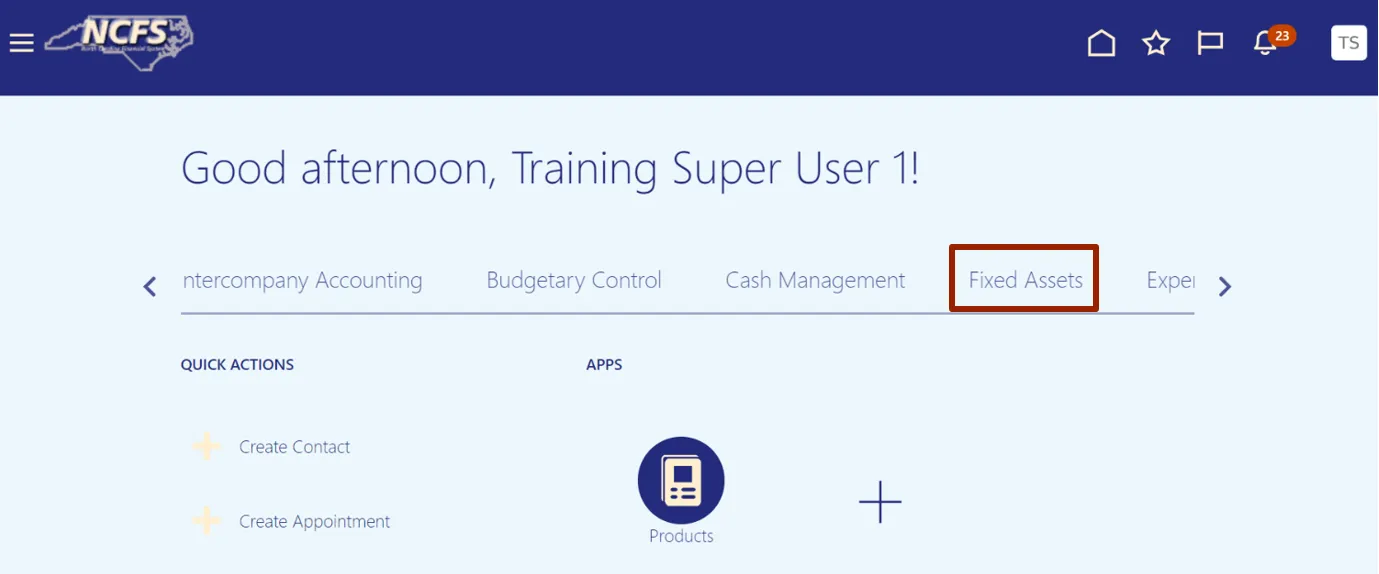
Step 1. Log on to the NCFS portal with your credentials to access the system.
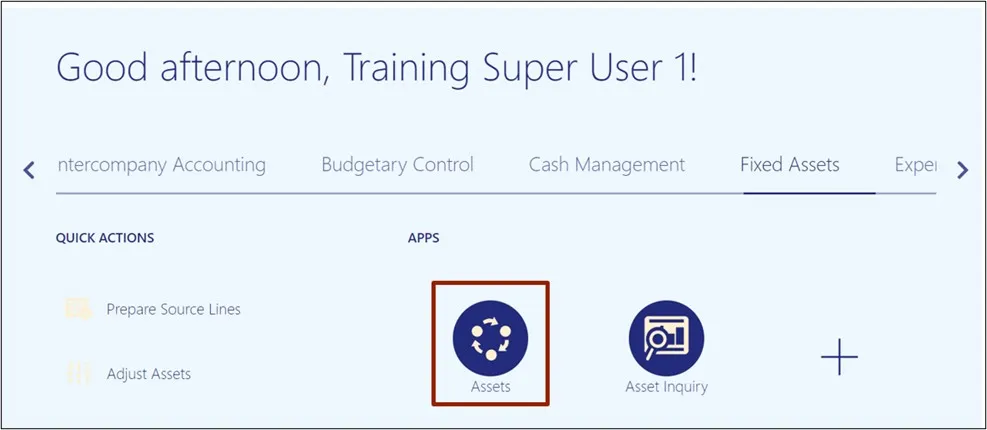
Step 2. On the Home page, click the Fixed Assets tab.
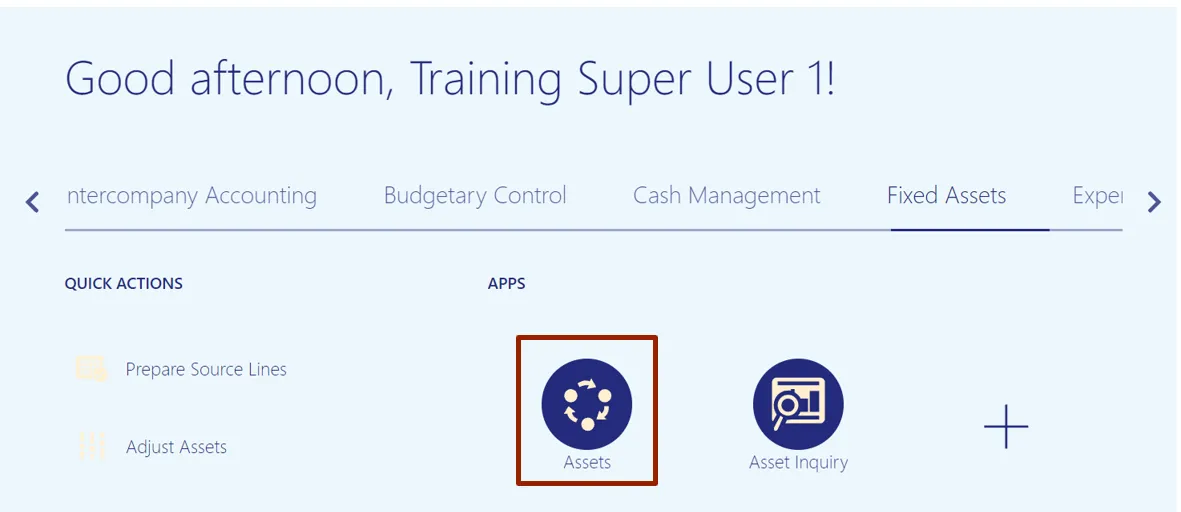
Step 3. Click the Assets app.
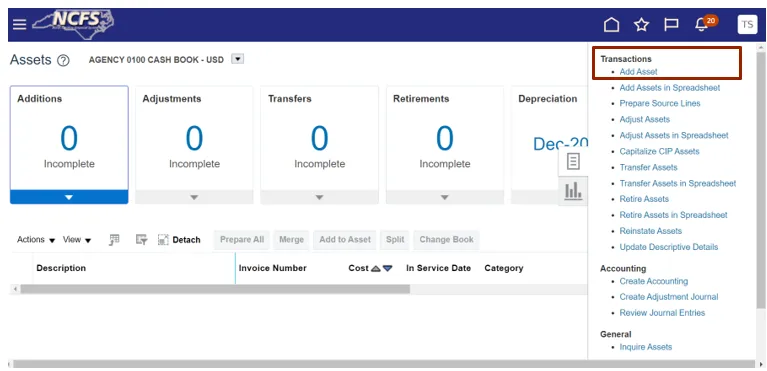
Step 4. On the Assets page, click the Tasks icon.

Step 5. Under the Transactions section, click Add Asset.
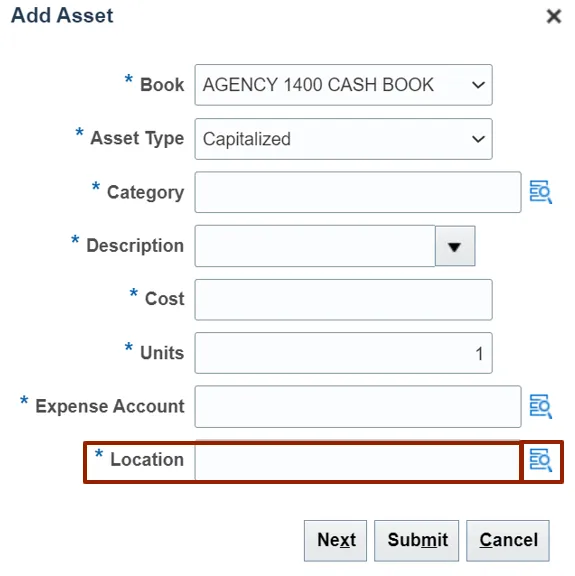
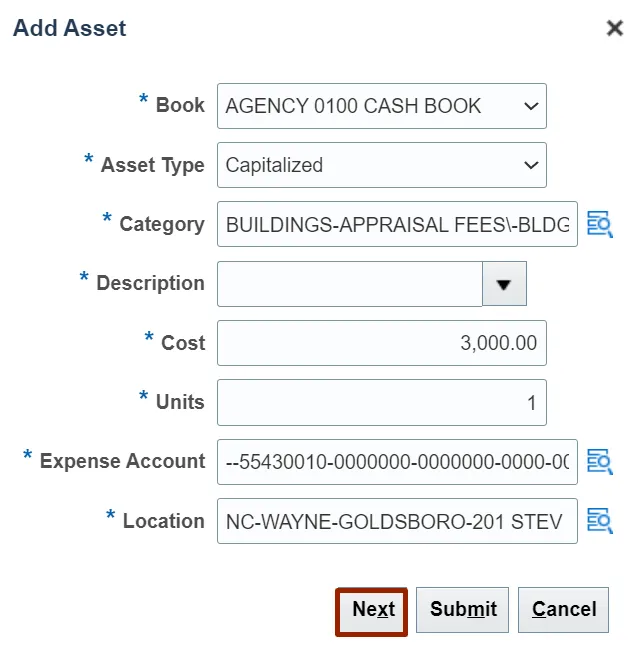
Step 6. The Add Asset pop-up appears. From the Book drop-down choice list, select the appropriate Asset Book option.
In this example, we choose: AGENCY 1400 CASH BOOK.

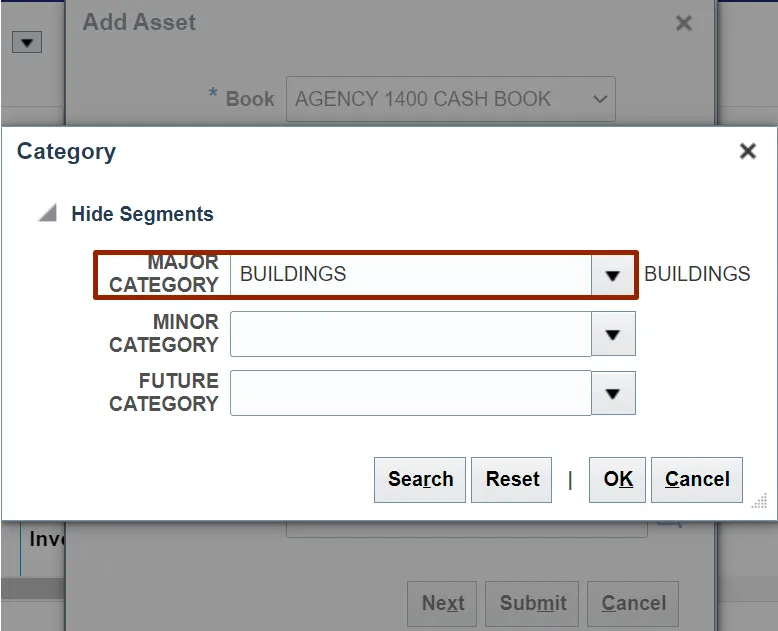
Step 7. Click the Search icon to fill in the Category field details.

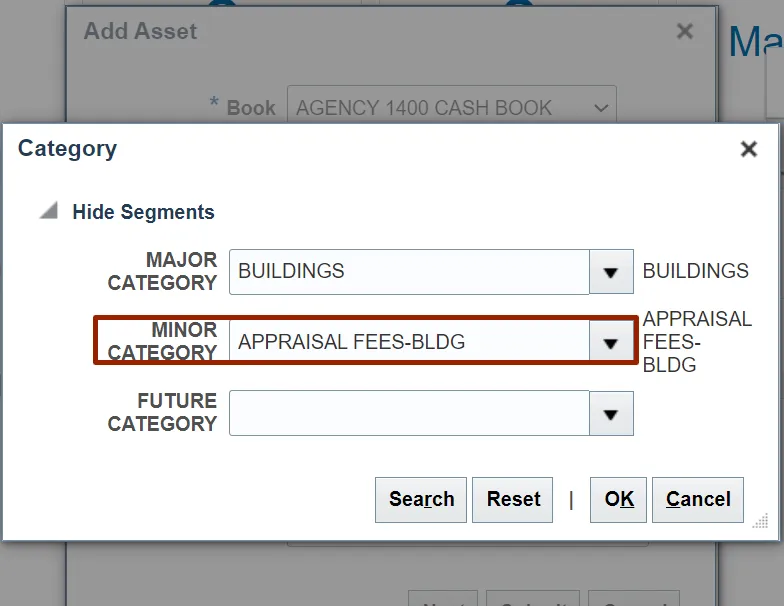
Step 8. The Category pop-up appears. Choose the Major Category from the drop-down list.
In this example, we selected BUILDINGS.
Step 9. Choose the Minor Category from the drop-down list.
In this example, we selected APPRAISAL FEES-BLDG.
Step 10. Choose the Future Category from the drop-down list.
In this example, we selected NONE.
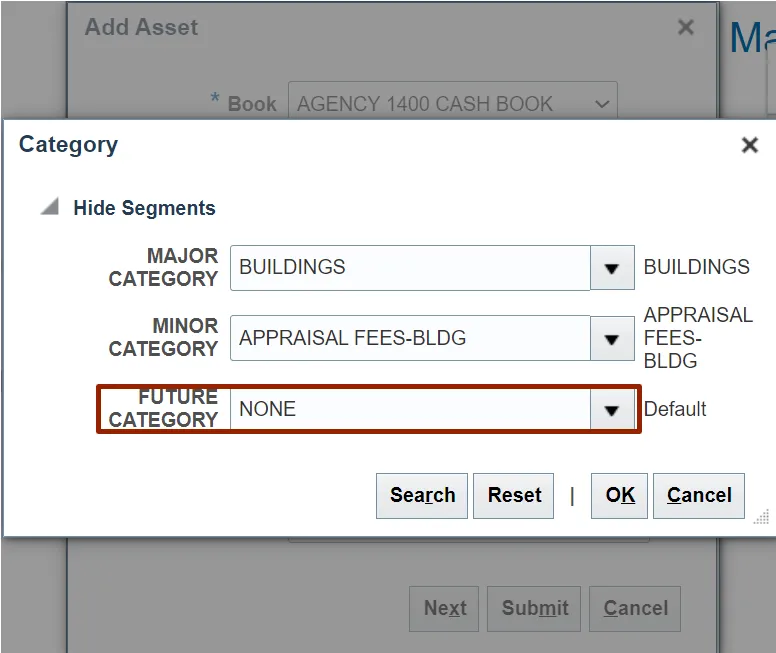
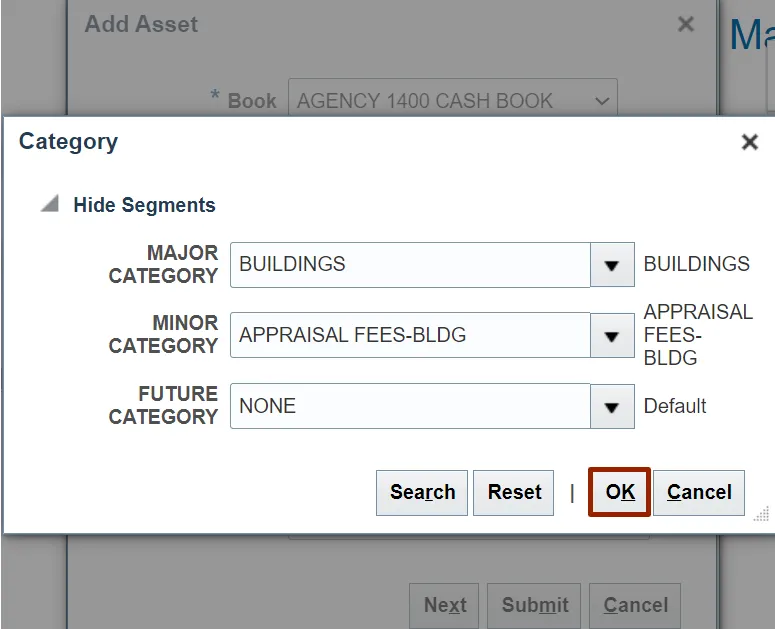
Step 11. Click the OK button.
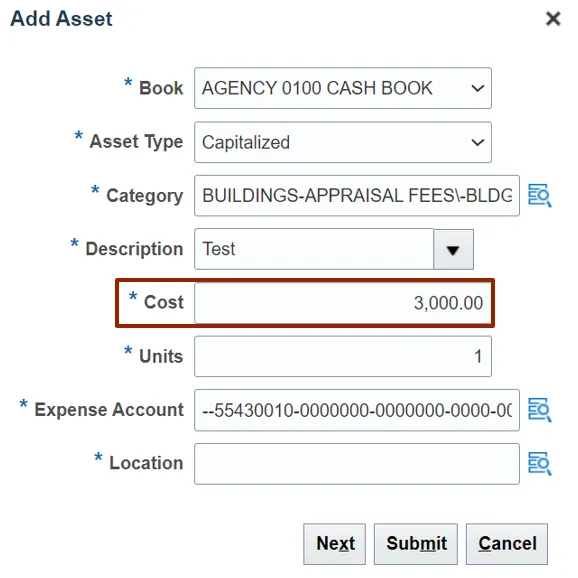
Step 12. The Category field details are updated. Choose the Description from the drop-down list.
In this example, we selected Test.

Step 13. Enter the Amount in the Cost field.
In this example, we choose: Cost – 3000.
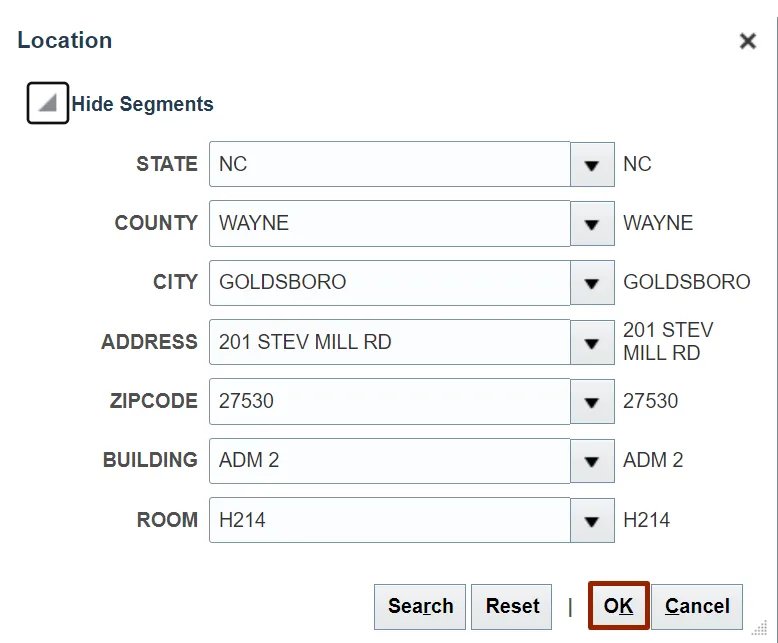
Step 14. To add Location, click the Search icon.
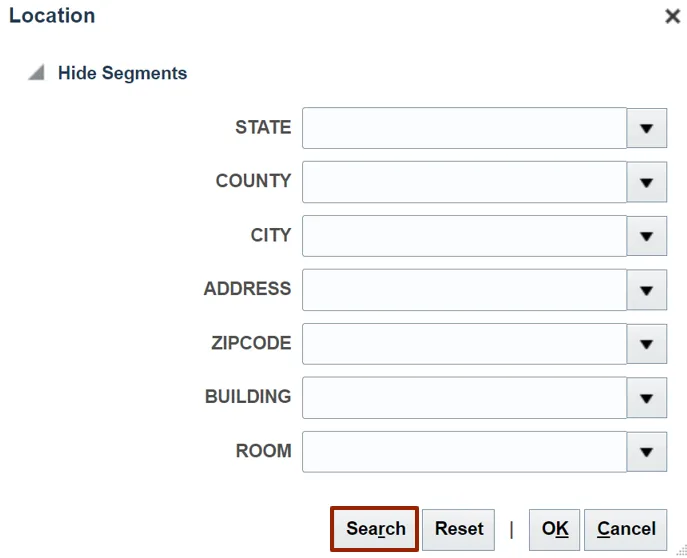
Step 15. The Location pop-up appears. Click the Search button.
Step 16. Under Show Segments section, select the required Address from the list of addresses.
In this example, we choose: COUNTY – WAYNE.
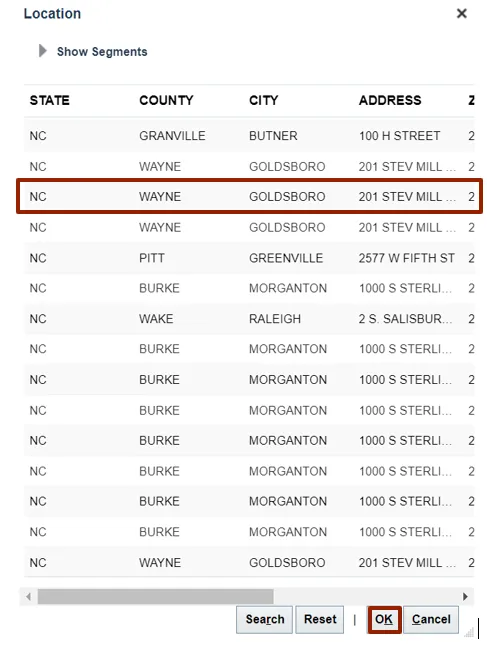
Step 17. Click the OK button.
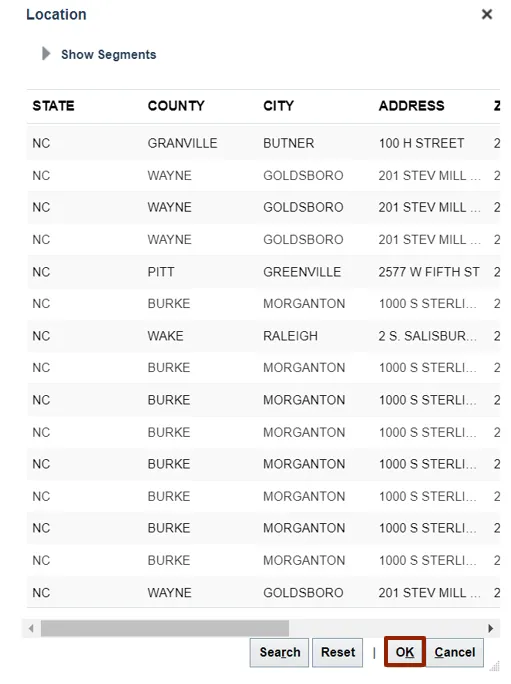
Step 18. Click the OK button to add details.
Step 19. The Location field information is updated. Click the Next button.
Step 20. The Expense Account pop-up appears. From the Agency drop-down choice list, select the appropriate Agency.
In this example, we choose 1400 (OFFICE OF THE STATE CONTROLLER).
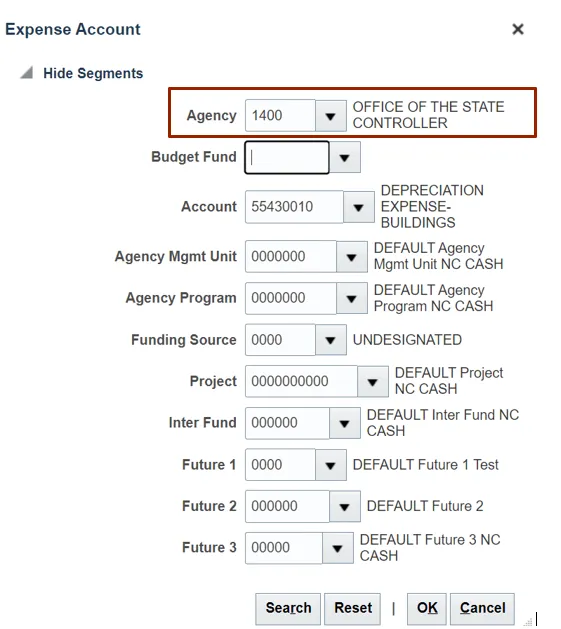
Step 21. Click the Budget Fund drop-down choice list and select the appropriate Budget Fund.
In this example, we choose: Budget Fund – 000000 (DEFAULT Budget Fund NC CASH).

Step 22. Click the OK button.
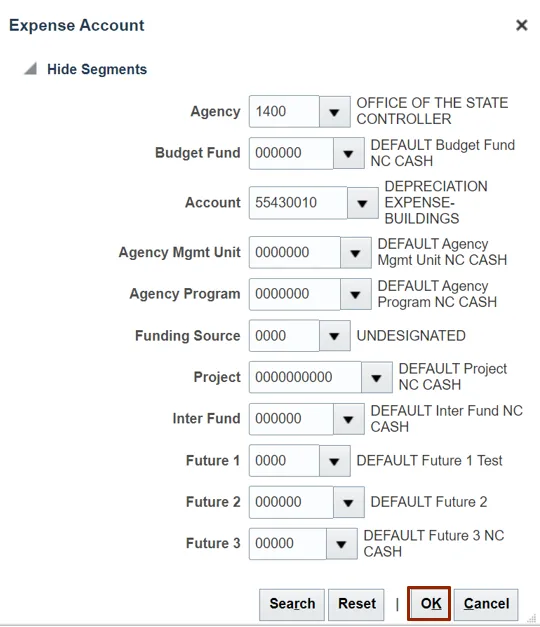
Step 23. The Expense Account field information is updated. Click the Next button.

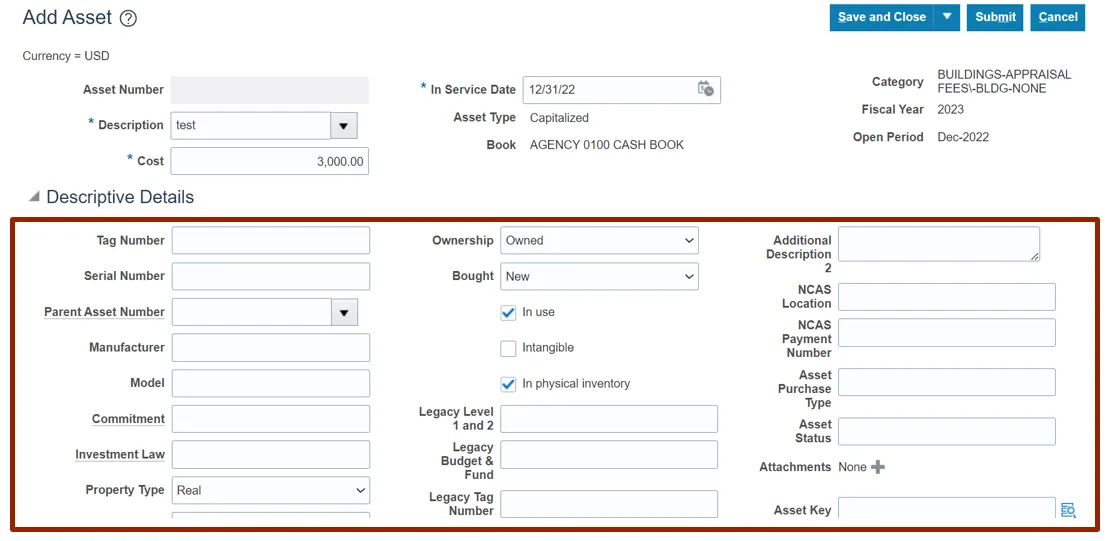
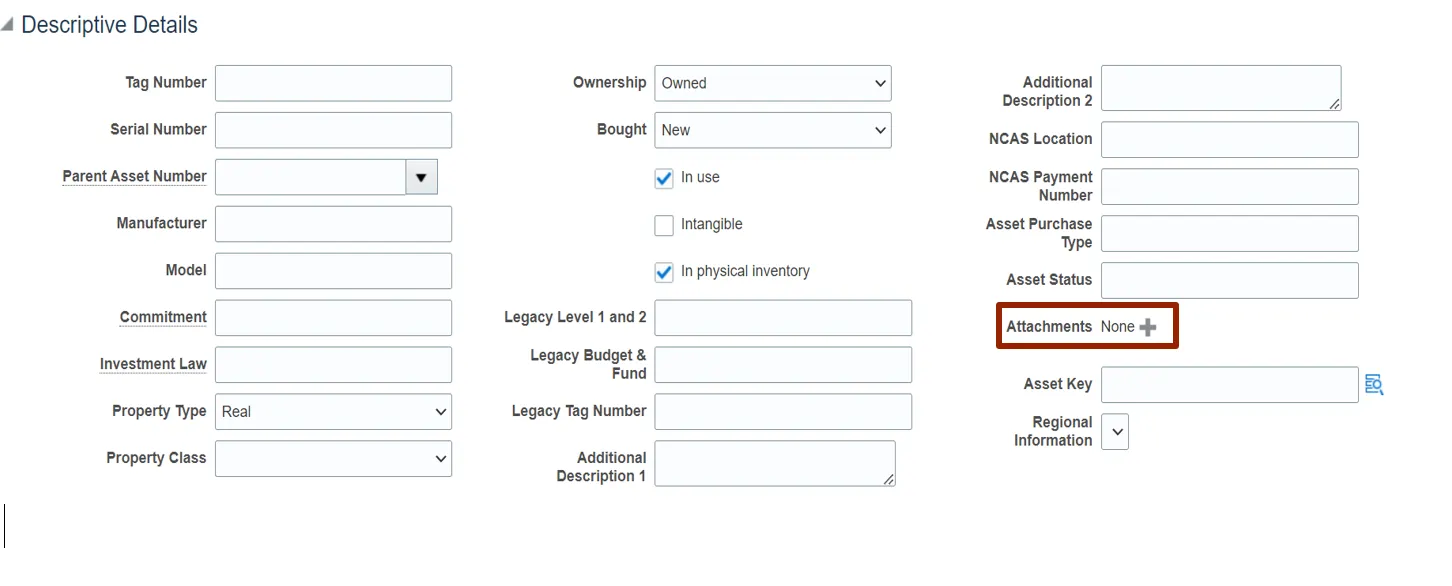
Step 24. Under Descriptive Details section, enter the details in the required field.
Step 25. On the Attachments tab, click the Plus icon.
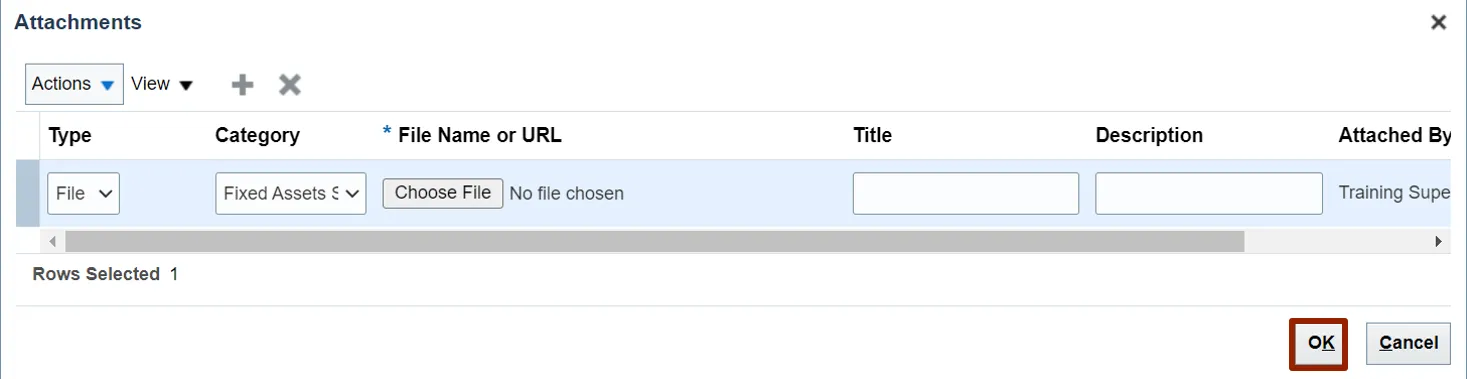
Step 26. The Attachment pop-up appears. Click the Choose File option.

Step 27. Once a file is selected, click the OK button.
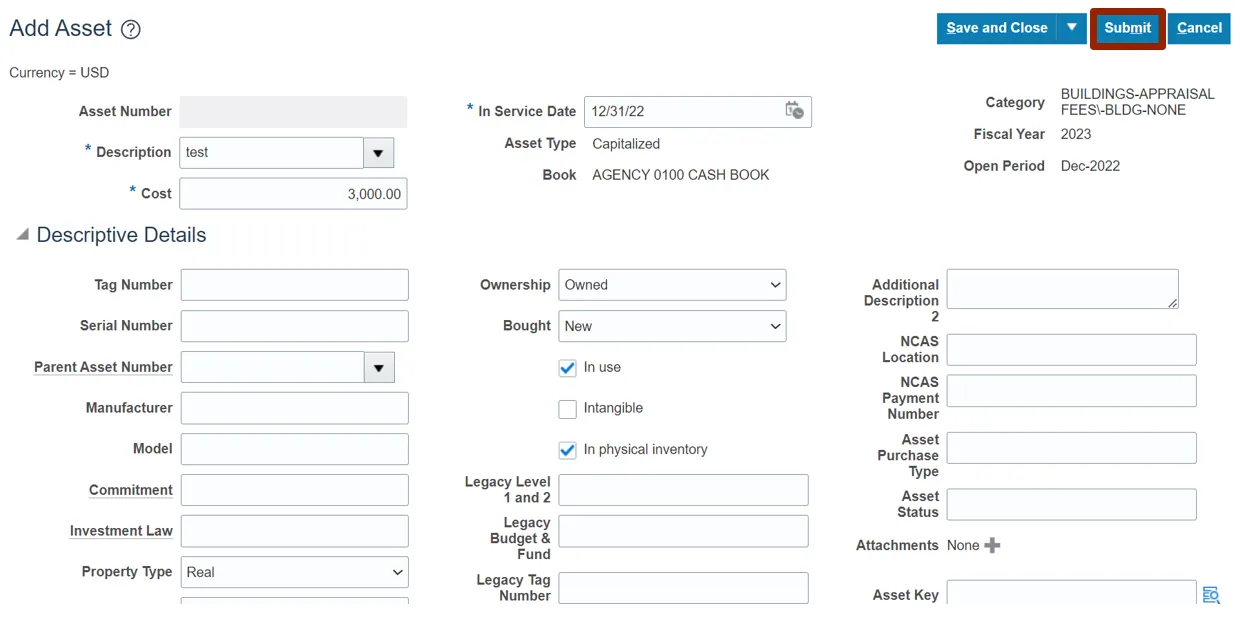
Step 28. Click the Submit button.
Transfer Fixed Asset (Agency, Location, and/or Employee)
To transfer fixed asset (agency, location, and/or employee), please follow the steps below. There are 15 steps to complete this process.
Step 1. Log in to the NCFS portal with your credentials to access the system.
Step 2. On the Home page, click the Fixed Assets tab.

Step 3. Click the Assets app.
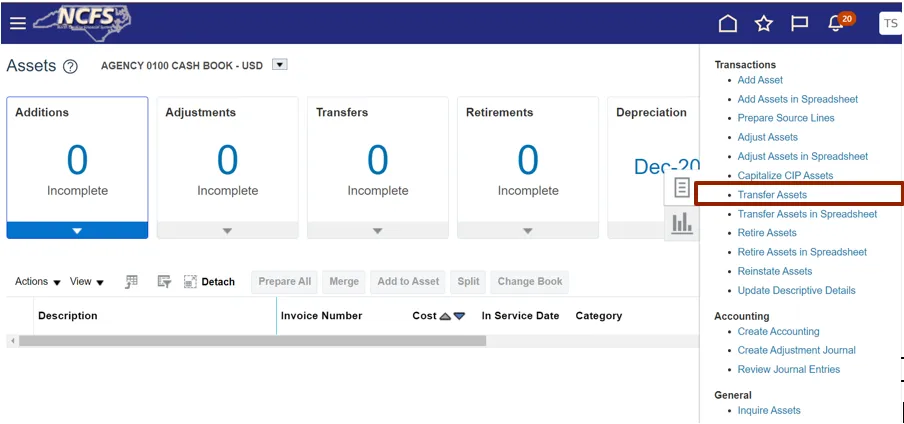
Step 4. On the Assets page, click the Tasks icon.

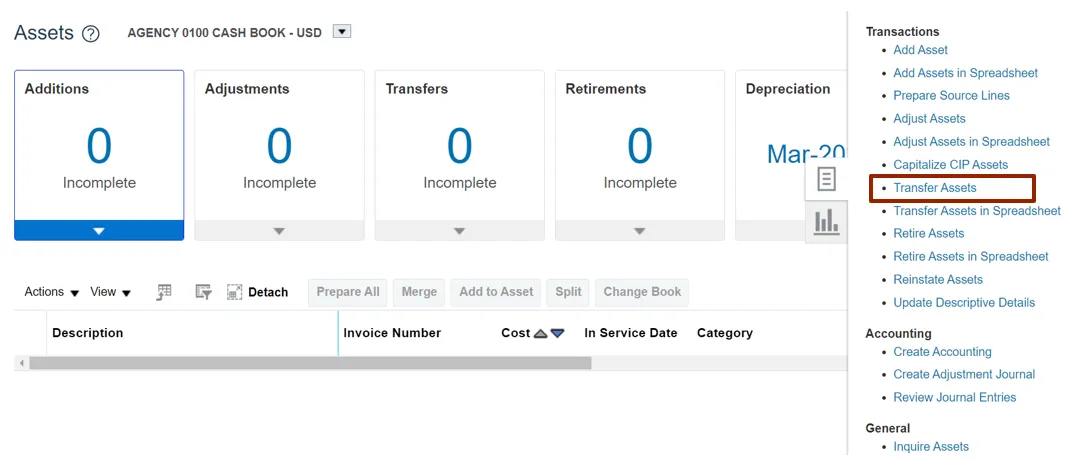
Step 5. Under the Transactions tab, click Transfer Assets.
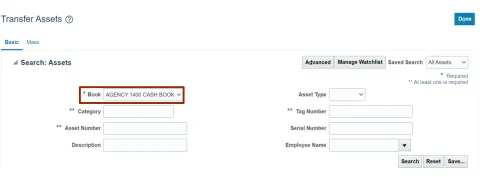
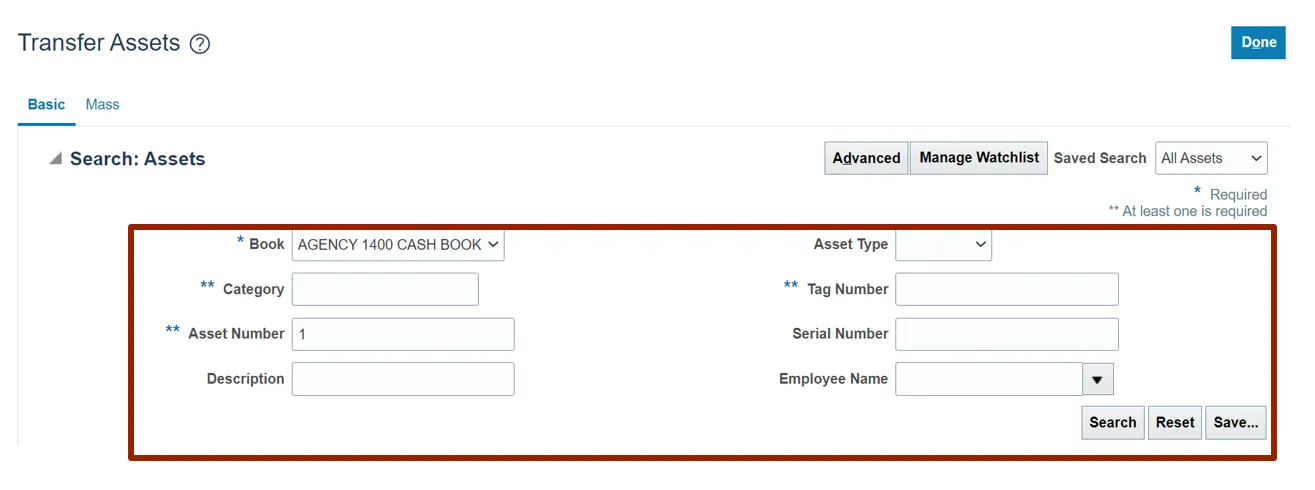
Step 6. On the Transfer Assets page, click the Book drop-down choice list, and select the appropriate Asset Book option.
In this example, we choose: AGENCY 1400 CASH BOOK.
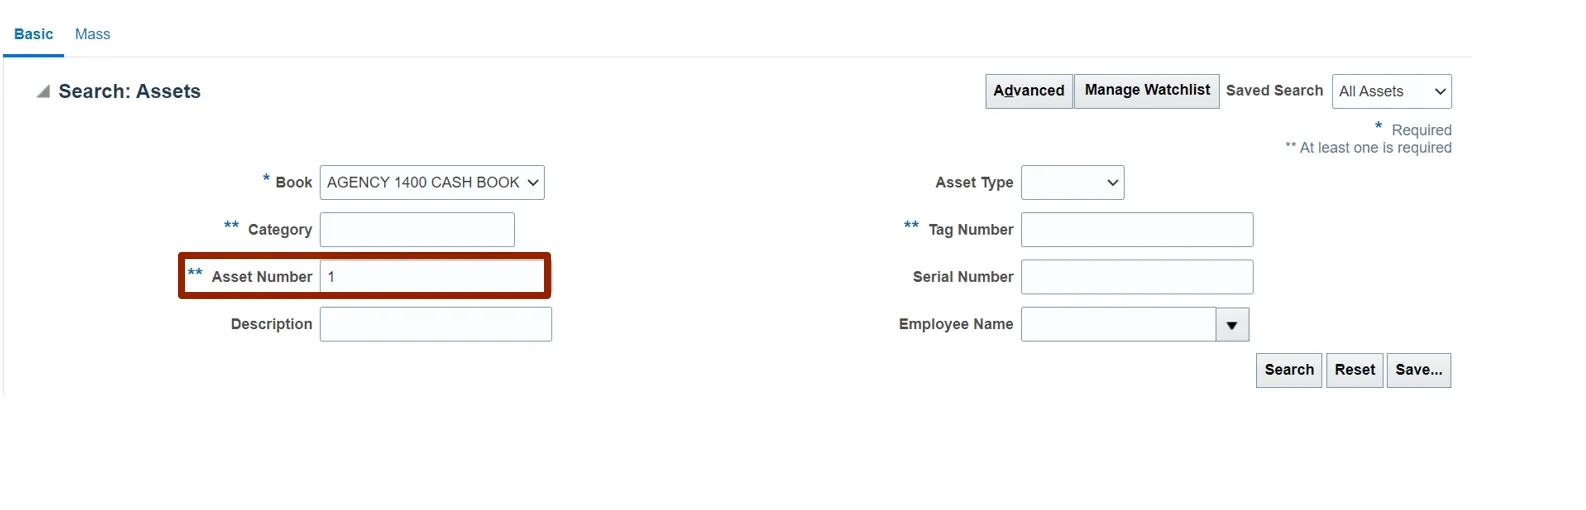
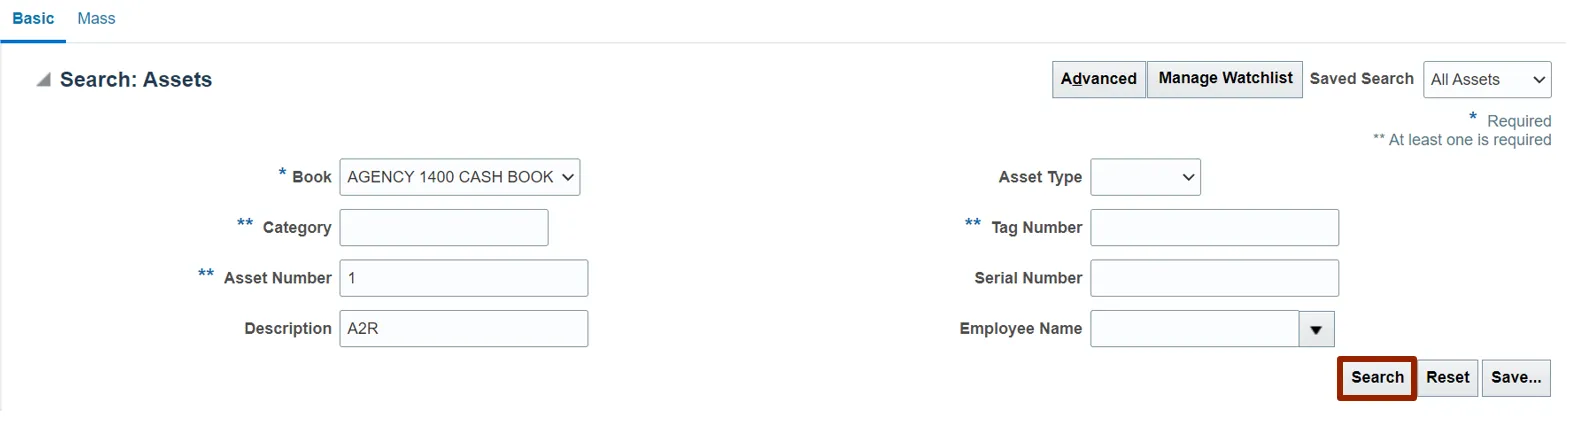
Step 7. Enter the Asset Number in the Asset Number field.
In this example, we choose 1.
Step 8. Enter the details in the Description field.
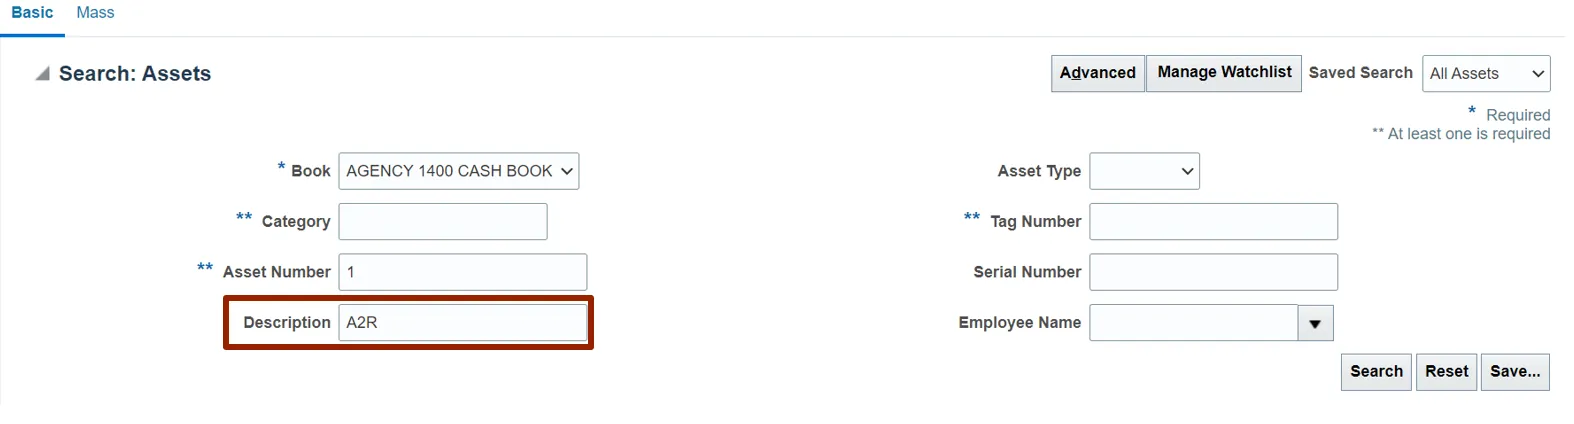
Step 9. Click the Search button.
Step 10. Under the Search: Assets section, click the Asset Number link.
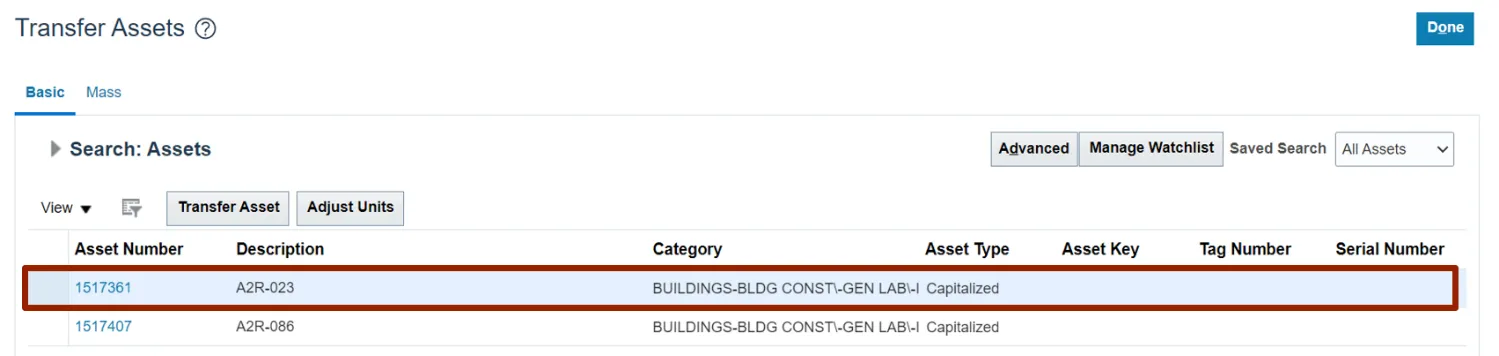
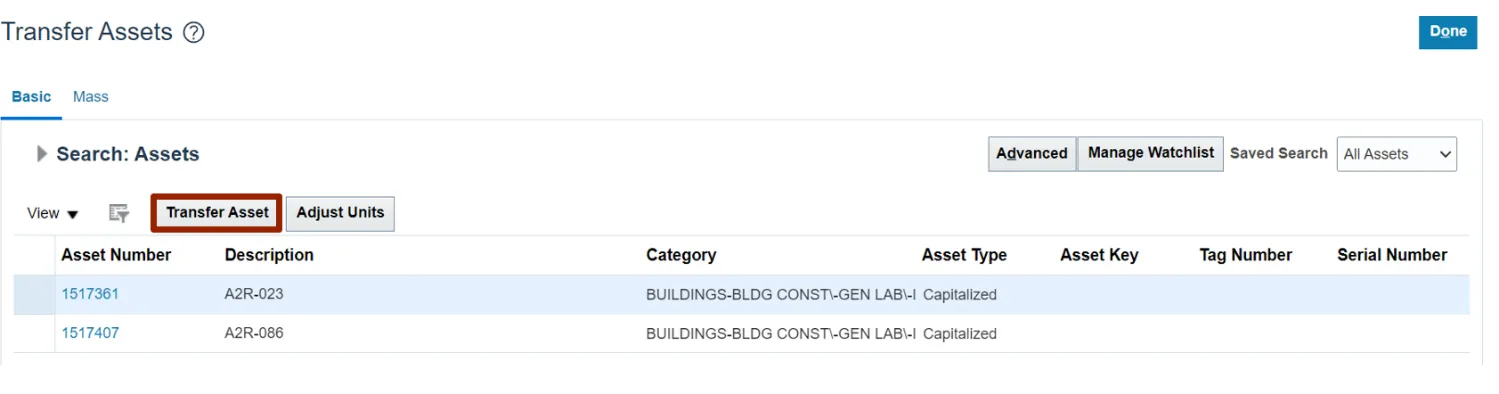
Step 11. Click the Transfer Asset button.
Step 12. On the Transfer Asset: Asset page, under the Assignment Details section, click the Add icon.

Step 13. Enter the details in New Units field.
In this example, we choose in row one New Unit as 1 and row two Unit as 0.

Step 14. Enter the details in the Employee Name, Employee Number, and Depreciation Expense Account field as necessary.
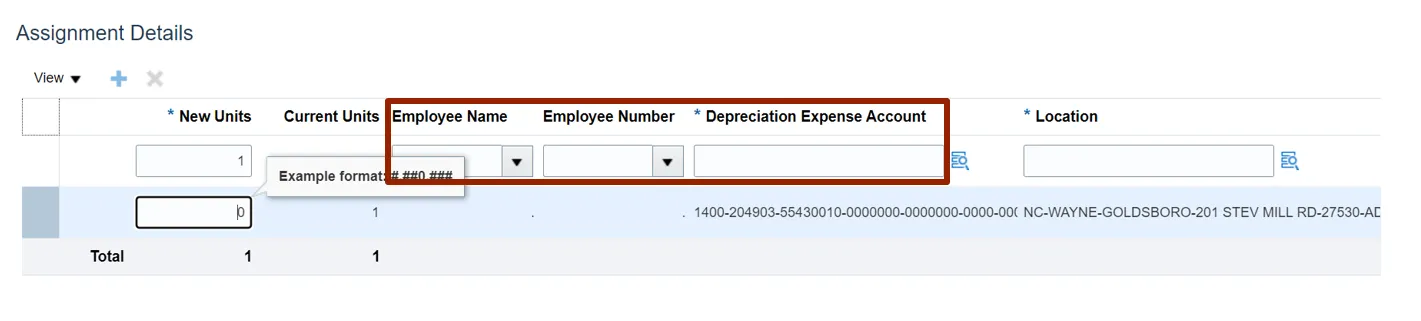
Step 15. Click the Submit button.

Adjust the Financial Details (Cost) of a Fixed Asset
To adjust the financial details (cost) of a fixed asset, please follow the steps below. There are 11 steps to complete this process.
Step 1. Log in to the NCFS portal with your credentials to access the system.
Step 2. On the Home page, click the Fixed Assets tab.

Step 3. Click the Assets app.

Step 4. On the Assets page, click the Tasks icon.
Step 5. Under the Transactions tab, click Adjust Assets.

Step 6. On the Adjust Assets page, enter the details in the Search field and any one field marked by** in the search criteria Section.
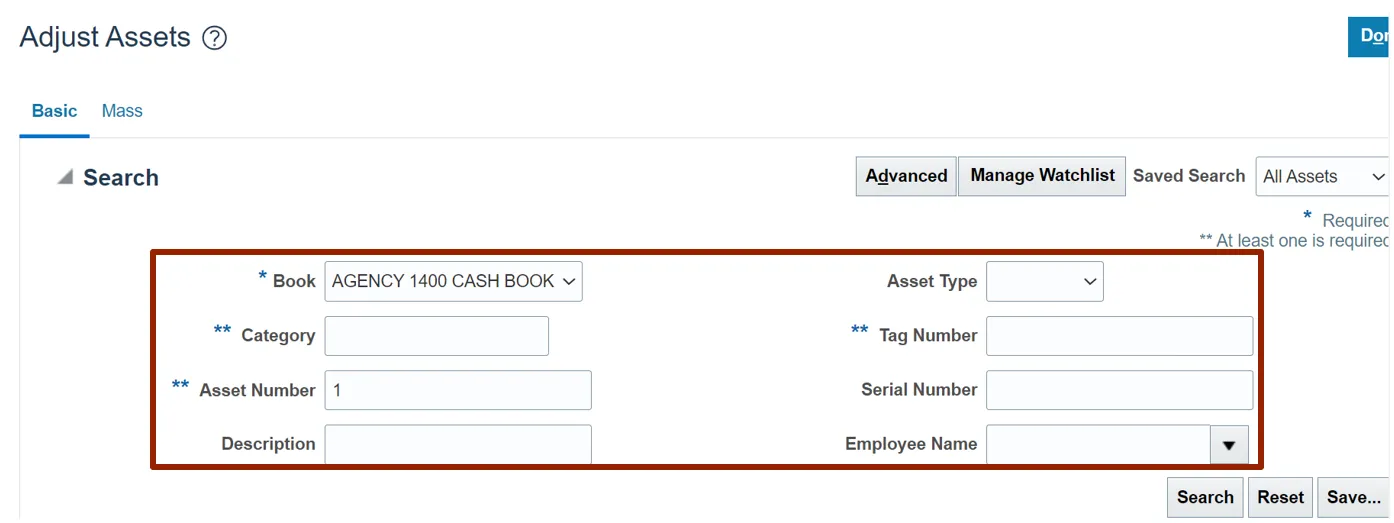
Step 7. Click the Search button.
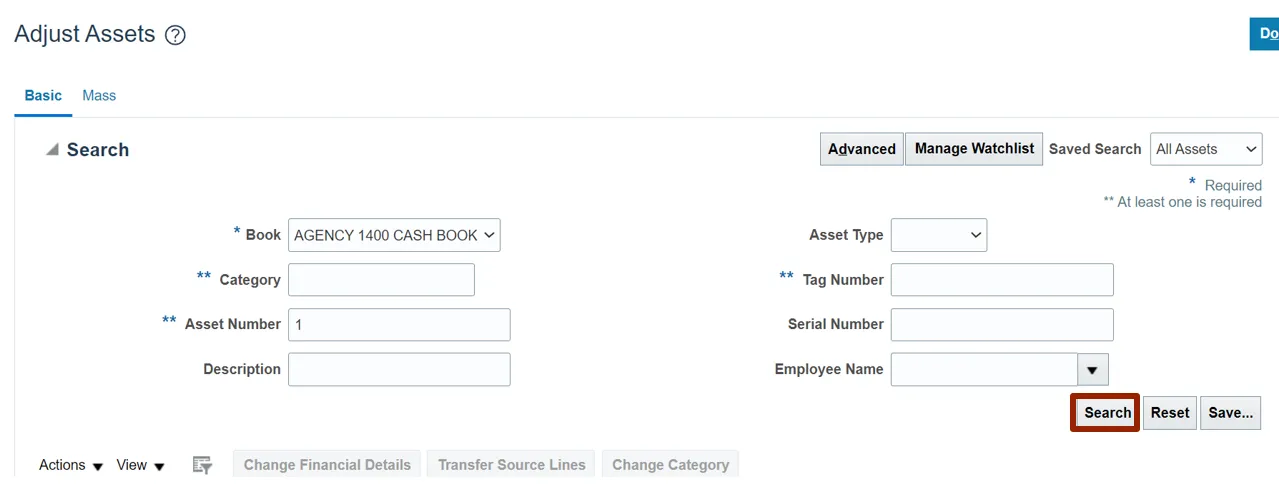
Step 8. Under the Search section, select the required Asset.
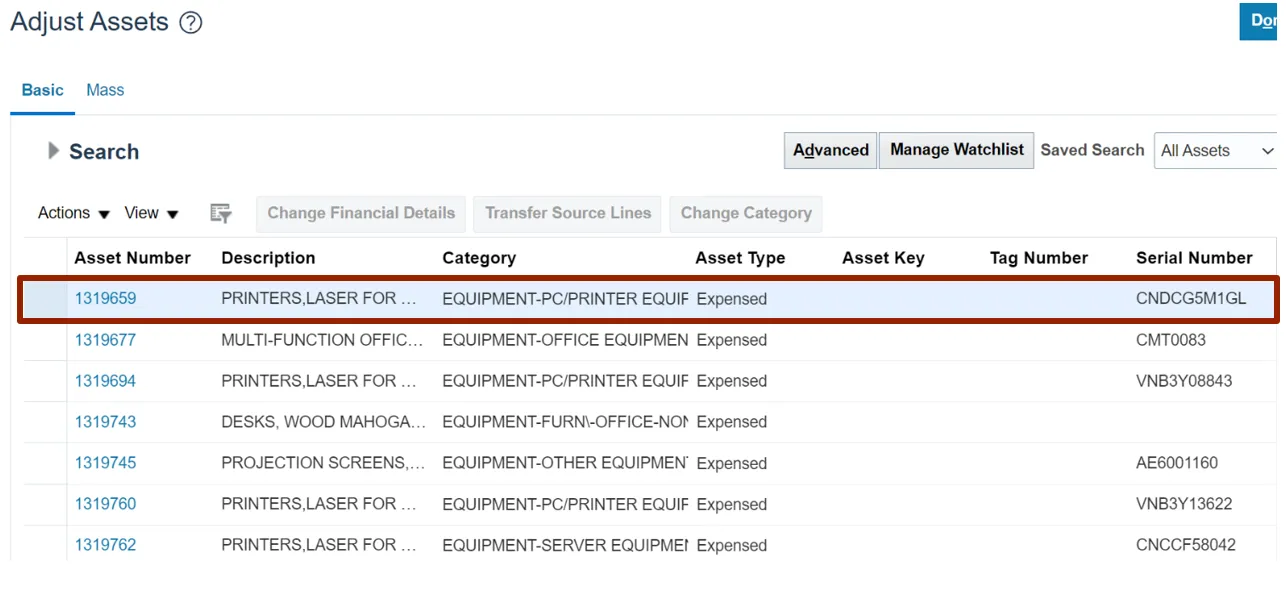
Step 9. Click the Change Financial Details button.

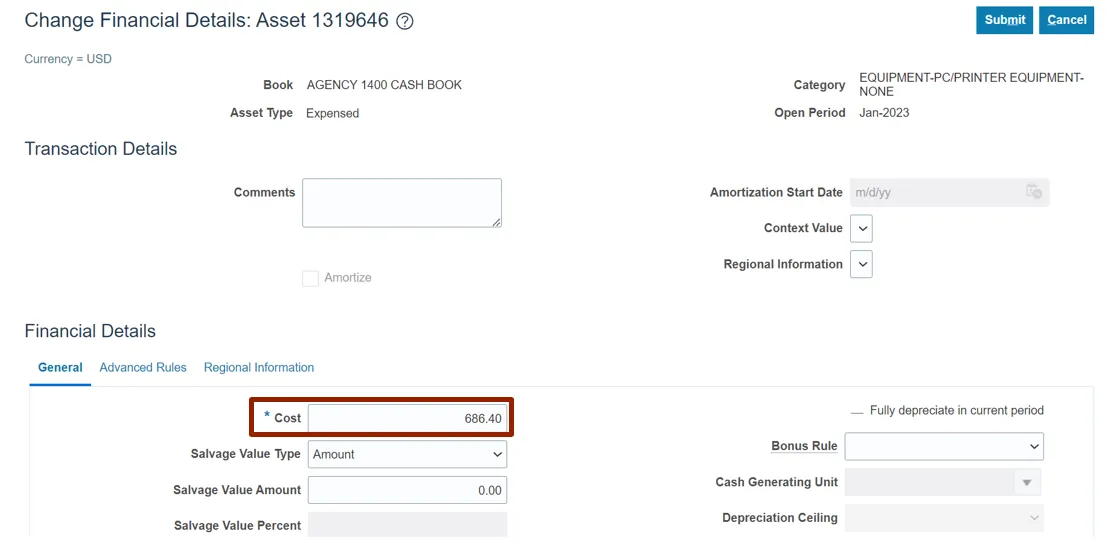
Step 10. On the Change Financials Details: Asset page, under the Financials Details section, enter the Amount in the Cost field.
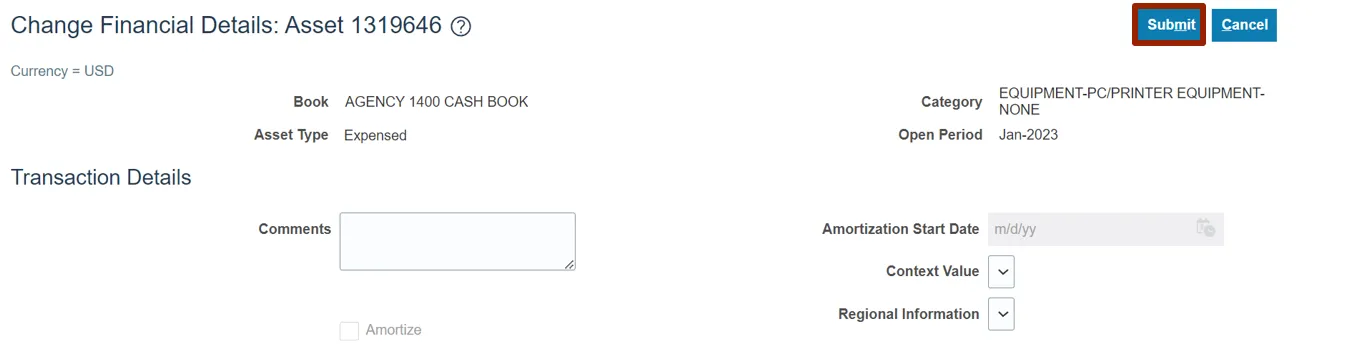
Step 11. Click the Submit button.
Adjust Units on an Asset
To adjust units on an asset, please follow the steps below. There are 11 steps to complete this process.
Step 1. Log in to the NCFS portal with your credentials to access the system.
Step 2. On the Home page, click the Fixed Assets tab.

Step 3. Click the Assets app.

Step 4. On the Assets page, click the Tasks icon.

Step 5. Under the Transactions tab, click Transfer Assets.
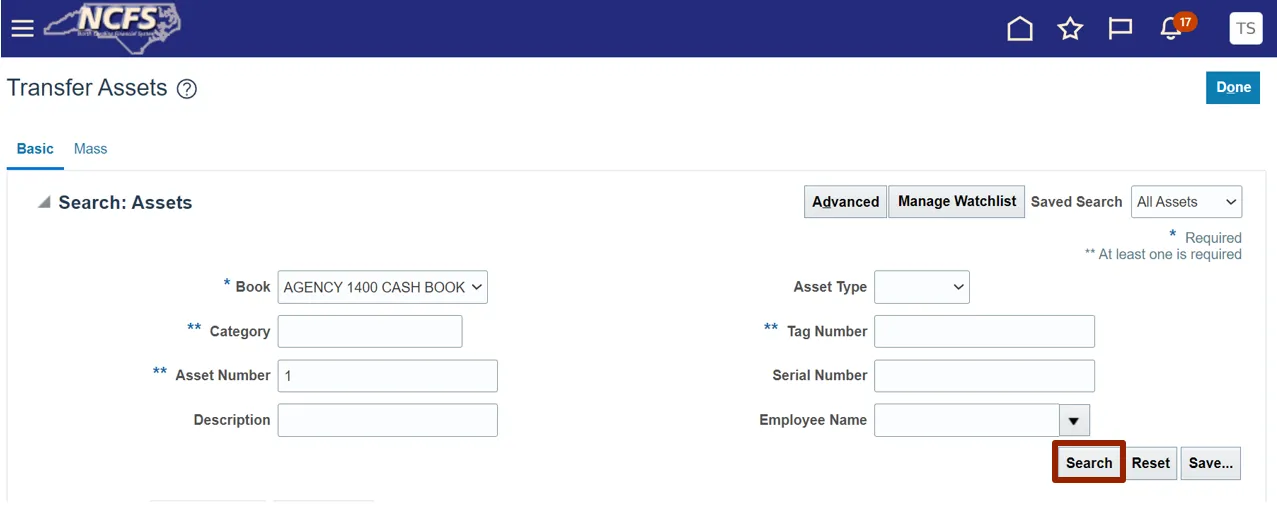
Step 6. On the Transfer Assets page, enter the relevant data under Search: Assets section. Click the Book drop-down choice list and select the appropriate Asset Book option.
In this example, we choose: Book - AGENCY 1400 CASH BOOK and Asset Number – 1.
Step 7. Click the Search button.
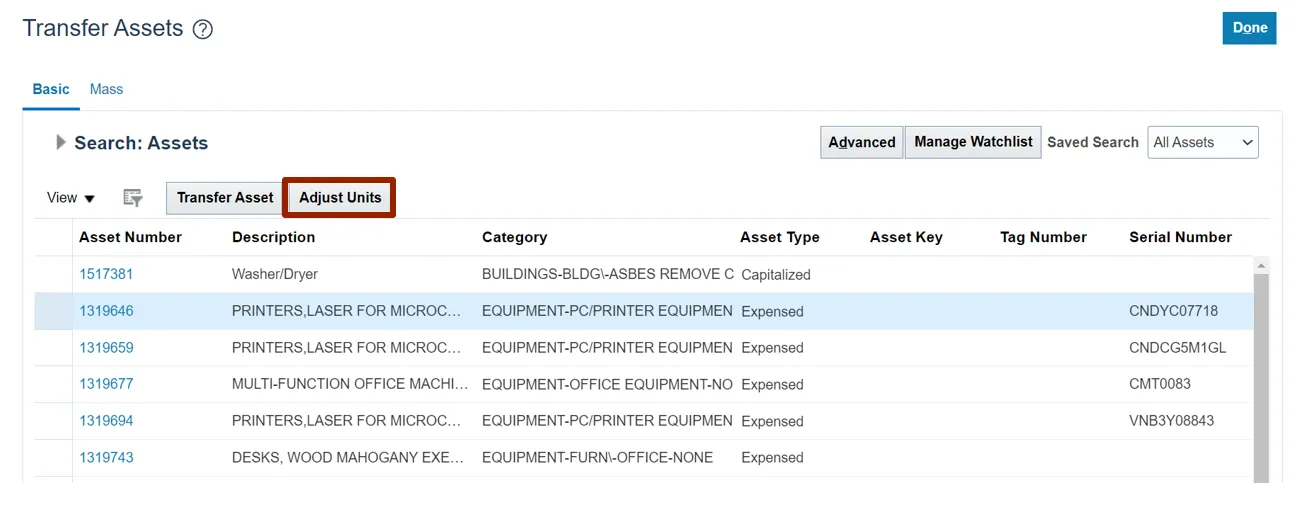
Step 8. Under the Search: Assets section, select the required Asset.

Step 9. Select the Adjust Units button.
Step 10. On the Adjust Units: Asset page, under the Unit Details section, enter the units required in the New Units field.
In this example, we choose value 3.

Step 11. Click the Submit button.

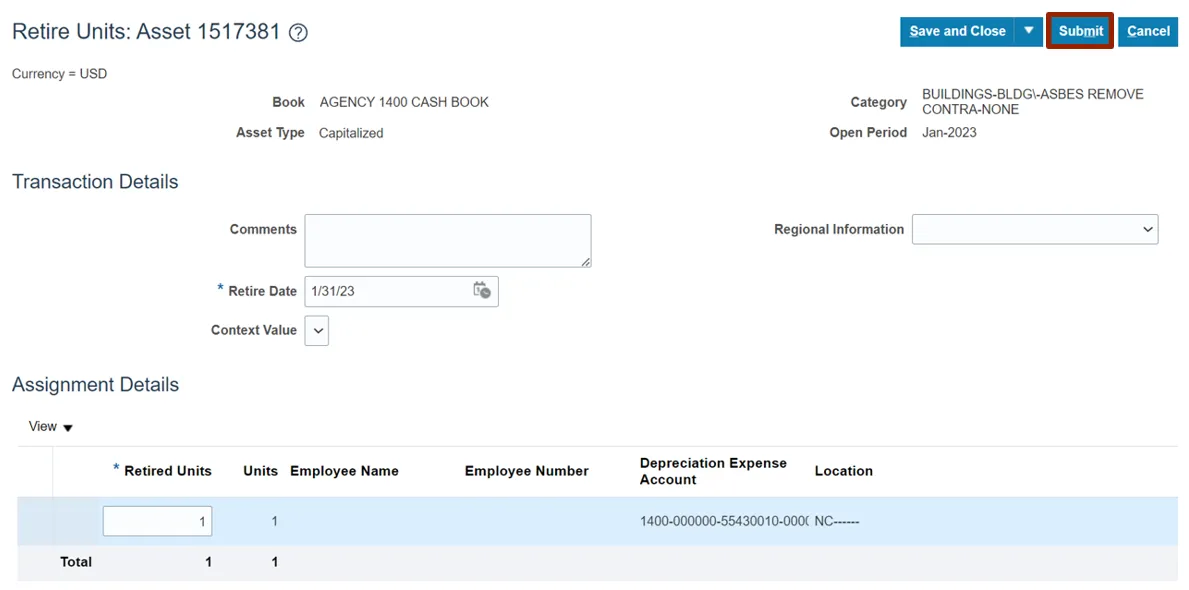
Retire Asset Unit and Retire Asset Cost
To retire asset unit and retire asset cost, please follow the steps below. There are 14 steps to complete this process.
Step 1. Log in to the NCFS portal with your credentials to access the system.
Step 2. On the Home page, click the Fixed Assets tab.

Step 3. Click the Assets app.

Step 4. On the Assets page, click the Tasks icon.

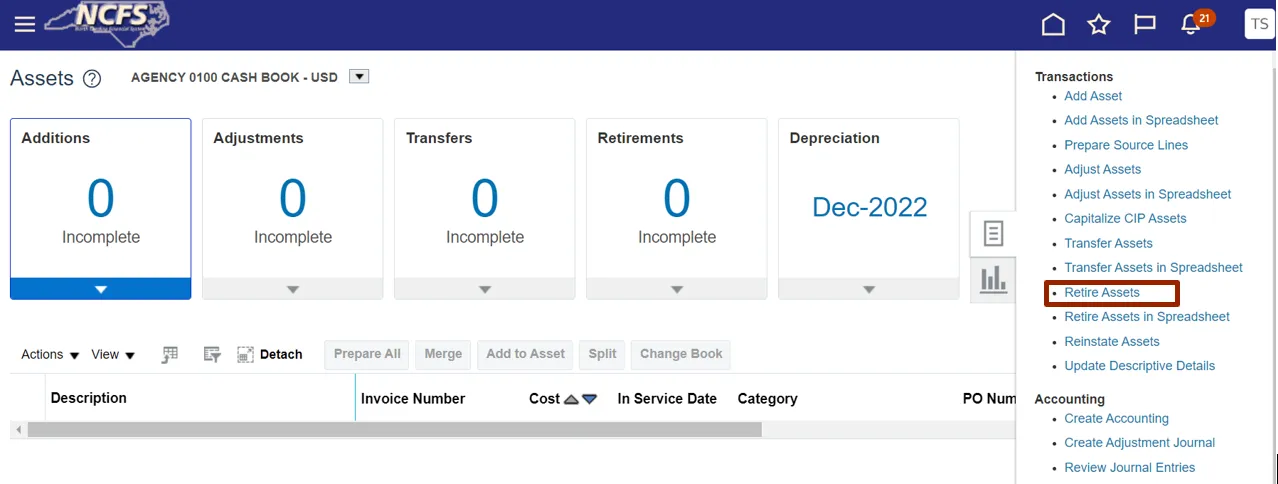
Step 5. Under the Transactions tab, click Retire Assets.
Step 6. On the Retire Assets page, under the Search: Assets section, enter the relevant information. Click the Book drop-down choice list and select the appropriate Asset Book option.
In this example, we choose: Book as AGENCY 1400 CASH BOOK and Asset Number as 1.
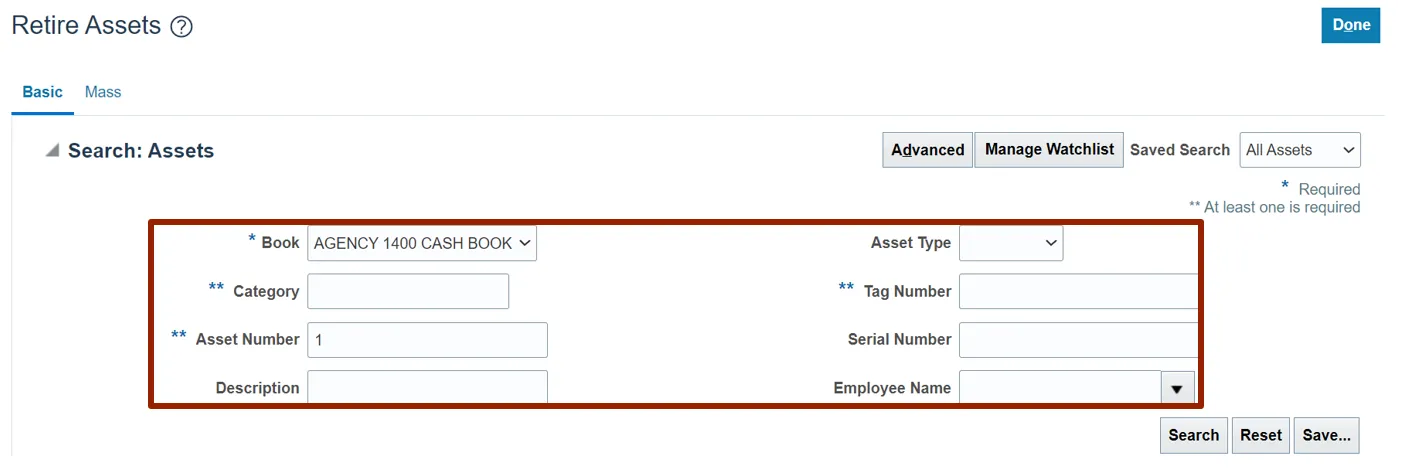
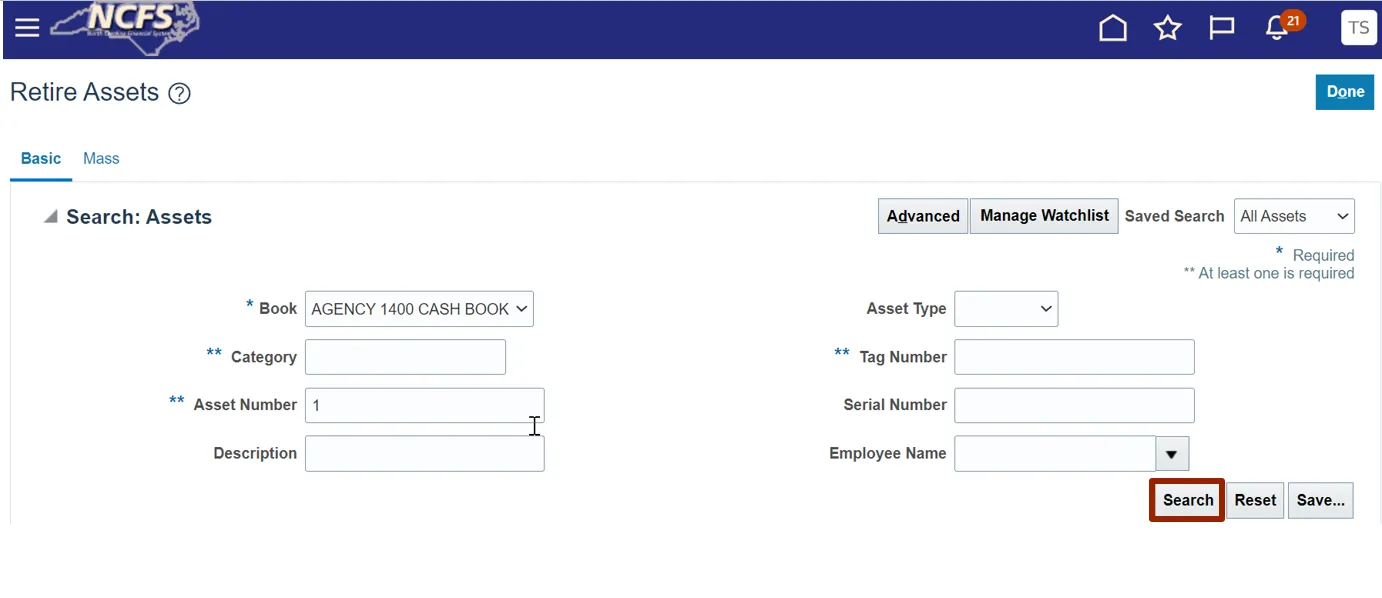
Step 7. Click the Search button.
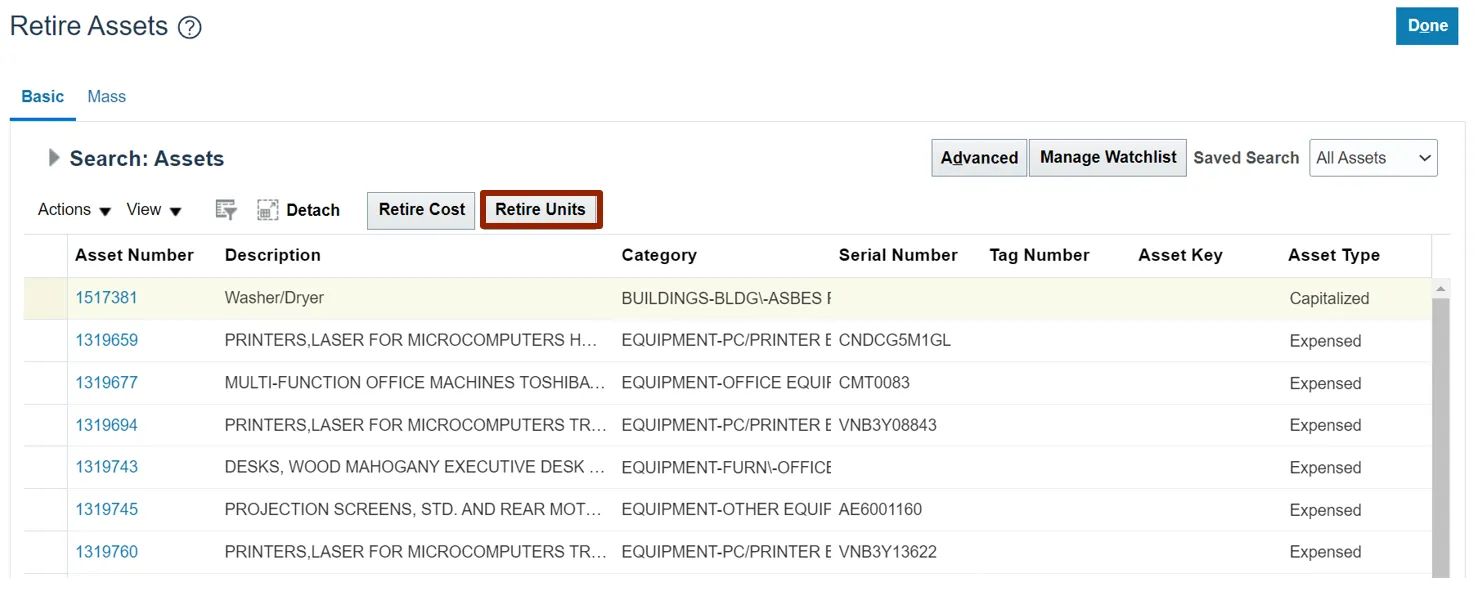
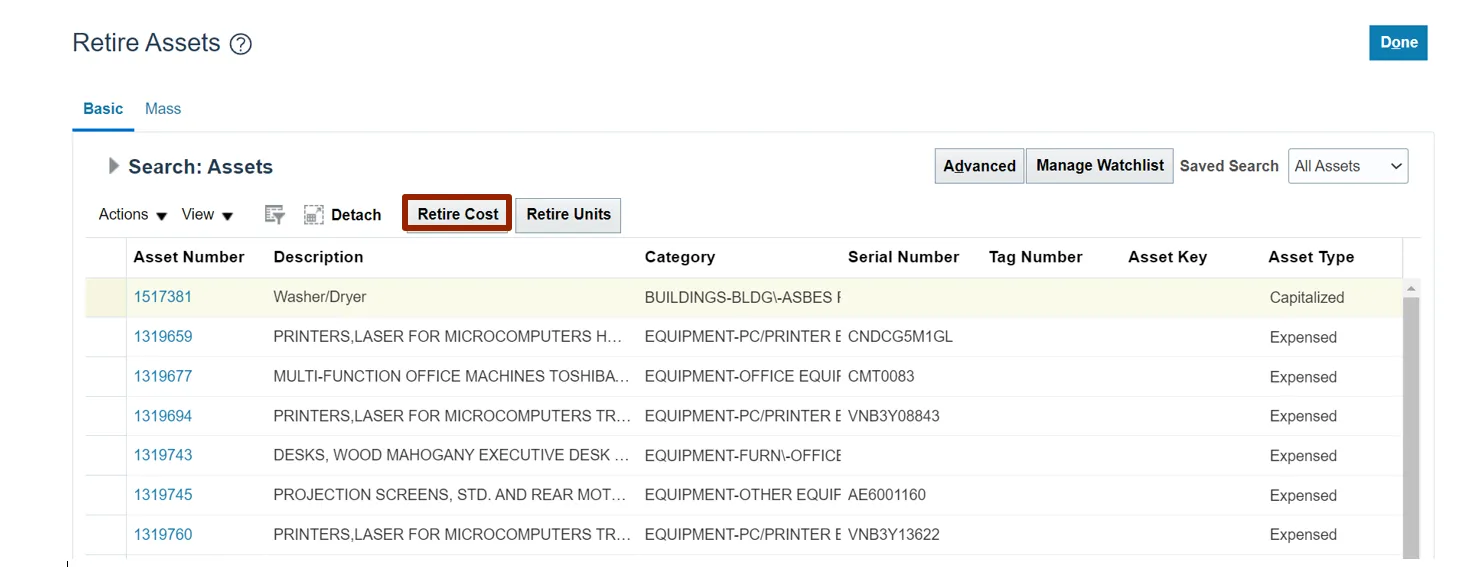
Step 8. Under the Search: Assets section, select the required Asset.
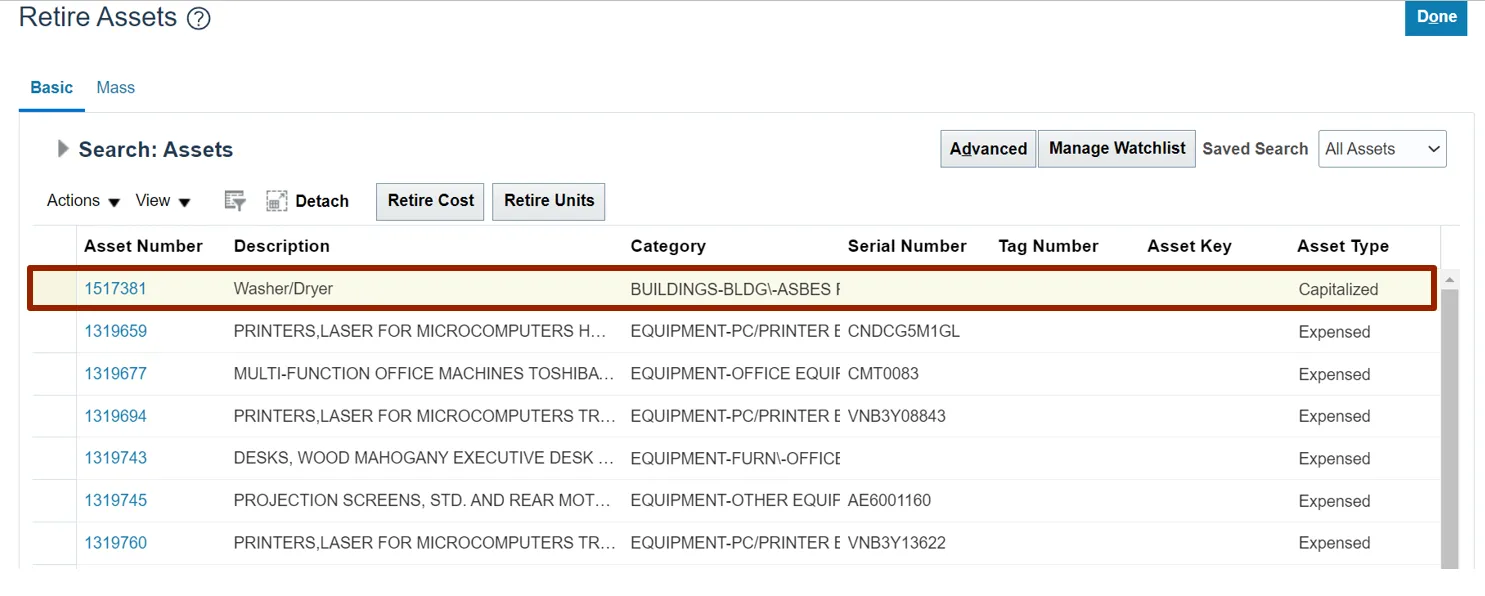
Step 9. Click the Retire Units button.
Step 10. Under the Assignment Details section, enter the units required in the Retired Units fields.
In this example, we choose value 1.
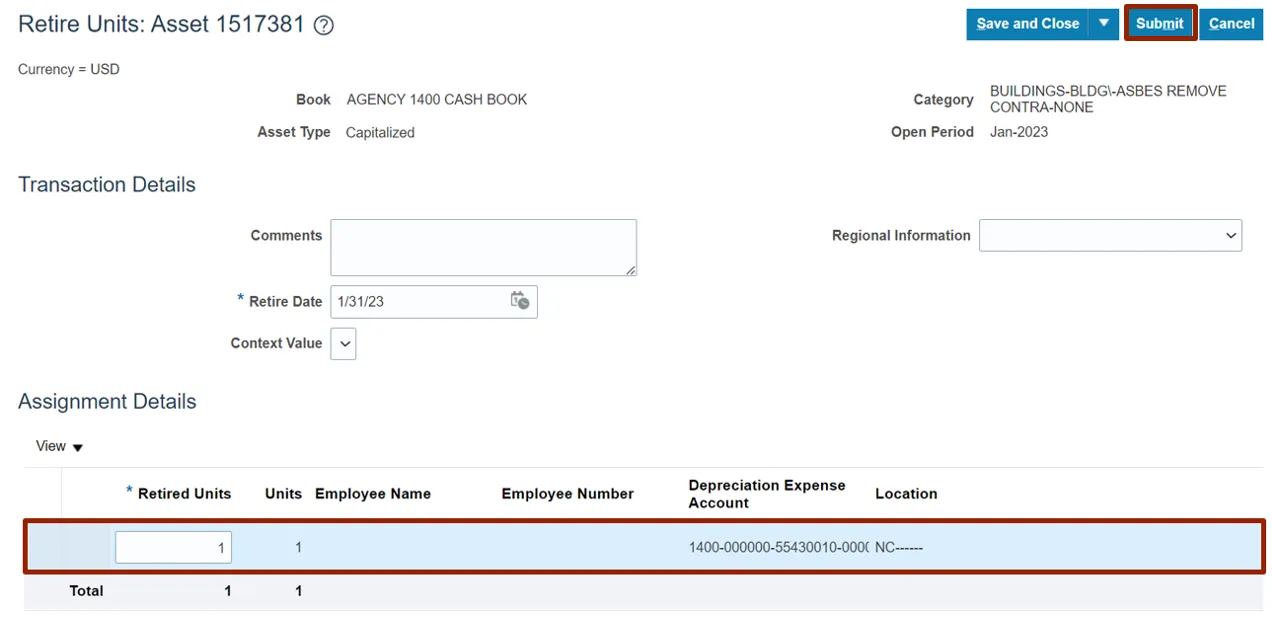
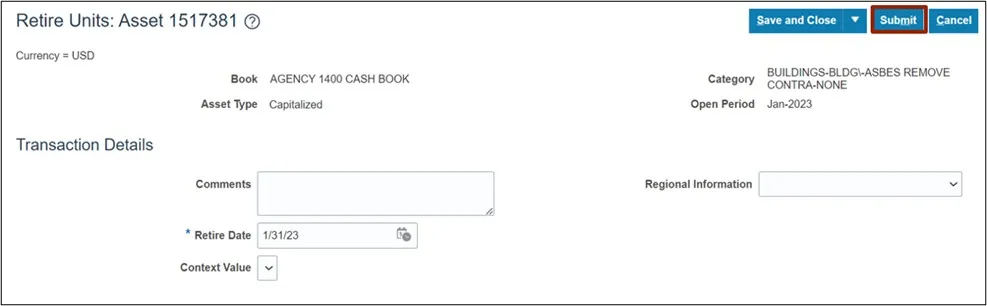
Step 11. Click the Submit button.
Step 12. Click the Retire Cost button.
Note: The steps for Retire Units and Retire Costs (Steps 1–8) are similar. Step 9 describes how to Retire Unit, and Step 11 describes how to Retire Cost.
Step 13. On Retire Cost: Asset page, under Retirement Details section, enter the details in the Cost Retired field.
In this example, we choose: 1.
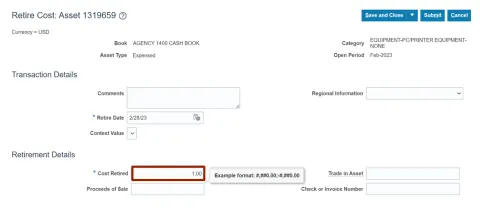
Step 14. Click the Submit button.
Wrap-Up
Using the above steps you can add or create an asset record, transfer asset to accommodate business requirement, adjust the number of units transferred, and retire them when no longer in use either completely or partially in NCFS.
Additional Resources
- Virtual Instructor-Led Training (vILT)