Purpose
The purpose of this Quick Reference Guide (QRG) is to provide a step-by-step guide of how to create and update customer records, including recent system changes, benefits, process flows, and the maintenance of customer data in the North Carolina Financial System (NCFS).
Introduction and Overview
This QRG offers step-by-step instructions for creating and managing customer records in NCFS. It explains how to perform essential tasks such as entering new customer information, updating existing records, and ensuring data accuracy. Following these steps ensure consistency and compliance with system standards and help streamline customer records.
Create Customer Records
In NCFS AR, various types of information about customers, including personal details, transaction history, and individual preferences is collected. Customer data is then used to understand customer behavior, enhance services, and comply with financial regulations. Effective data management helps in personalizing customer experiences and ensuring data security.
Search for a Customer
There are 8 steps to complete this process.
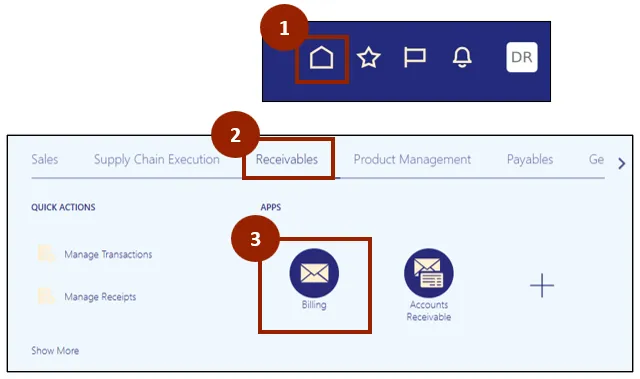
Step 1. Begin from the Home page or click the Home icon to navigate to the home page.
Step 2. Click the Receivables tab.
Step 3. Select Billing.

Step 4. Click the Task icon.
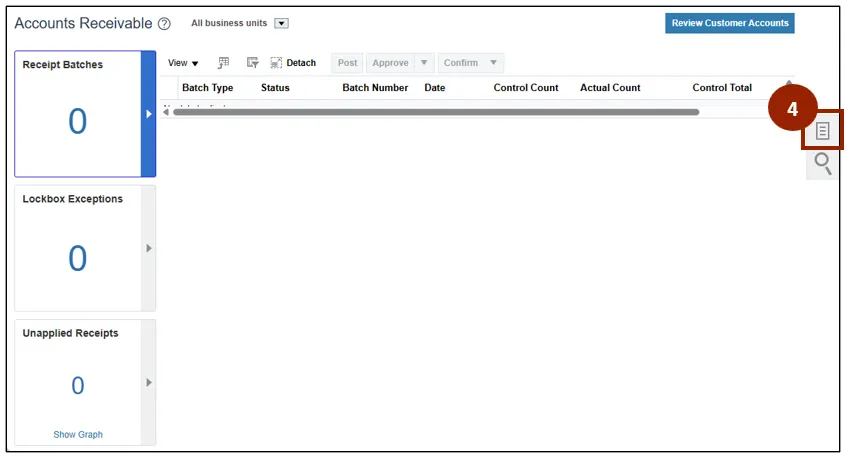
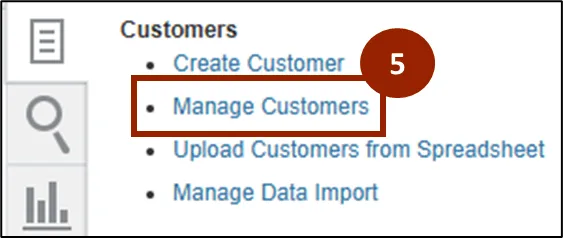
Step 5. Click the Manage Customers hyperlink from the Task list.

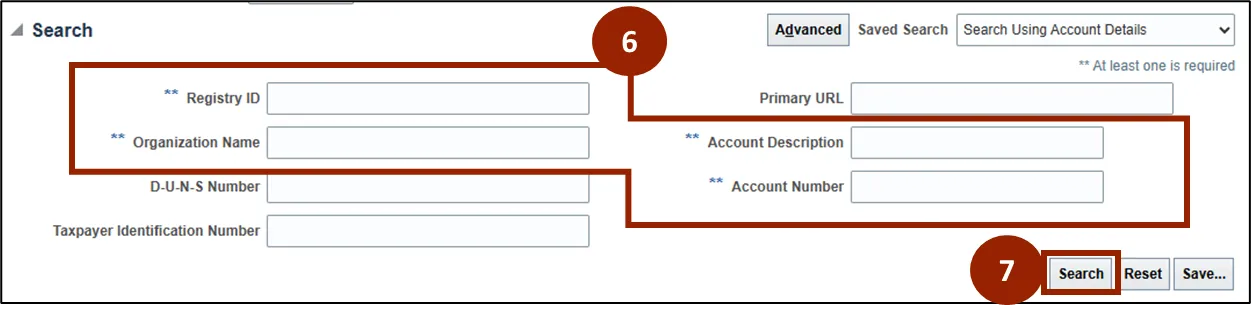
Step 6. Enter at least one of the four key details to query the customer:
- Registry ID
- Organization Name
- Account Description
- Account Number
Step 7. Click Search.

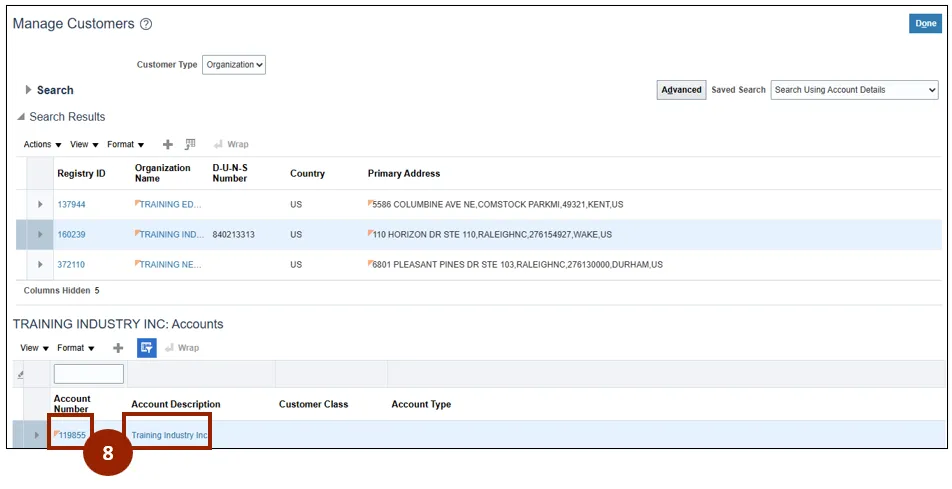
Step 8. The search results are displayed.

Note: If the customer does not exist in NCFS, move on to the Create a Customer Record section.
Creating a Customer Record
There are 10 steps to complete this process.
Step 1. Begin from the Home page or click the Home icon to navigate to the home page.
Step 2. Click the Receivables tab.
Step 3. Select Billing.
Step 4. Click the Task icon.
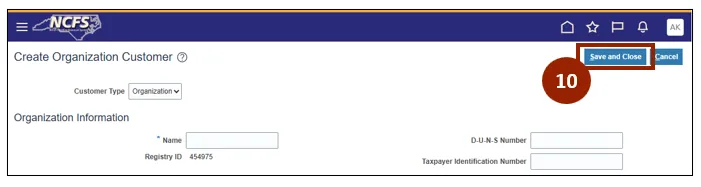
Step 5. Select Create Customer from the Task list.

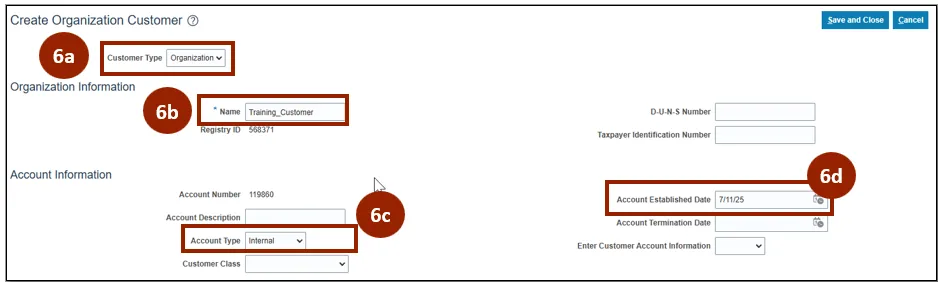
Step 6. Fill in the four required fields:
- Step 6a. Customer Type: Choose Organization if the customer is an entity, and Person if the customer is an individual.
- Step 6b. Name: Enter the name of the customer for identification.
- Step 6c. Account Type: Specify the classification or category of the customer account.
- Step 6d. Account Established Date: Specify the date the customer account is created.
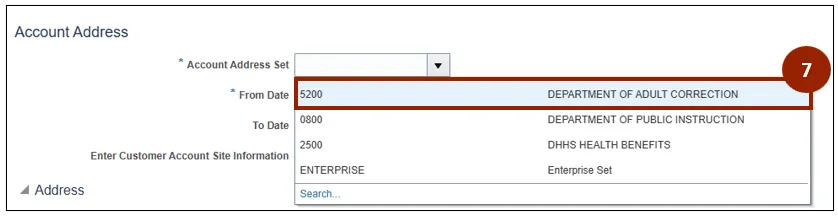
Step 7. In the Account Address section, select Department of Adult Correction from the Account Address Set dropdown list.
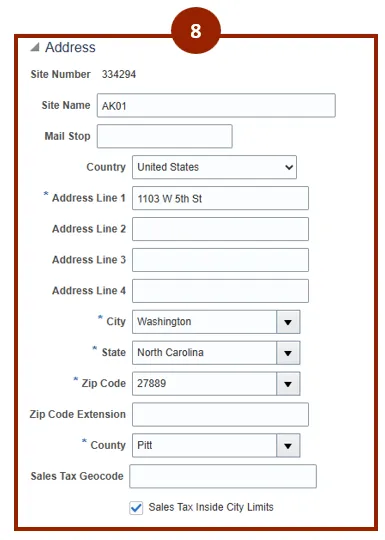
Step 8. In the Address Section, provide the Site Name and the full address of the customer site for shipping and billing purposes.
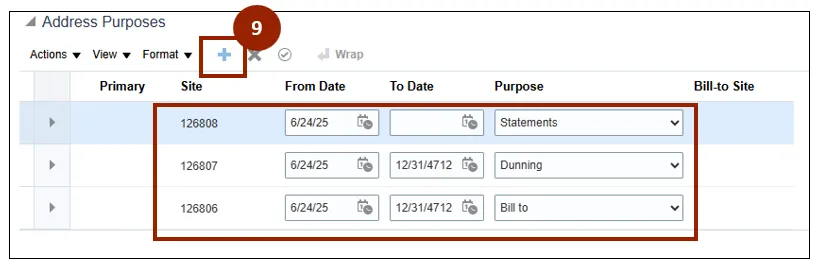
Step 9. Within the Address Purposes section, click the + to add a purpose to the address provided. (i.e., Bill to, Ship to, Dunning, Statements).
Note: It is necessary to assign either Bill to or Ship to as one of the address purposes.
Step 10. Click Save and Close to save the customer record.
Manage Customer Records
There are 30 steps to complete this process.
Step 1. Begin from the Home page or click the Home icon to navigate to the home page.
Step 2. Click the Receivables tab.
Step 3. Select Billing.

Step 4. Click the Task icon.

Step 5. Click the Manage Customers hyperlink from the Task list.
Step 6. Enter at least one of the four key details to query the customer:
- Registry ID
- Organization Name
- Account Description
- Account Number
Step 7. Click Search.
Step 8. Select the relevant customer record. In the Accounts section, click on either the Account Number or the Account Description to proceed.
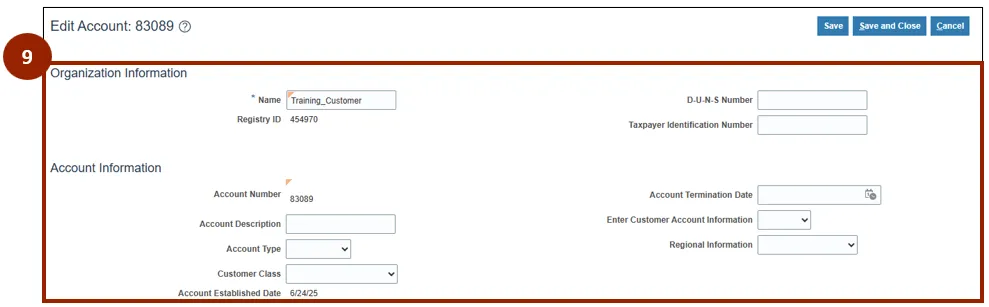
Step 9. Review and update the information in the Organization Information and Account Information sections.
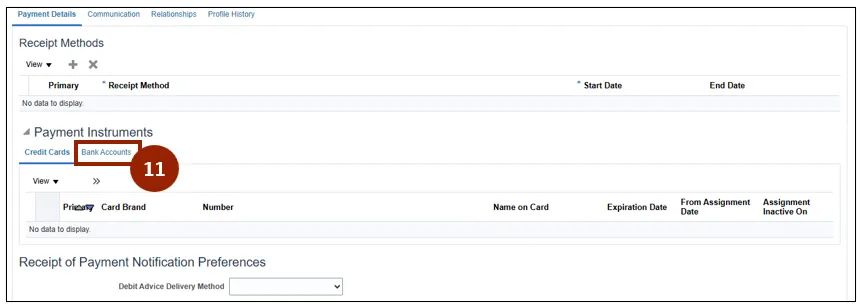
Step 10. Click on the appropriate tab to update customer information related to each category (i.e. Payment Details, Communication, Relationships, Profile History).

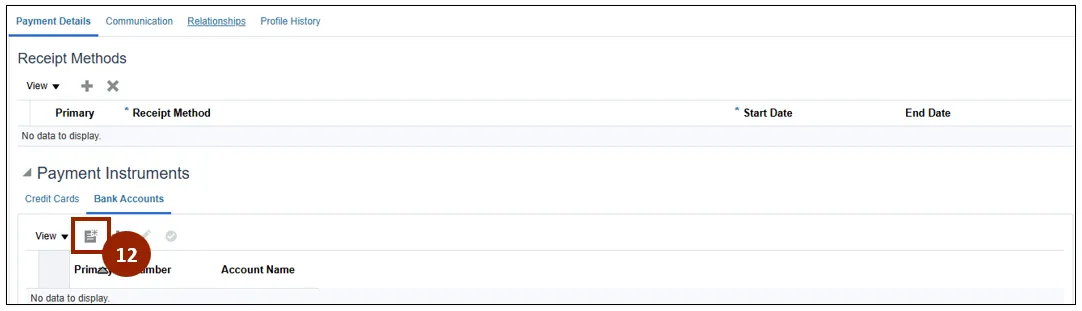
Step 11. If a customer's banking information needs to be updated, click on Bank Accounts in the Payment Instruments section of the Payment Details tab.
Step 12. Click the Create icon to add a new bank account.
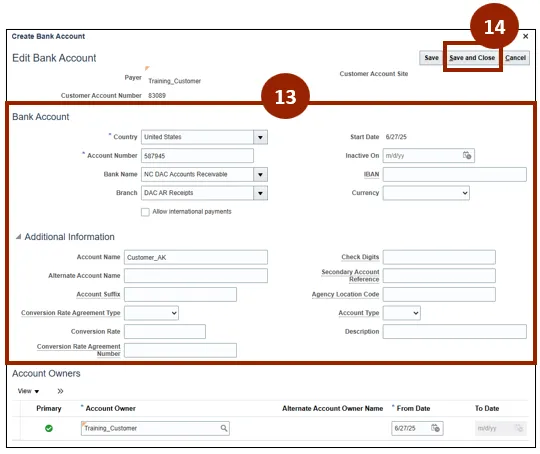
Step 13. Ensure that all available details are included, and all mandatory fields are filled in accurately.
Step 14. Click Save and Close.
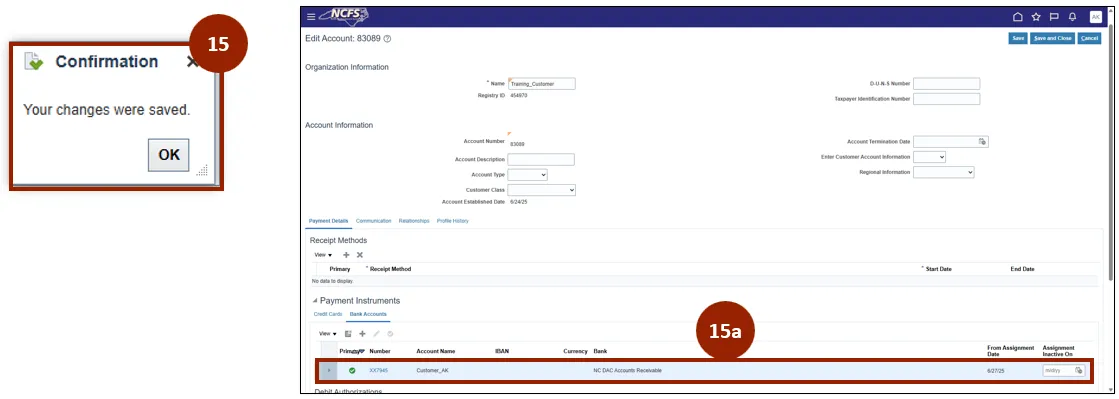
Step 15. When a new bank account has been successfully added, you will see a confirmation message.
- Step 15a. In the Payment Instruments section, under the Bank Accounts tab users can view the added bank account.
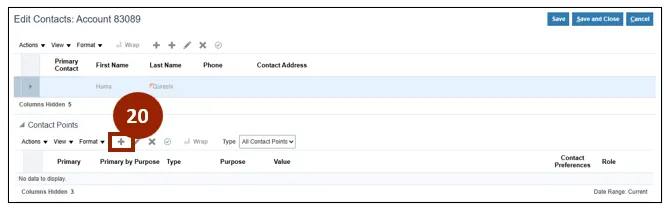
Step 16. Click the Communications tab.
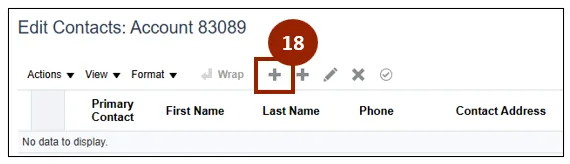
Step 17. Click Edit Contacts within the Account Contacts section.
Note: Communication details should be entered at the site level. Enter the Bill To Contact at the Bill To Site location, and the Ship To Contact (if applicable) at the Ship To Site location.

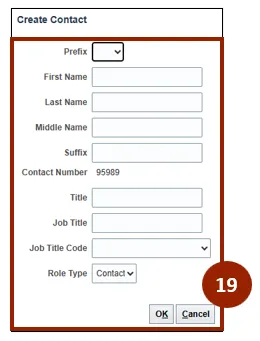
Step 18. Within the Contacts section, click the + sign to create a new contact and associate it with the customer account.
Step 19. Fill in the Create Contact form with the necessary details and click OK.
Step 20. Click the + icon under Contact Points to create a contact point or define a method of correspondence for the selected contact.
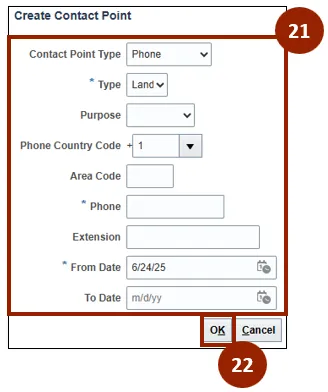
Step 21. Fill in the Create Contact Point form with the necessary details:
- Contact Point Type: Choose the modality of contact from Email, Phone, Social Media and Web.
- Type: Choose the communication type, such as Landline, Mobile or Fax.
- Purpose: Select the purpose of the contact type being created, such as Work, Dunning, Collections, etc.
- Fill in the remaining mandatory fields as per selection of contact point type.
Step 22. Click OK.
Step 23. In the Account Contact Responsibilities section, click + to assign a responsibility to the selected contact.
Step 24. Select the Responsibility Type from the dropdown list.
Step 25. You can assign multiple responsibilities to a contact, and set one responsibility as the primary responsibility:
- Click the encircled check mark icon to set it as the primary responsibility.
- The Primary Responsibility column displays a green check mark to the record that has been designated as the primary responsibility.
Step 26. Click Save to save the updates to account contact records.

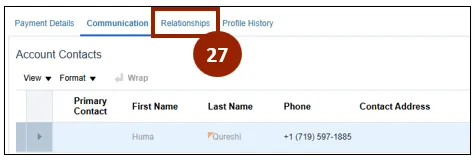
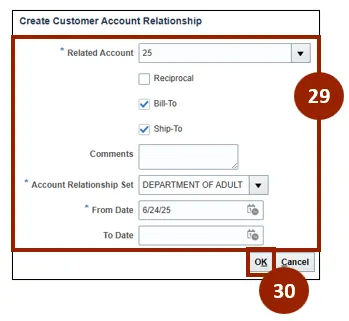
Step 27. Click the Relationships tab.
Step 28. Click the + icon to create a customer account relationship.
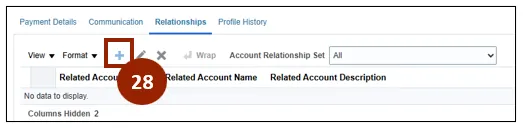
Step 29. Fill in the mandatory details - Related Account, Account Relationship Set and From Date.
Step 30. Click OK.
Note: To assign multiple responsibilities to a contact, repeat steps 27 to 30.
Customize Customer Details
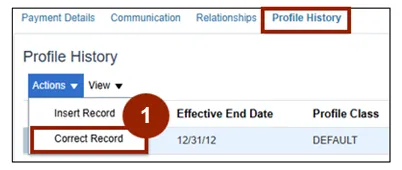
Utilize the following two steps to customize details of the customer profile to meet specific requirements for an account or site, and navigate to the Profile History tab.
There are 2 steps to complete this process.
Step 1. Click Actions and select Correct Record from the dropdown.
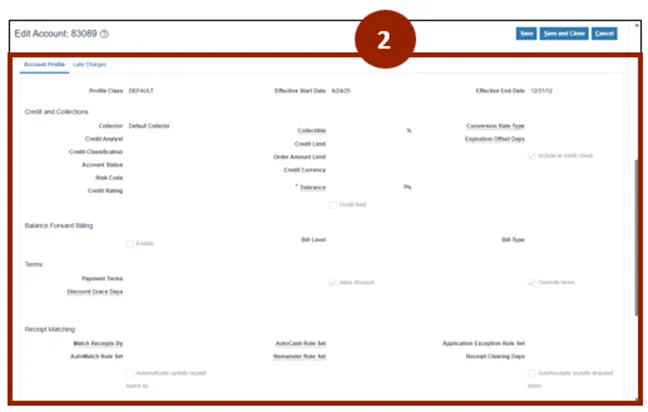
Step 2. You can now customize the profile class and edit some important fields such as:
- Collector: Identifies the collector responsible for customer.
- Credit Classifications: Identifies the credit level of the customer.
- Credit Limit: The maximum credit amount allowed for the customer.
- Order Amount Limit: The maximum amount allowed per order for the customer.
- Conversion Rate Type: Defaults to Corporate.
- Payment Terms: Indicates the number of days customers must pay the amount due.
- Tolerance: Defaulted to 0%.
- Allow Discount Checkbox: Indicates if customers are allowed to have a discount.
- Match Receipts By: Identifies how receipts will be matched to customers.
- Send Statements, Credit Balances, Dunning Letters: Identifies if statements, credit balances and dunning letters should be sent to the customer.
- Preferred Contact Method: Identifies how customers should be contacted for dunning and credit balances.
- Statement Preferred Delivery Method: Identifies how statements should be delivered to customers.
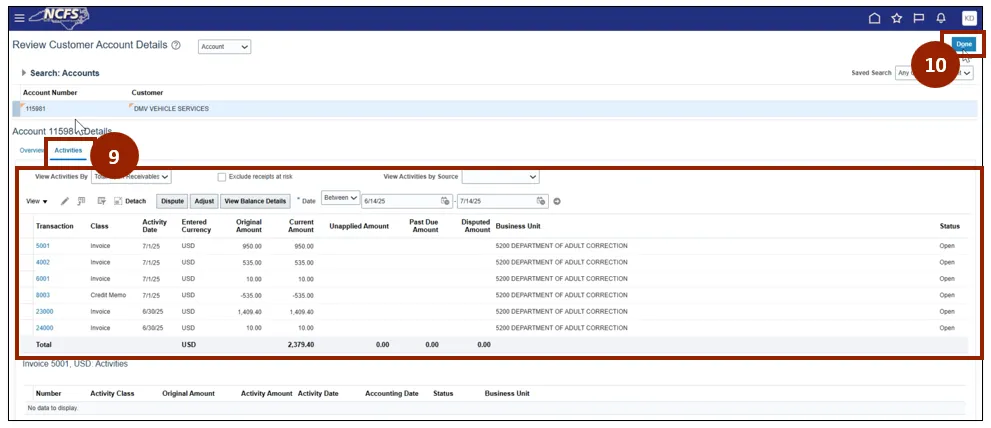
Review Customer Account Details
There are 10 steps to complete this process.
Step 1. Begin from the Home page or click the Home icon to navigate to the Home page.
Step 2. Click the Receivables tab.
Step 3. Select Billing.

Step 4. Click the Task icon.
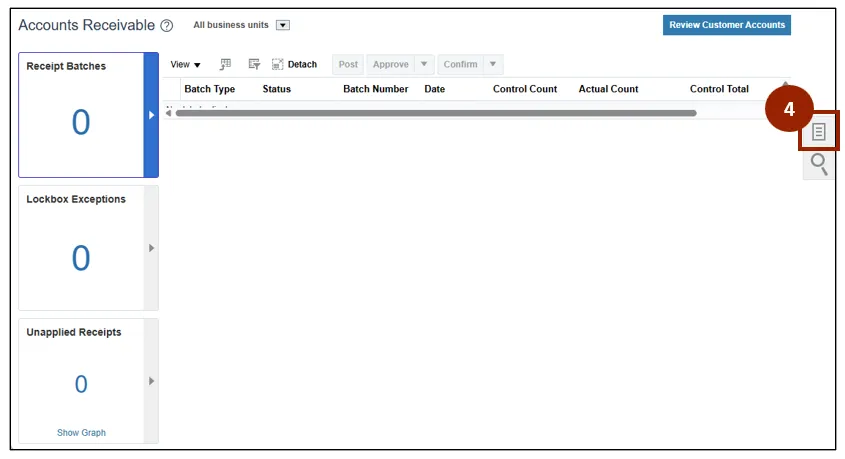
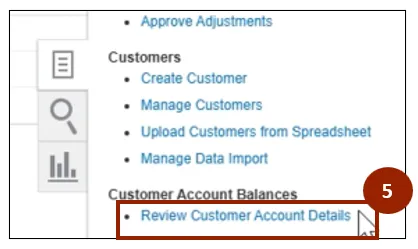
Step 5. Click Review Customer Account Details from the Task list.
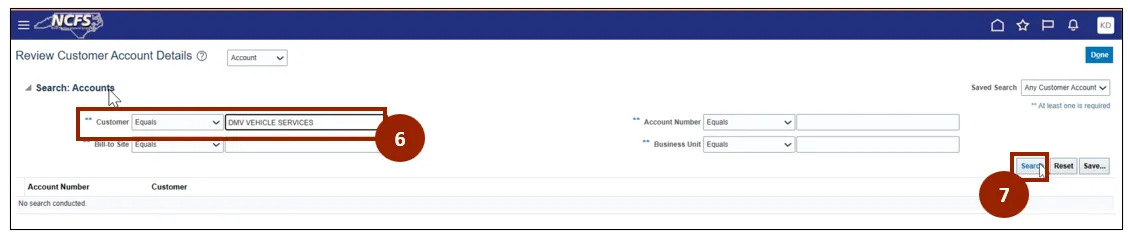
Step 6. In the Accounts section, in the Customer field enter the name of the customer.
Step 7. Click Search.
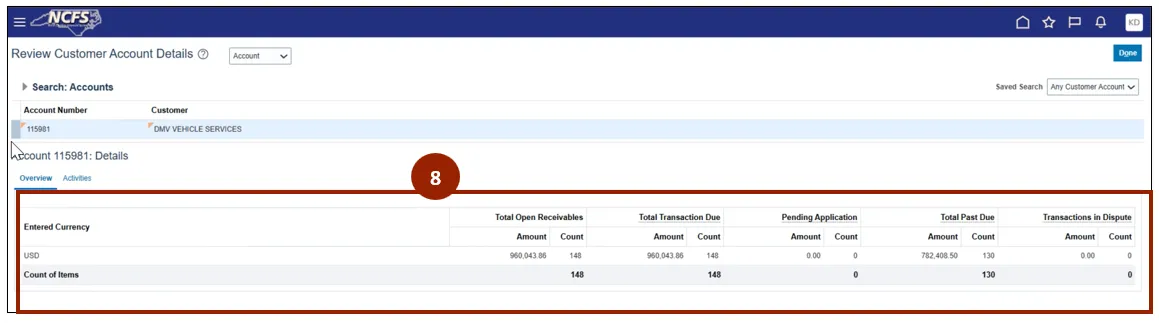
Step 8. The account overview is displayed.
Step 9. Click the Activities tab to view detailed information.
Step 10. Click Done.
Wrap-Up
NCFS users can update customer records, including recent system, changes, benefits, process flows, and the maintenance of customer data using the steps above.
Additional Resources
- Instructor Led Training (ILT)