Purpose
The purpose of this Quick Reference Guide (QRG) is to provide step-by-step explanation of how to: Create and manage new items, Associate new items to 5200DACNI and 5200DACCENI Non-Inventory Organizations, Associate items to DAC Inventory Organizations, Associate existing items to additional DAC Inventory Organizations, Associate DAC items to an Organization when a Replenishment Source Organization is an Organization(warehouse), update MIN/MAX Value (Planning) and other attributes for the Inventory Organization in the North Carolina Financial System (NCFS).
This QRG is to be used in conjunction with Virtual Instructor-Led Training INV101: Inventory Agency Manager, INV102: Inventory Cost Accounting, and INV109: Inventory Item Maintenance. As well as INV-04 QRG and INV-08 QRG.
Introduction and Overview
Inventory Item Management is the process of managing the items for use in a cycle of ordering, storing, selling, and restocking products. DAC will be responsible for adding and maintaining items in the item master file. DAC has a separate item class within the item master titled DAC ITEM CLASS.
Create and Manage New Items
To Create and manage new items in NCFS, please follow the steps below. There are 20 steps to complete this process.
Step 1. Navigate to the NCFS environment.
Step 2. Log in to the NCFS portal with your credentials to access the system.
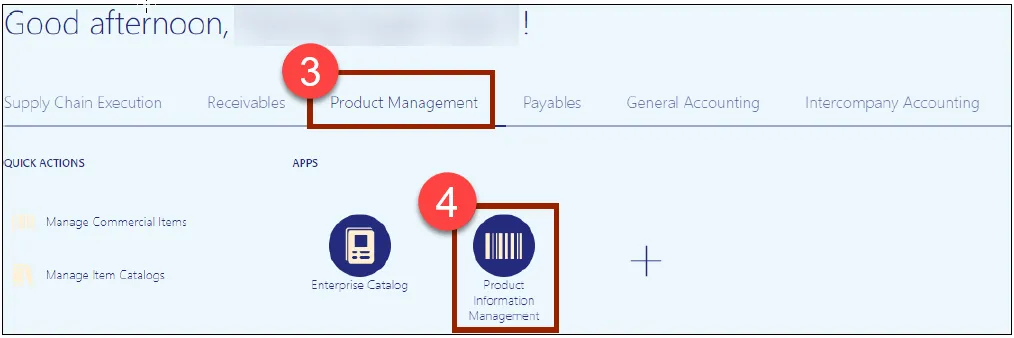
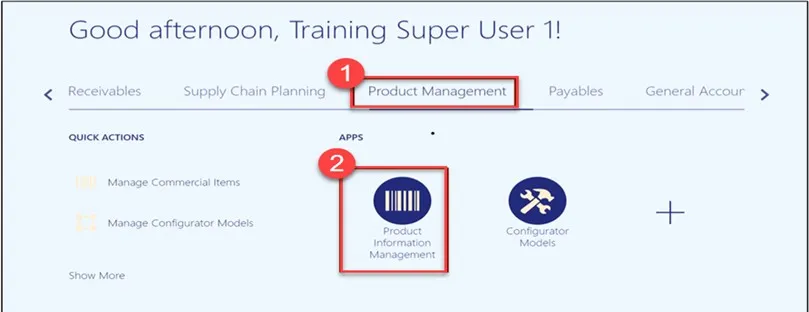
Step 3. On the Home page, click Product Management tab.
Step 4. Click the Product Information Management app.
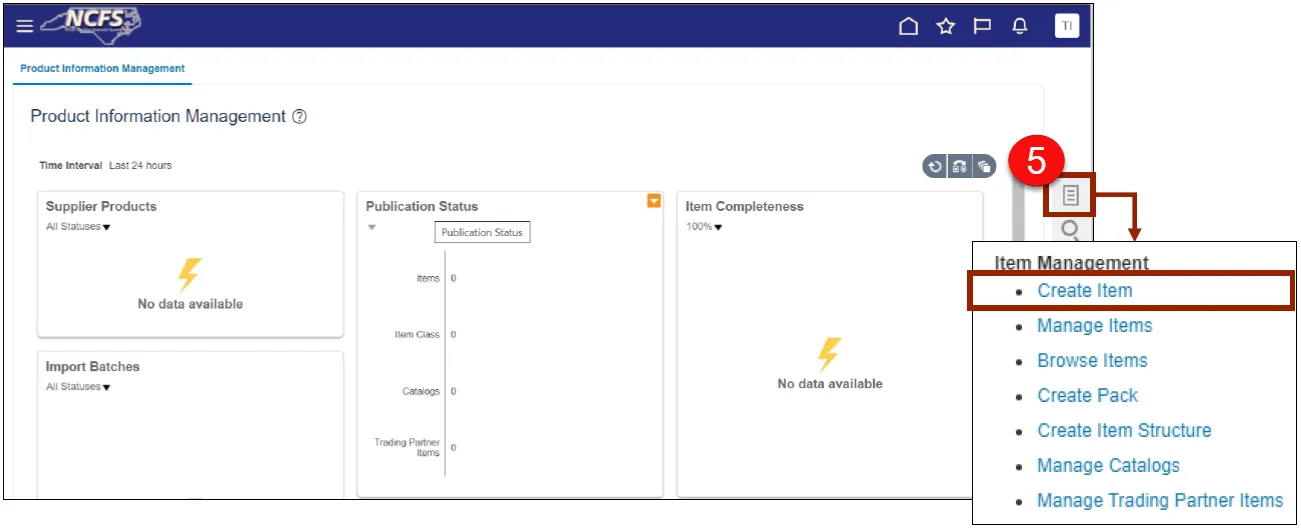
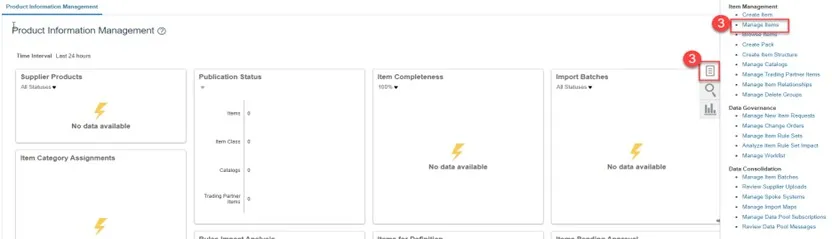
Step 5. The Inventory Management Dashboard page will appear, click the Tasks Icon on the right-hand side of screen and then click Create Item.
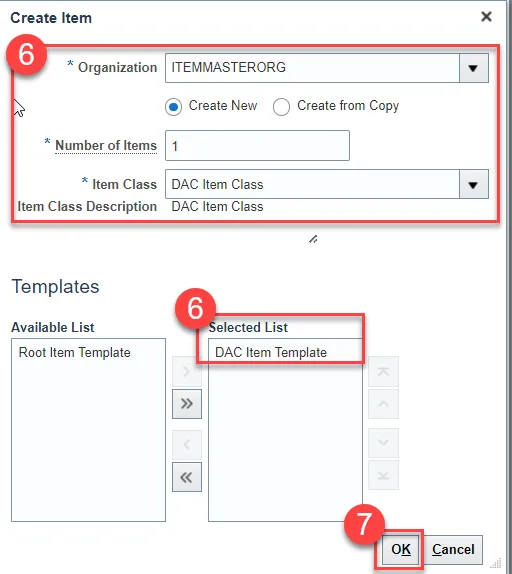
Step 6. In the Create Item dialog box, provide values for the following fields:
- Organization defaults to (ITEMMASTERORG).
- Create New radio button selected.
- Number of Items.
- Item Class (DAC Item Class).
- Template defaults to (DAC Item Template) in Selected List.
Step 7. Click OK.
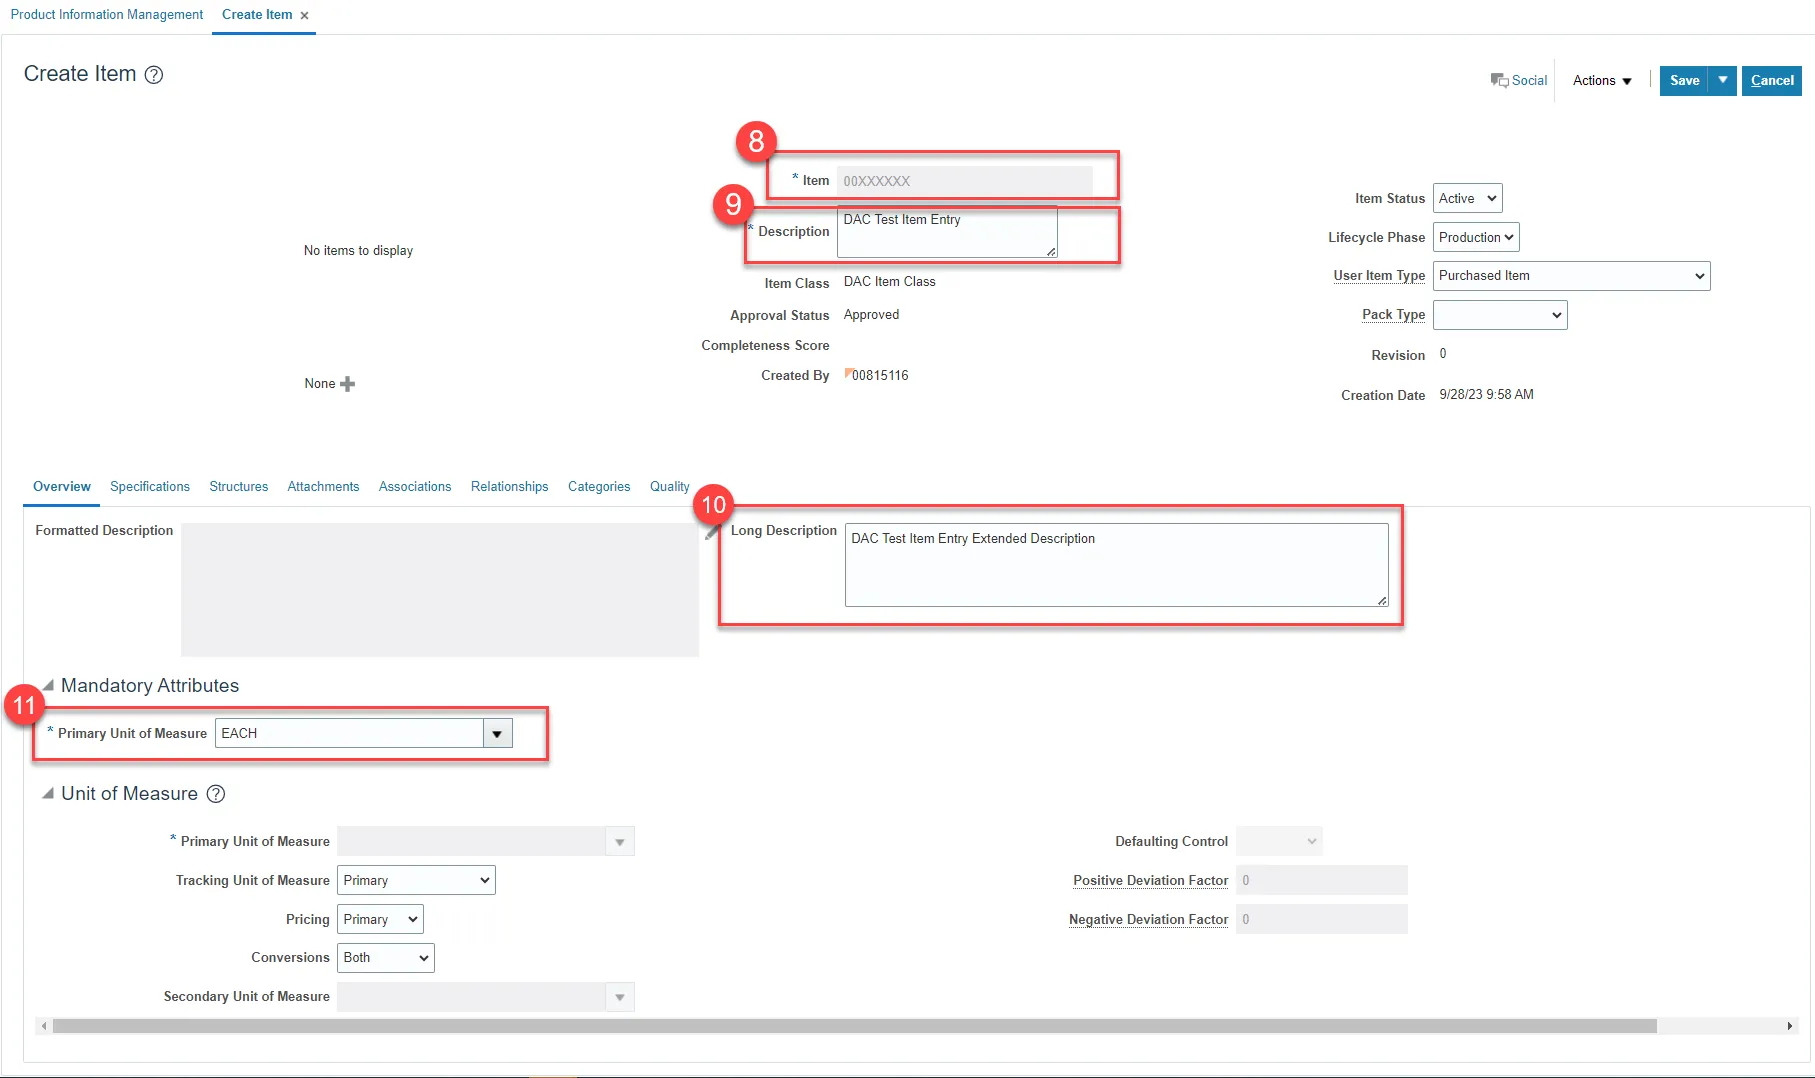
Step 8. New Item number is system generated as shown (for DAC).
Step 9. Enter Item Description (80 Character length).
Step 10. Enter Item Long Description if needed (2000 Character length).
Step 11. Select the Primary Unit of Measure.
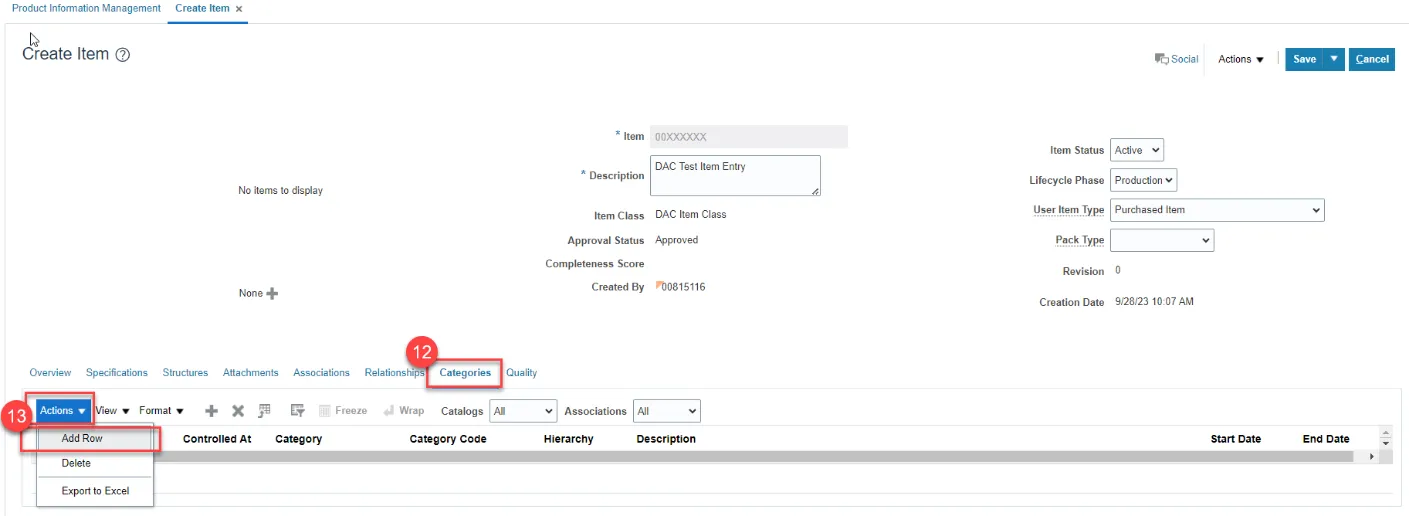
Step 12. Click on Categories.
Step 13. Click the Actions drop down and select Add Row.
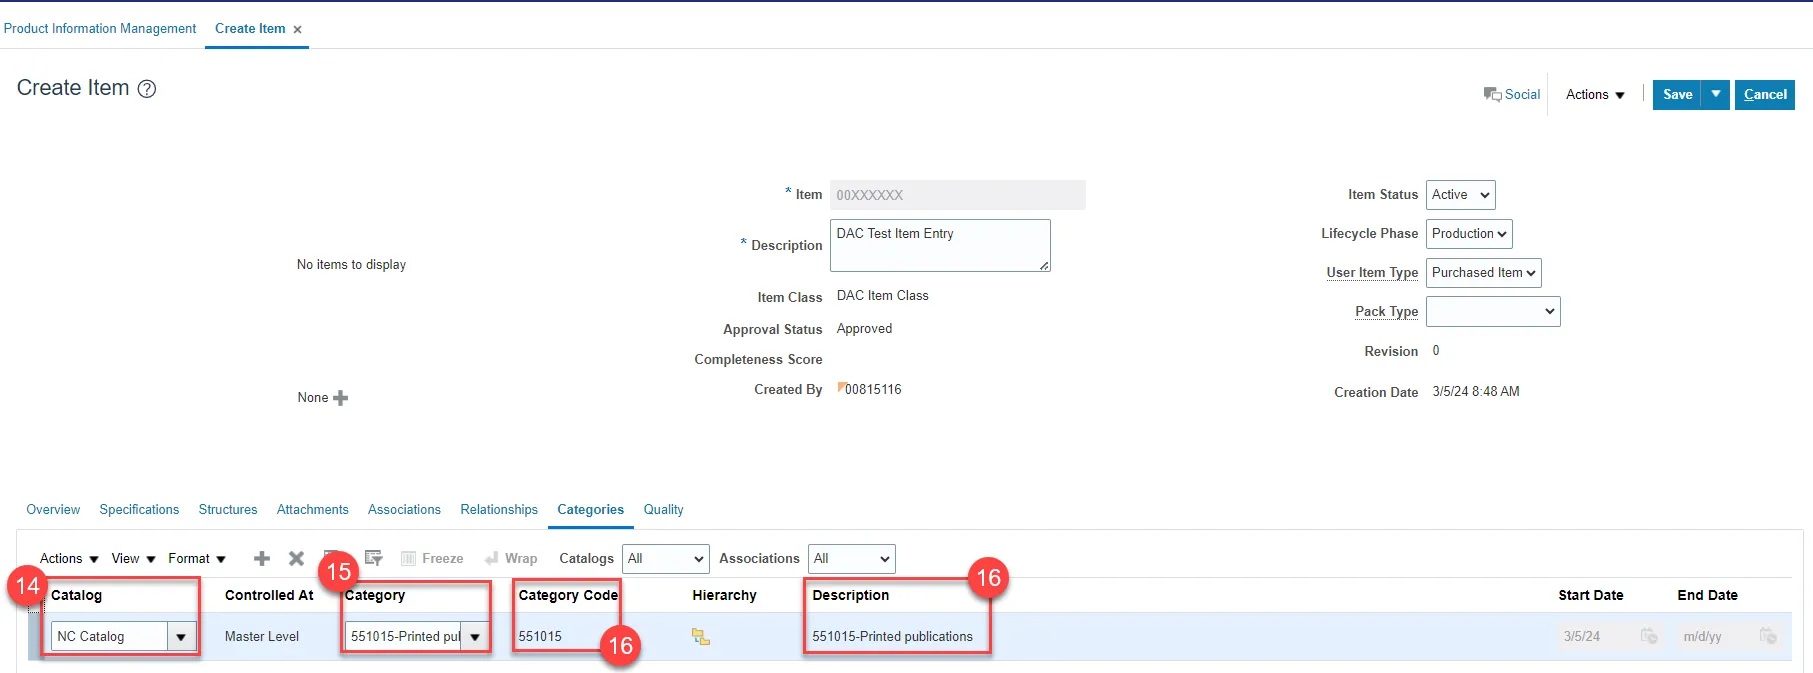
Step 14. In the Catalog field, Select NC Catalog.
Step 15. In the Category field, select the appropriate UNSPSC Category Code (Reference existing list of like items for UNSPSC Category Codes).
Step 16. Category Code and Description will populate upon Category selection.
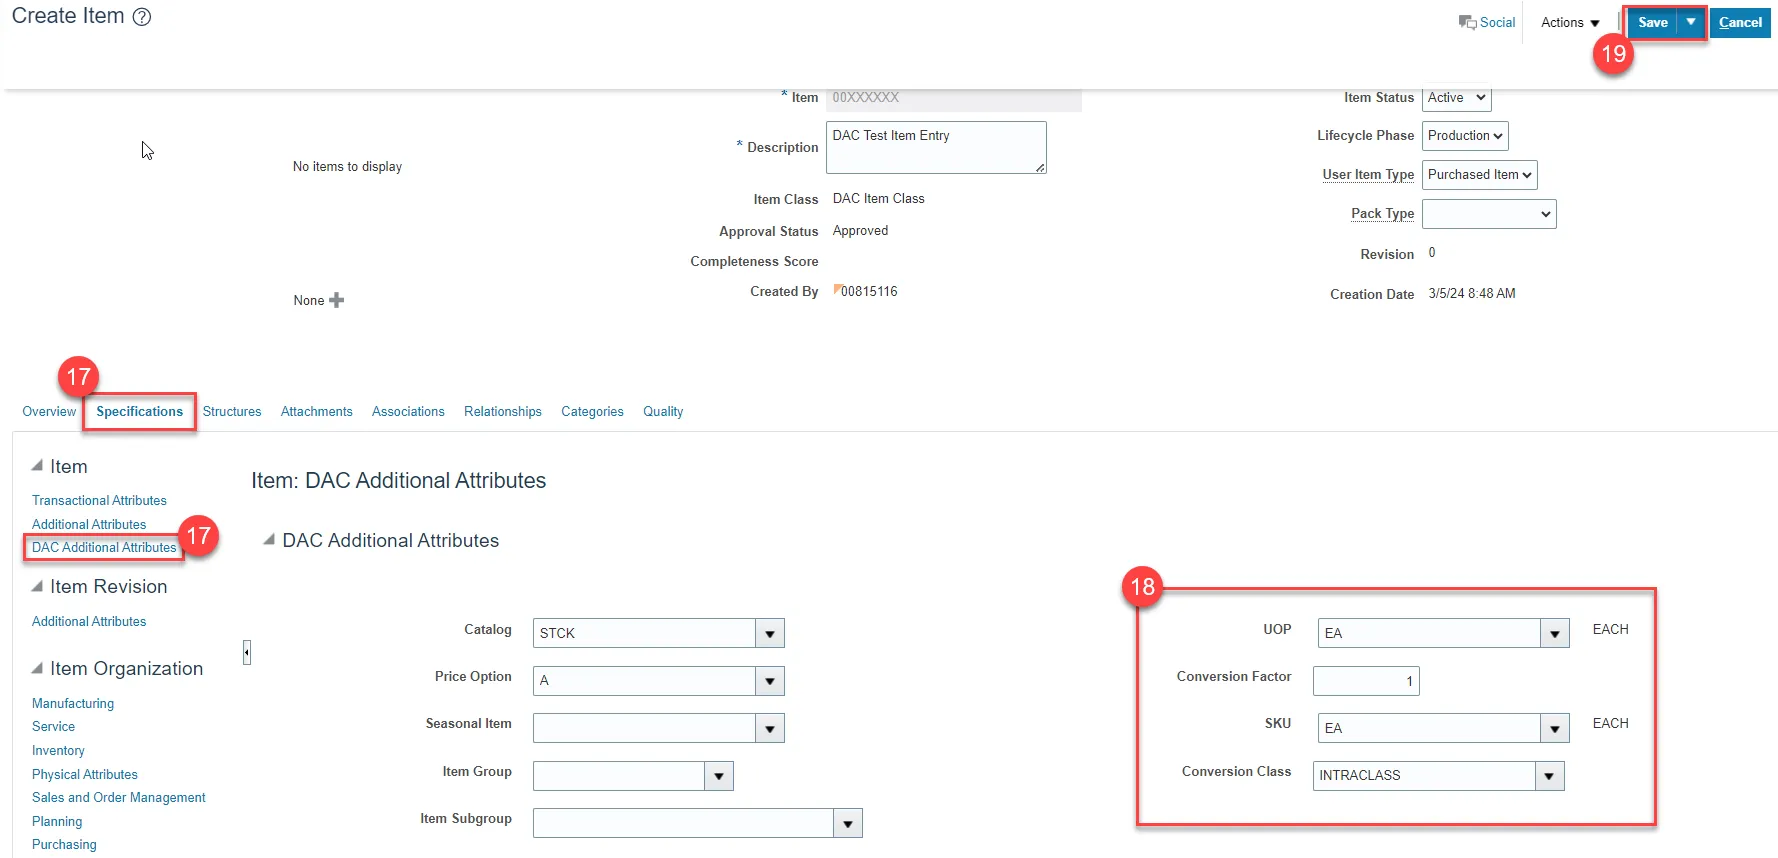
Step 17. Click on Specifications tab, then click on DAC Additional Attributes.
Step 18. Enter the item Unit of Purchase (UOP), Conversion Factor, Stock Keeping Unit (SKU), and Conversion Class.
Step 19. Click Save.
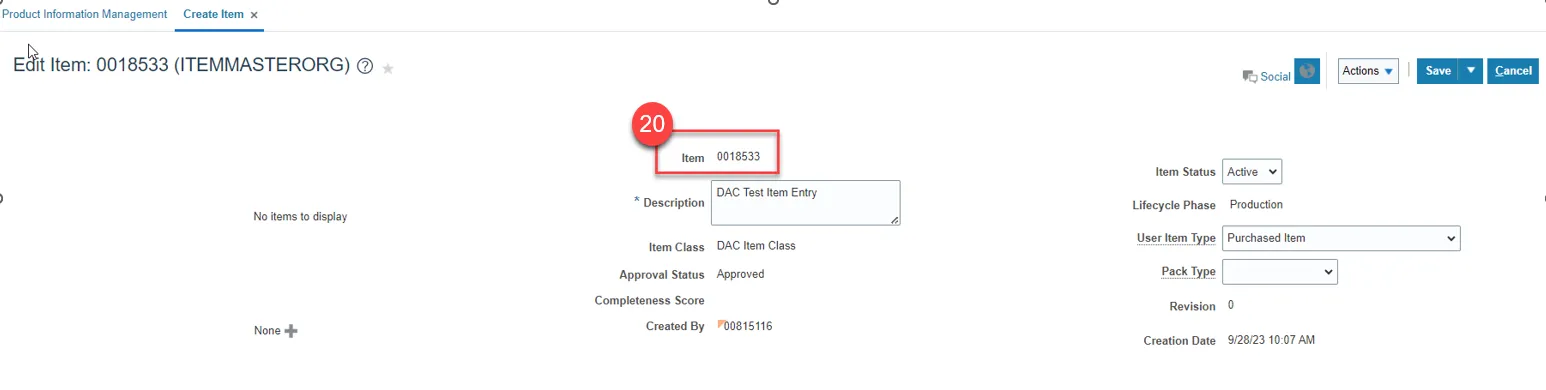
Step 20. The new Item number will be displayed.
5200DACNI and 5200DACCENI Non-Inventory Organization Item Association
To Associate a New Item to your 5200DACNI and 5200DACCENI Non-Inventory Organization in NCFS, please follow the steps below. There are 9 steps to complete this process.
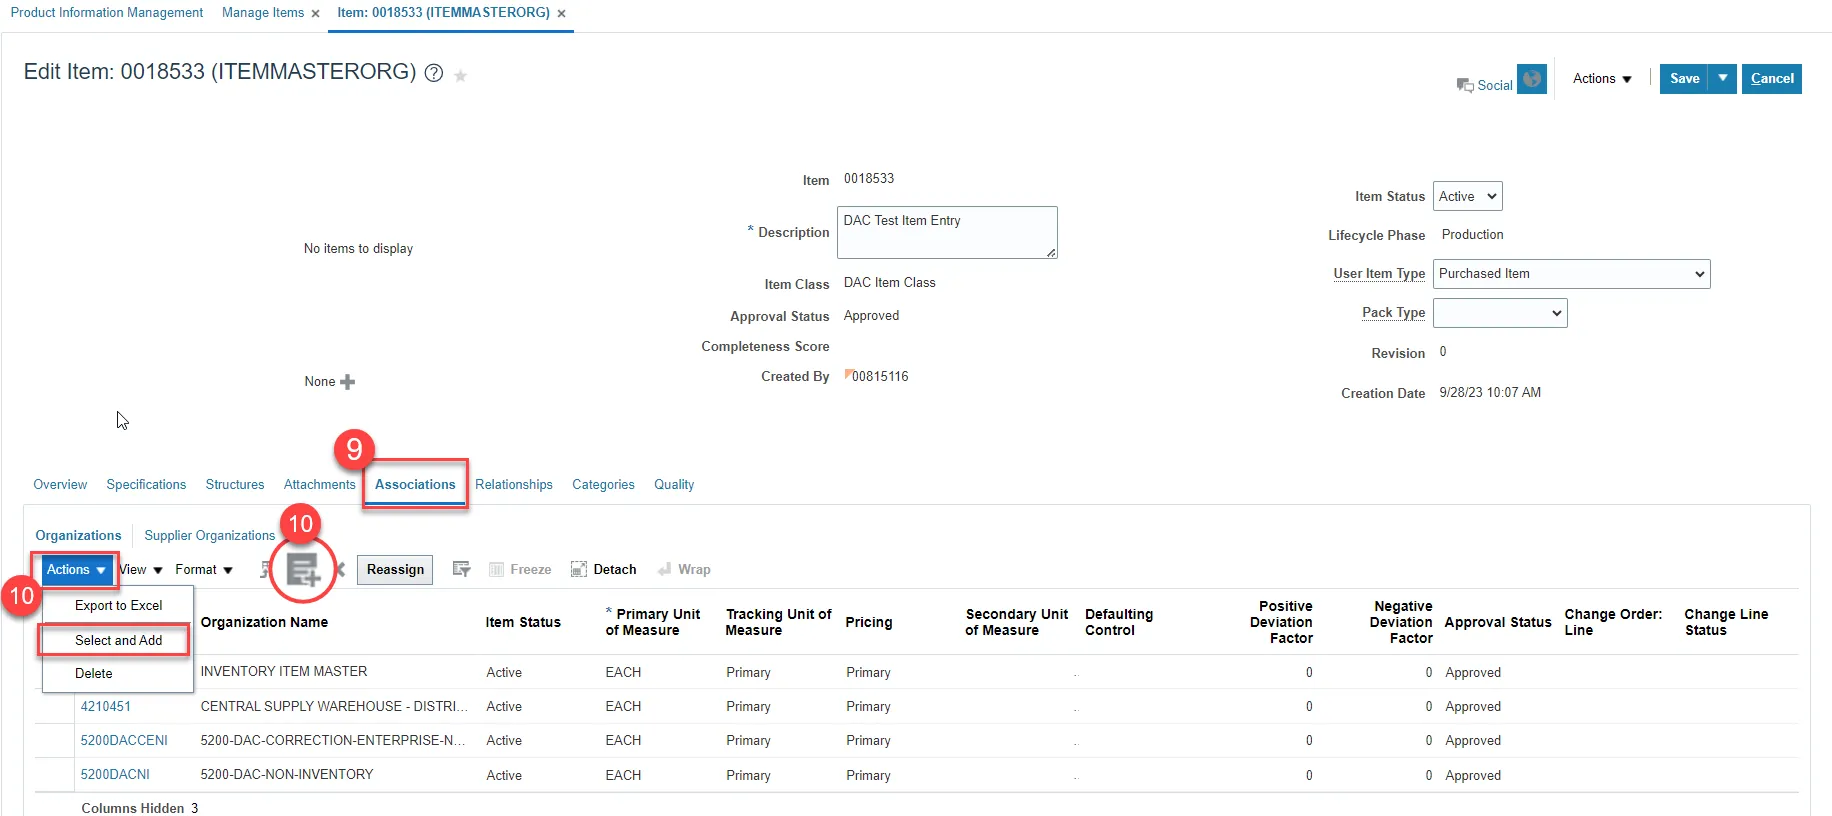
Step 1. Click on the Associations Tab for the newly created item.
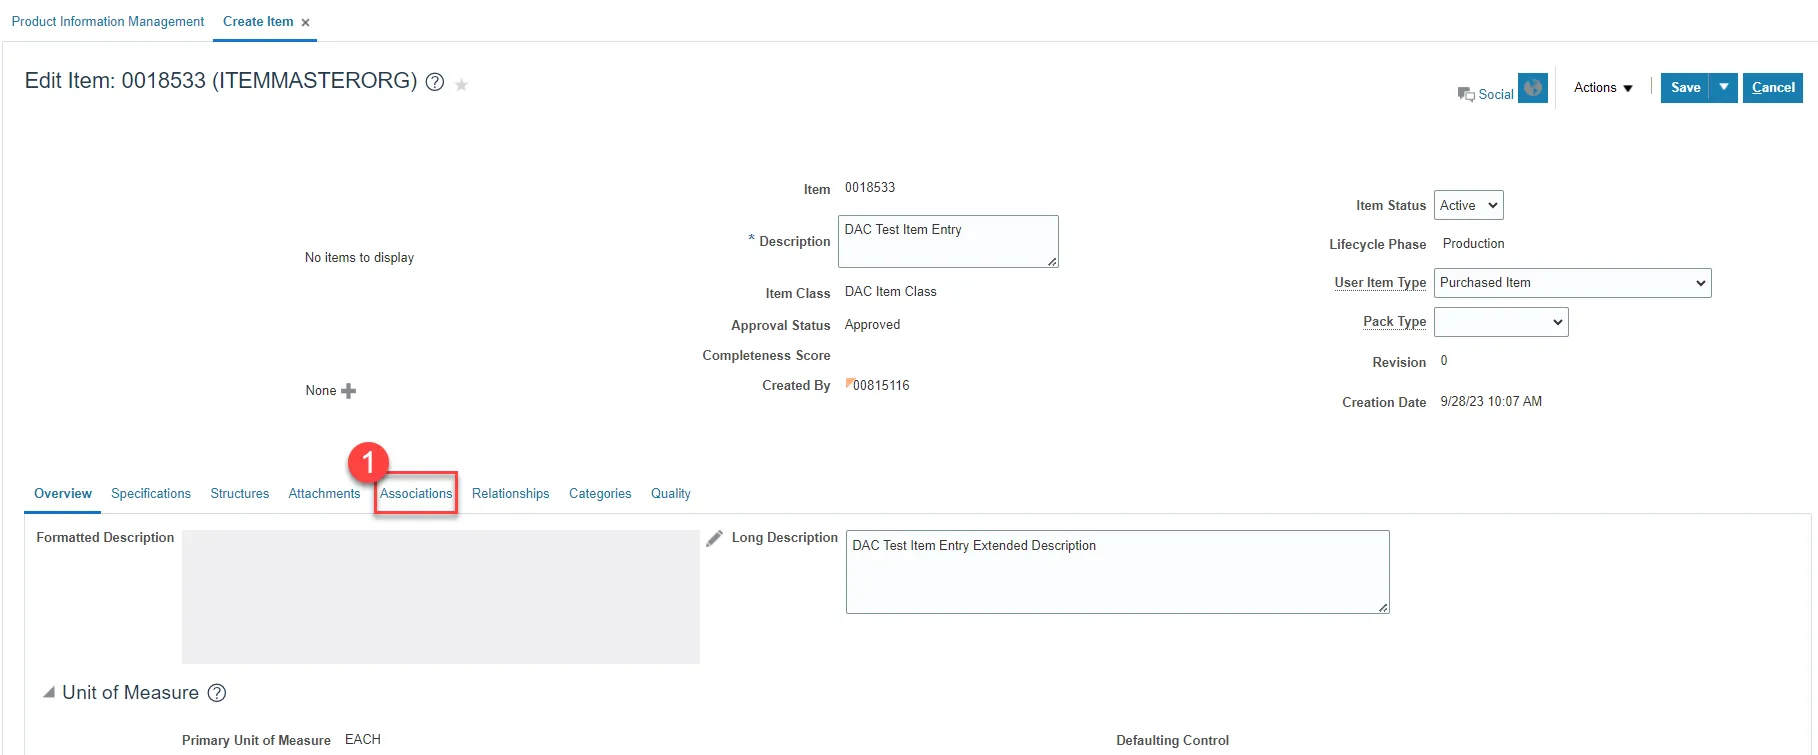
Step 2. Click the Select and Add Icon or Click the Actions drop down and Select and Add and a Pop-up window will appear to Select and Add: Organizations.
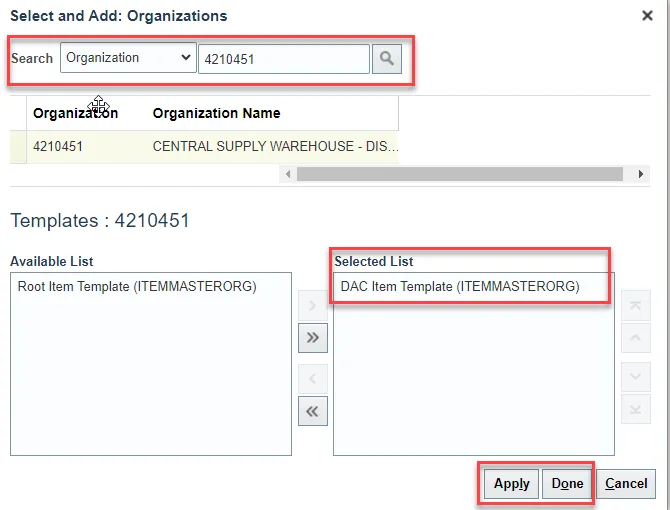
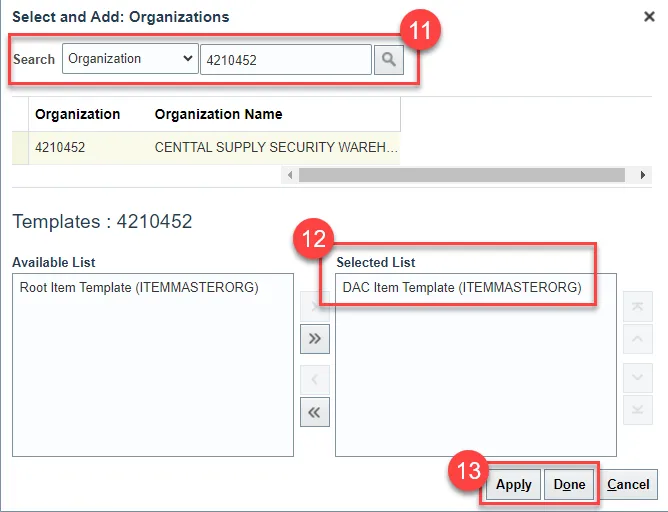
Step 3. Enter the 5200DACNI and 5200DACCENI Non-Inventory Organization to Associate item to and Click the Search button.
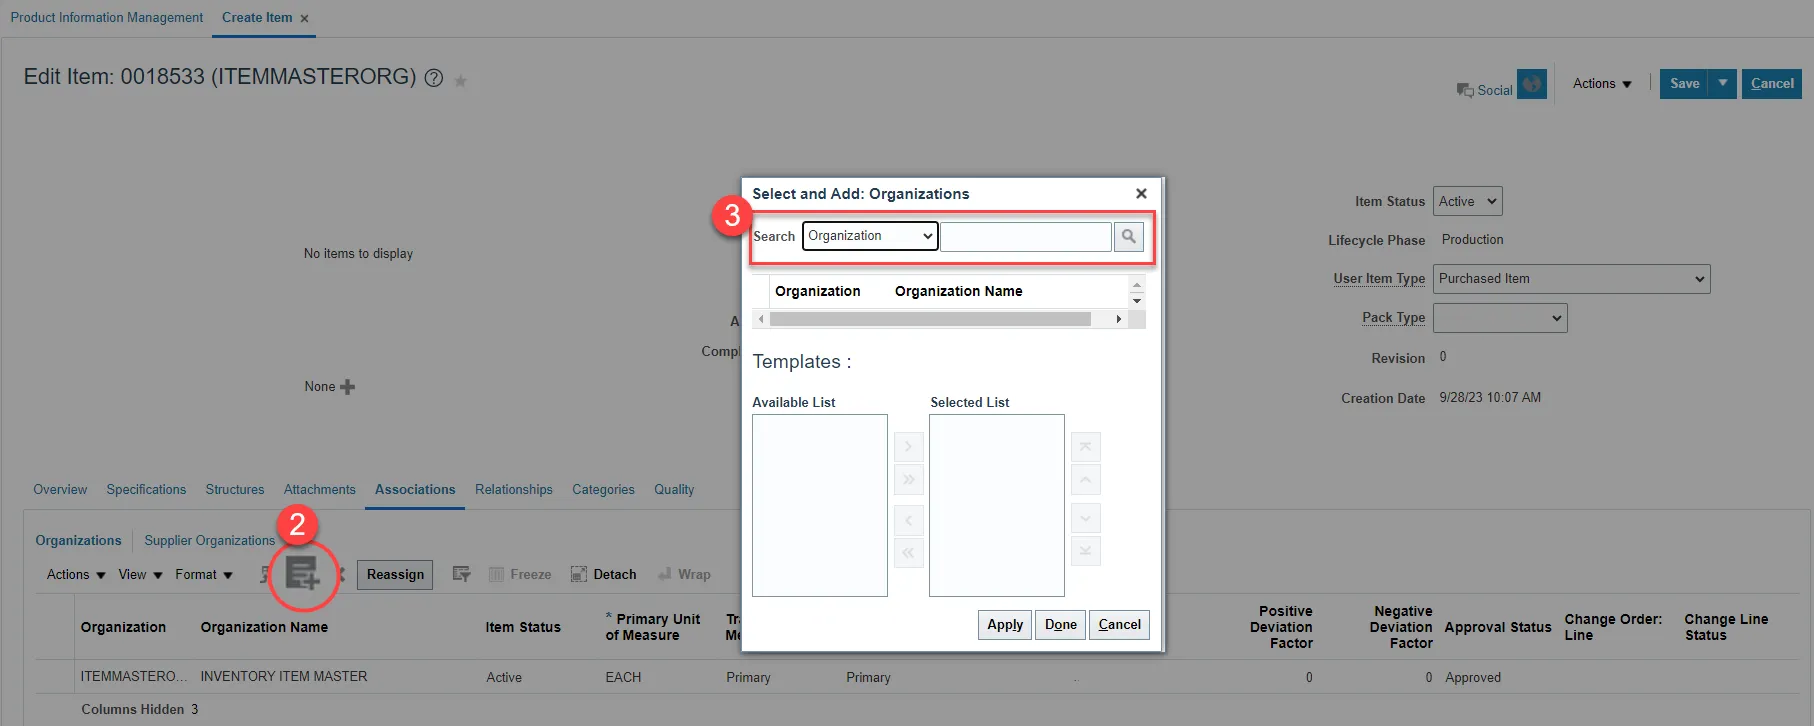
Note: Always Associate New Items to the Non-Inventory Organization 5200DACNI and 5200DACCENI first.
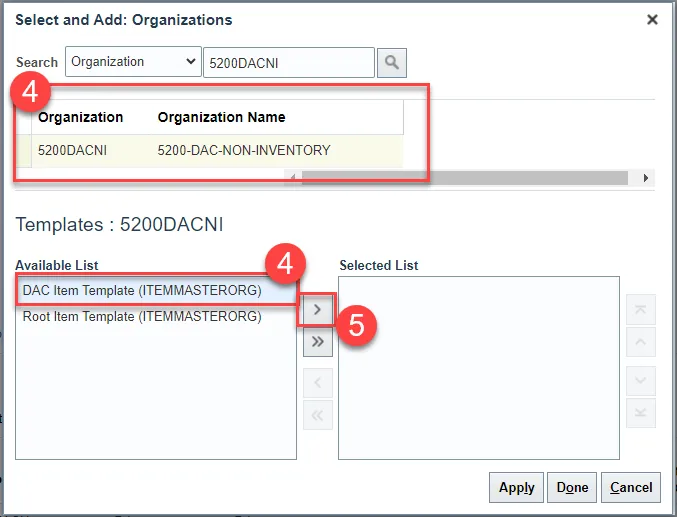
Step 4. Select the Organization and the DAC Item Template (ITEMMASTERORG) will populate under Available List.
Step 5. Click the Single Arrow to move this template to the Selected List.
Step 6. Click Apply and then Done.

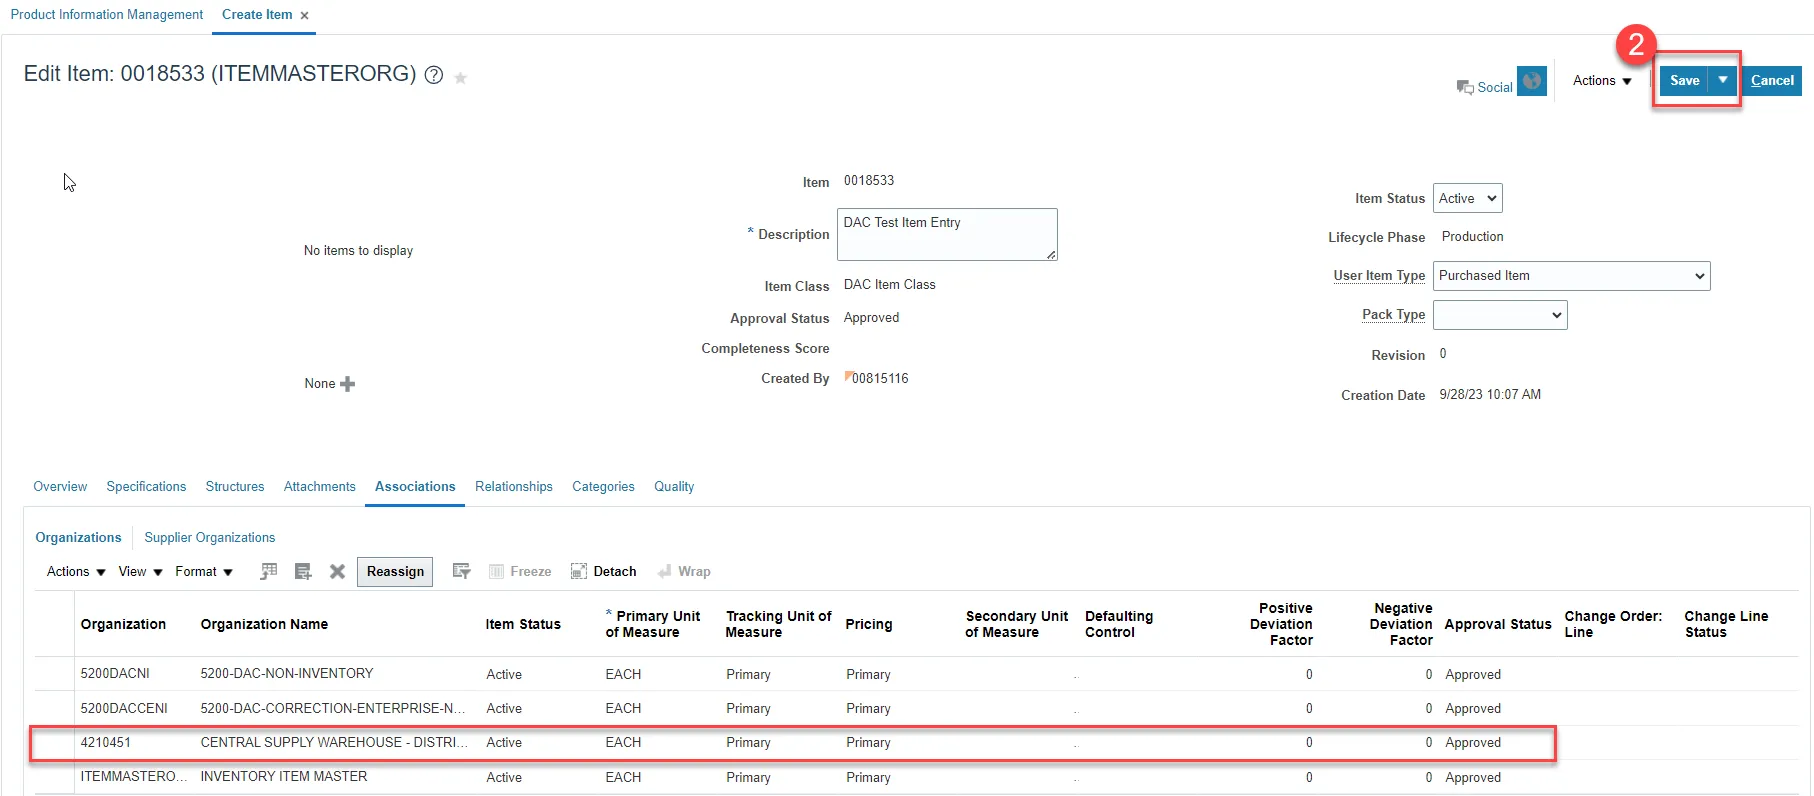
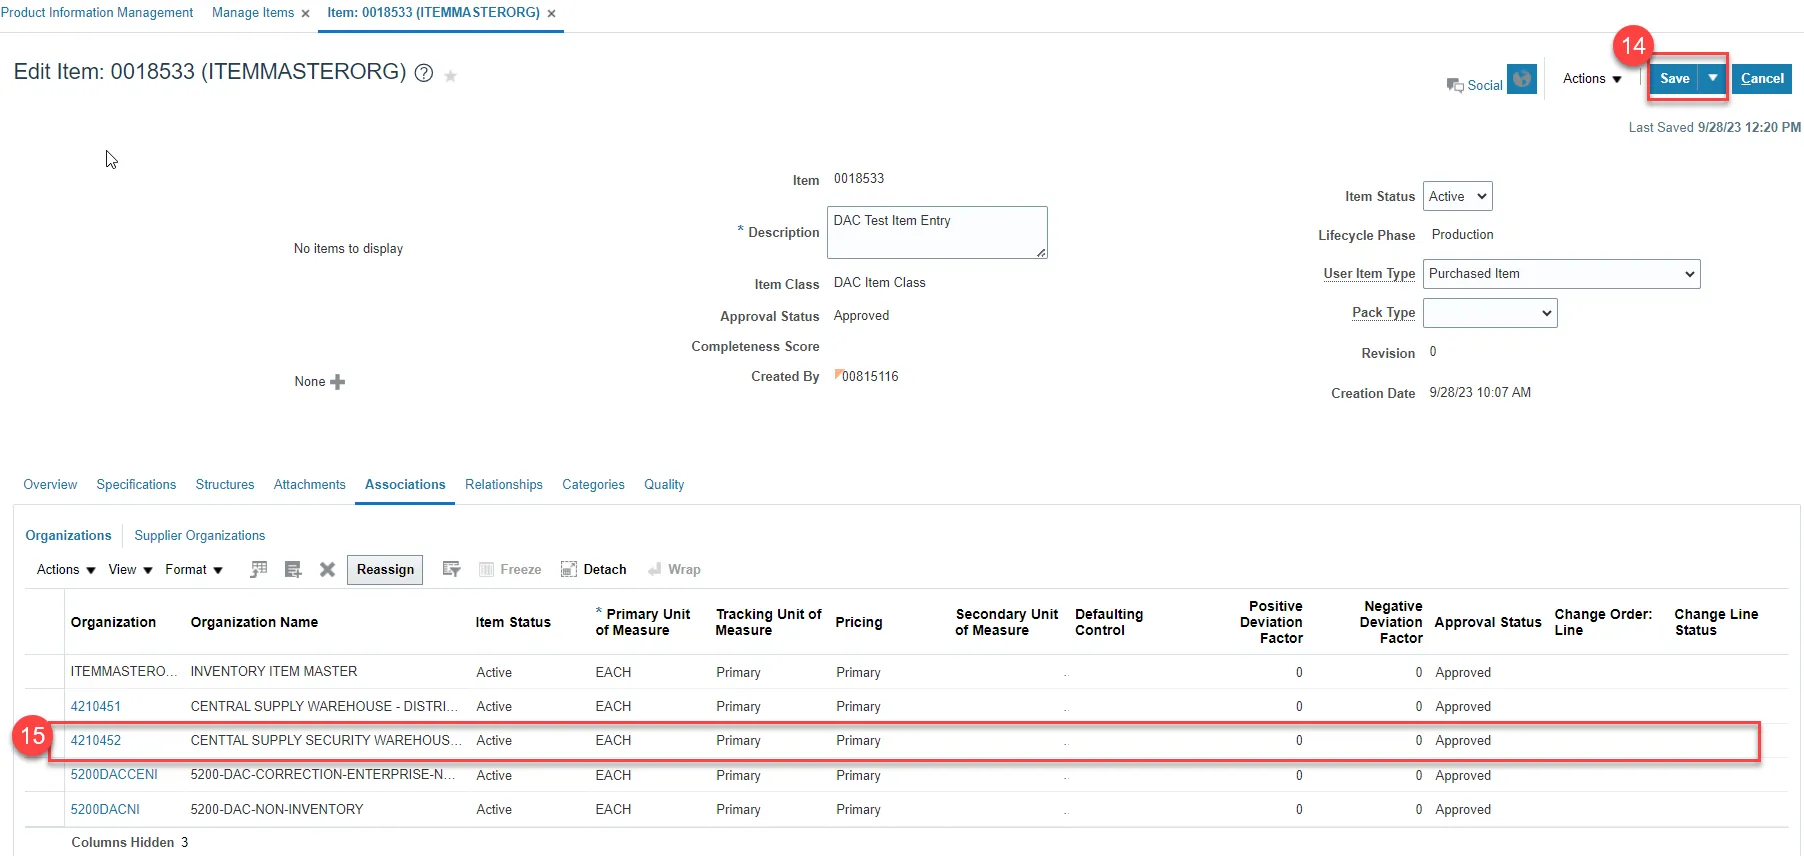
Step 7. The newly Associated Non-Inventory Organizations will now appear under the item’s Associations tab.
Step 8. Click Save.
Step 9. Repeat steps 1-8 for the 5200DACCENI Non-Inventory Organization.

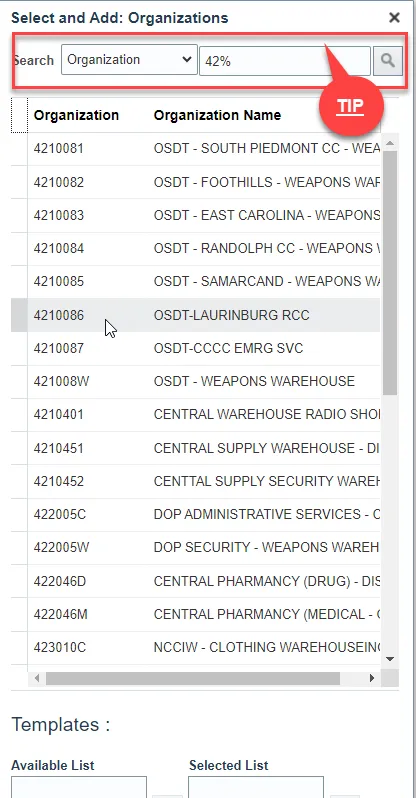
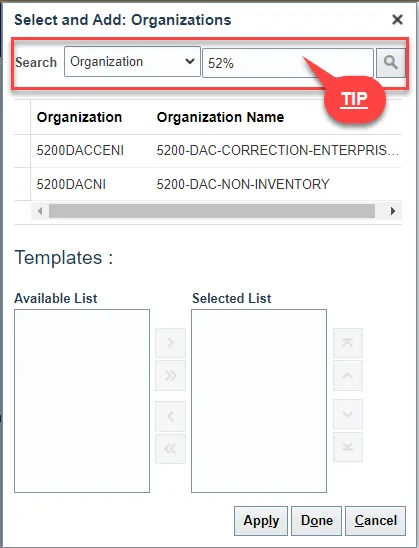
Tip: When Selecting and Adding Organizations/Association to an Item, you can pull up a complete list of DAC warehouses by entering a numeric character and percentage sign (42%). To search a specific group of warehouses such as Food warehouses, enter a numeric character and percentage sign and then the last character of the warehouse (42%F). To search DAC Non-Inventory Organizations, enter (52%). See examples below.
This will allow you to select multiple Organizations for Item association at once by pressing the Control (Ctrl) key and clicking multiple Organizations or holding down the SHIFT key and selecting multiple Organizations.
Note: The Organization Templates will not display, but the DAC Item Template (ITEMMASTERORG) will be selected for all Organizations selected.

DAC Inventory Organization Association
There are 2 steps to complete this process.
Step 1. Repeat steps 1-8 to add additional DAC Organization associations to the newly created item. See Example below.
Note: For DAC Main Distribution Centers (Example: 4210451, etc…), the Replenishment Source Type MUST always be SUPPLIER.
Step 2. Click Save.
Associate Existing Items to Additional DAC Inventory Organization(s)
There are 15 steps to complete this process.
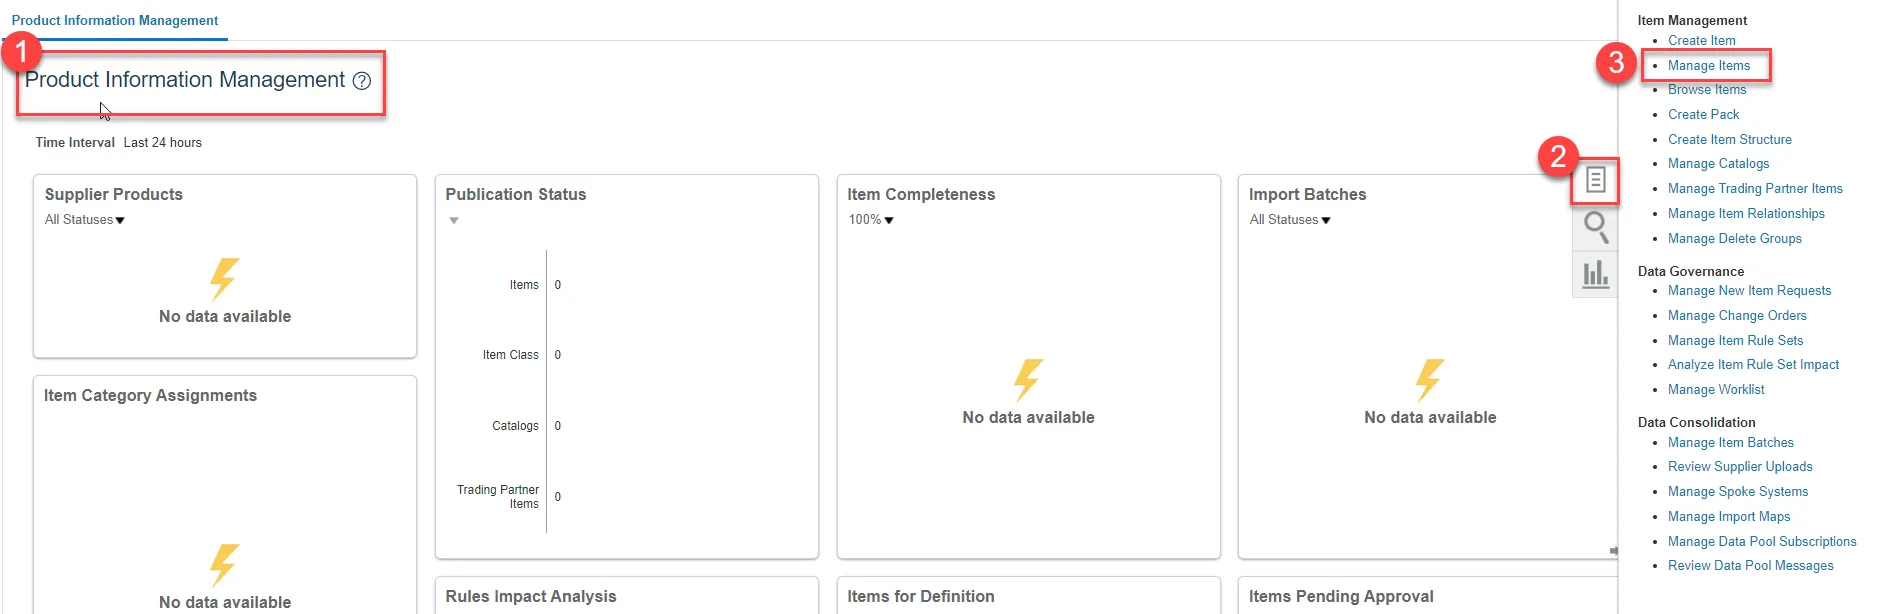
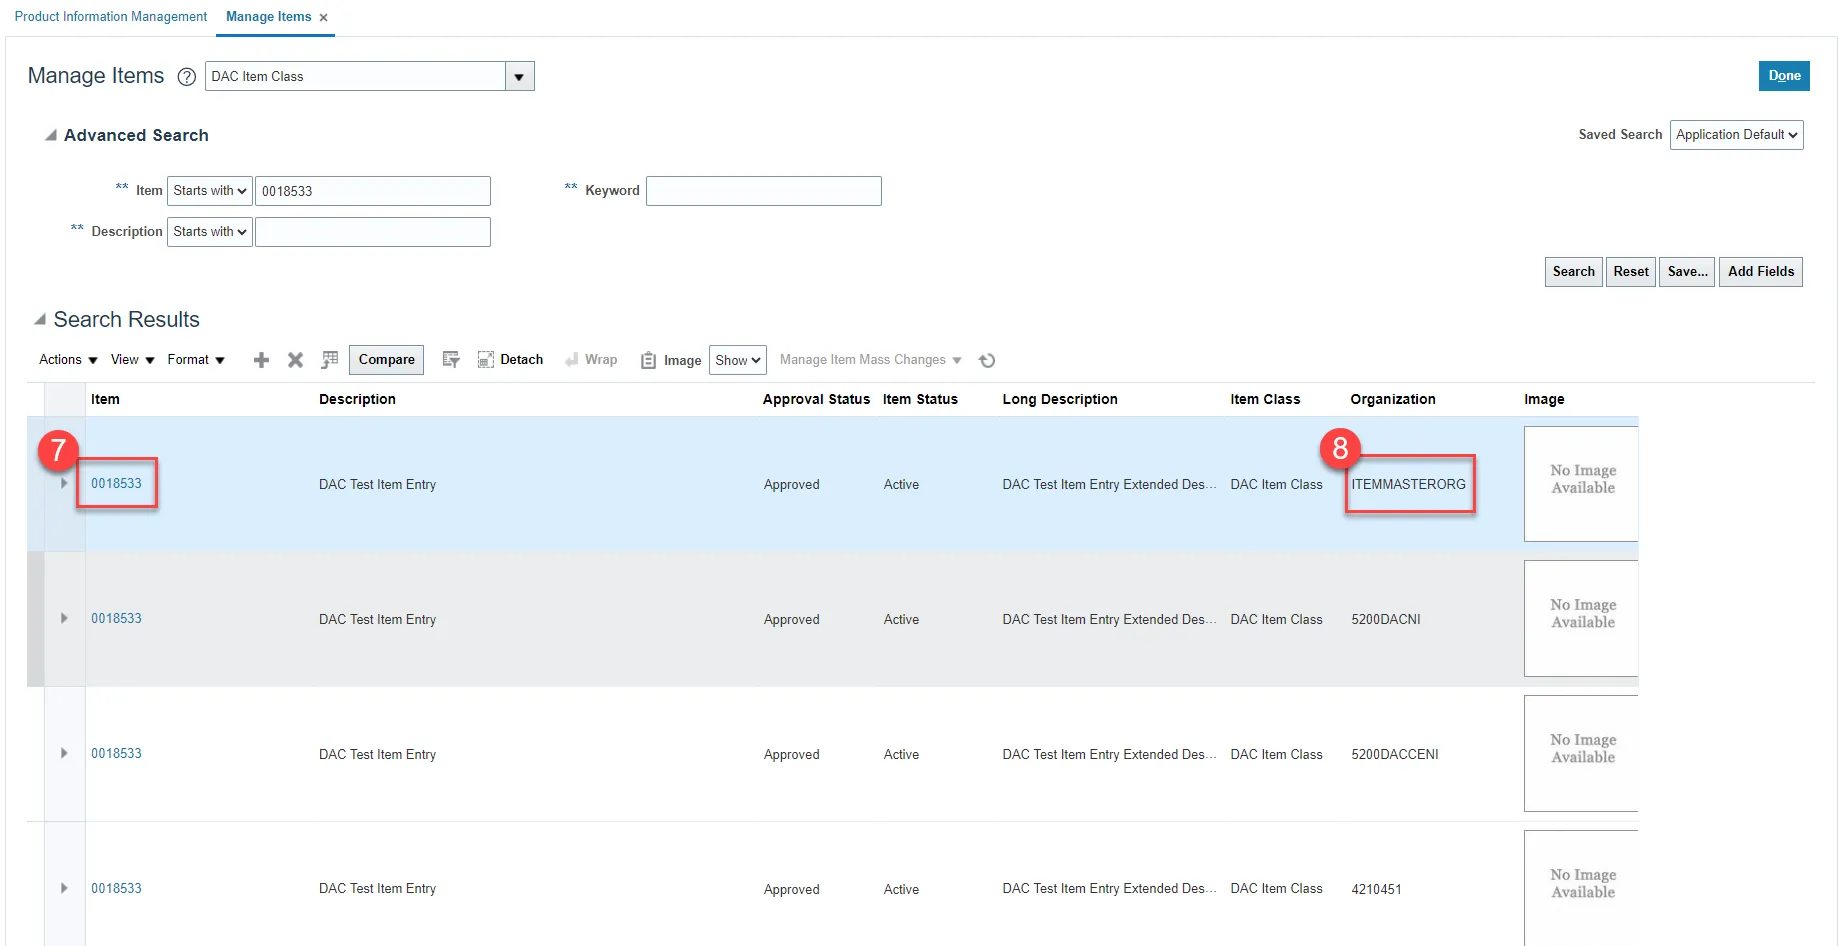
Step 1. Navigate to Product Information Management tab.
Step 2. Click the Task Menu Icon.
Stpe 3. Select Mange items under Item Management.
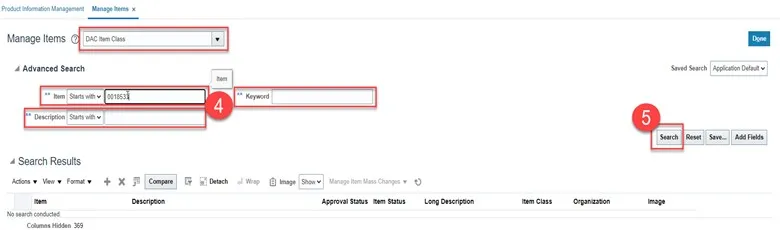
Step 4. Select the DAC Item Class.
Stpe 5. Enter Item Number, Description or Keyword to search Item for updating.
Step 6. Click the Search Button.

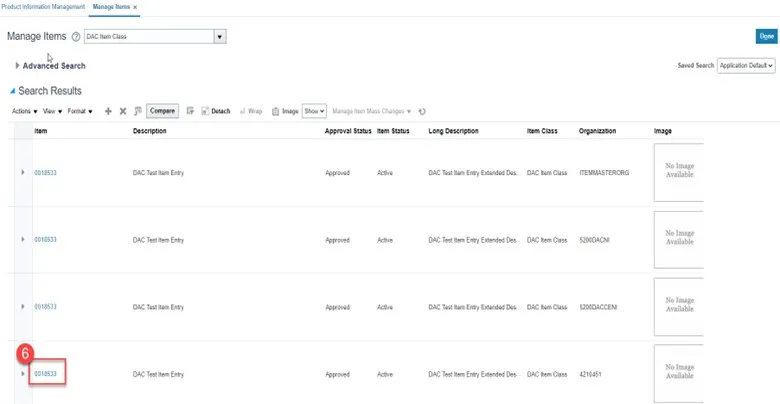
Step 7. The DAC item will populate and show a list of associated Organizations.
Step 8. Click the Item number for ITEMMASTERORG organization.
Step 9. Click the Associations Tab.
Step 10. Click the Select and Add icon or Click Actions and Select and Add.
Step 11. Select the DAC Organization(s) to associate the existing item too.
Step 12. Select the DAC Item Template (ITEMMASTERORG) and click the Arrow icon to move to Selected List.
Step 13. Click Apply and then Done.
Step 14. Click Save.
Step 15. The new DAC Organization/Association is complete.
Adding Item to a Sub-Inventory Location within a Warehouse
There are 28 steps to complete this process.
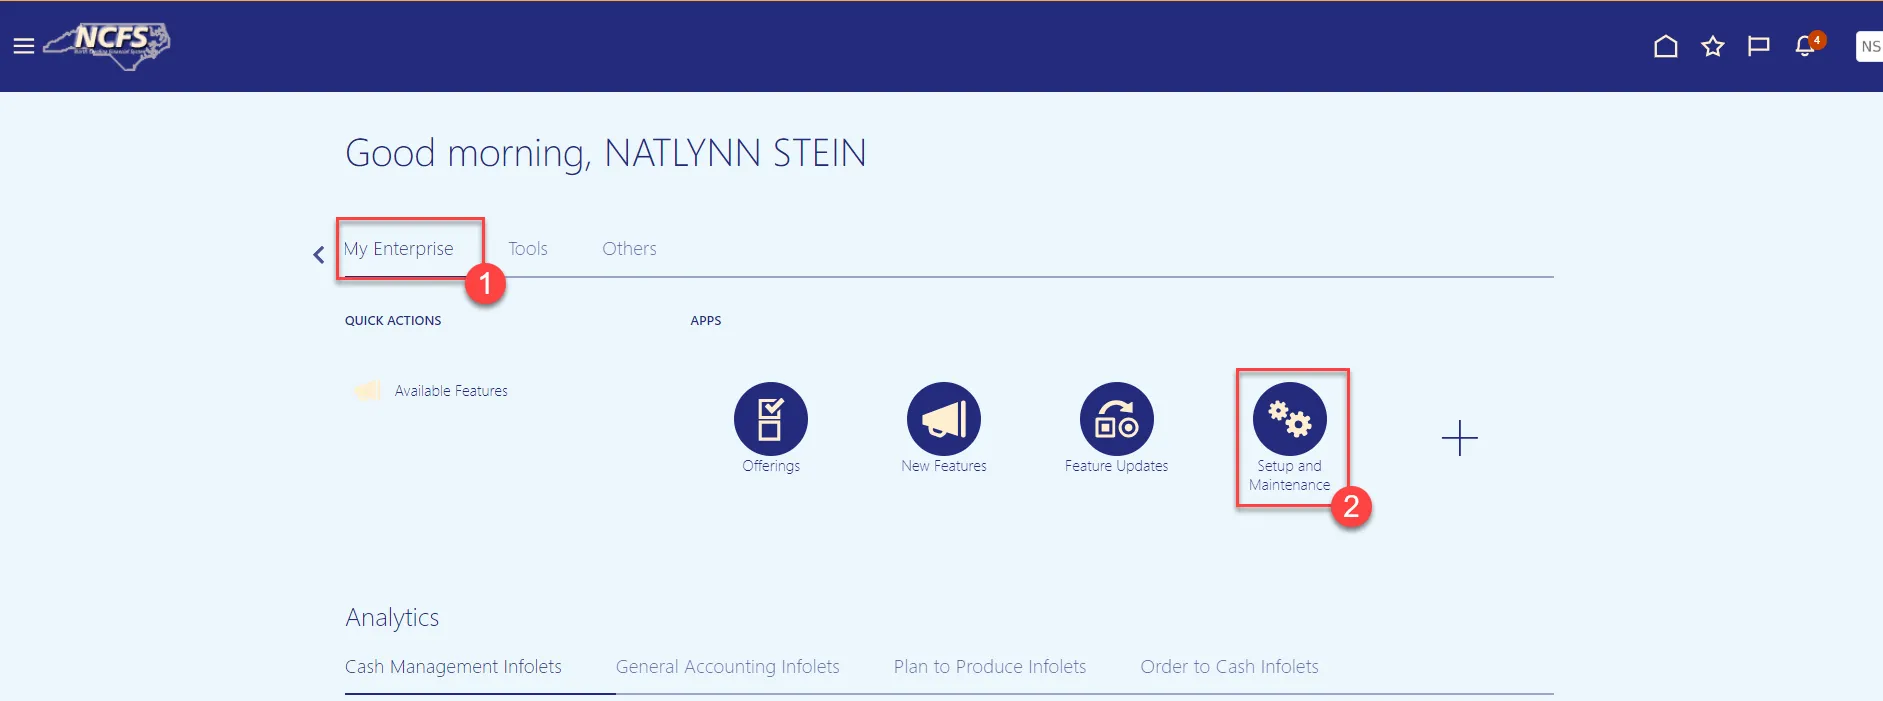
Step 1. Navigate to My Enterprise.
Step 2. Select Setup and Maintenance.
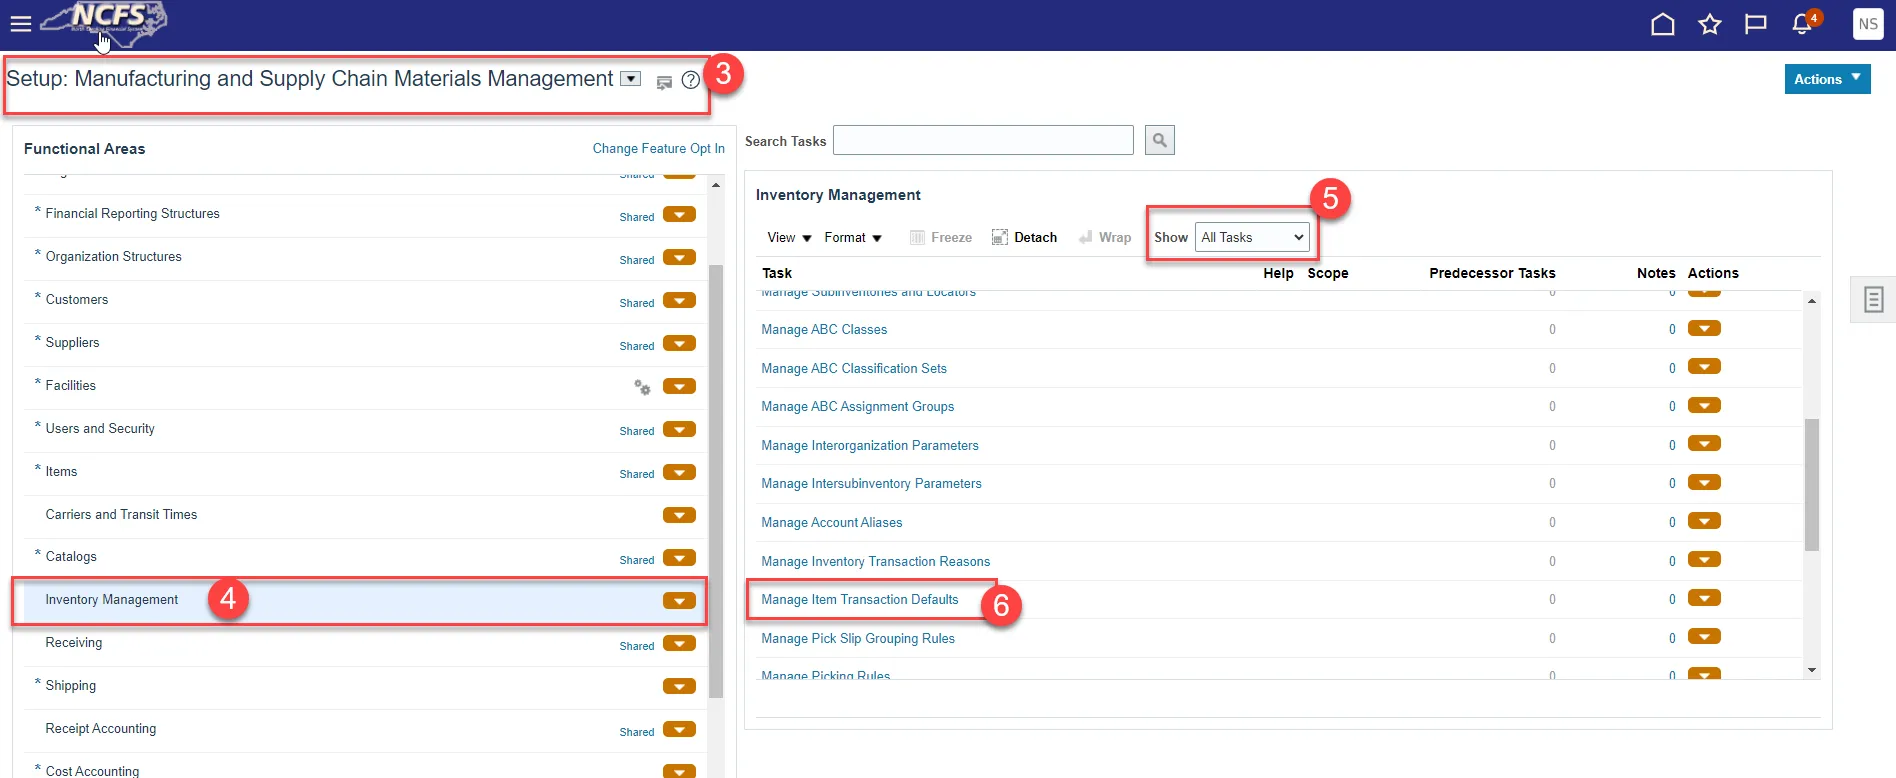
Step 3. Select Manufacturing and Supply Chain Materials Management.
Step 4. Select Inventory Management.
Step 5. Change the Show field drop down to All Tasks.
Step 6. Select Manage Items Transaction Defaults.
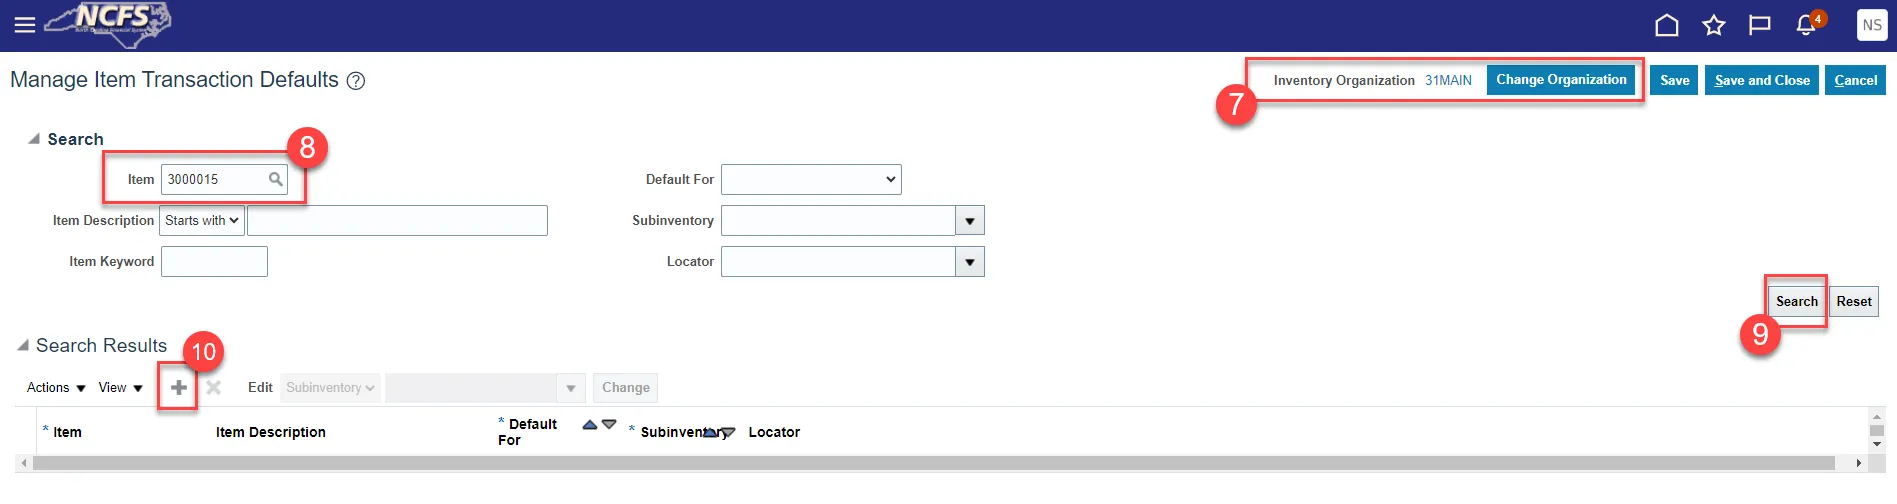
Step 7. Select the appropriate Inventory Organization.
Step 8. Enter the Item number.
Step 9. Click Search.
Step 10. Click the Add sign to add the Item to a Sub-Inventory.
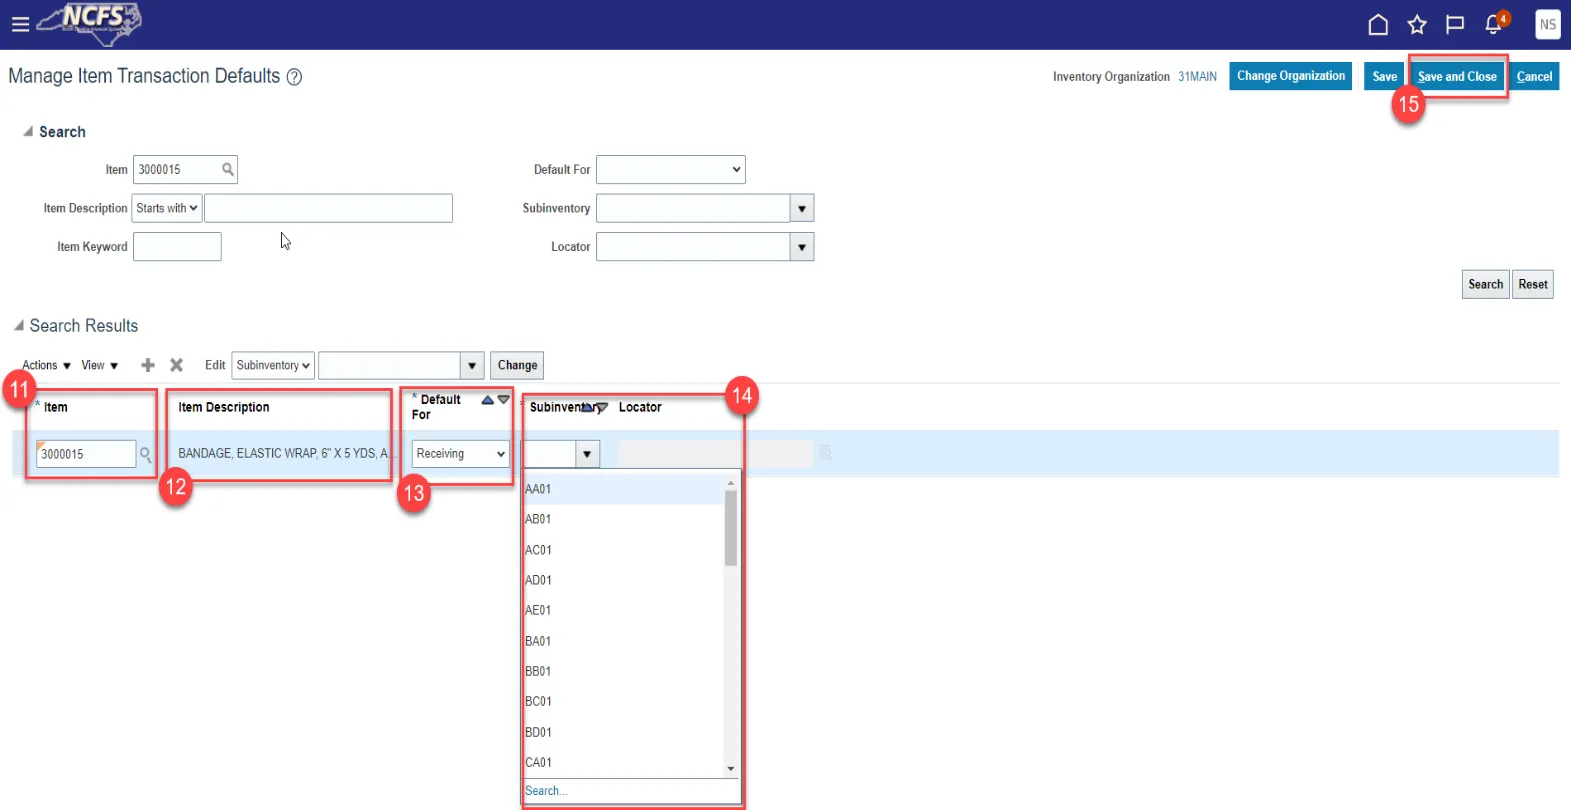
Step 11. Enter the Item Number in the Item field.
Step 12. The Item Description will populate.
Step 13. Select Receiving from the Default For drop down list.
Step 14. Select the appropriate Sub-inventory from the drop-down list.
Step 15. Click Save and Close.
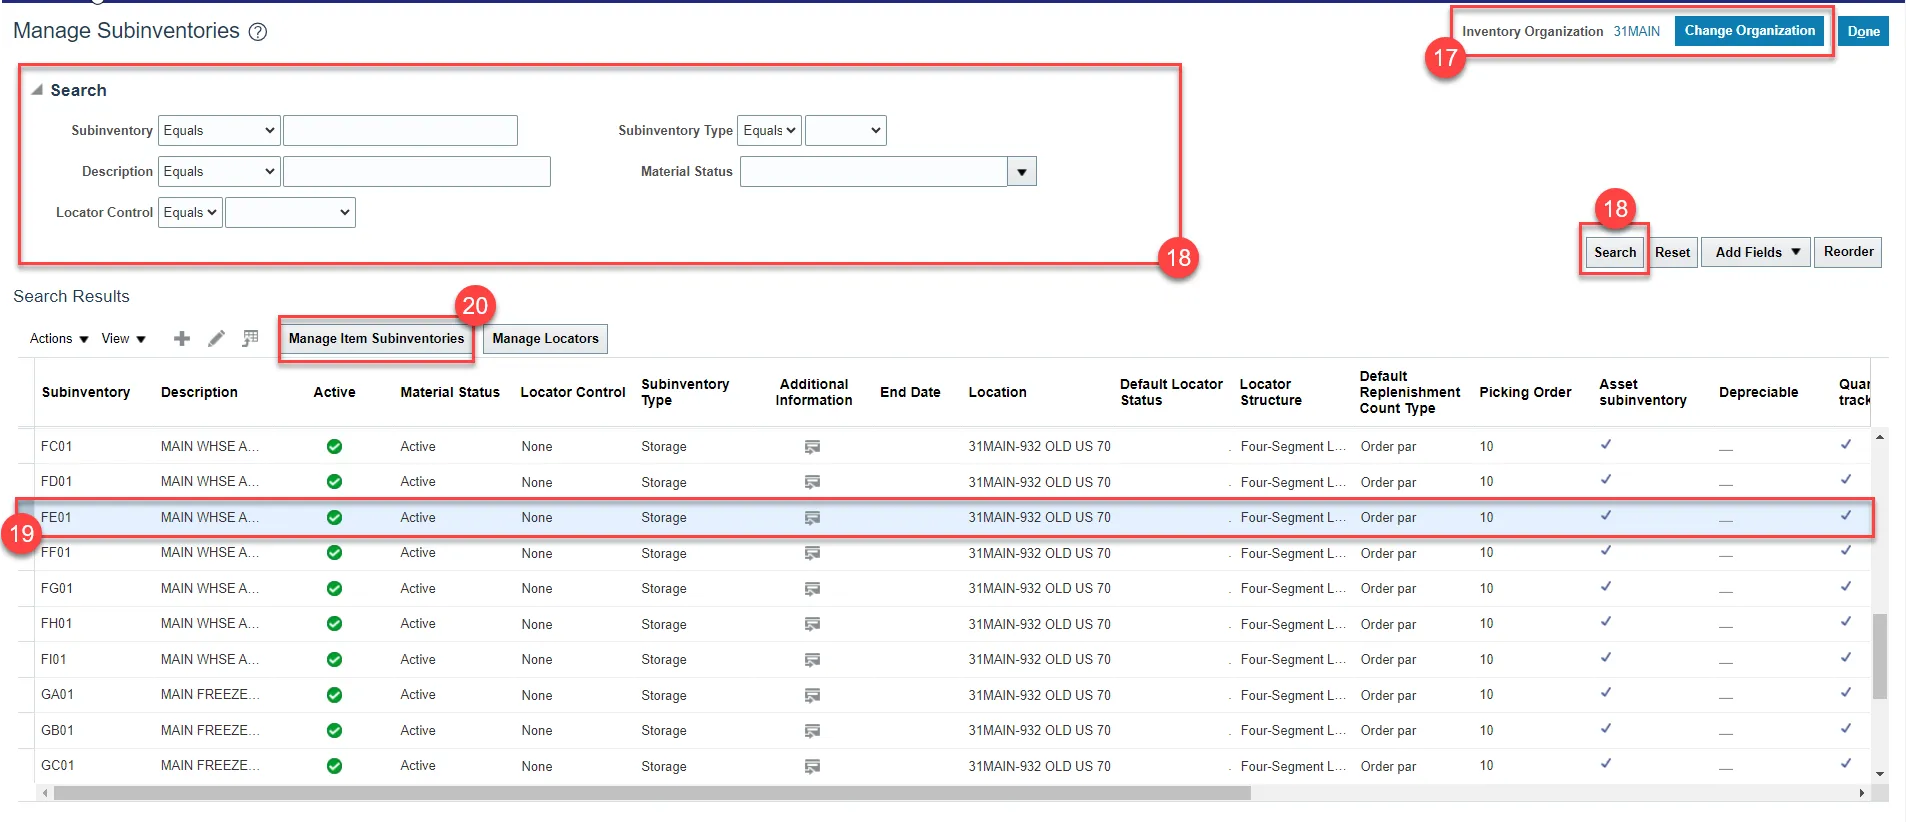
Step 16. Navigate back to Inventory Management Functional Area and select Manage Subinventories and Locators.
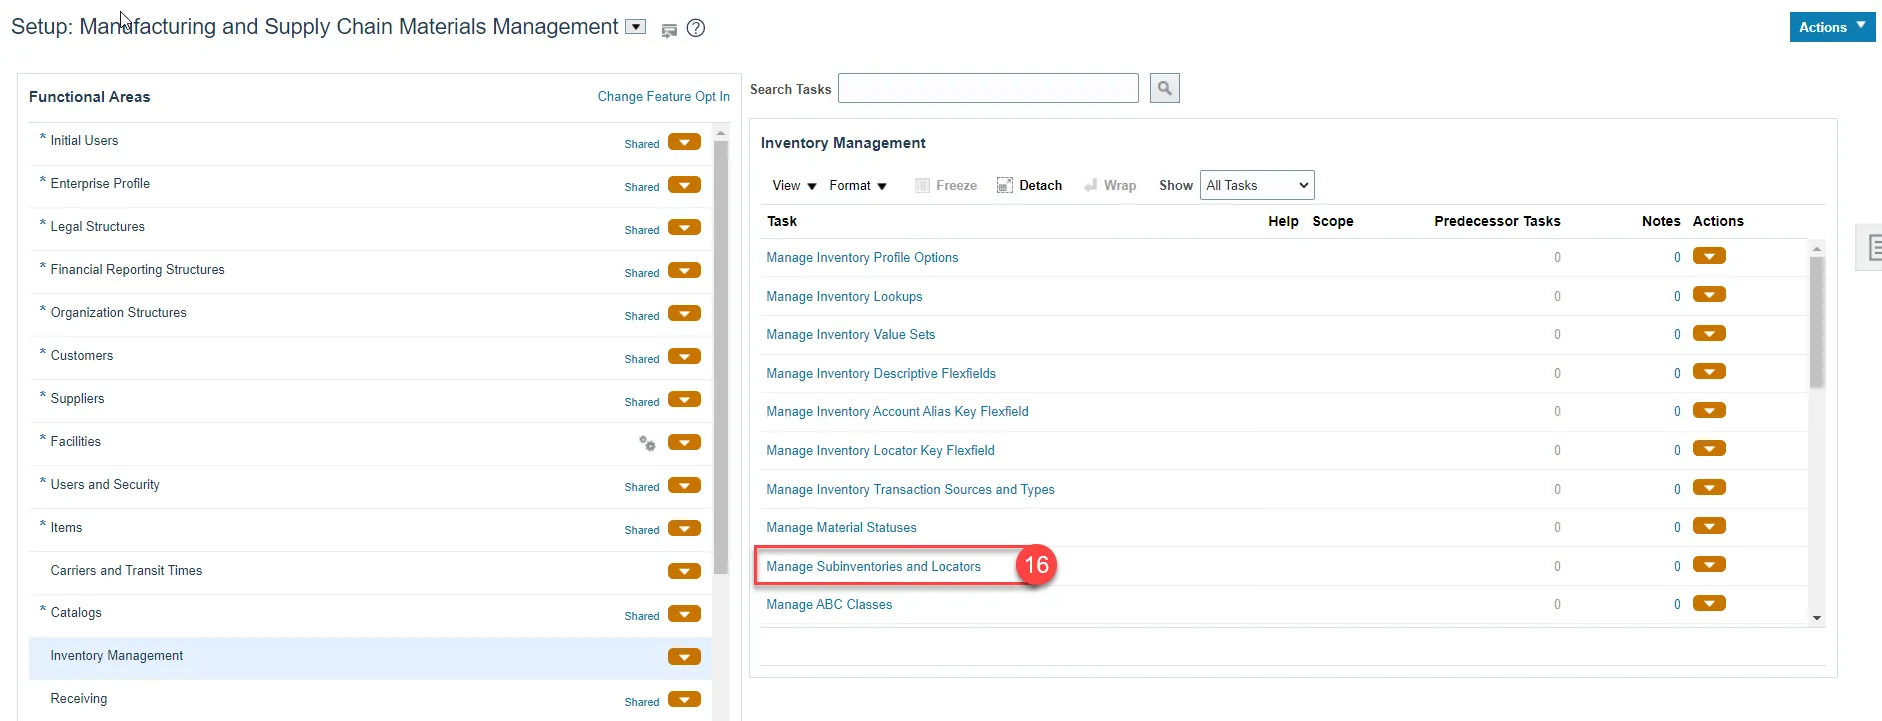
Step 17. Select the appropriate Inventory Organization.
Step 18. Enter appropriate search criteria if known or click the Search button to pull up all valid Subinventories.
Step 19. Click on the appropriate Subinventory row.
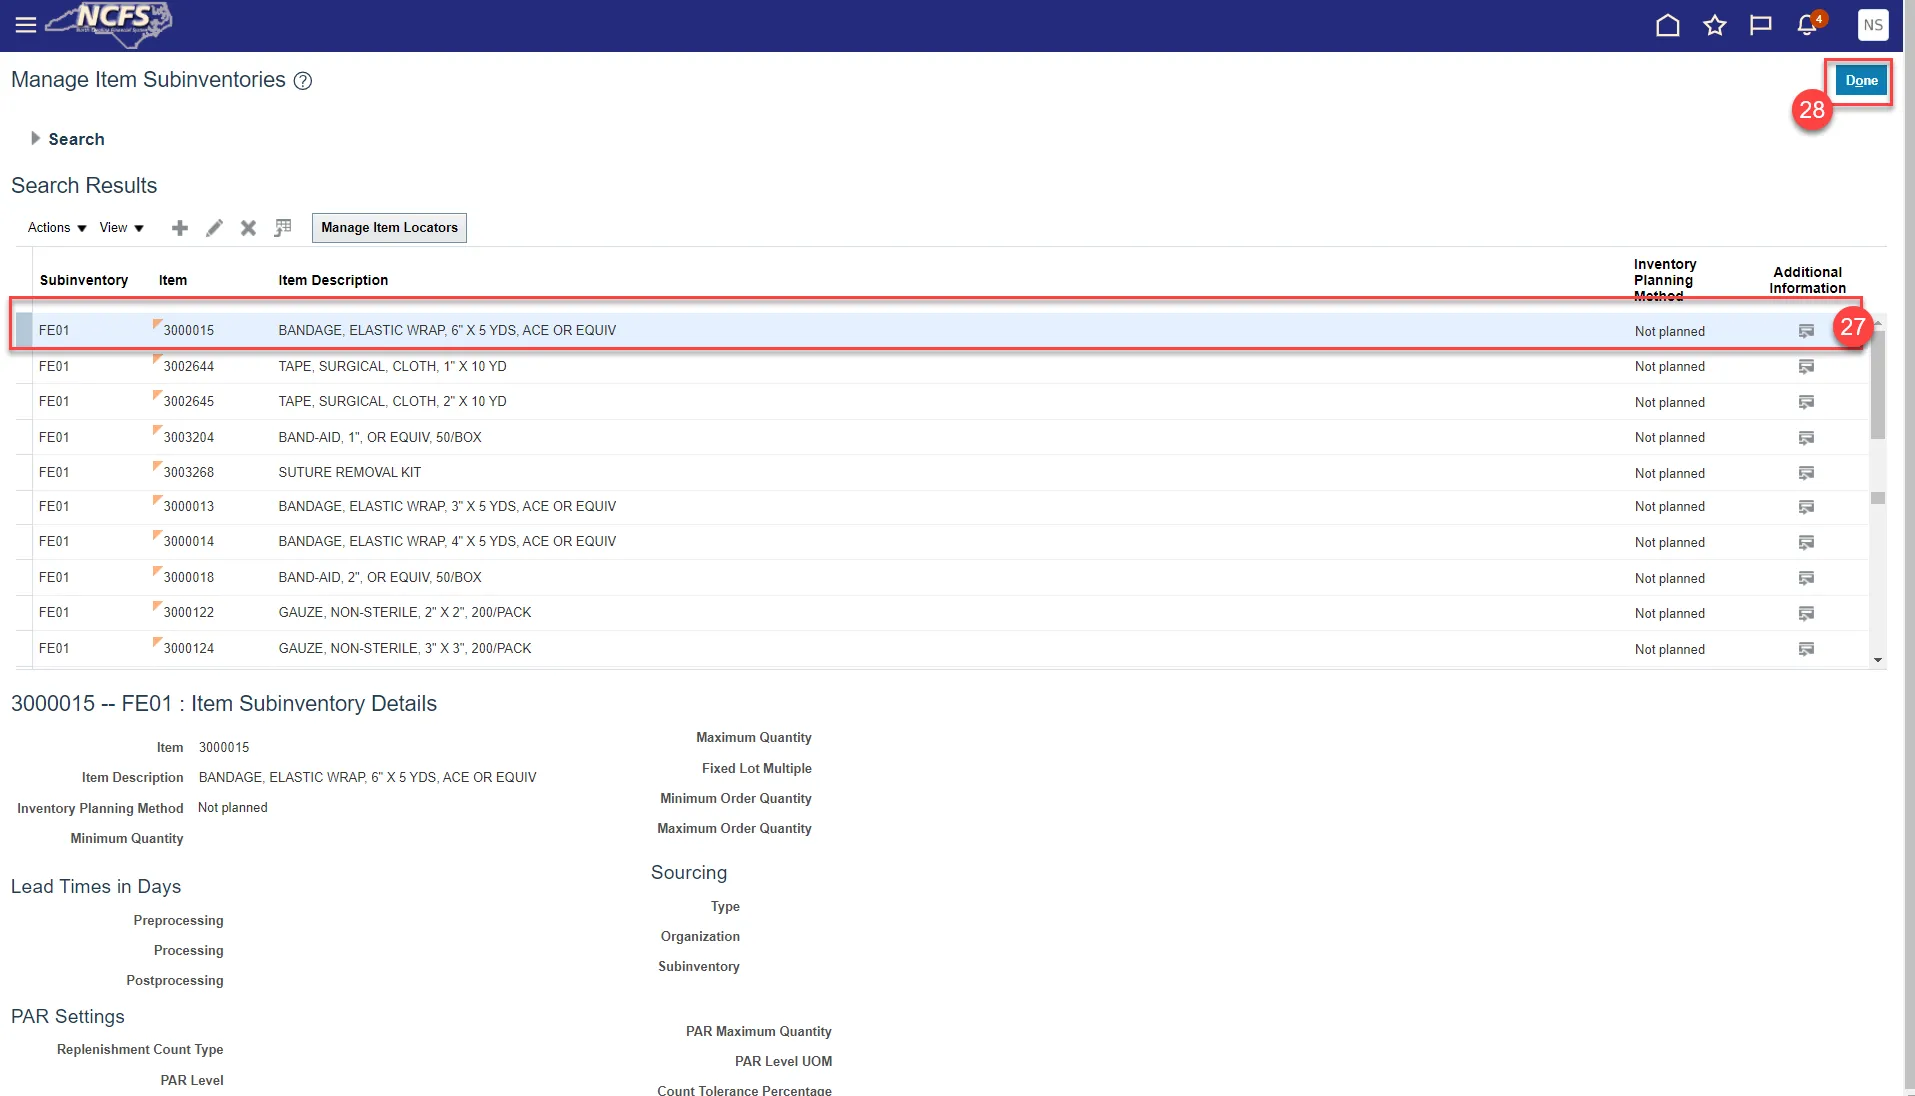
Step 20. Click the Manage Item Subinventories button.
Step 21. Click on Actions and select Add.
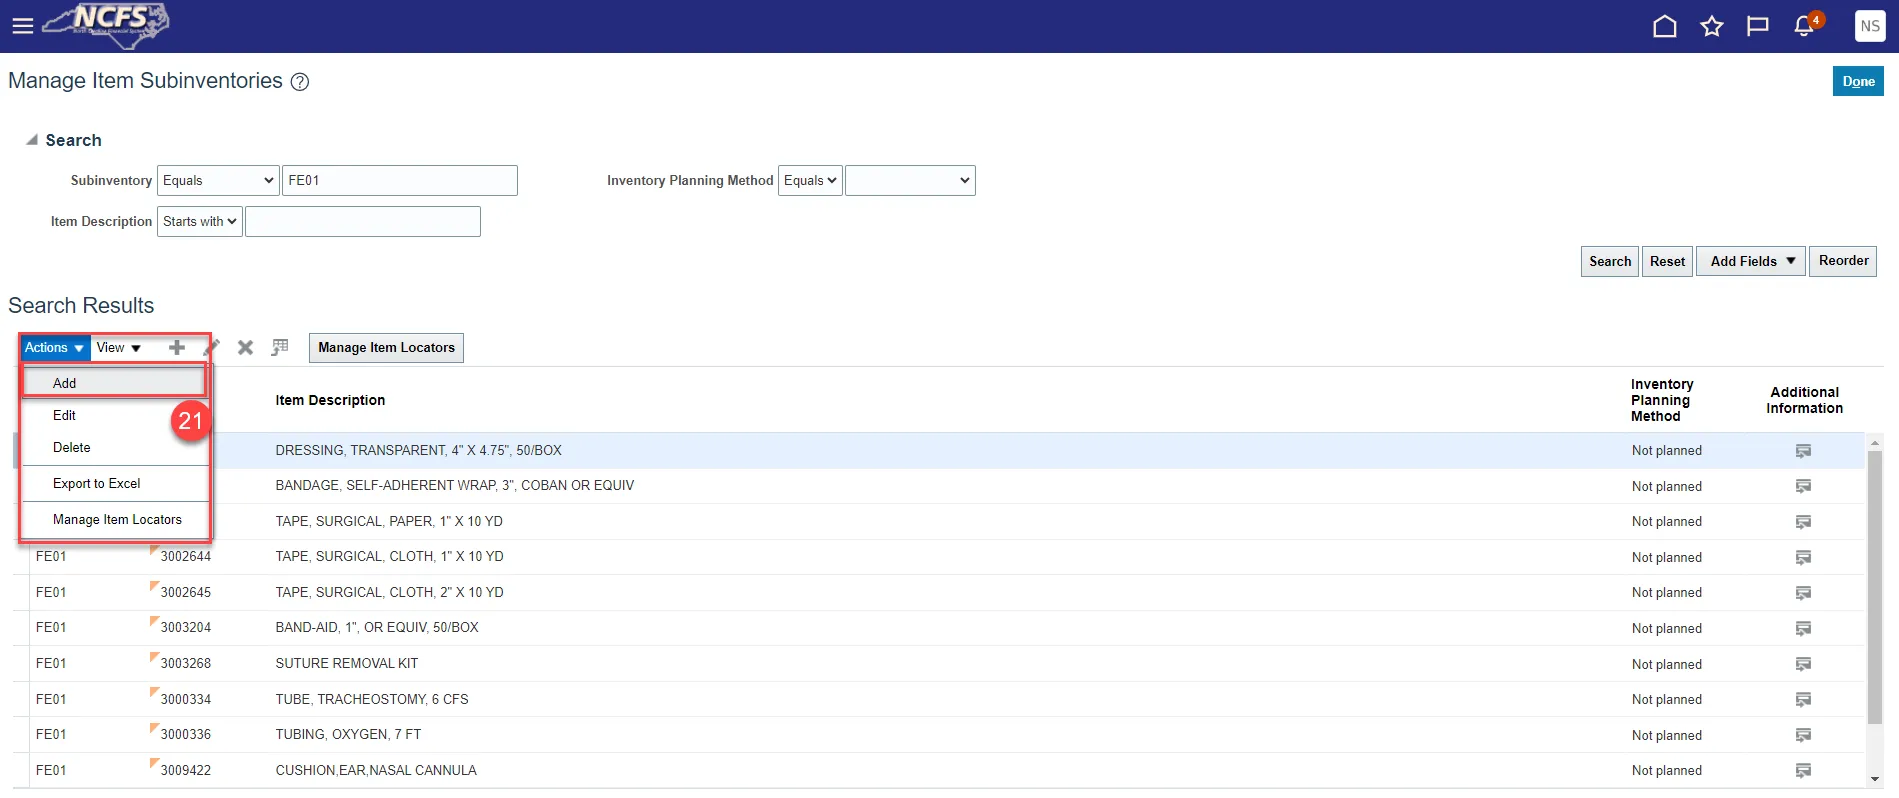
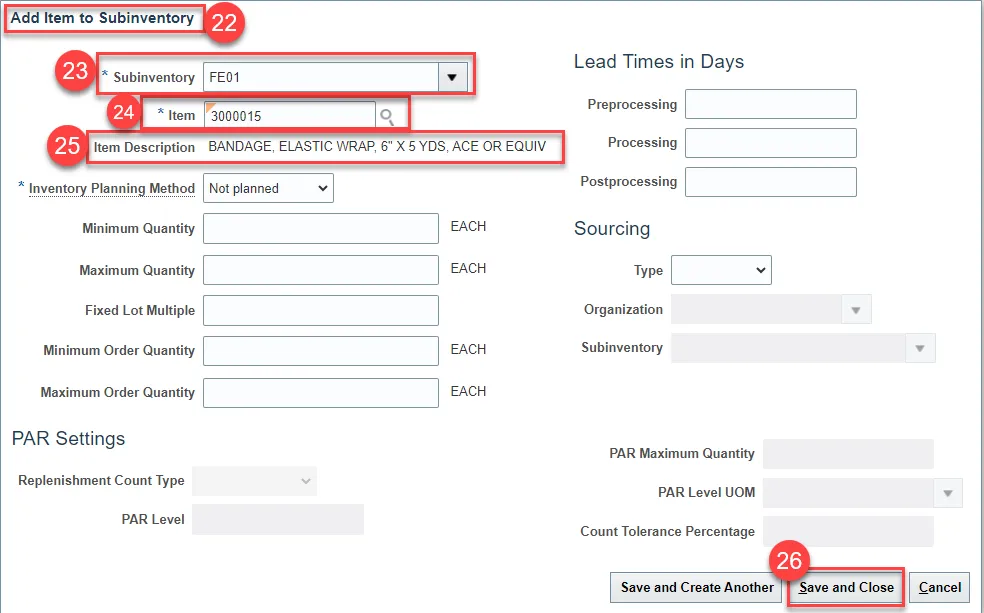
Step 22. The Add Item to Subinventory window will appear.
Step 23. The Subinventory will default with selection.
Step 24. Enter the Item number in the Item field.
Step 25. The Item Description will populate.
Step 26. Click the Save and Close button.
Step 27. The Item will now show associated with to the Subinventory selected.
Step 28. Click the Done button.
Associate DAC items to an Organization When the Replenishment Source is an Organization (Warehouse)
In most cases, your DAC warehouse(s) will order inventory items from another DAC warehouse. The Source Replenishment Type will need to be updated to Organization and an Organization will need to be selected. Follow the below steps to set up this relationship.
There are 9 steps to complete this process.
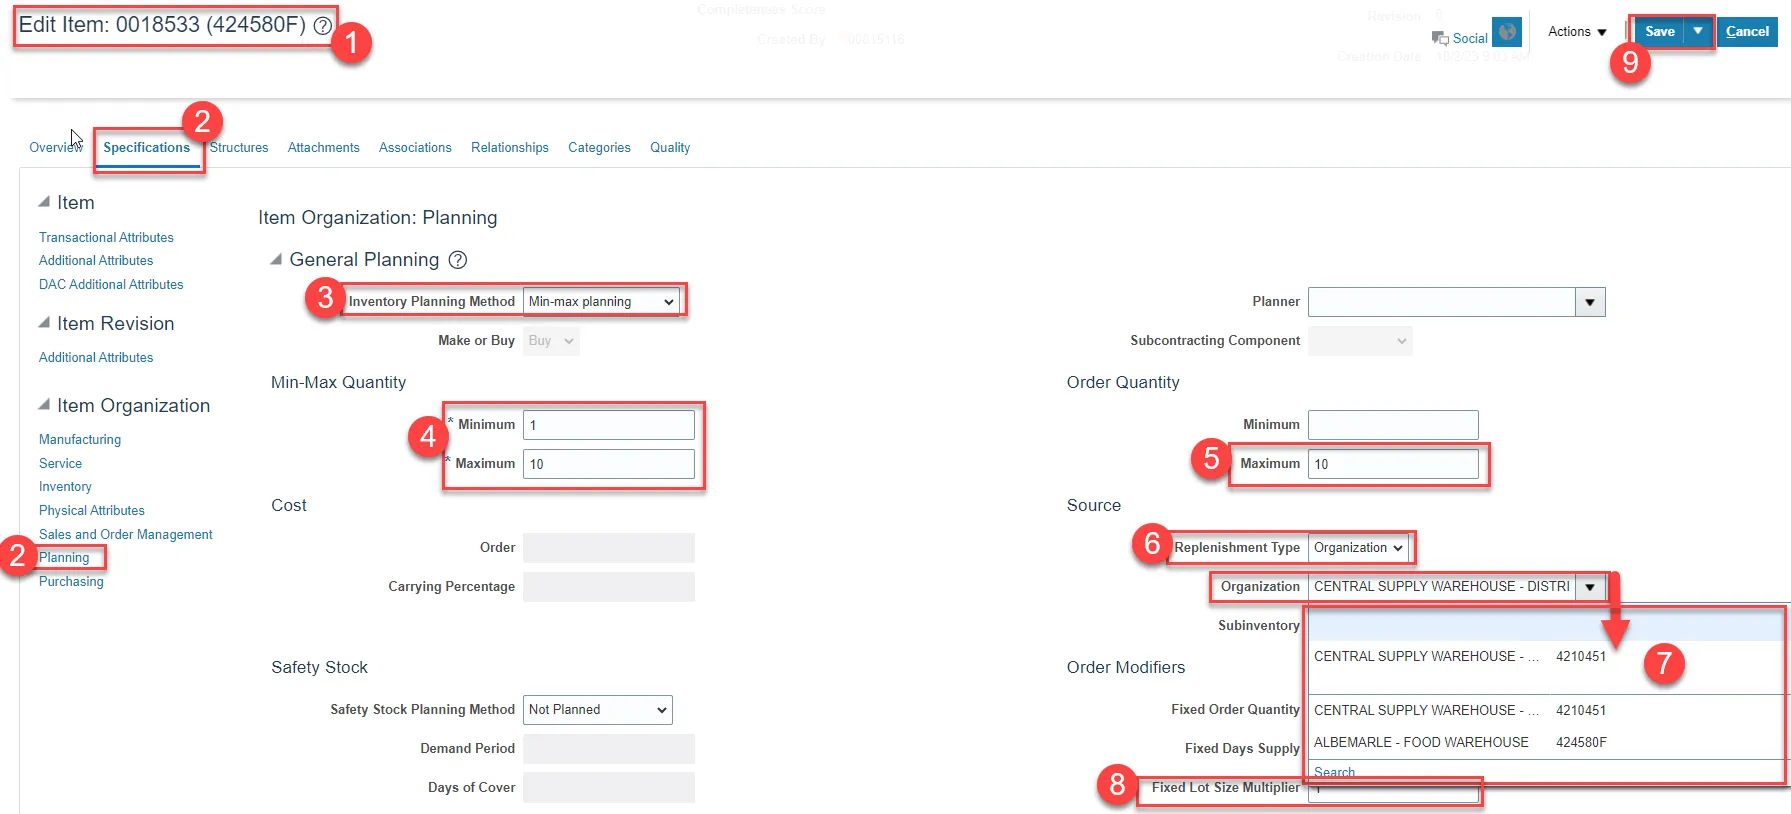
Step 1. Pull up the Item and Organization in NCFS.
Step 2. Click on Specifications and then Planning.
Step 3. Set Inventory Planning Method to Min-Max Planning.
Step 4. Enter Minimum and Maximum quantities.
Step 5. Enter Maximum Order Quantity.
Step 6. Under Source enter Replenishment Type as Organization.
Step 7. Under Organization field select the Source Organization from the drop down.
Step 8. Under Order Modifiers, enter 1 as the Fixed Lot Size Multiplier.
Step 9. Click Save.
DAC Min/Max Value (Planning) and Updating Other Attributes
Note: Min/Max Value (Planning) is not required for 5200DACNI and 5200DACCENI Non-Inventory Organizations and ITEMMASTERORG.
There are 13 steps to complete this process.
Step 1. Navigate to the Product Management Tab.
Step 2. Select Product Information Management.
Step 3. Click on the Tasks Icon and select Mange Items.
Step 4. Under the Advanced Search, enter Item, Description, or Keyword.
Step 5. Click Search.
Step 6. Click on the Item for the DAC Organization to update Min/Max Value.
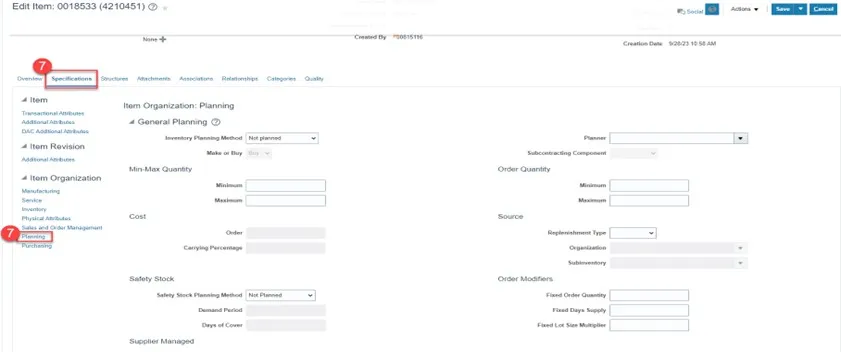
Step 7. Click Specifications and then Click Planning under Item Organization.
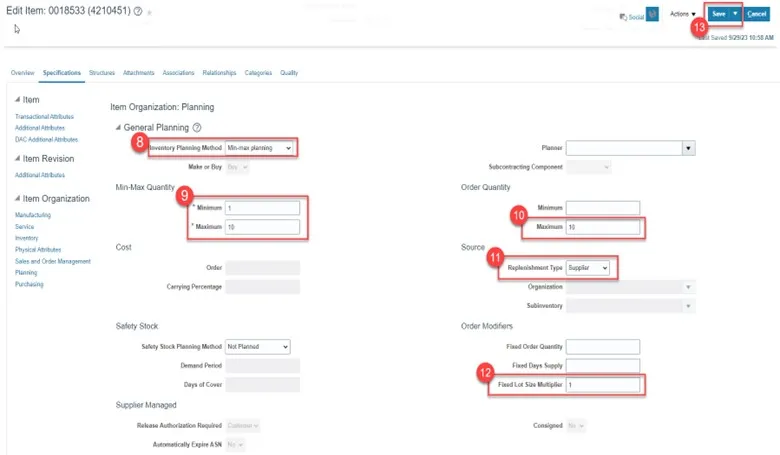
Step 8. Under General Planning enter the Inventory Planning Method as Min-max planning.
Step 9. Under Min-Max Quantity enter the Minimum and Maximum quantities.
Step 10. Under Order Quantity enter the Maximum quantity.
Step 11. Under Source enter the Replenishment Type as Supplier.
Step 12. Under Order Modifiers enter the Fixed Lot Size Multiplier as 1.
Step 13. Click Save.
Updating Attributes for DAC Non-Inventory Organizations
This process if only for 5200DACNI and 5200DACCEIN DAC Non-Inventory Organizations.
The majority of Attributes will default per the DAC Item Template, below are the only Attributes that MUST be updated. There are 8 steps to complete this process.
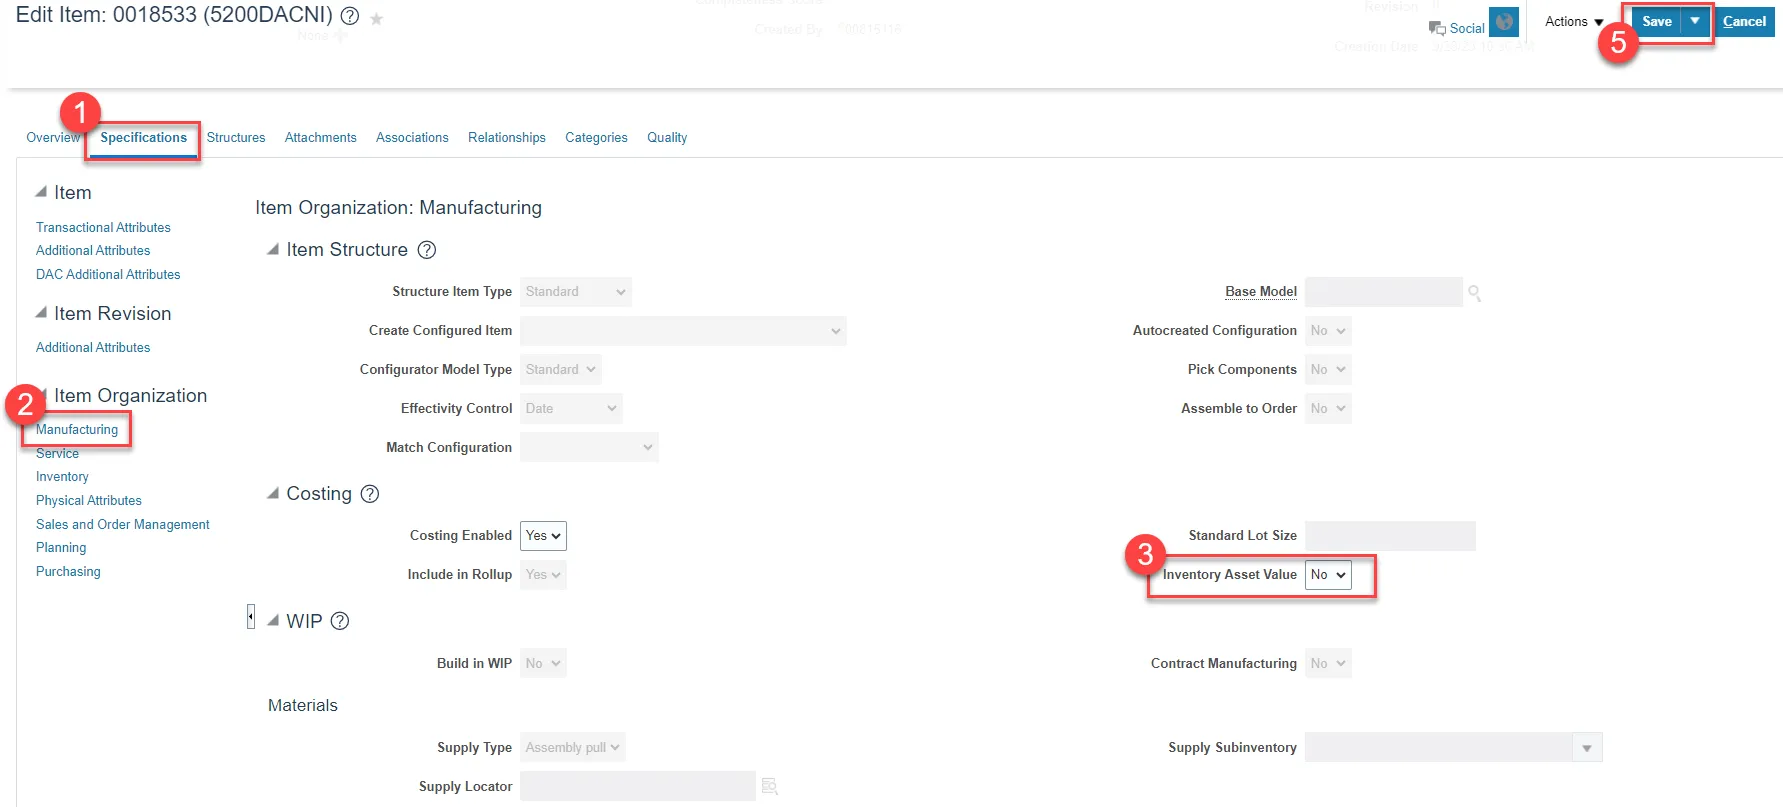
Step 1. Click on the Specifications tab for the selected Item and Non-Inventory Organization.
Step 2. Click on the Manufacturing tab.
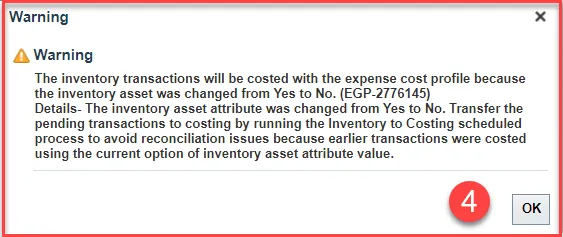
Step 3. Under the Costing section update the Inventory Asset Value to No.
Step 4. A Warning Pop-up window will appear, Click OK.
Step 5. Click Save.
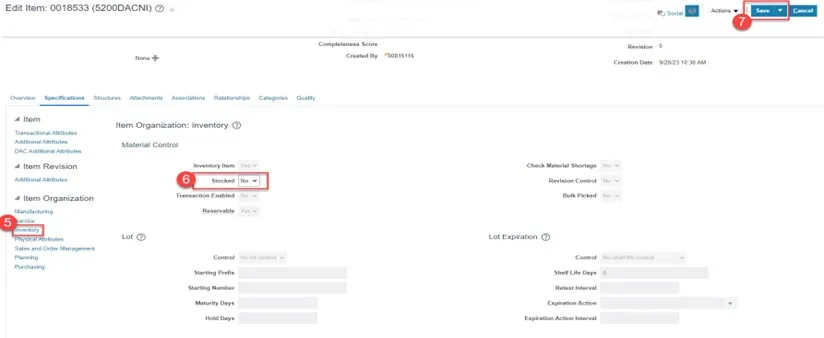
Step 6. Next click on the Inventory tab.
Step 7. Under Material Control update the Stocked field to No.
Step 8. Click Save.
Current List of DAC Organizations in NCFS
Organization Code
- 5200DACCENI(ASSIGNED TO ALL DAC ITEMS)
- 5200DACNI(ASSIGNED TO ALL DAC ITEMS)
- 4210081
- 4210082
- 4210083
- 4210084
- 4210085
- 4210086
- 4210087
- 421008W
- 4210401
- 4210451
- 4210452
- 422005C
- 422005W
- 422046D
- 422046M
- 423010C
- 423010F
- 423010W
- 423011C
- 423011F
- 423060C
- 423060F
- 423060W
- 423070C
- 423070F
- 423070W
- 423080C
- 423080F
- 423080W
- 423085C
- 423085F
- 423085W
- 423095C
- 423095F
- 423095W
- 423100C
- 423100F
- 423100W
- 423101W
- 423305C
- 423305F
- 423305W
- 423306C
- 423306F
- 423400C
- 423400F
- 423400W
- 423500C
- 423500F
- 423500W
- 423600C
- 423600F
- 423600W
- 423601C
- 423601F
- 423710C
- 423710F
- 423710W
- 423720C
- 423720F
- 423720W
- 423721C
- 423721W
- 423725C
- 423725W
- 423730C
- 423730F
- 423730W
- 423731W
- 423740C
- 423740F
- 423740W
- 423741W
- 423805C
- 423805F
- 423805W
- 423930C
- 423930F
- 423930W
- 423931C
- 423931F
- 423980C
- 423980F
- 423980W
- 424110C
- 424110F
- 424110W
- 424140C
- 424140F
- 424140W
- 424150C
- 424150F
- 424150W
- 424151W
- 424170C
- 424170F
- 424170W
- 424180C
- 424180F
- 424180W
- 424215C
- 424215F
- 424215W
- 424230C
- 424230F
- 424230W
- 424240C
- 424240F
- 424240W
- 424265C
- 424265F
- 424265W
- 424290C
- 424290F
- 424290W
- 424345C
- 424345F
- 424345W
- 424346C
- 424355C
- 424355F
- 424355W
- 424360C
- 424360F
- 424360W
- 424365C
- 424365F
- 424365W
- 424370C
- 424370W
- 424415C
- 424415F
- 424415W
- 424420C
- 424420F
- 424420W
- 424430C
- 424430F
- 424430W
- 424445C
- 424445F
- 424445W
- 424515C
- 424515F
- 424515W
- 424525C
- 424525F
- 424525W
- 424555C
- 424555F
- 424555W
- 424575C
- 424575F
- 424575W
- 424576C
- 424576F
- 424580C
- 424580F
- 424580W
- 424625C
- 424625F
- 424625W
- 424630C
- 424630F
- 424630W
- 424631C
- 424631F
- 424635C
- 424635F
- 424635W
- 424655C
- 424655F
- 424655W
- 424665C
- 424665F
- 424665W
- 424680C
- 424680F
- 424680W
- 424850C
- 424850F
- 424850W
- 424855C
- 424855F
- 424855W
- 424860C
- 424860F
- 424860W
- 424861C
- 424861W
- 424870C
- 424870F
- 424870W
- 424871C
- 424875C
- 424875F
- 424875W
- 424880C
- 424880F
- 424880W
- 424885C
- 424885F
- 424885W
- 424886C
- 425001W
- 425002W
- 425003W
- 425004W
- 425470W
- 428105R
- 428115R
- 428120R
- 428123R
- 428124R
- 428125R
- 428130R
- 428136R
- 428142R
- 428143R
- 428144R
- 428146R
- 428149R
- 428156R
- 428161R
- 428165R
- 428170R
- 428180R
- 428260R
- 428262R
- 428305R
- 428315R
- 428330R
Wrap-Up
The above steps detail item creation and maintenance in NCFS.
Additional Resources
- Virtual Instructor-Led Training (vILT)
- Quick Reference Guides (QRG)